Overview
TypingMind Plugins allow you to add new capabilities for the AI models. Plugins work using the OpenAI Function Calling API specifications. TypingMind also supports running plugins for other models like Gemini and Claude. Plugins can be implemented using the following implementation types:- JavaScript: run a JavaScript code in a secure sandbox environment, then return the result to the AI model or render the result to the user chat conversation.
- HTTP Actions: send an HTTP request and get the response.
- MCP: use a Model Context Protocol server as a plugin.
All existing TypingMind plugins are open-source under MIT license. You can view the source code of the plugins from our public GitHub repository here. The repos that contain the plugins are ones with names that start with
plugin-. You can fork or create your own plugin from these plugins.Create new plugin
Open TypingMind → Plugins → Click “Create Plugin” to start creating your own plugins.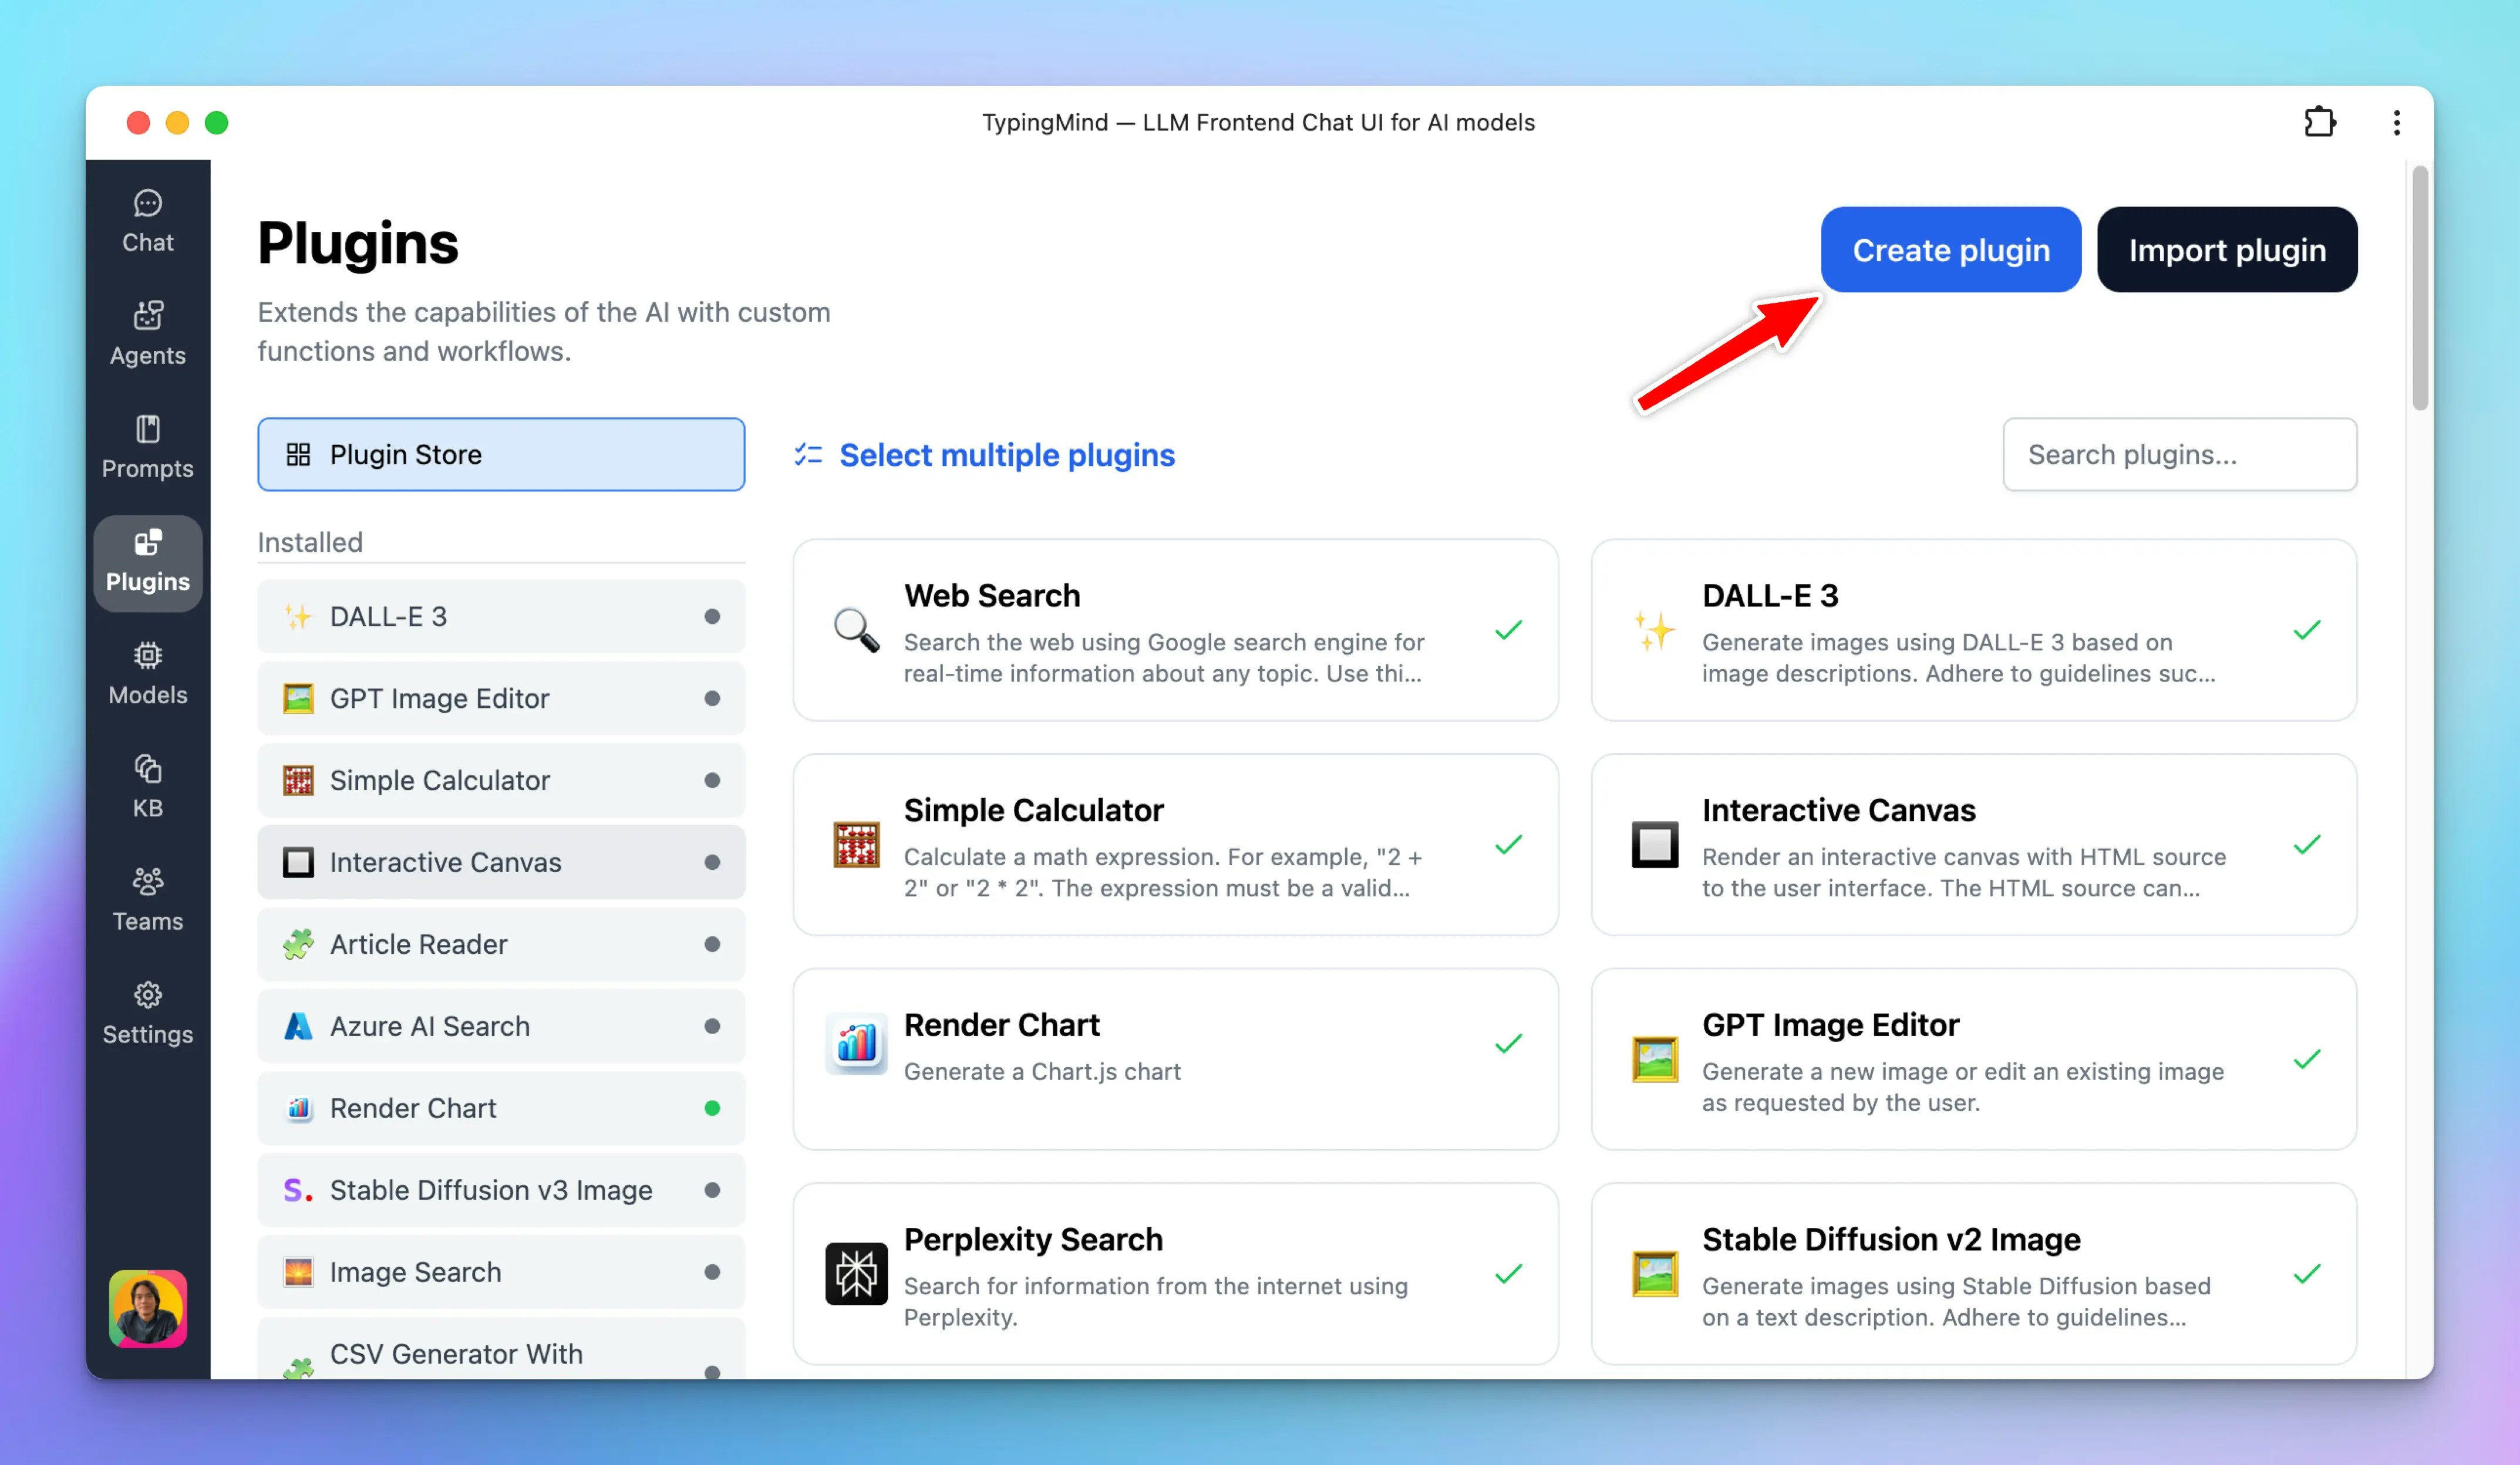
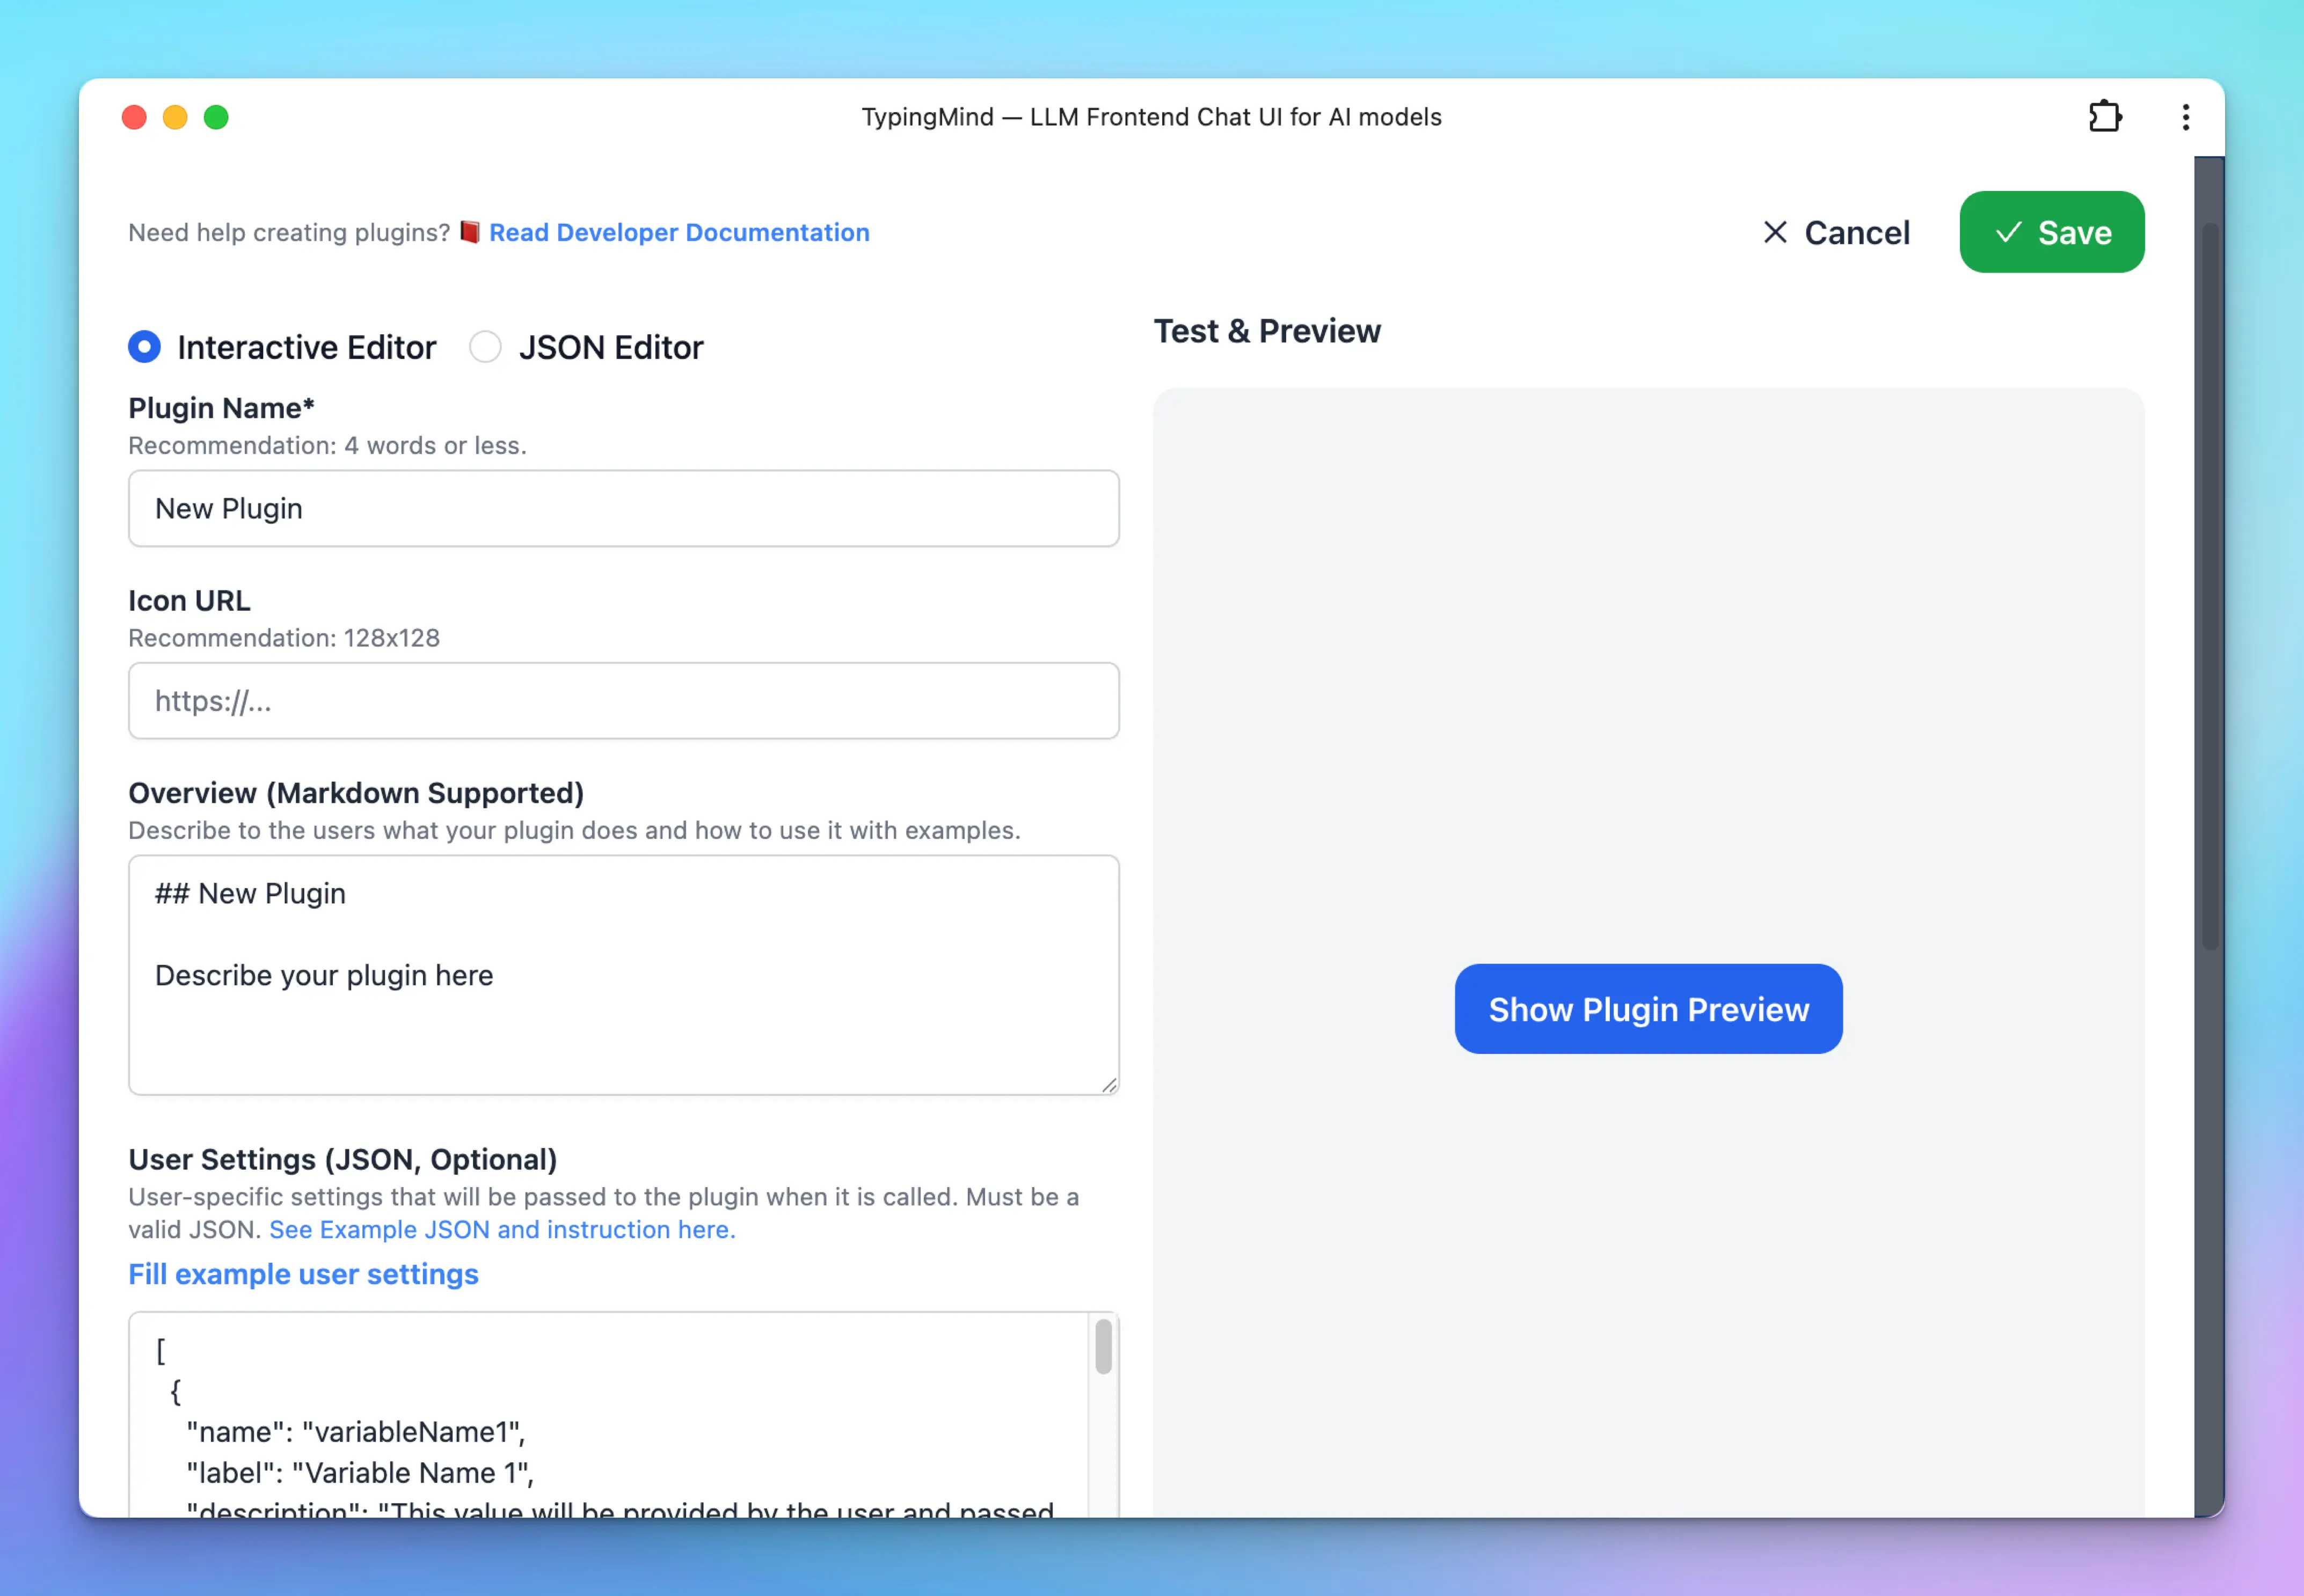 Enter the relevant information about the plugin.
- Plugin Name: to be shown to the user.
- Overview: introduction about the plugin and how to use it. Markdown is supported.
User Settings
User Settings allows you to define necessary input fields for your plugin which will be filled by the users. Each user may have their own settings, and the settings values will be passed to the plugin code as variables. The User Settings value is a JSON string with the following format: Here’s what each key represents:
name: This is the identifier the plugin will use to retrieve the user’s input.label: This is the label displayed to the user to help identify what information should be entered. Try to make this intuitive and relevant to the data you’re asking for.required(optional): Must be a boolean value oftrueorfalse, indicating whether the field is required or not. Default isfalse.description(optional): Displayed as a small text under the label. Use this to clarify other information related to the field.type(optional): This is used to specify the type of data expected from the users. For instance, input type could bepassword,email,number, orenum. By default, if not specified, the type is assumed to betext.placeholder(optional): The placeholder text to be shown in the input field.values(optional): Only takes effect when type isenum. This must be an array of strings of allowed values for the field.defaultValue(optional): The default value if not provided by the user. To use these settings within your plugin, you can access them from the user’s input and either store them for later use or use them immediately as needed.
Plugin Context
Plugin Context is a way to provide additional context and instructions to the AI’s context. Plugin context will be added directly to the AI’s context (system prompt) when the plugin is enabled for the conversation, even when the plugin is not running.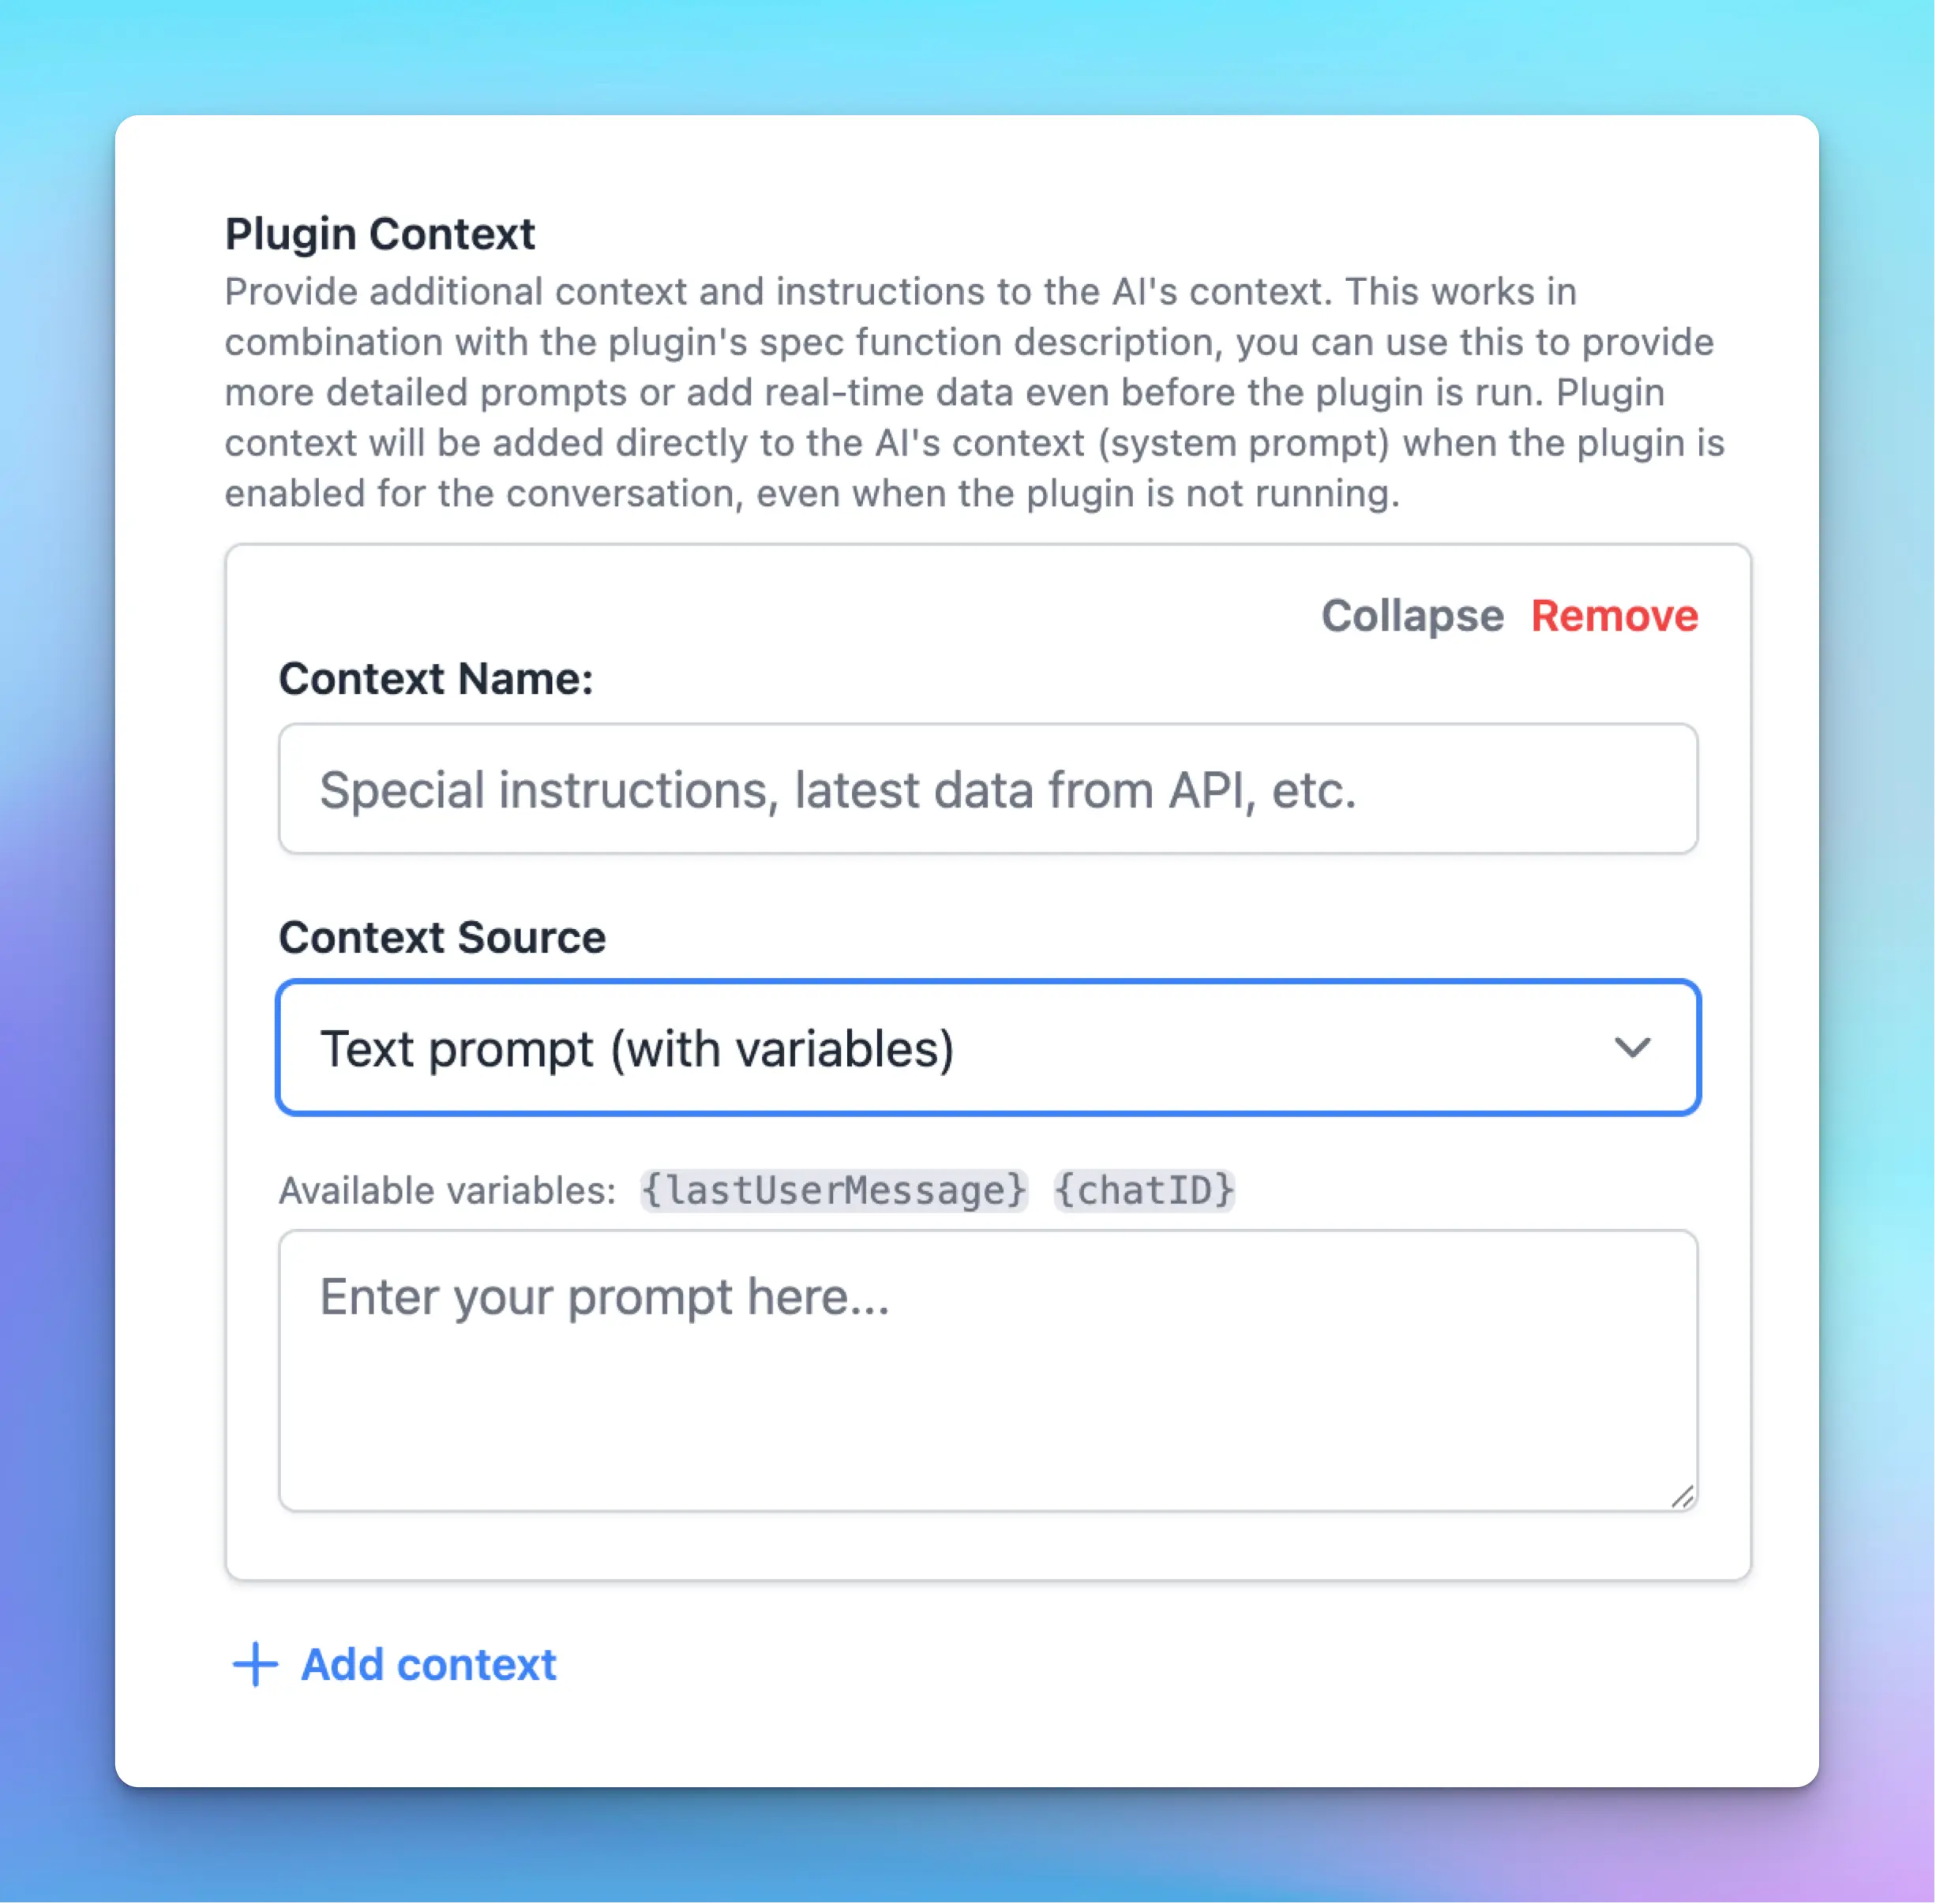 You can provide context in two ways:
- Static text prompt: a fixed text prompt (with variables from user settings).
- Read context from an HTTP endpoint: allows you to inject live data to the context of the plugin.
This feature serves the same purpose as the description field of the function JSON (defined in the OpenAI Function Spec). The advantage of Plugin Context is you can provide extremely long instructions, inject context variables (like user settings), or use real-time information via an HTTP request instead of a fixed value in the function JSON.
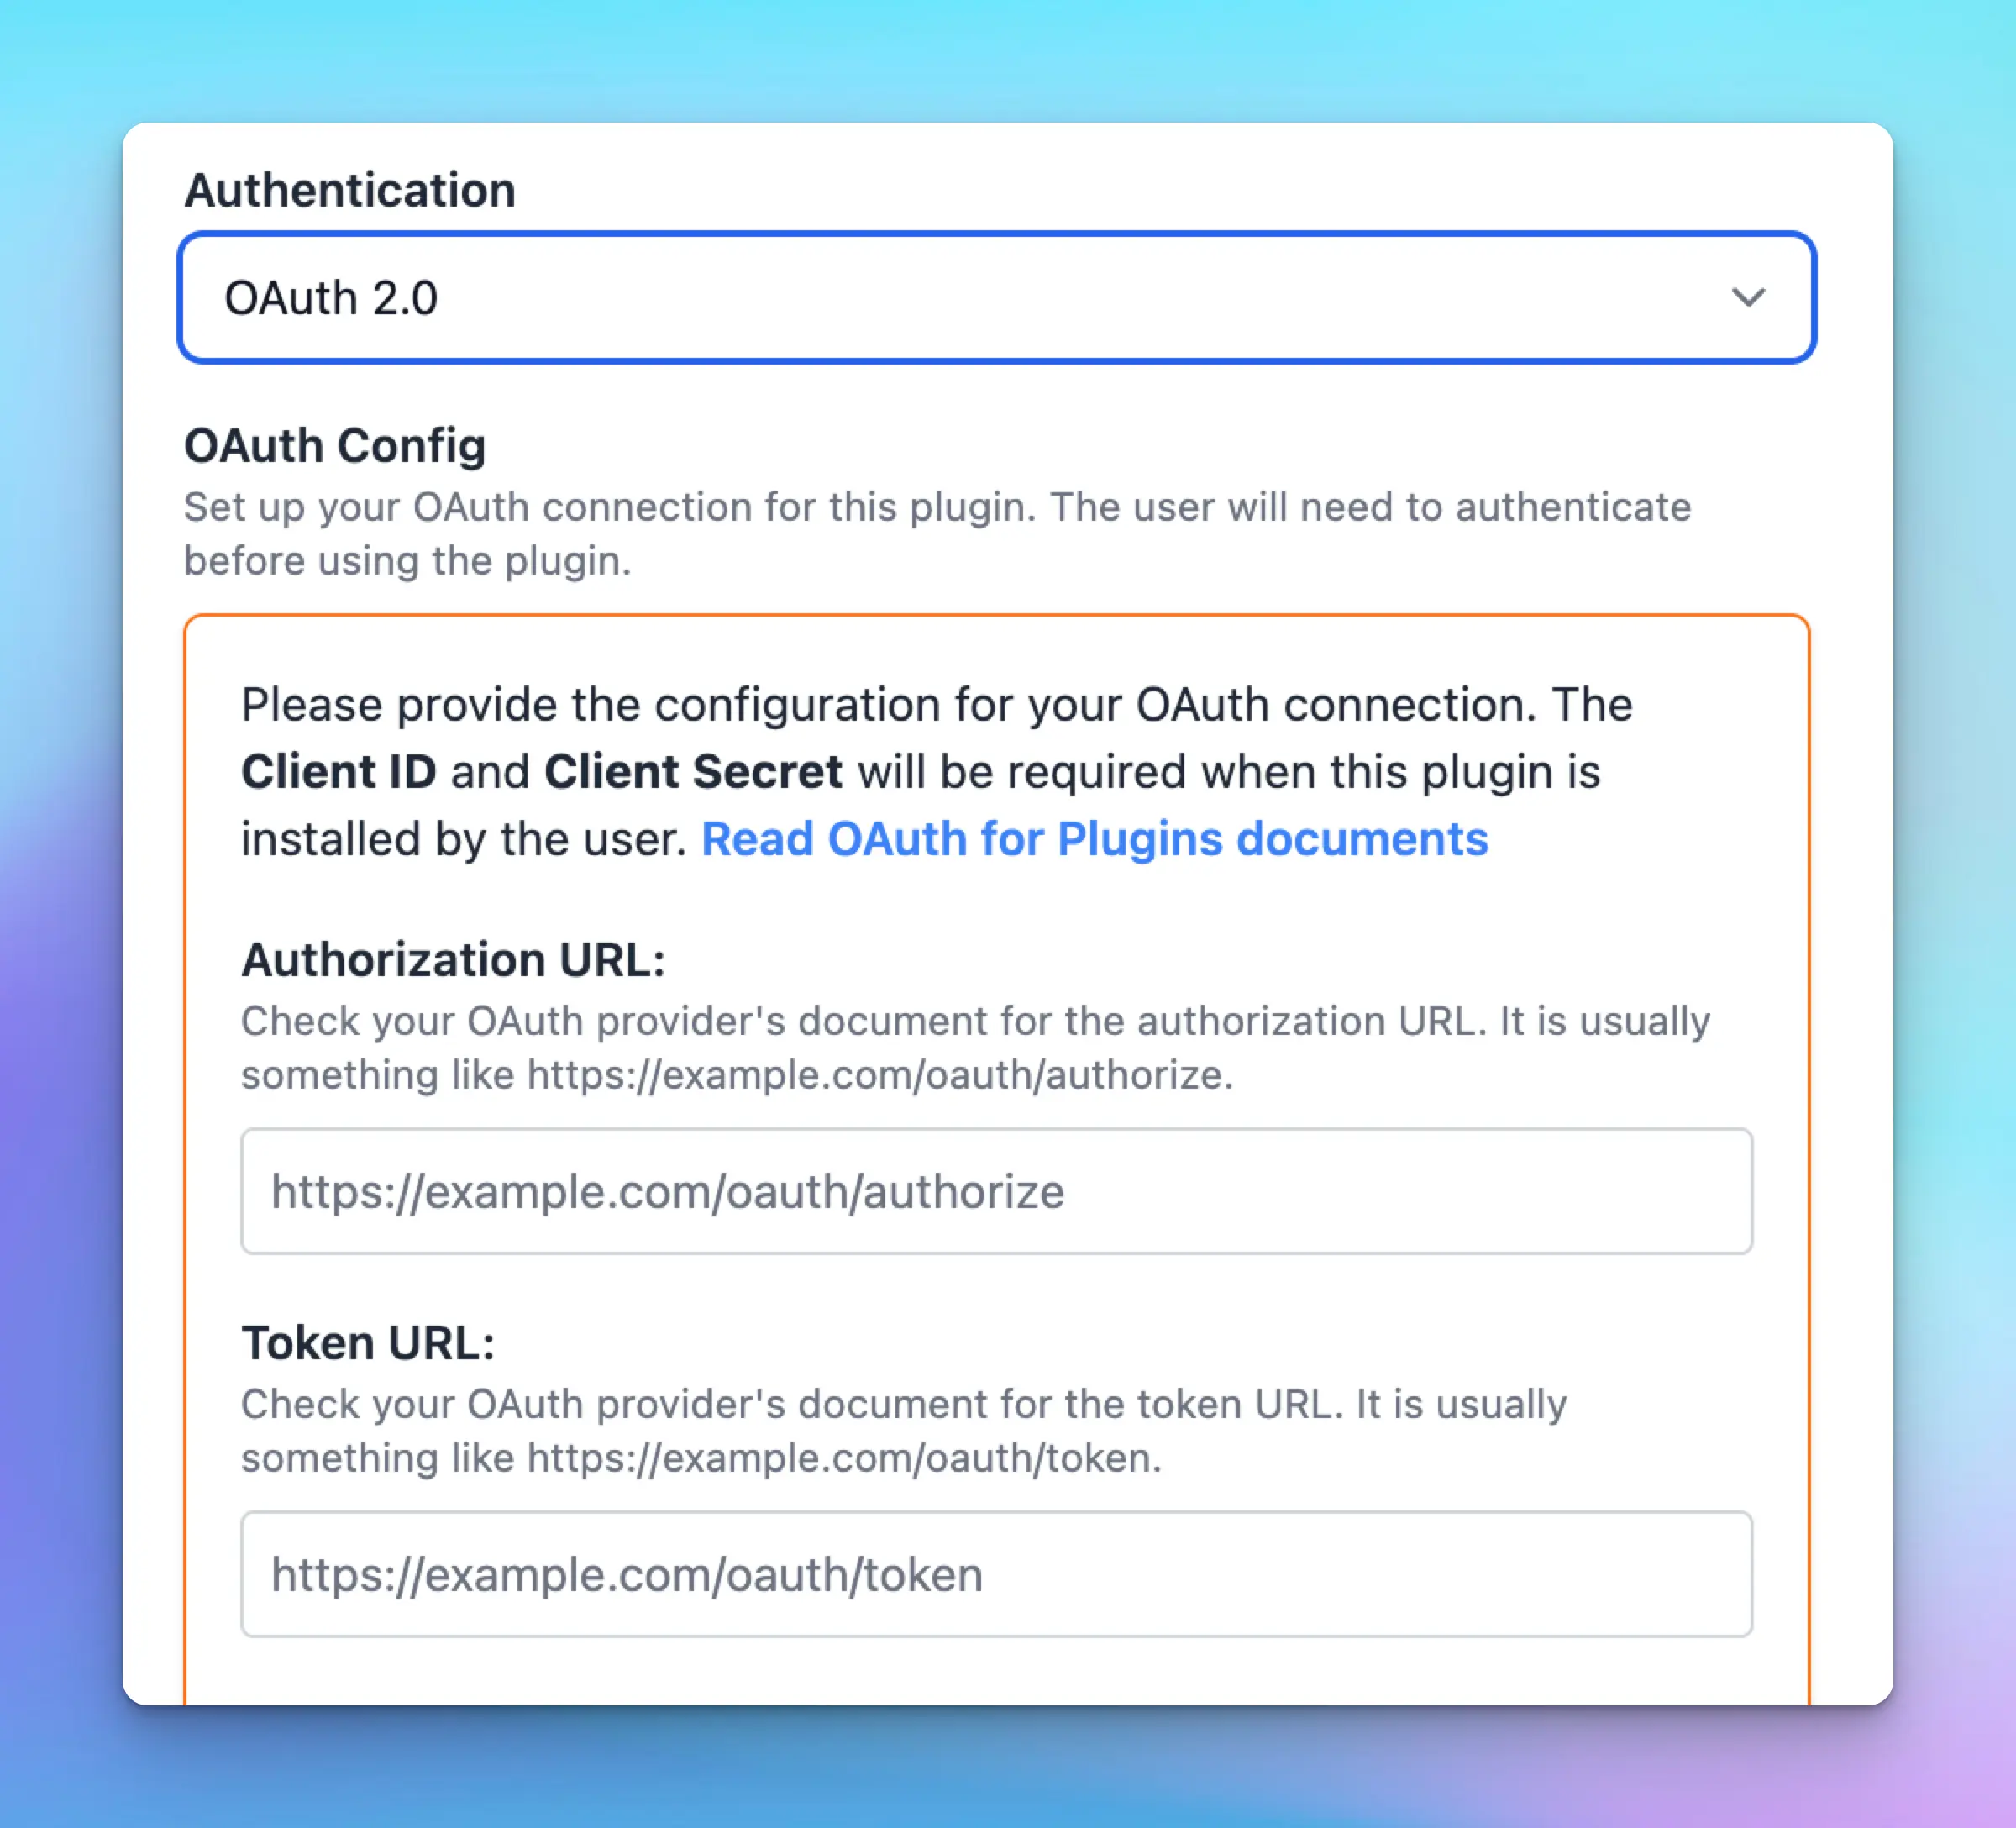
Authentication
TypingMind Plugin supports 3 options for Authentication.- No authentication: the user doesn’t need to authenticate to use the plugin.
- API Key: requires the user to add an API key to use the plugin.
- OAuth 2.0: requires the user to log in to an OAuth provider to use the plugin.
API Key Authentication
Authentication via API key is done by using the combination of User Settings and variables.Take an example, let’s say your plugin requires a Firecrawl API key. Start by defining an API key field in the User Settings, for example:firecrawl_api_key and mark it as required.
{firecrawl_api_key}. You can access this variable (in the later step) to add to your request to Firecrawl API.
OAuth 2.0 Authentication
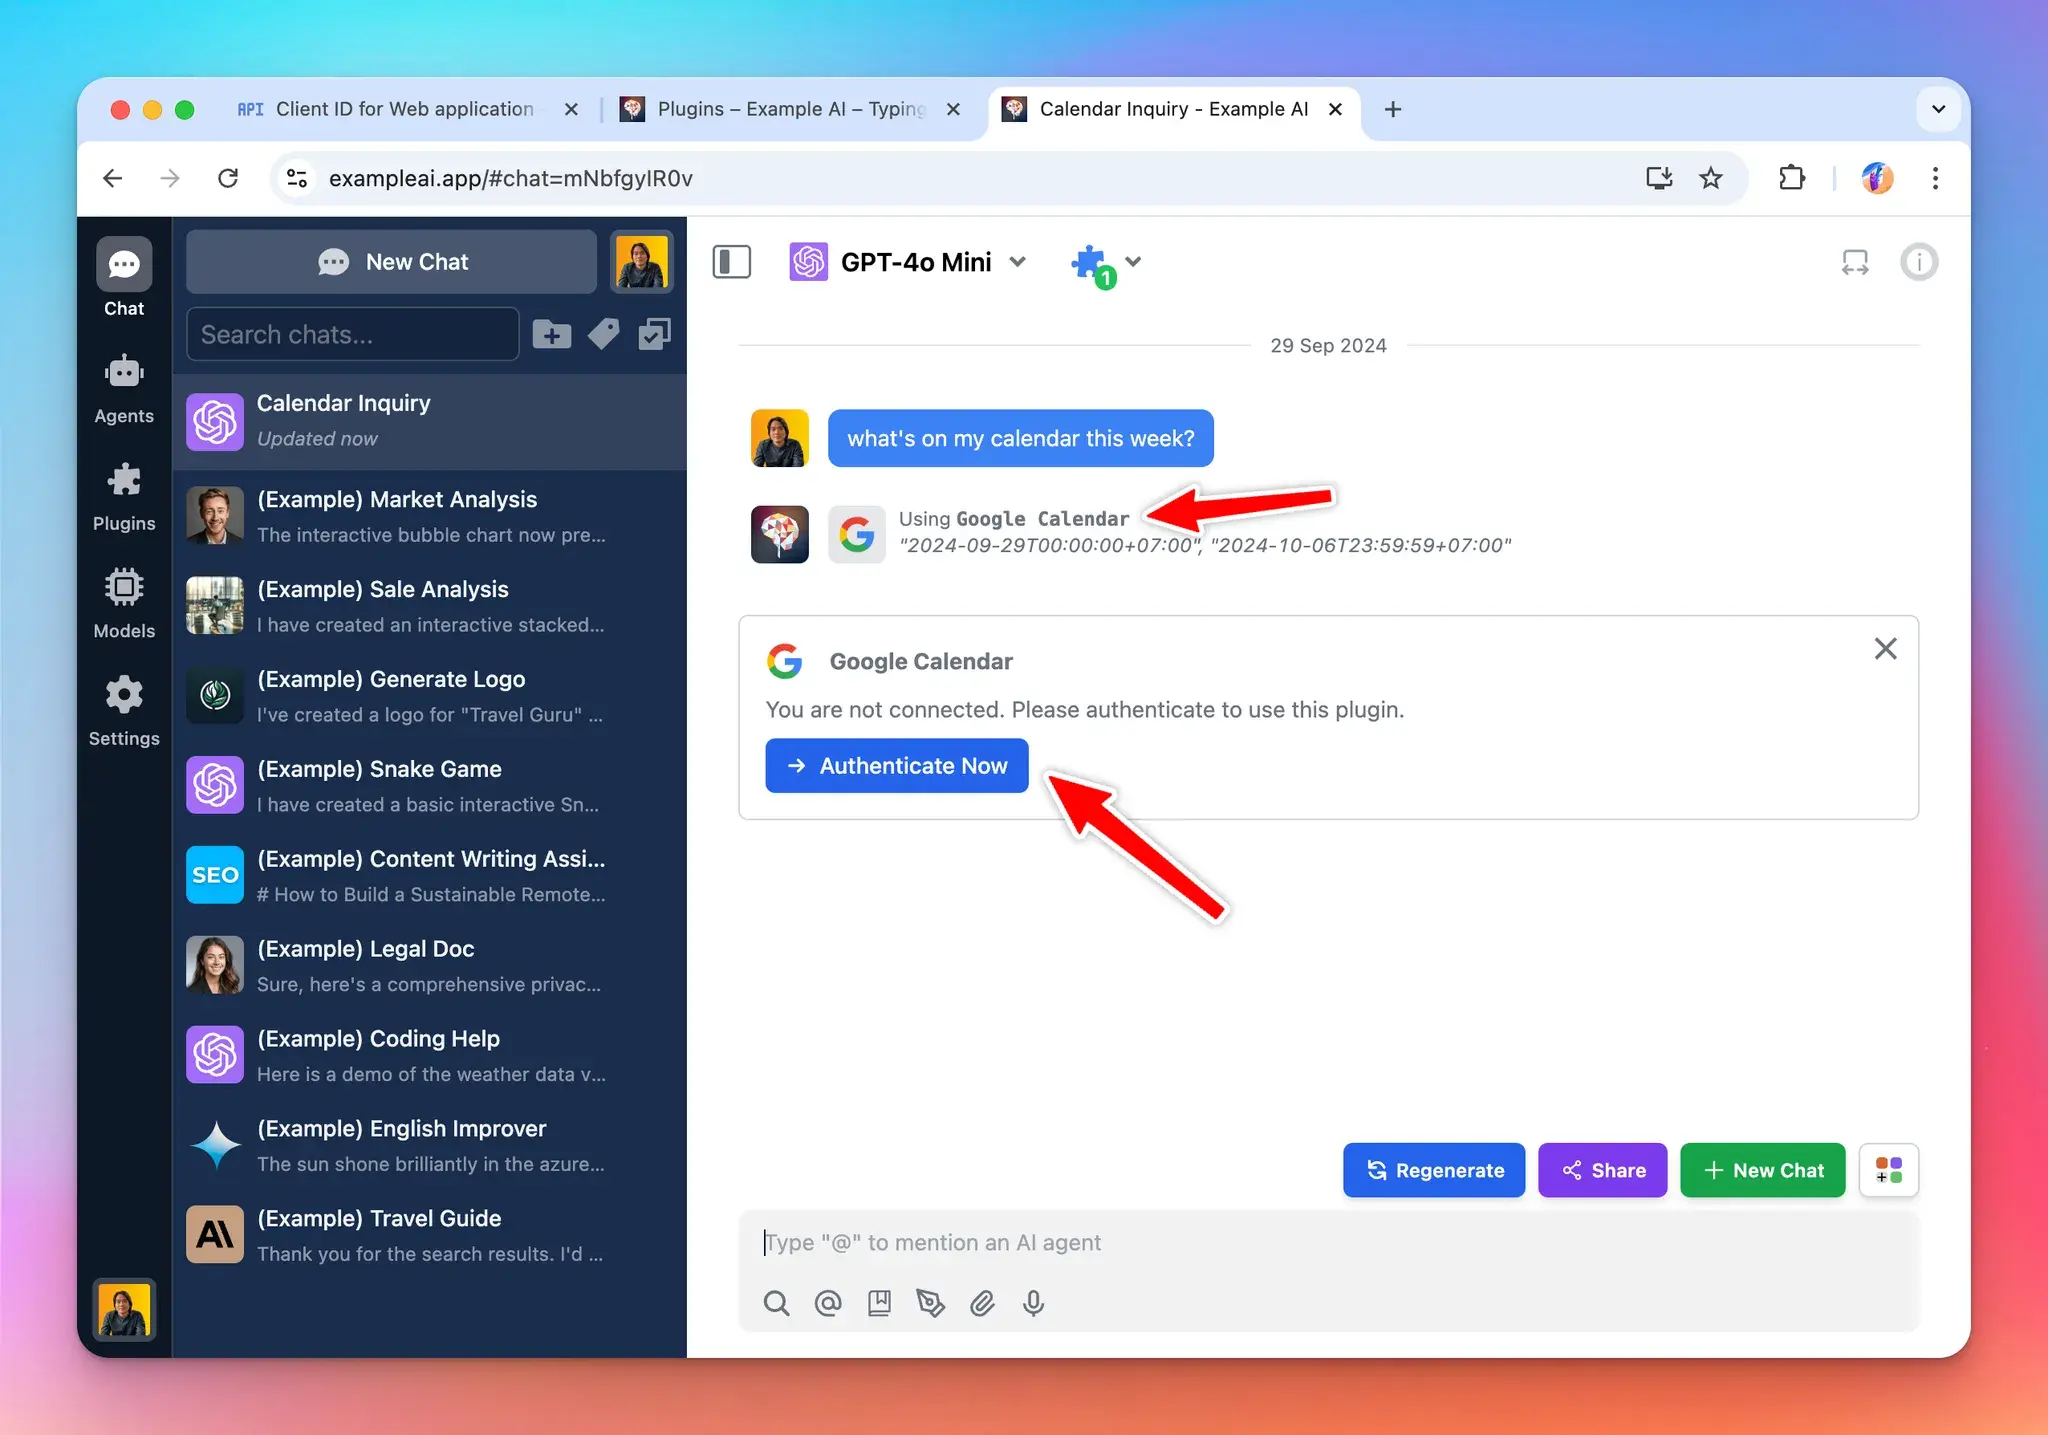
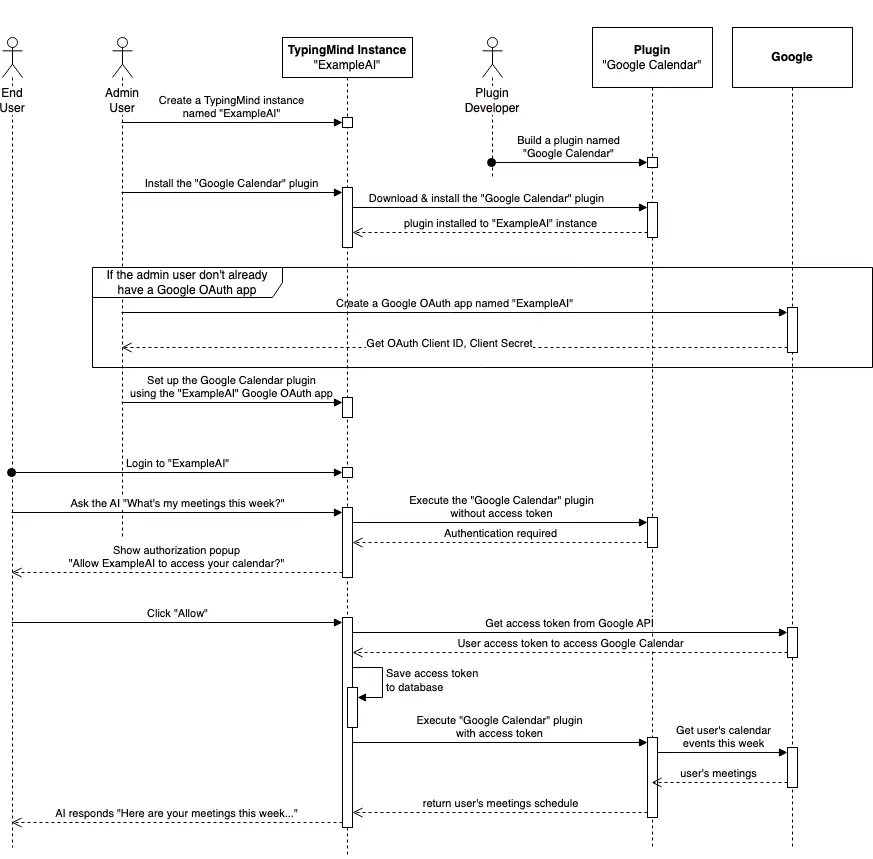
OAuth authentication enables plugin developers to create plugins that act on behalf of the user using the user’s account. This authentication type makes it easy to work with external services that require OAuth. Some example plugins you can create using OAuth authentication:- A Google Calendar plugin that allows the AI to read events from the user’s Google calendar.
- A Slack message plugin that allows the AI to send a message to the user’s Slack channel.
 OAuth 2.0 flow overview:
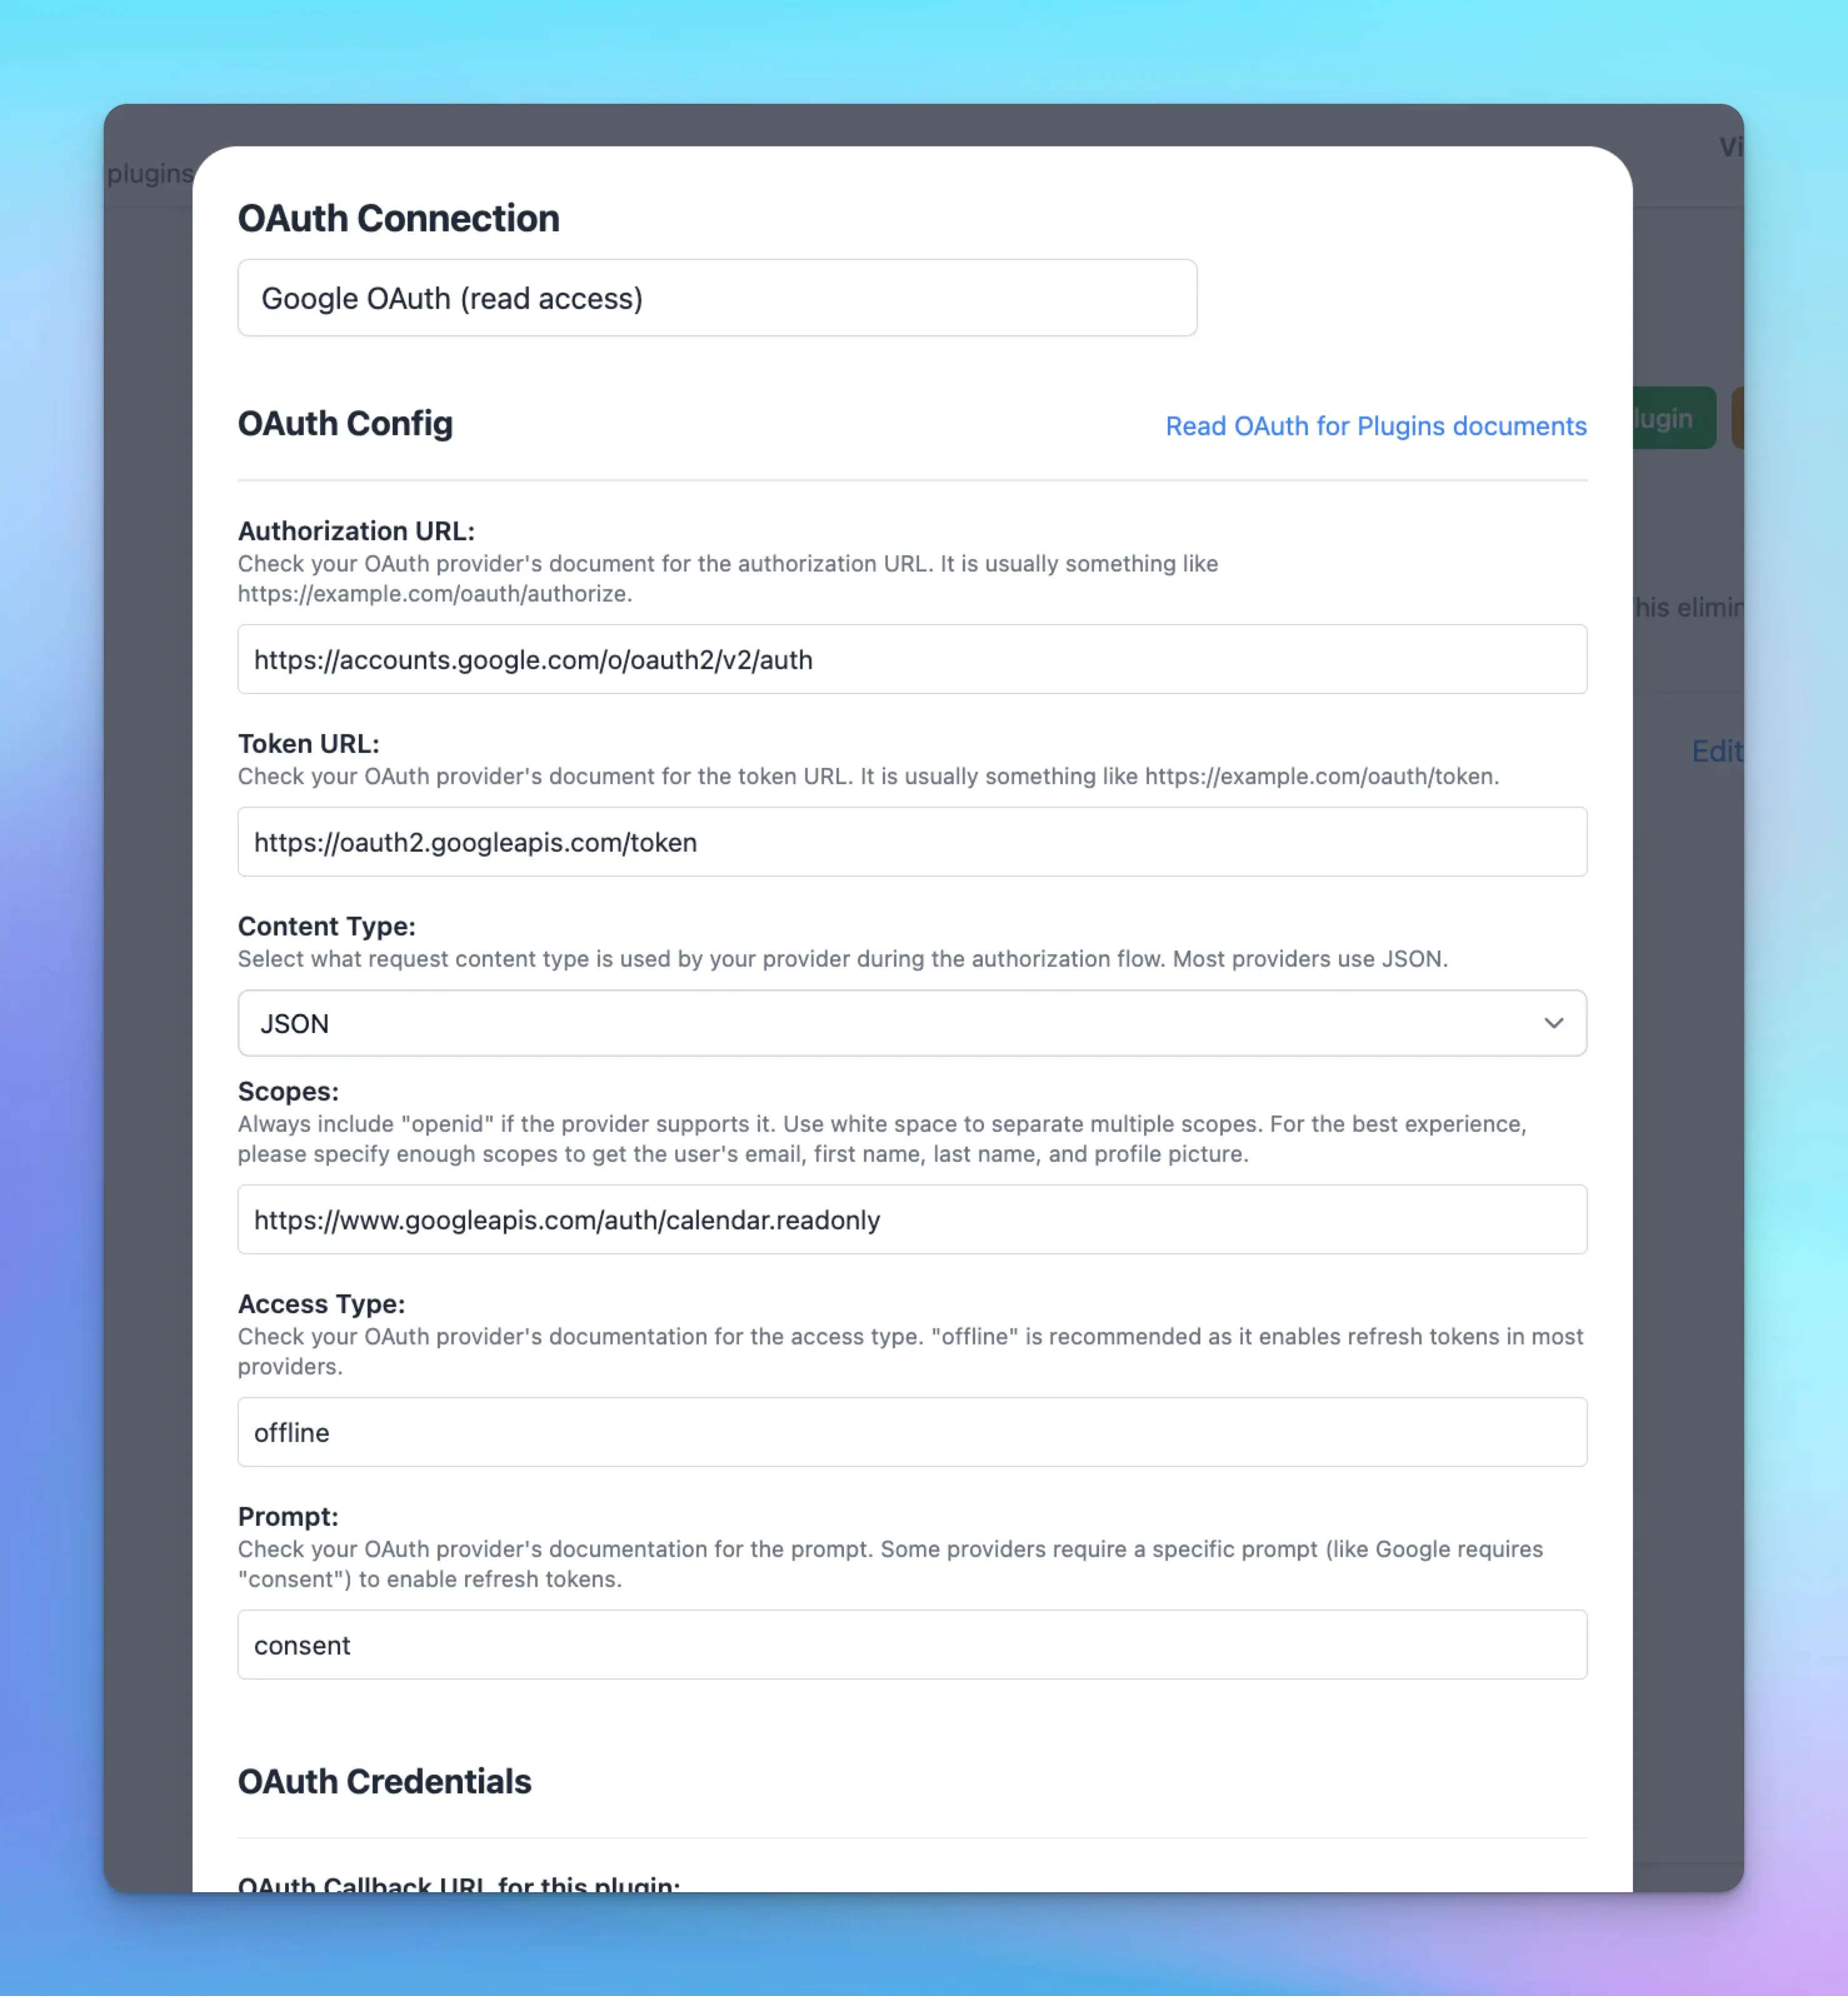
- Creating a plugin with OAuth requires the plugin developer to set up Authorization URL, Token URL, Scopes, Prompt, and Access Type. These parameters are different depending on which OAuth provider is used.
- When installing a plugin with OAuth, the plugin will require setting up OAuth Client ID and OAuth Client Secret. The admin user who installs the plugin will need to set this up with their own OAuth app.
- When the plugin is being used by the end users, they will need to authorize first. The authorization process is handled by TypingMind automatically.
- Plugin developers can use the
{OAUTH_PLUGIN_ACCESS_TOKEN}variable in their plugin source code as a placeholder for the user’s access token. If the user has not authorized or the access token has expired, the variable will hold an empty value.
 Handling refresh token for persistent access
Access tokens are typically short-lived. A refresh token allows new access tokens to be obtained without re-authentication, ensuring a smooth user experience even when access tokens expire quickly (e.g., in one hour).
TypingMind manages refresh tokens internally if they are provided by the OAuth provider. However, whether a refresh token is issued depends on your OAuth configuration.
To make sure refresh tokens are issued, it is often necessary to set specific parameters:
Handling refresh token for persistent access
Access tokens are typically short-lived. A refresh token allows new access tokens to be obtained without re-authentication, ensuring a smooth user experience even when access tokens expire quickly (e.g., in one hour).
TypingMind manages refresh tokens internally if they are provided by the OAuth provider. However, whether a refresh token is issued depends on your OAuth configuration.
To make sure refresh tokens are issued, it is often necessary to set specific parameters:
- Access Type: Setting
access_type=offlineto explicitly request a refresh token. - Prompt: Many providers (like Google) only issue a refresh token the first time a user grants consent. Using
prompt=consentensures a refresh token is issued even if the user has previously authorized the app.
access_type or prompt, while others are strict about these parameters, or expect different values. Always consult the documentation of the specific provider.
Example OAuth Configuration:
Shared OAuth Connections (TypingMind for Team only)
TypingMind supports Shared OAuth Connections, allowing multiple plugins to share a single OAuth configuration. This simplifies plugin management and reduces repetitive OAuth setups, ensuring users only authenticate once across multiple plugins with the same OAuth settings. Note: this feature is not available in the TypingMind Personal version. Key Benefits:- Centralized OAuth Setup: Admins configure OAuth credentials just once for multiple plugins.
- Simplified User Experience: Users authenticate once and gain seamless access across all plugins sharing the OAuth connection.
- Create a Shared Connection:
- Navigate to the Plugins Manager
- Select the “Shared OAuth Connections” tab
- Click “Add New Connection” to create a new OAuth connection
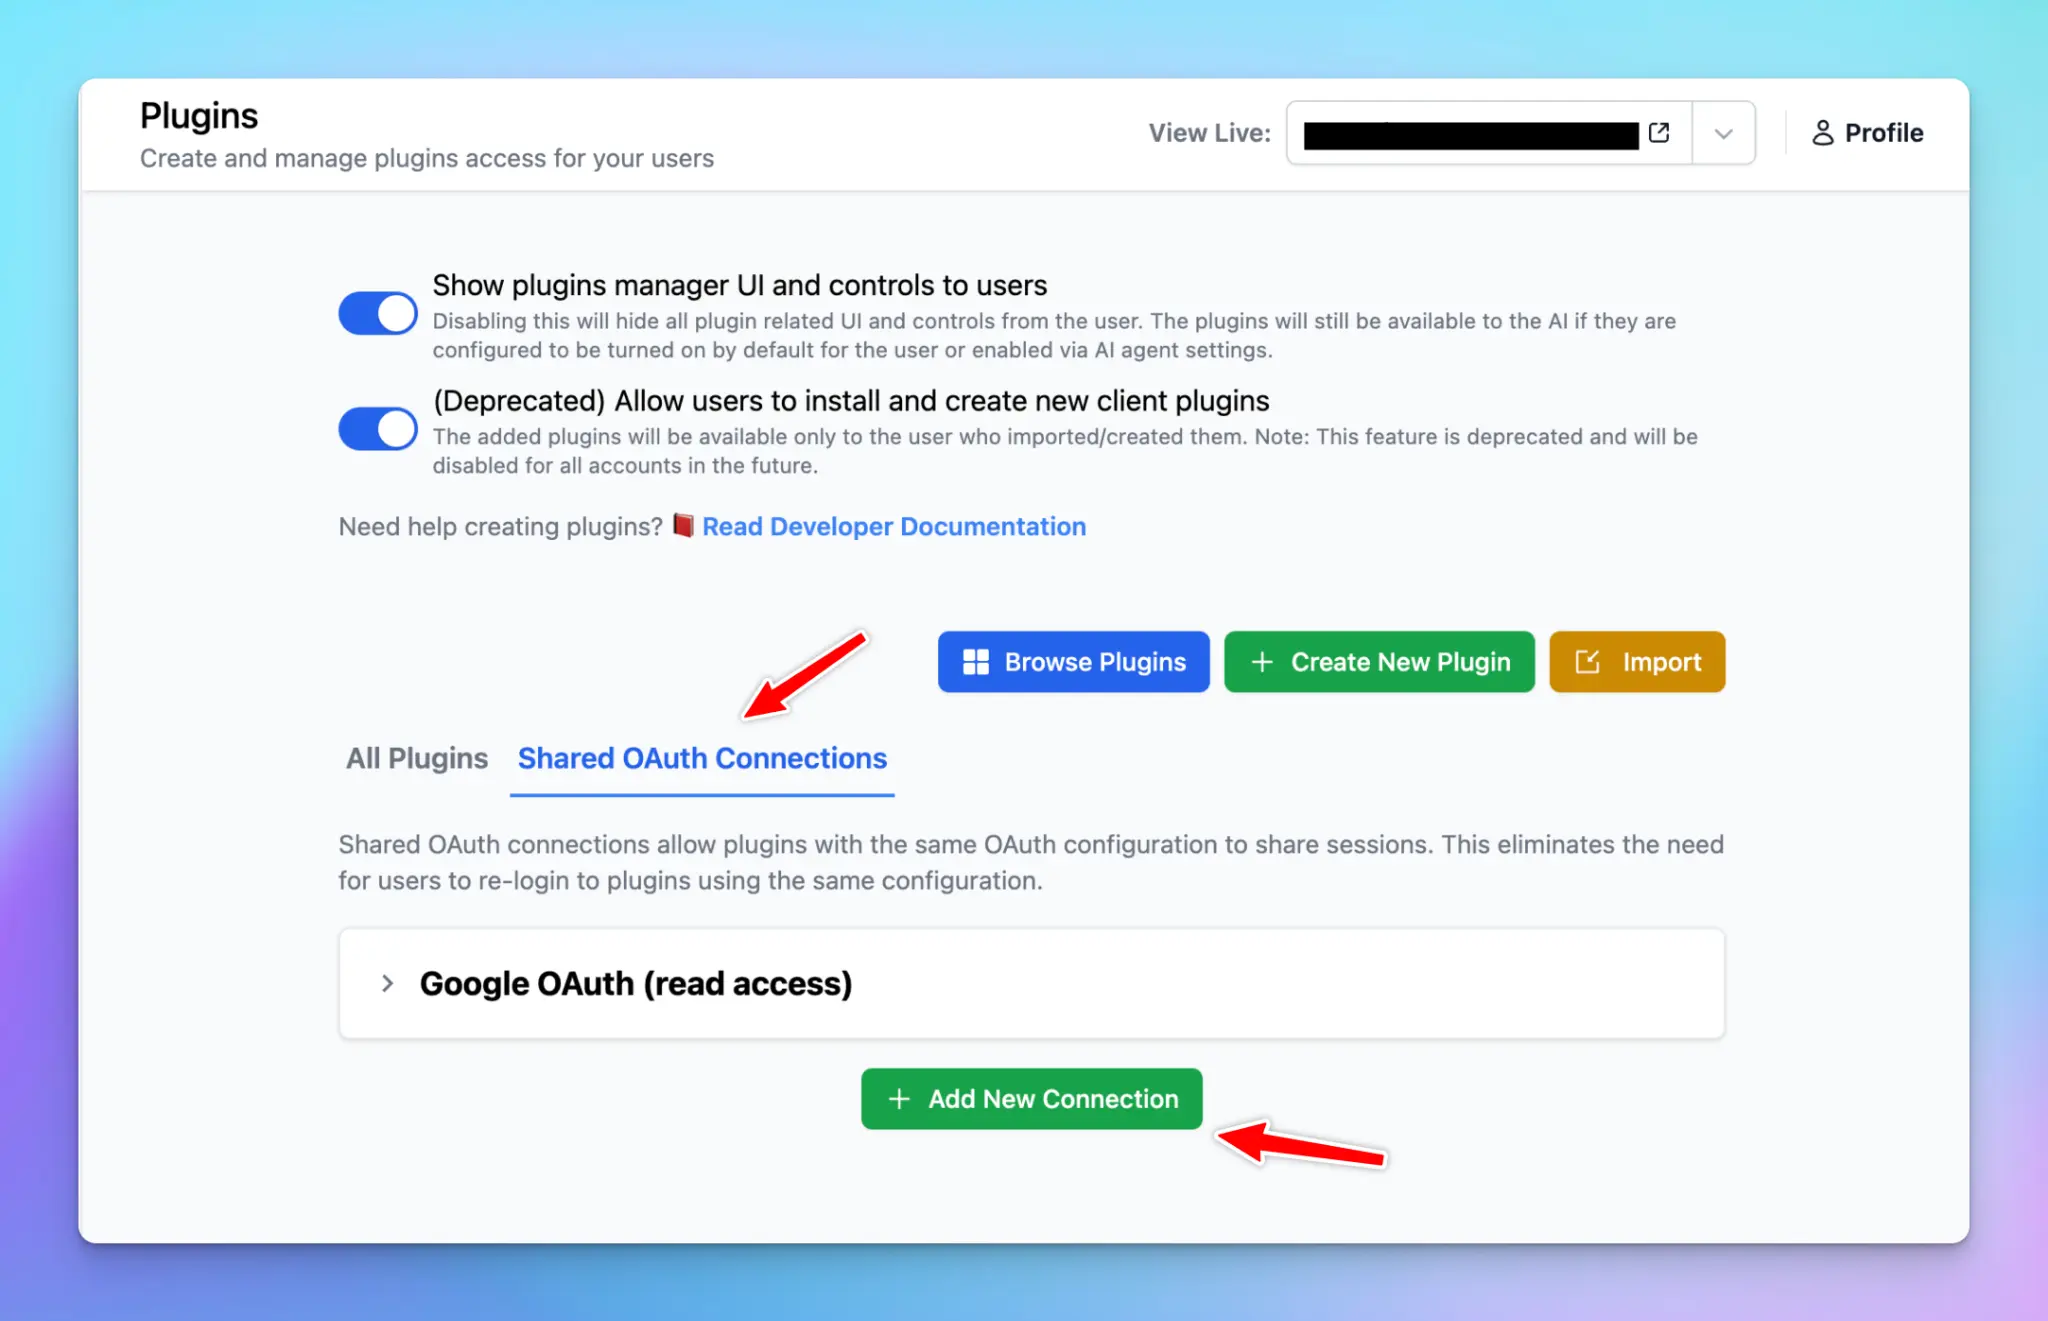
- Configure OAuth Credentials:
- Enter necessary details such as Authorization URL, Token URL, Client ID, Client Secret, Scopes, Prompt, and Access Type
- Enter necessary details such as Authorization URL, Token URL, Client ID, Client Secret, Scopes, Prompt, and Access Type
- Apply Shared OAuth to Plugins:
- Edit the desired plugin
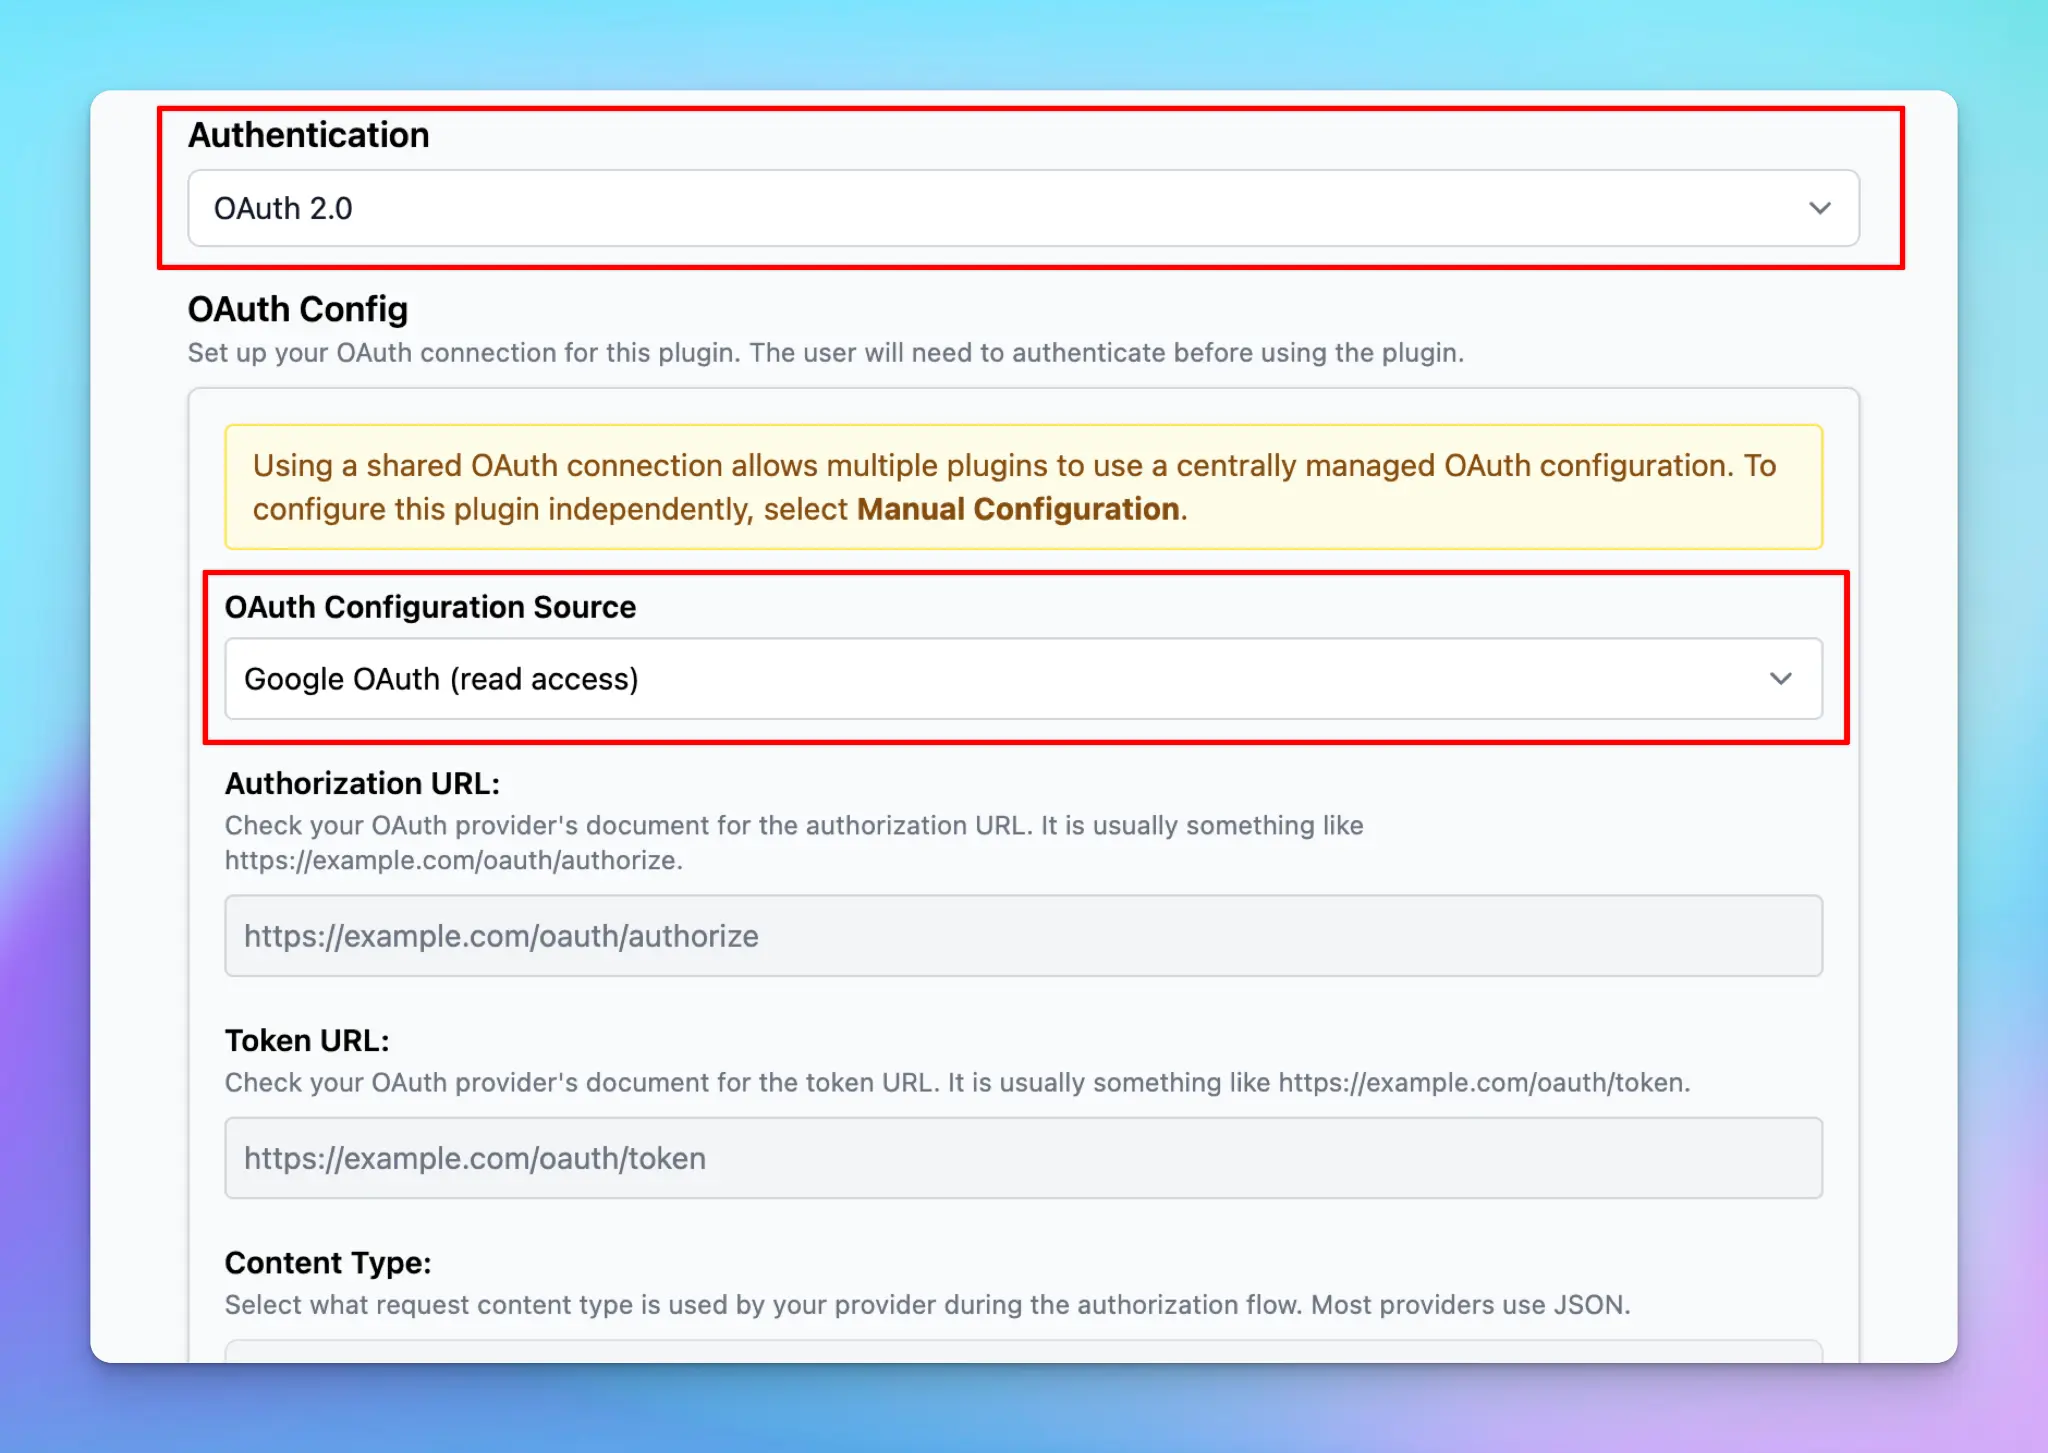
- Under the “Authentication” section, select OAuth 2.0
- Choose your “OAuth Configuration Source” from the dropdown menu, selecting your newly created shared OAuth connection
- Plugin credentials will automatically apply from the shared connection—no further setup required
Built-in OAuth Plugins:
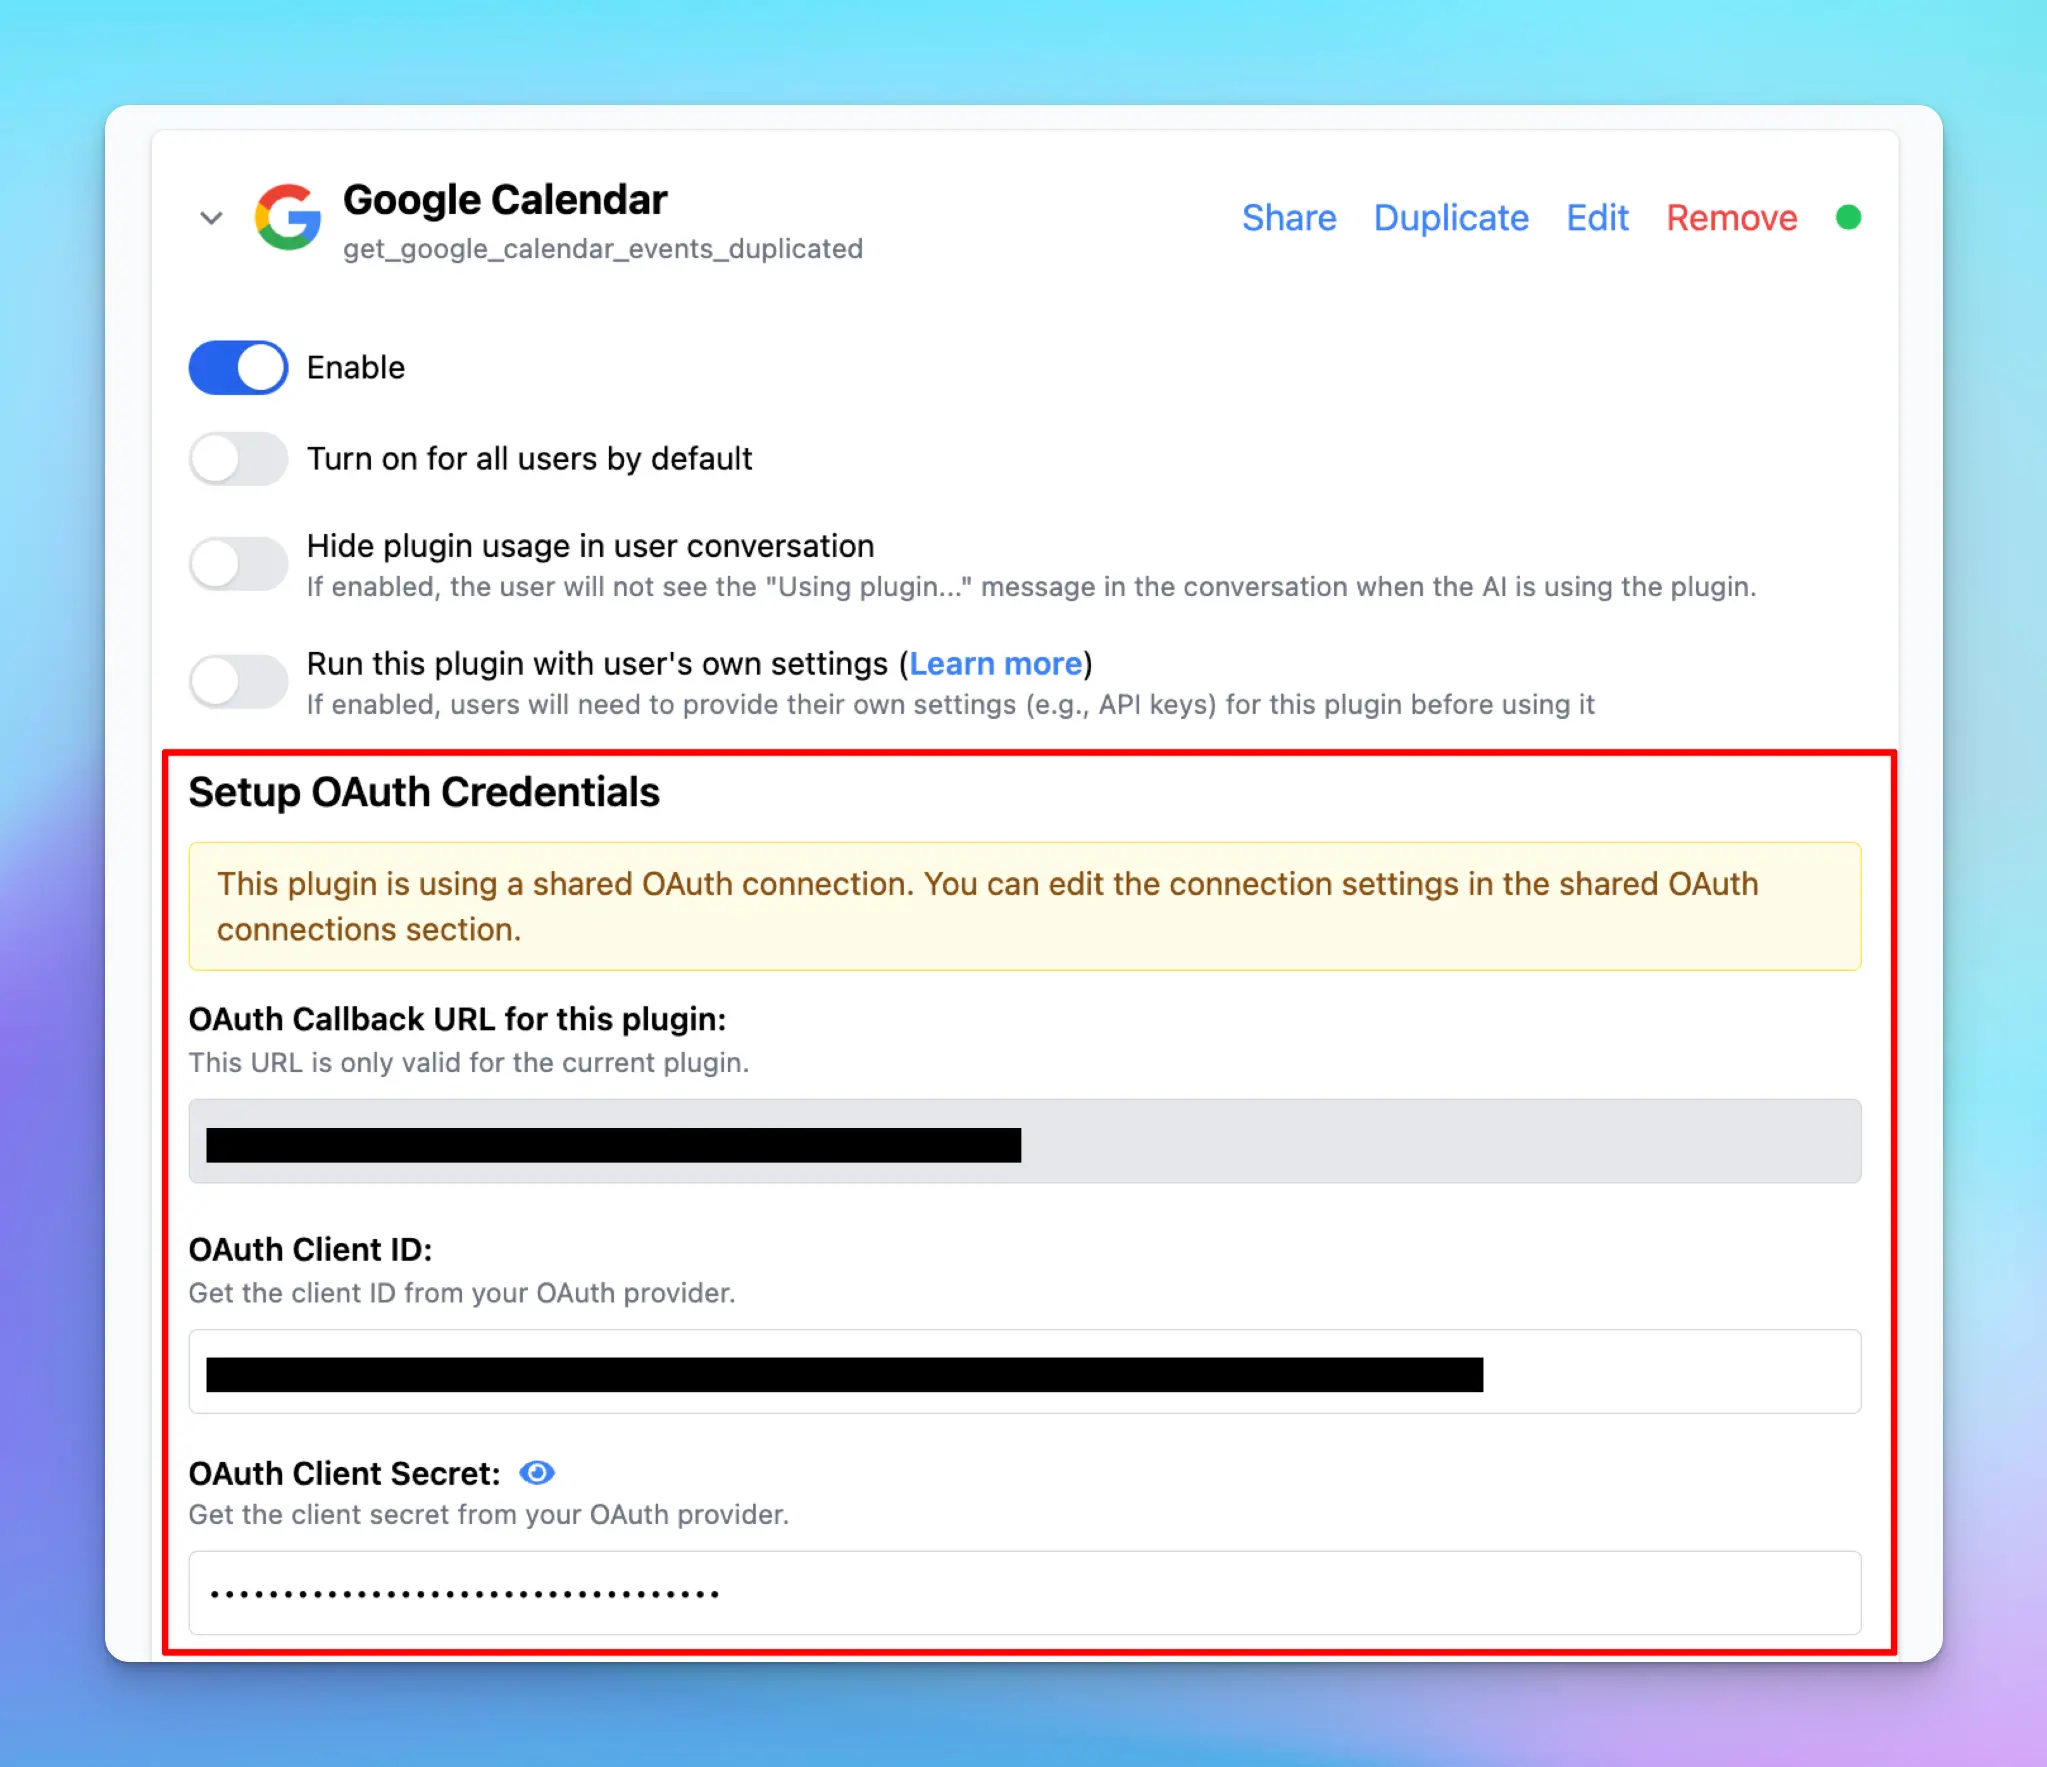
- Built-in plugins provided by the system come with predefined OAuth settings and cannot be directly modified.
- To apply a shared OAuth connection:
- Duplicate the built-in plugin
- Edit your duplicated plugin to select the shared OAuth connection
Permissions & Resources Access
TypingMind plugins can request additional permissions to be able to access additional resources and data from the chat conversation or from the user (the “authorized resources”). By default, plugins will have access to the user settings (provided by the user when installing the plugin) and the parameters provided by the AI model when it uses the plugin functions. To access other resources and data (like user message content and attachments), plugin developers can define the additional permissions in the plugin. TypingMind currently supports the following permissions:How to access resources
Currently, you can only access the authorized resources when using the JavaScript Code as the Implementation Type in your function. The authorized resources are available as the 3rd parameter provided to the function defined in your code. For example:List of permissions and their associated resources
1. Read user message and attachments Allow the plugin to read the user message and its attachments that was sent right before the plugin is used.- Permission ID:
read_user_message - Resource variable name:
userMessage - Example data:
- Permission ID: (No permission needed)
- Resource variable name:
previousRunOutput - Example data: exactly the return value of the plugin in its last execution.
Note: the plugin can only read its own output, not other plugins’ output. It also can only access the immediate previous run’s output, not the entire output of the chat history.
- User: “Create an image of a cat”
- AI: uses GPT Image Editor to create an image and output.
- User: “Add a hat”
- AI: uses GPT Image Editor, which accesses the
resources.previousRunOutputto get the previously generated image and make modifications from there.
Example plugins that use permissions
All of TypingMind’s built-in plugins are open source. Our GPT Image Editor plugin is a good example of how to use the plugin permission system to access user attachments and the previous run output. You can read the code here: GPT Image EditorPlugin Functions
This is where you define the functionalities of the plugin. A TypingMind Plugin can have multiple functions, which help you organize multiple tasks into one single plugin for easier management. Plugin functions can be implemented using the following types:- JavaScript: run a JavaScript code in a secure sandbox environment, then return the result to the AI model or render the result to the user chat conversation.
- HTTP Actions: send an HTTP request and get the response.
- MCP: use a Model Context Protocol server as a plugin.
OpenAI Function Spec
All implementation types (except MCP) require you to define a function specification in JSON. TypingMind uses OpenAI Function Spec as the standard function definition format. Here are the best practices:- Make sure it’s in the correct JSON format: Follow the instructions in OpenAI document to understand how to write one. You can see the spec of existing plugins like Simple Calculator, JavaScript Interpreter, or the Generate Random Number example plugin below for reference.
- Unique Function Name: Note that the
namefield of the spec must be unique across all plugins you currently have. This is because OpenAI API will use this name to call the function, having multiple functions with the same name will confuse the AI. - Use meaningful names & descriptions: It’s important to provide a meaningful function name, function description, parameter name, parameter description, etc. The AI will use these names and descriptions to understand and decide when to use your function. Providing a meaningful and accurate name will help the AI use your function/plugin better.
JavaScript Code
You can implement your plugin using JavaScript code. The code will be run directly on the user’s browser. Below are the details. Make sure it’s a valid JavaScript
Write the function implementation in JavaScript. You can use
Make sure it’s a valid JavaScript
Write the function implementation in JavaScript. You can use async functions if necessary.
Make sure the function name match
It’s important that you define a function with the exact same name as defined in the JSON spec at the top level. For example, if you have "name": "get_calculation_result" in your JSON spec, then the code must have a function named get_calculation_result defined at the top level.
Provided parameters
TypingMind will call your function with the following ****parameters:
- First parameter,
params: Provided by the AI model every time your function is used. The object contains multiple key/value pairs that the AI will decide when they execute your function. - Second parameter,
userSettings: Provided by the user when they install the plugin. If your plugin has a User Settings, the key/value pair of the user settings will be passed into this object. For example, if you have the following user settings:You can retrieve those settings in your function as follows: - Third parameter,
resources: the additional resources that your plugin has access to depends on its permissions. An example value ofresources:
<iframe sandbox="allow-scripts">. This sandbox environment provides some level of isolation, privacy, and security for the plugin code. Learn what you can and cannot do in an iframe sandbox here.
If you are using someone else’s code, make sure you read and understand what it does. Never use untrusted code in your plugin.
Be aware of CORS issues
Because the code is executed locally on your browser, if you decide to send a request to an external server, make sure that external server is configured correctly to accept the requests without any CORS related issues.
Example code of a plugin:
throw new Error("User friendly message here"). This way, the app will show the message "User friendly message here" to the end user. The AI will also see this error message and may attempt to run the plugins again with a different parameter if needed.
If your error is throw correctly, the app will display the error message like this:

HTTP Action
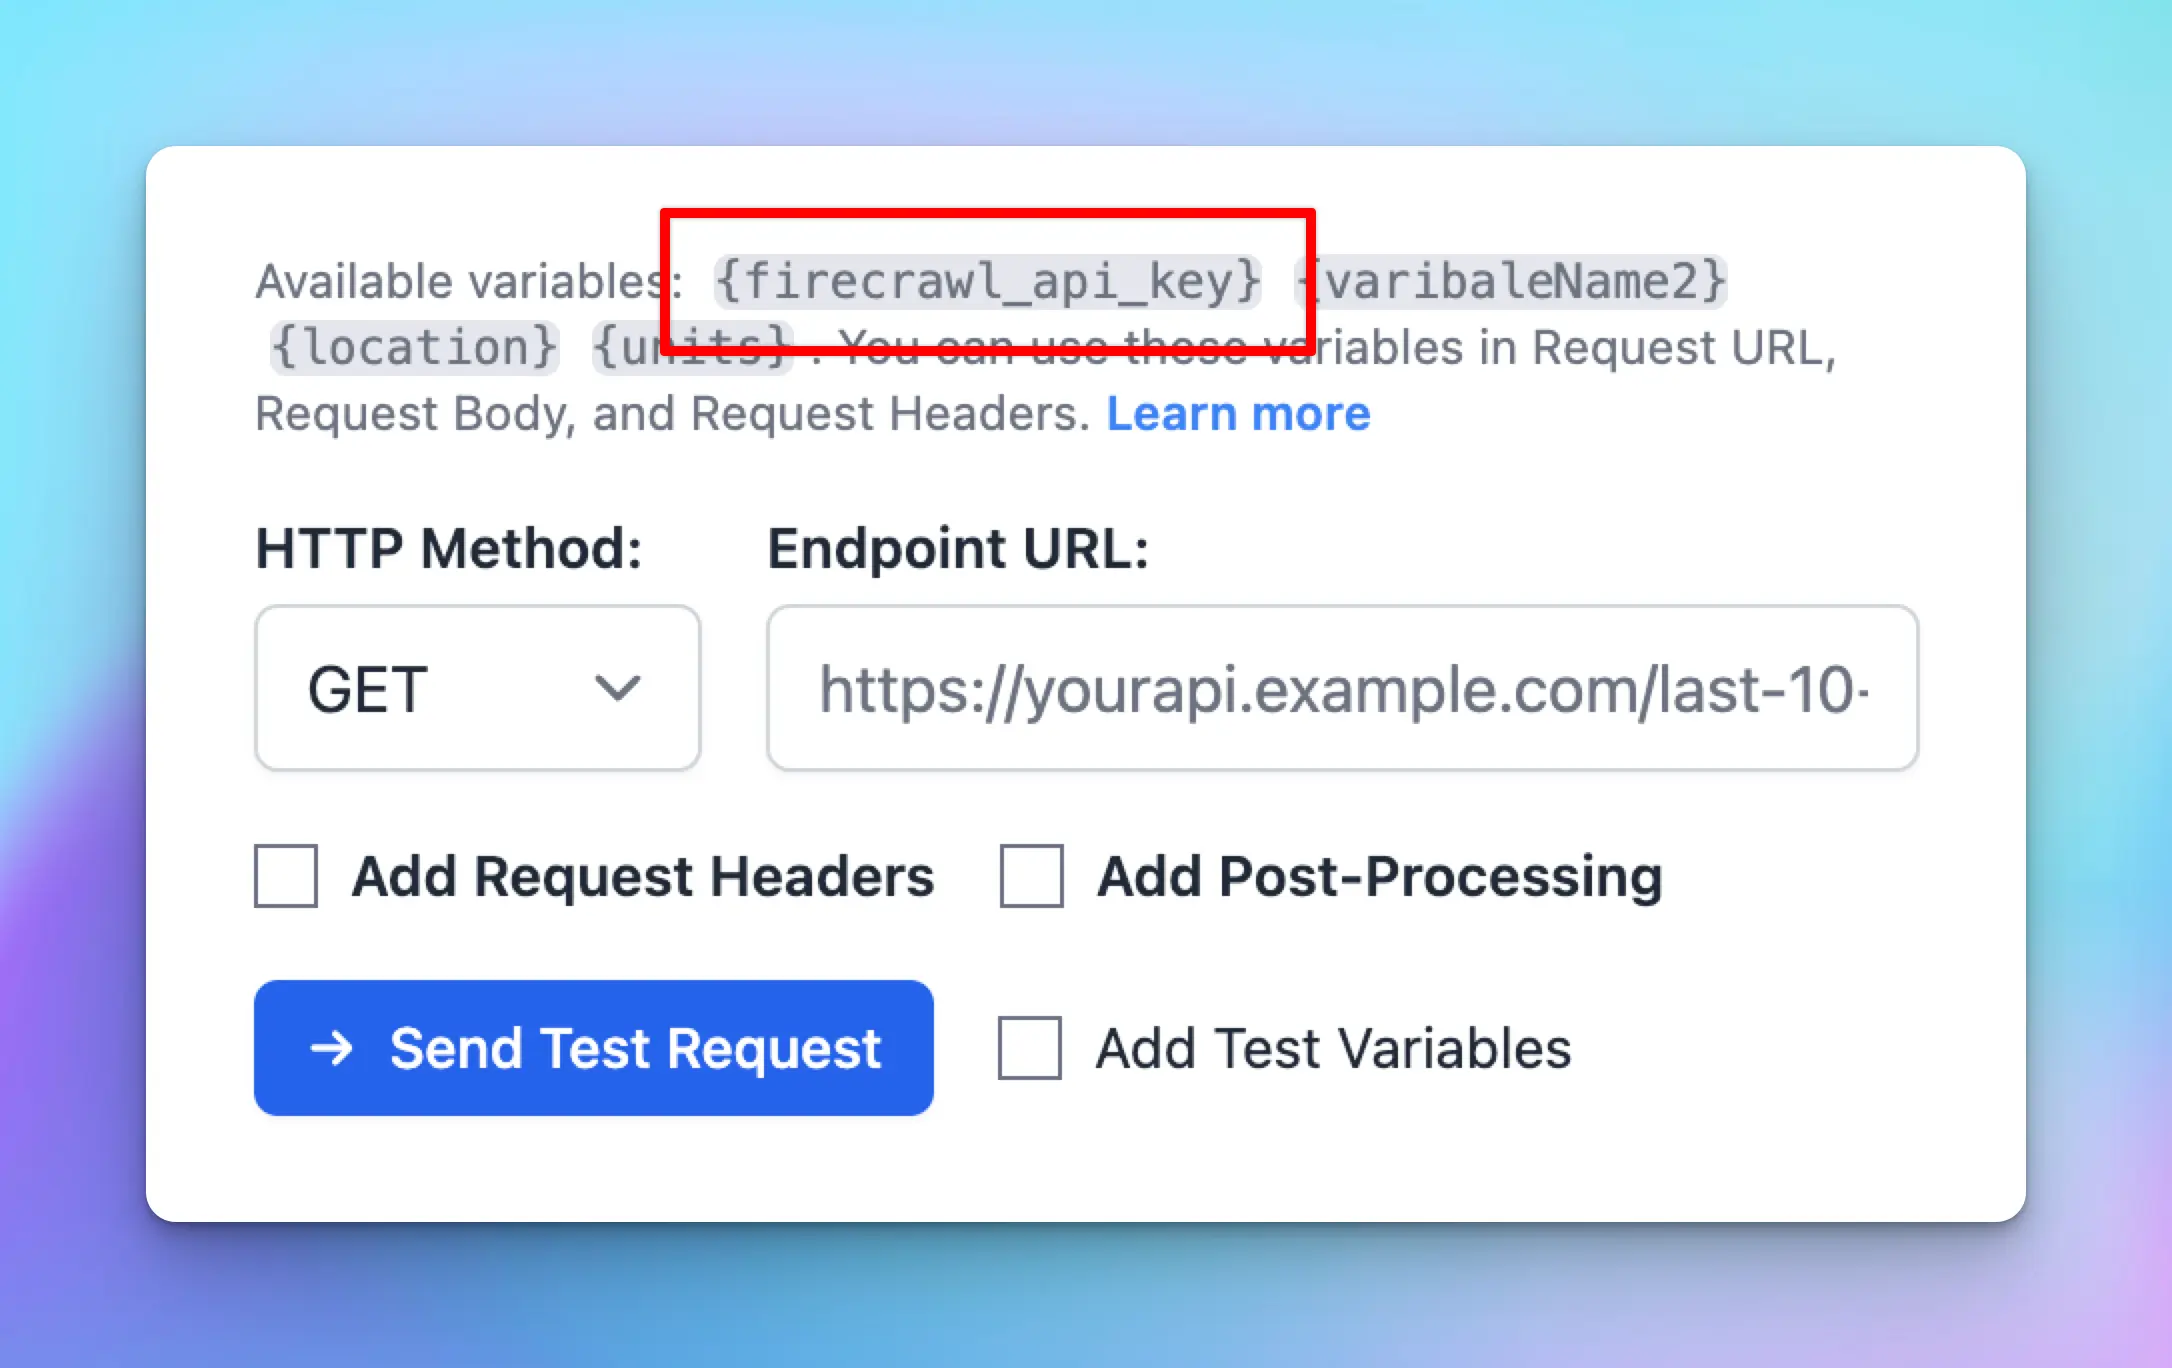
Another option to implement your plugin is HTTP Action.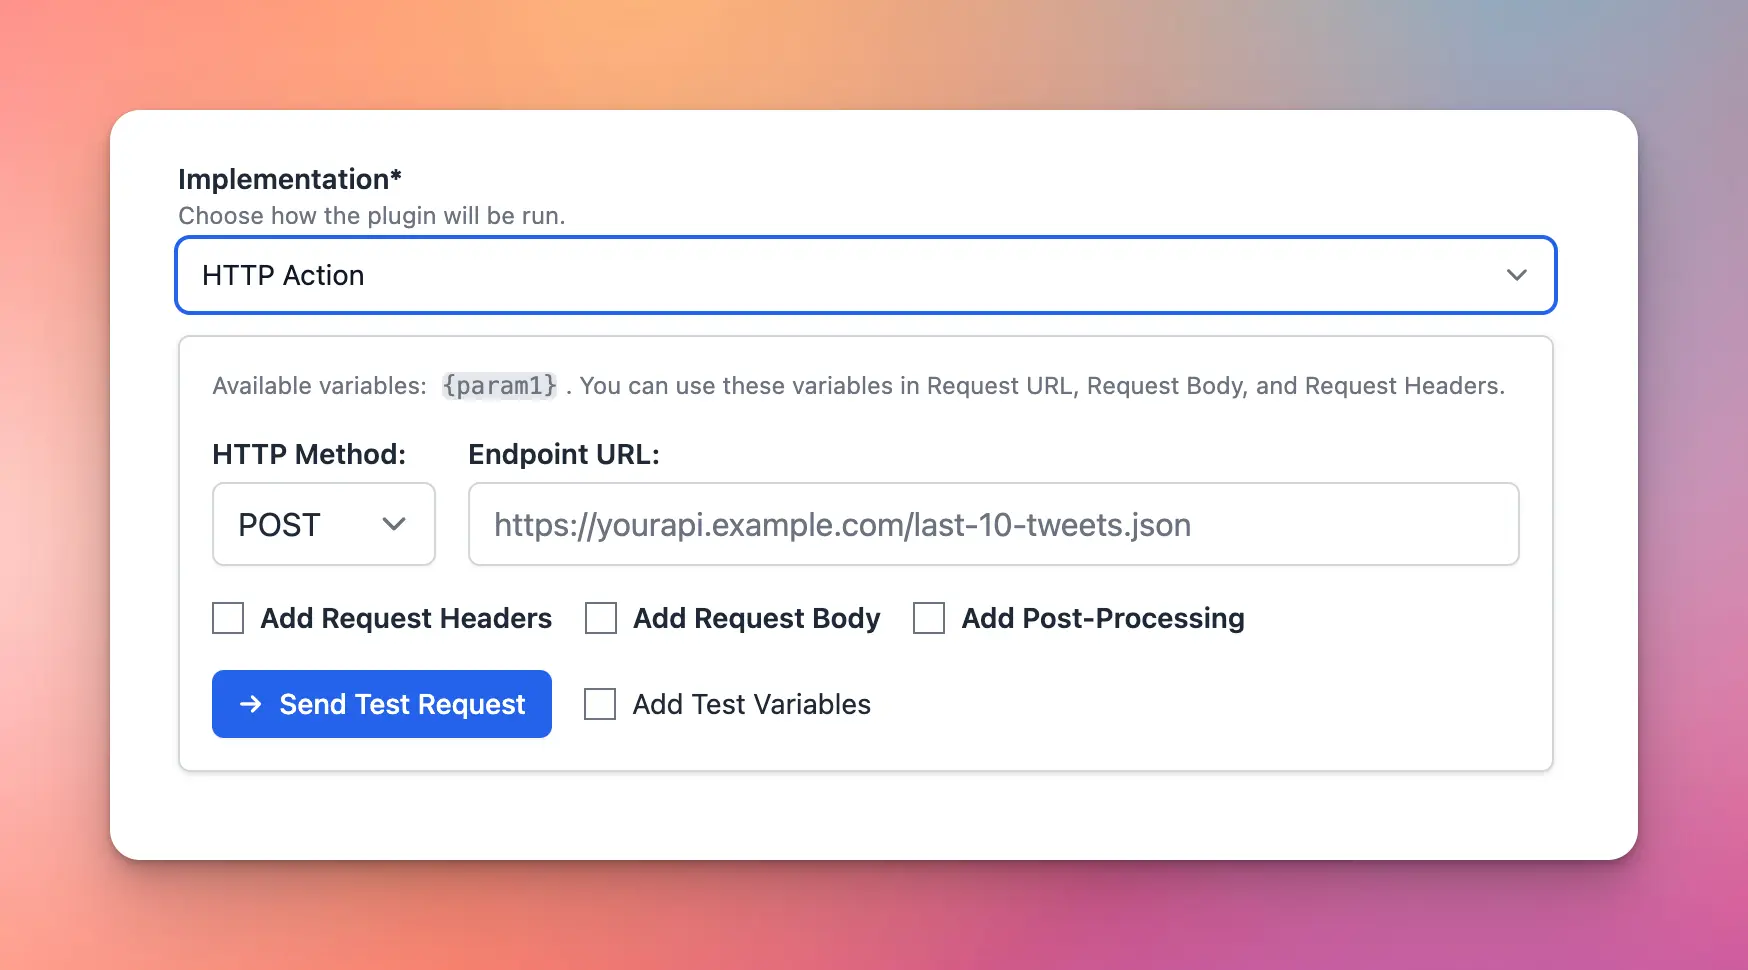 When the plugin runs, it will send a request from the user’s browser using the information provided.
- HTTP Method
- Endpoint URL
- Headers (optional)
- Body (optional)
- Post-Processing (optional)
{param1}, {param2}, etc.
Within the endpoint URL, headers, and body, you can use these variables to customize the requests. Variables comes from OpenAI Function Spec’s parameters and from User Settings.
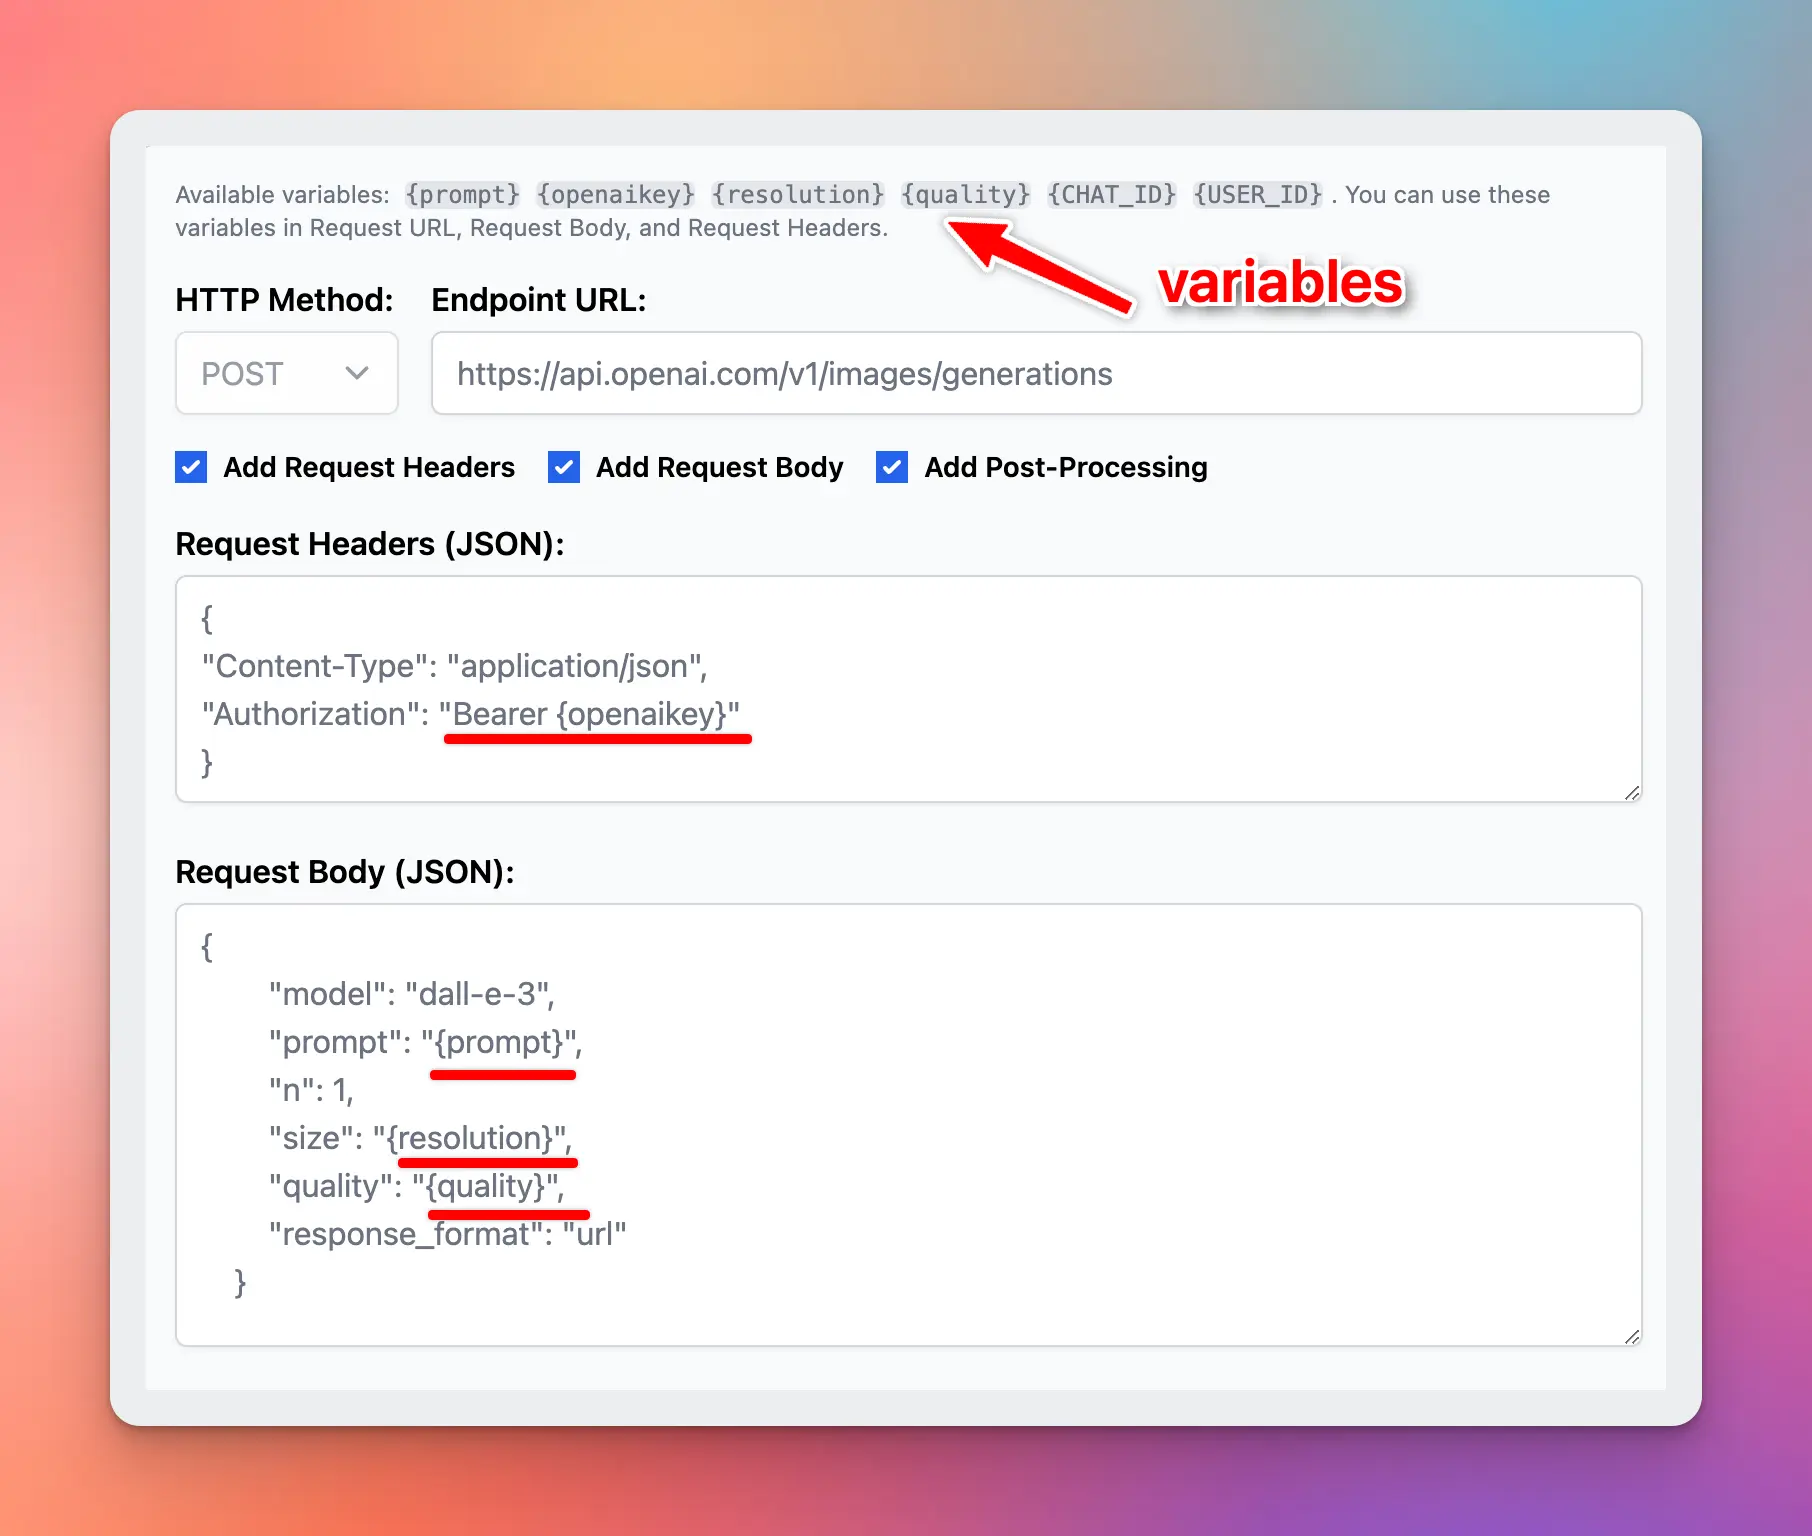
For example, in the DALL-E 3 server plugin:
- the variable
{openaikey}is used in the request headers - the variables
{prompt},{resolution},{quality}is used the request body.
{prompt} parameter is provided by the AI when using the plugin, the other parameters are provided by the user via the plugin setting UI.
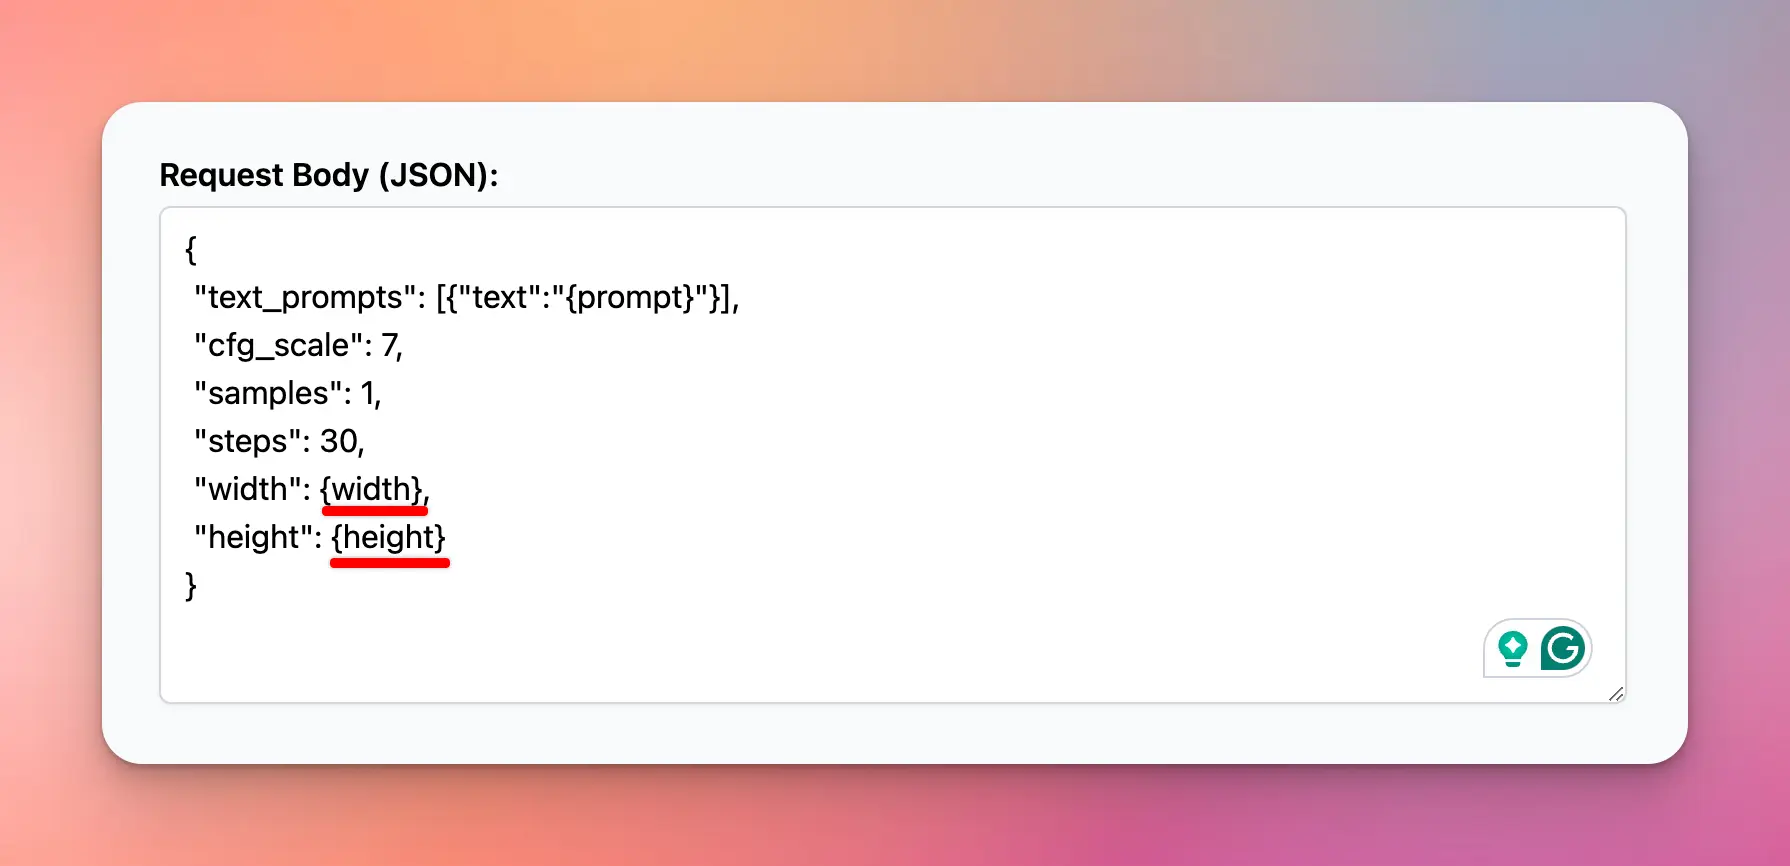
 In the example above, all variables are used in a string value to be valid in JSON format. But for number variables, you might want to use them directly as a value, not between the double quotes, we support an exception for that case:
 Built-in variables for HTTP Action on server side
When running an HTTP Action on server side (server plugin), your plugin has access to the following built-in variables:
Built-in variables for HTTP Action on server side
When running an HTTP Action on server side (server plugin), your plugin has access to the following built-in variables:
HTTP Action Post-Processing
Post-Processing can be used to transform the HTTP response to your desired output. This is helpful to trim the response down only the useful information, saving the number of tokens used.
Typing Mind supports two Post-Processing engines:
- JMESPath Transform (docs): Useful to filter a big JSON response to a smaller JSON.
- Handlebars.js Template (docs): Useful to rewrite the JSON response into a different format like Markdown or HTML.
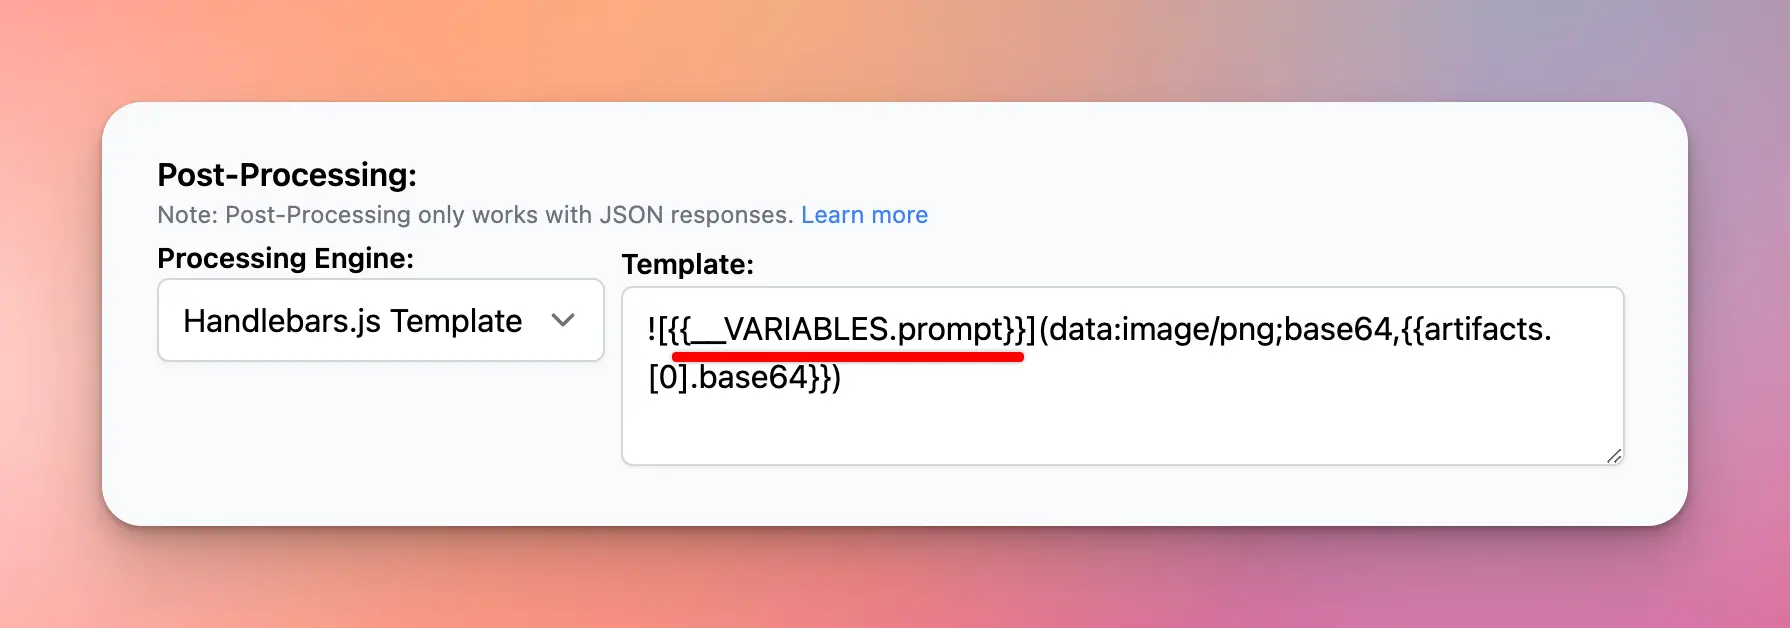
 You can also use all variables in this post-processing via a special property called
 __VARIABLES (Only support for object responses):
 Test your HTTP Action
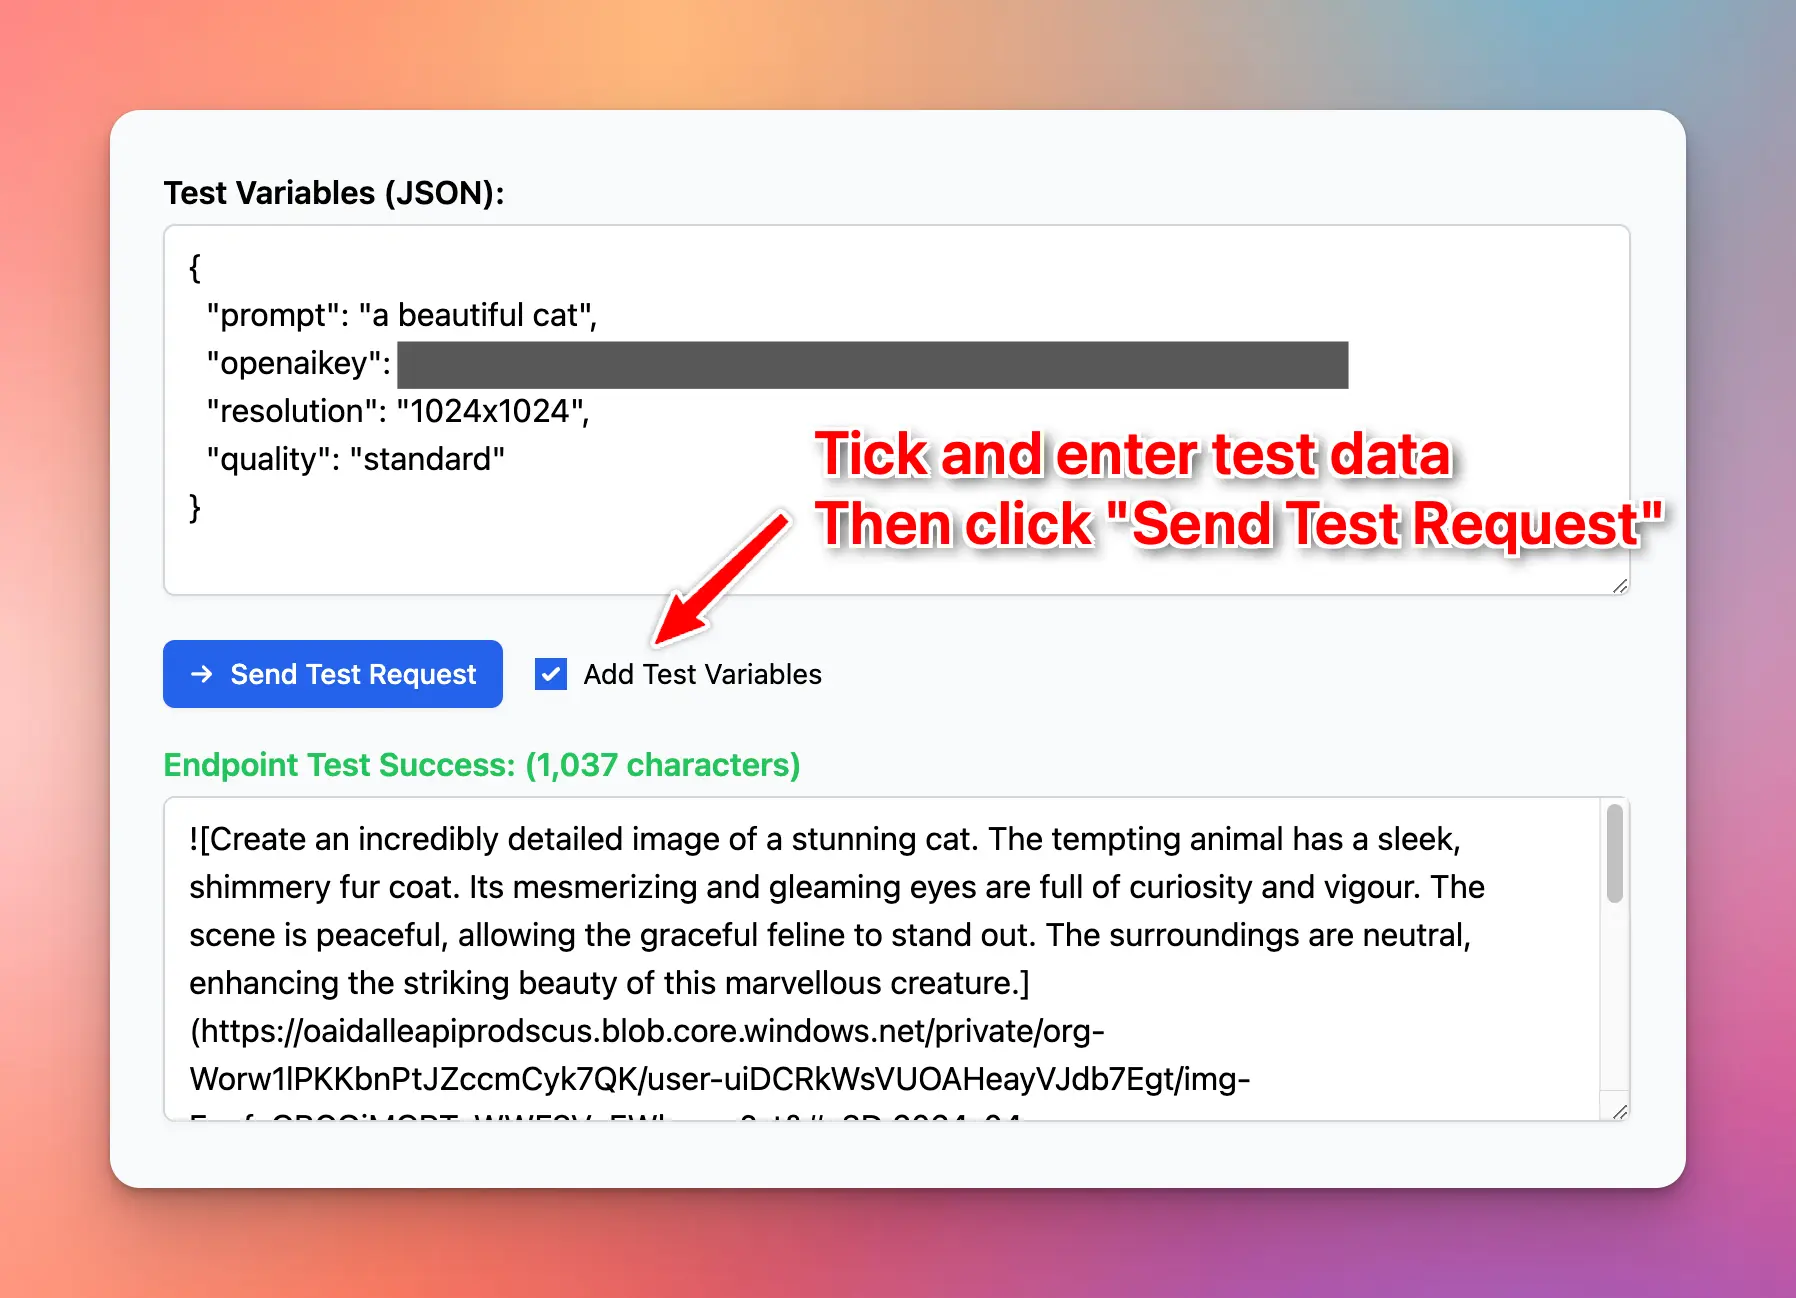
To make sure the HTTP requests are working normally, you can send a test request with test variables.
The test result will be what the AI model see (or what will be rendered to the user, depends on your plugin setting).
Test your HTTP Action
To make sure the HTTP requests are working normally, you can send a test request with test variables.
The test result will be what the AI model see (or what will be rendered to the user, depends on your plugin setting).
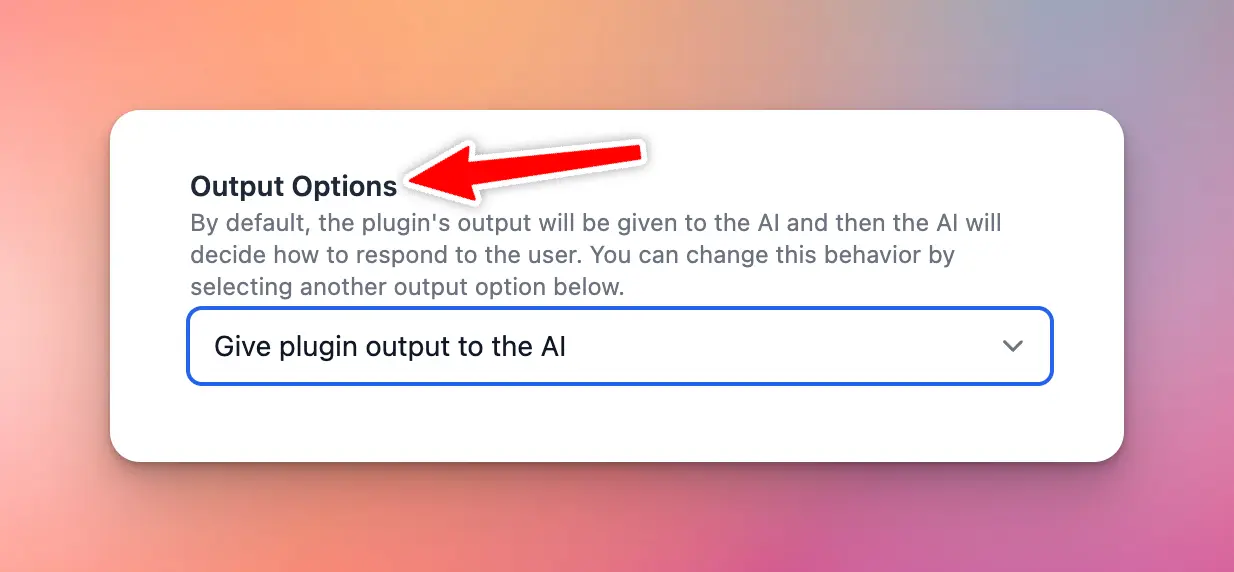
Output Options
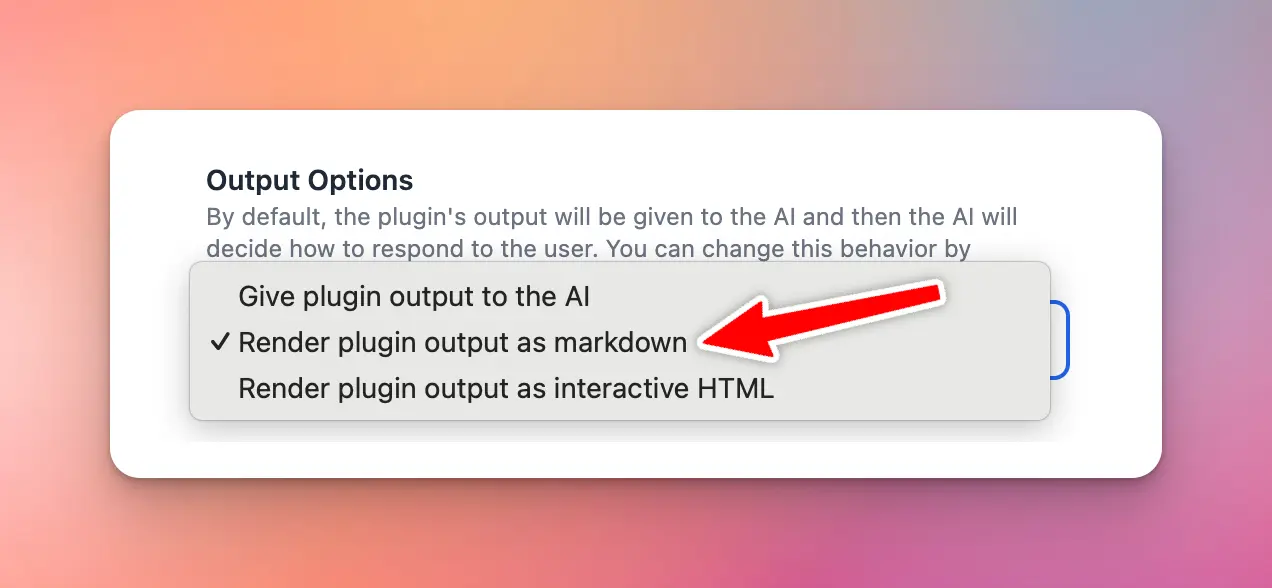
You can setup your plugin to output the result directly to the AI, or render the output directly to the users using Markdown or HTML.If you plugin has multiple functions, you can set output options for each function separately.
- Give plugin output to the AI
- Render plugin output as markdown
- Render plugin output as interactive HTML
- Render plugin output as special cards format
When to use custom output
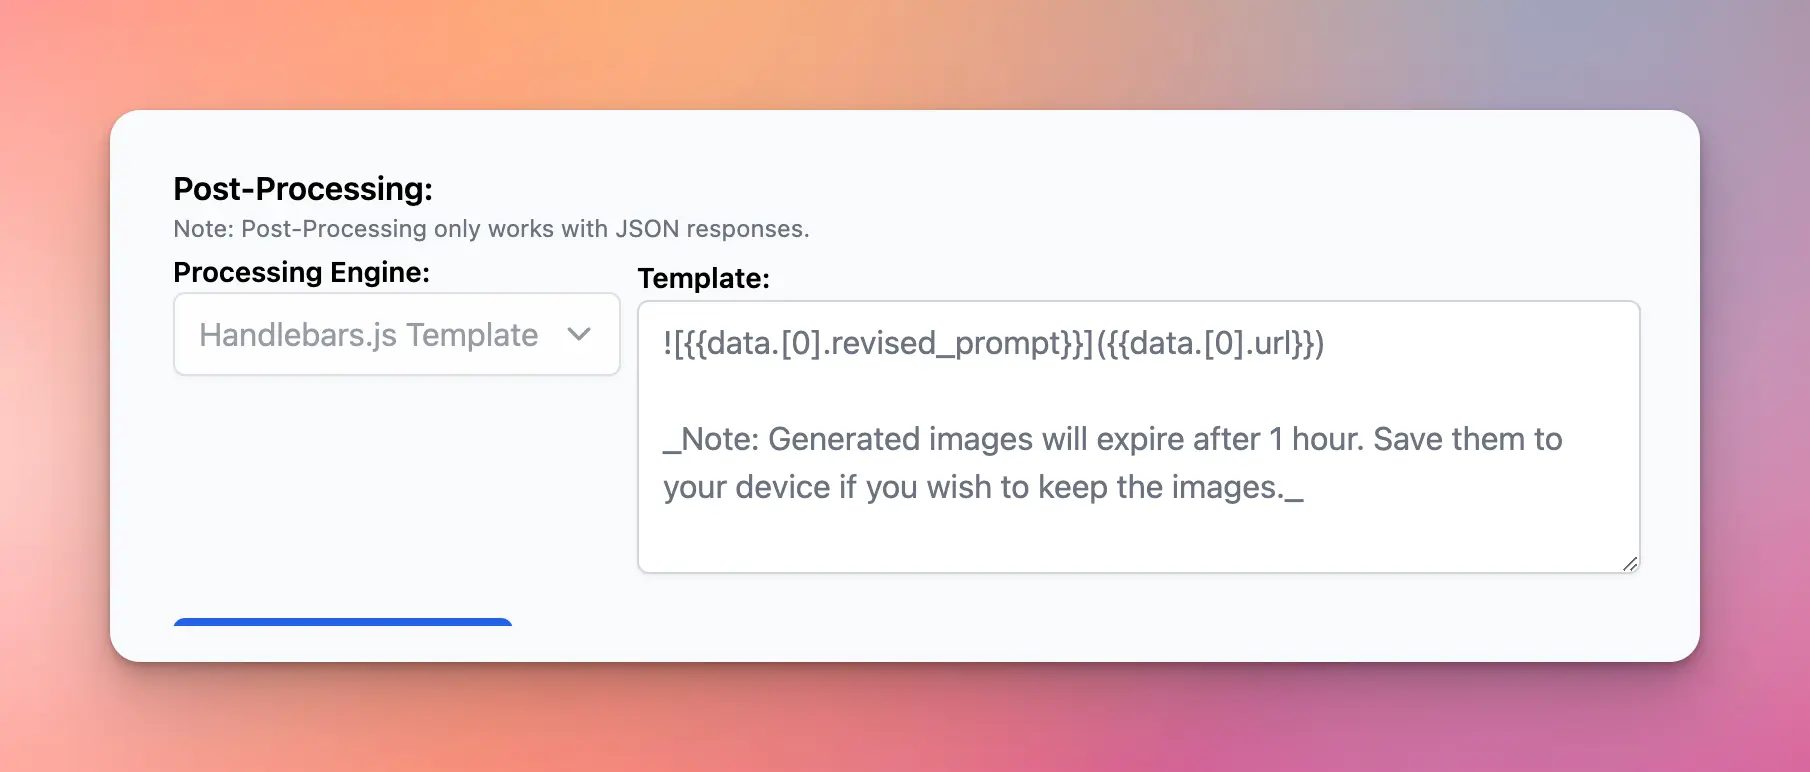
Normally, the return value of your plugin will be passed directly to the AI, then the AI will decide how to answer the user based on the returned value. However, in some cases, you prefer to render the output to the users directly by yourself. For example, the DALL-E 3 plugin will render the generated images directly to the users in Markdown format. This saves time for the users because the AI will not need to “type” the long image URLs manually after it received the return value from the plugin. In order to do this, the DALL-E 3 plugin uses the “Render plugin output as markdown” option.
Render markdown
When output option is set to “Render as markdown”, the output of the plugin function will be rendered as markdown (GitHub flavored).Render as HTML
This is useful if you want to show interactive content to the user. Examples:- Render interactive chart
- Show preview of generated code (HTML/JS/CSS)

Render as TypingMind Card
TypingMind Card is a special format to render your plugin output more nicely. To use this output type, your function must return a valid JSON object, the schema of this object depends on the type of card you want to render. TypingMind currently support the following card type:- Image Card

We are working on adding more card types soon!
Test your plugin
After filling in all the information, click “Show Plugin Preview” to start testing your plugin.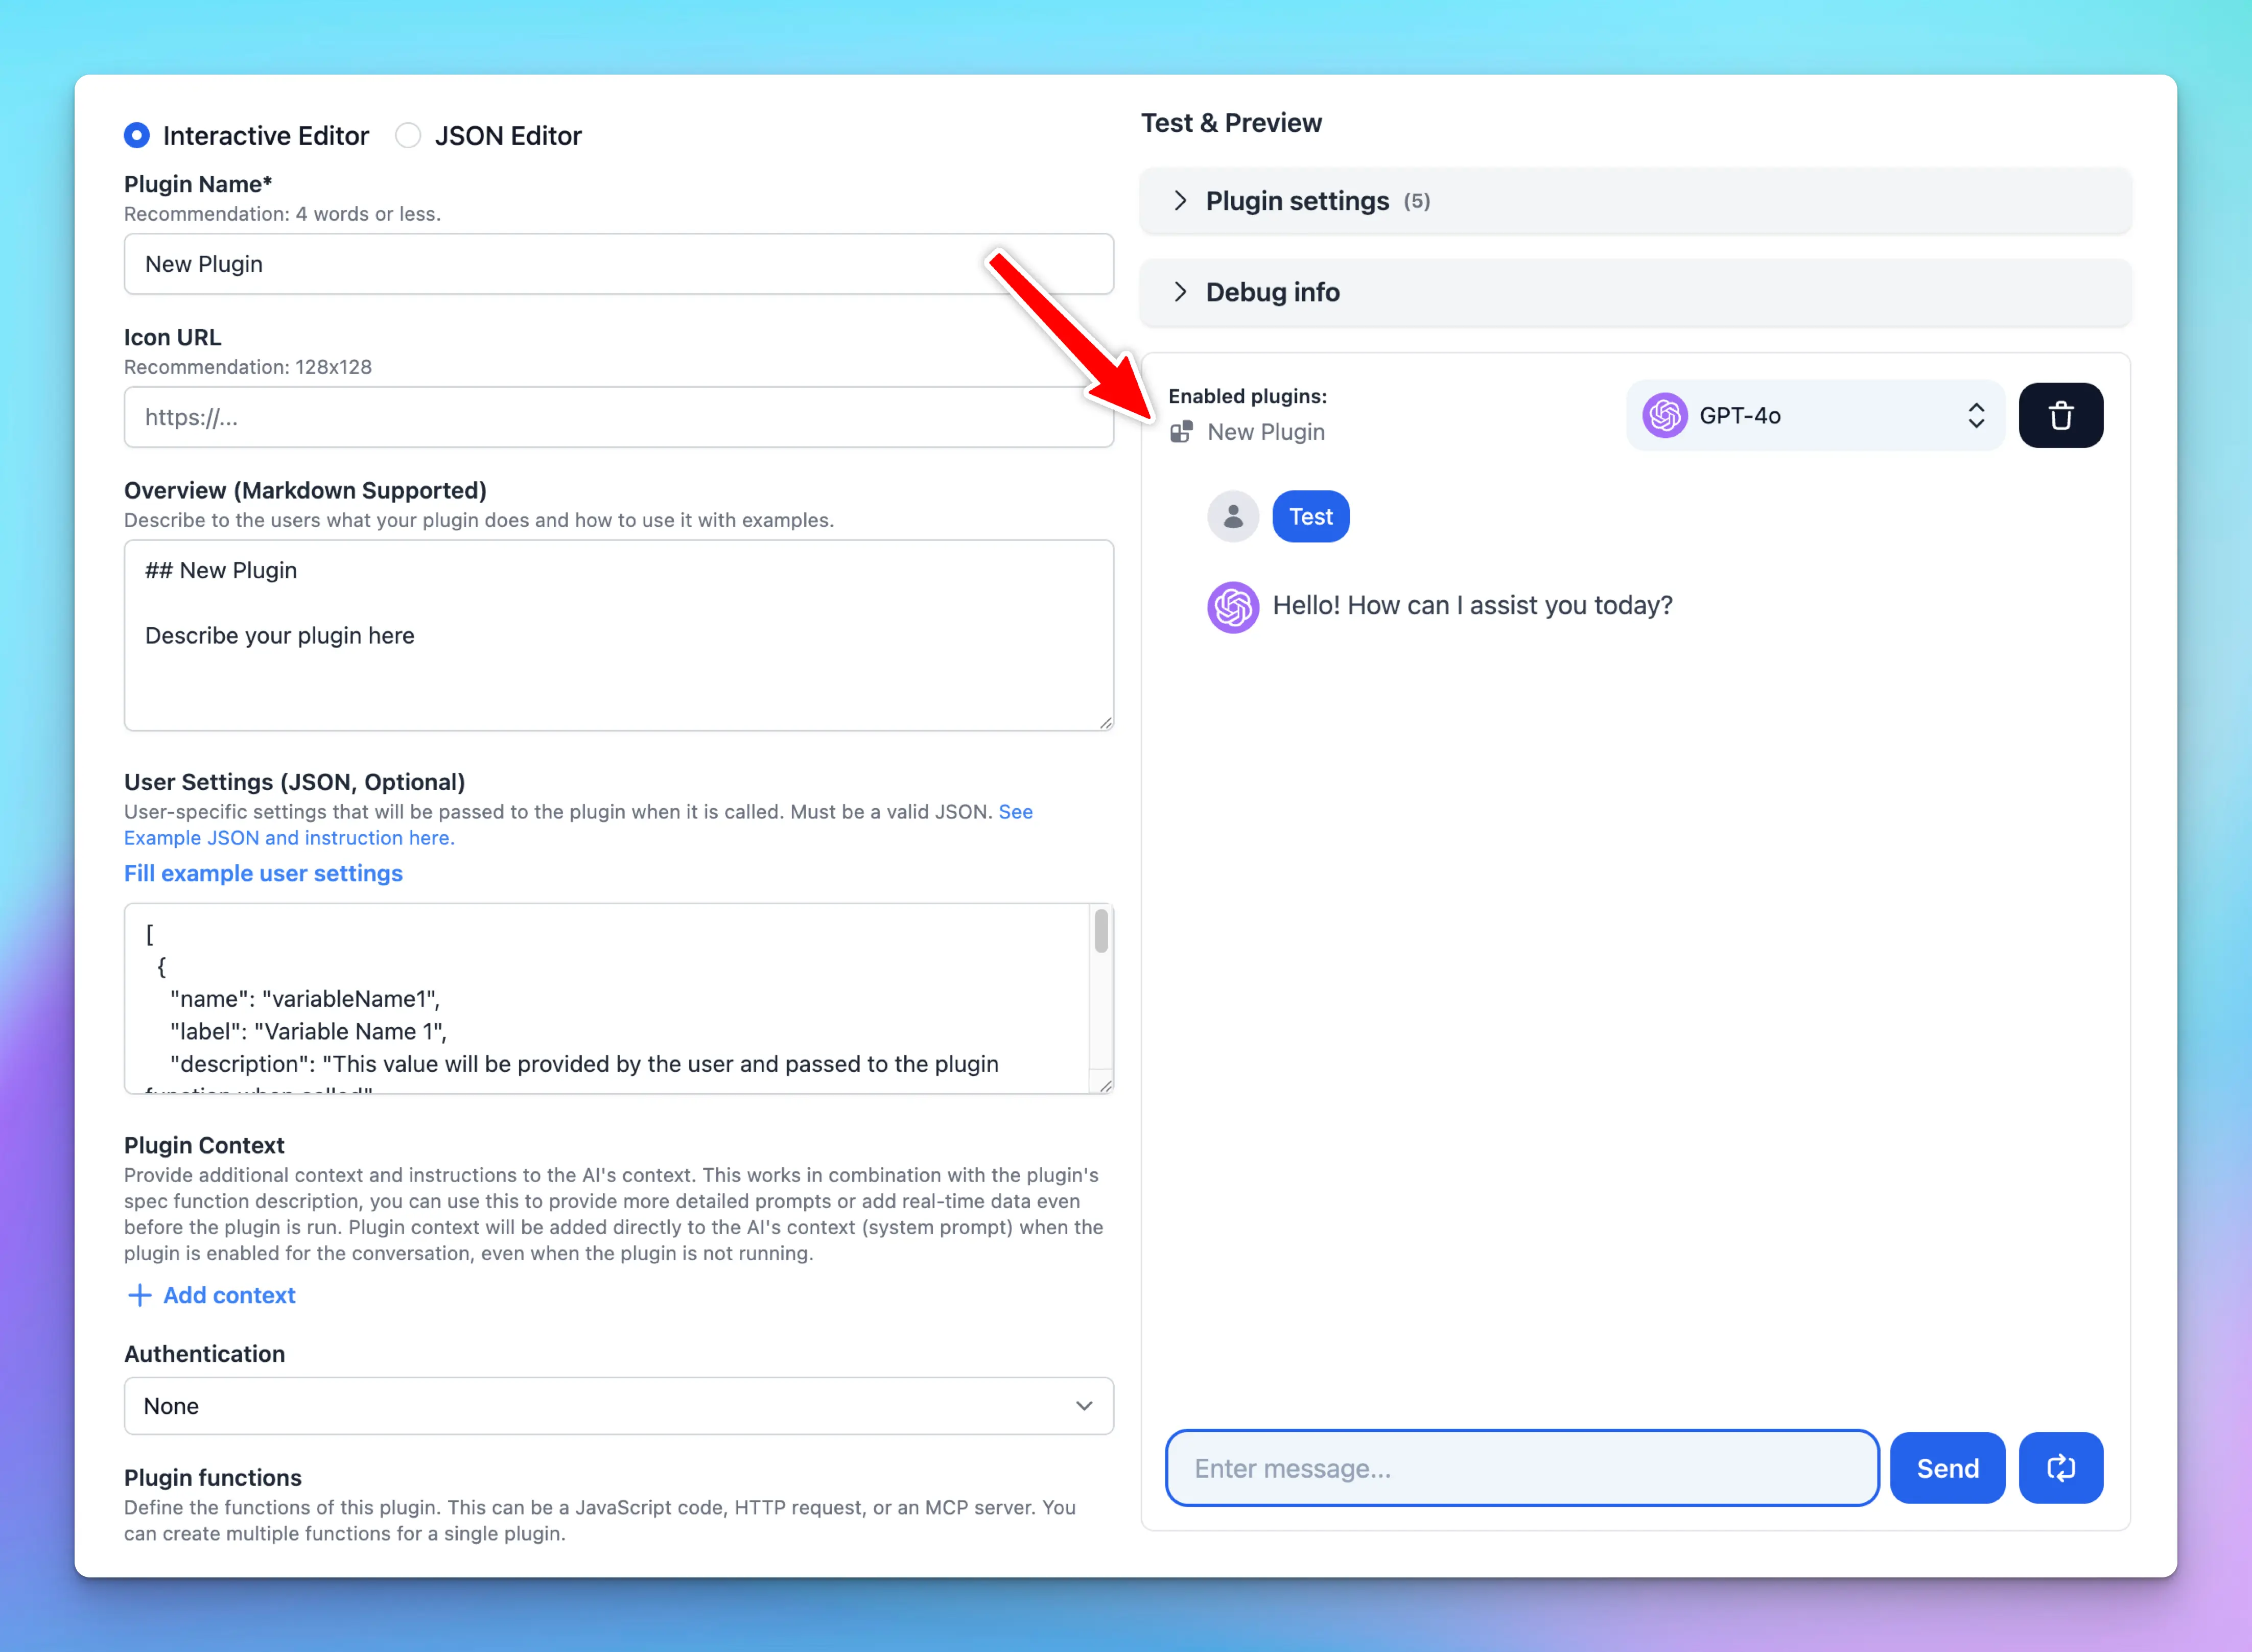 Note that the AI will decide to use your plugin only when necessary. Make sure your JSON spec has meaningful and accurate names and description.
Create plugin with raw JSON
Other than creating new plugins using the built-in Plugin Editor provided by TypingMind, you can also write plugins using the source directly using the “JSON Editor” feature in TypingMind while creating or editing a plugin. To view the latest JSON schema for TypingMind Plugin, go here: TypingMind Plugin JSON SchemaShare your plugin
Once you have created your plugin, you can share it with other people using the following way:- Export the plugin to a JSON file.
- Use the TypingMind’s default share feature to create a secret link.
- Upload your plugin source to a GitHub repository and share the GitHub link.
Limitations
- When using JavaScript implementation, your plugins are run on a sandboxed browser environment. Some JavaScript features may not be available.
- In TypingMind personal version, your plugins can send HTTP requests to external services, however, the destination server must be configured to allow CORS requests from Typing Mind. If CORS requests are not allowed, you will need an intermediate server to process the requests. Some API servers allow CORS requests from everywhere – like Perplexity API, or Open AI – so the intermediate server is not needed in these cases.
Example plugins
Click here to see some example plugins created by the community: User-contributed Plugins Visit our public GitHub Repository to view the source code of all of our existing plugins: https://github.com/TypingMindBugs, ideas, and feature request
If you have suggestions to improve the TypingMind Plugin system, please don’t hesitate to contact us via the following channels:- Bug report
- Ideas & feature suggestions
- Customer support:
support@typingmind.com