.svg?fit=max&auto=format&n=RaTUOQa09vPhW7_D&q=85&s=368f39de7ecc6605f73c43c2017546a3)
.svg?fit=max&auto=format&n=RaTUOQa09vPhW7_D&q=85&s=01a6eb27b4db3af8a1d5557525c579d3)
Overview
Let’s create a Slack Message Notifier plugin. This plugin allows you to send messages from TypingMind to a Slack channel. By the end of this tutorial, you’ll be able to build a plugin that looks like the one in the screenshot below: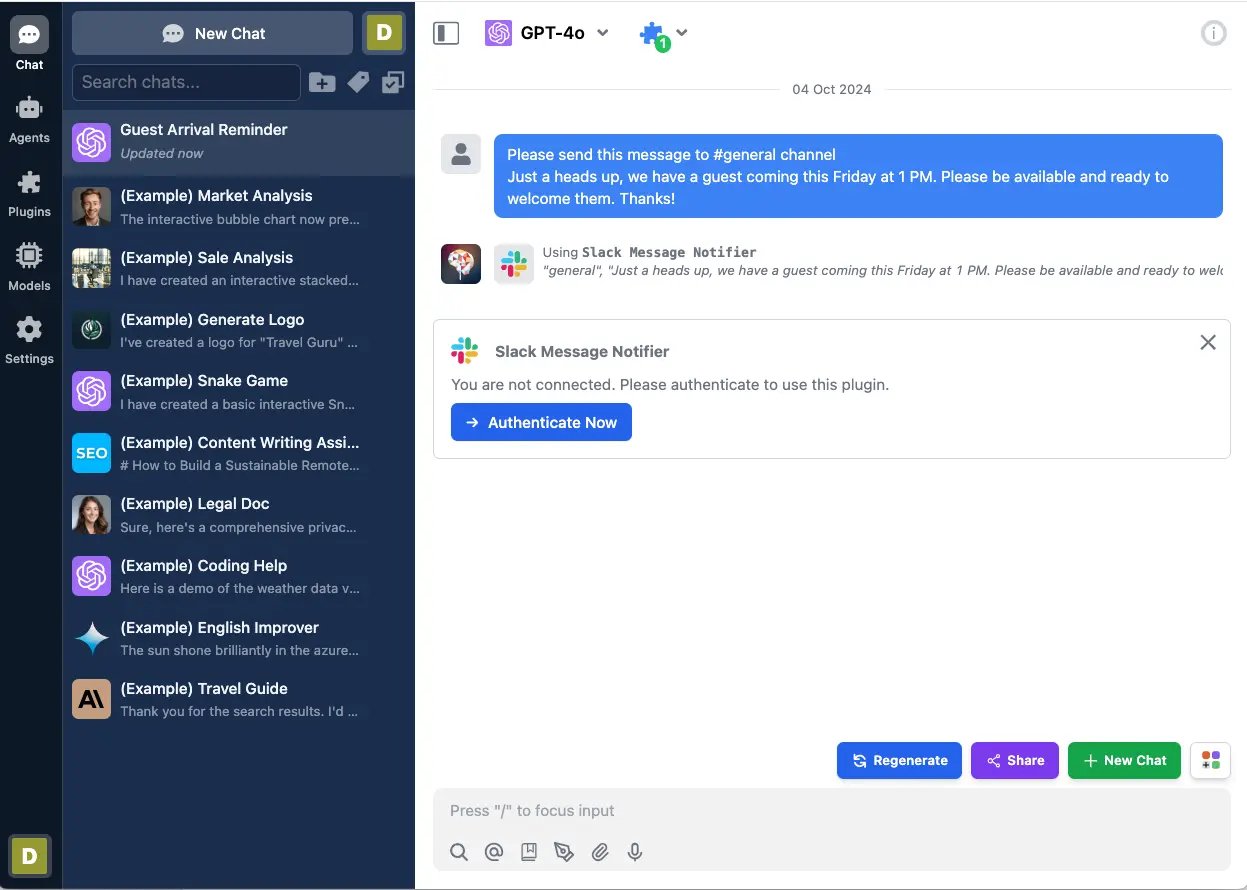
- Part 1: Create the plugin (as a plugin developer)
- Part 2: Install and setup the plugin (as an admin user)
- Part 3: Use the plugin (as an end user)
For clarity, this document is written in context of the TypingMind Team Version. If you are using the TypingMind License Version, please be aware that it is not supported yet. Read until the end for more details.
Table of Contents
- Part 1: Create the plugin
- Research Slack Web API
- Creating a new plugin on TypingMind
- OpenAI Function Spec
- Authentication
- Implementation
- Test the implementation
- Finish creating the plugin
- Part 2: Install and setup the plugin
- Prepare your TypingMind instance
- Create the Slack app
- Integrate Slack App with Designated Channels
- Install the Slack Message Notifier plugin
- Part 3: Users use the plugin
- Conclusion
- Learn more
Part 1: Create the plugin
In this step, we will act as a Plugin Developer to create a plugin. This plugin can later be listed on the plugin store or share directly to other people in the community via a share URL or a GitHub repo.
Research Slack Web API
Before we begin, let’s find the HTTP endpoint we need to send messages to Slack. A quick Google search reveals the relevant information in the Slack Web API Documentation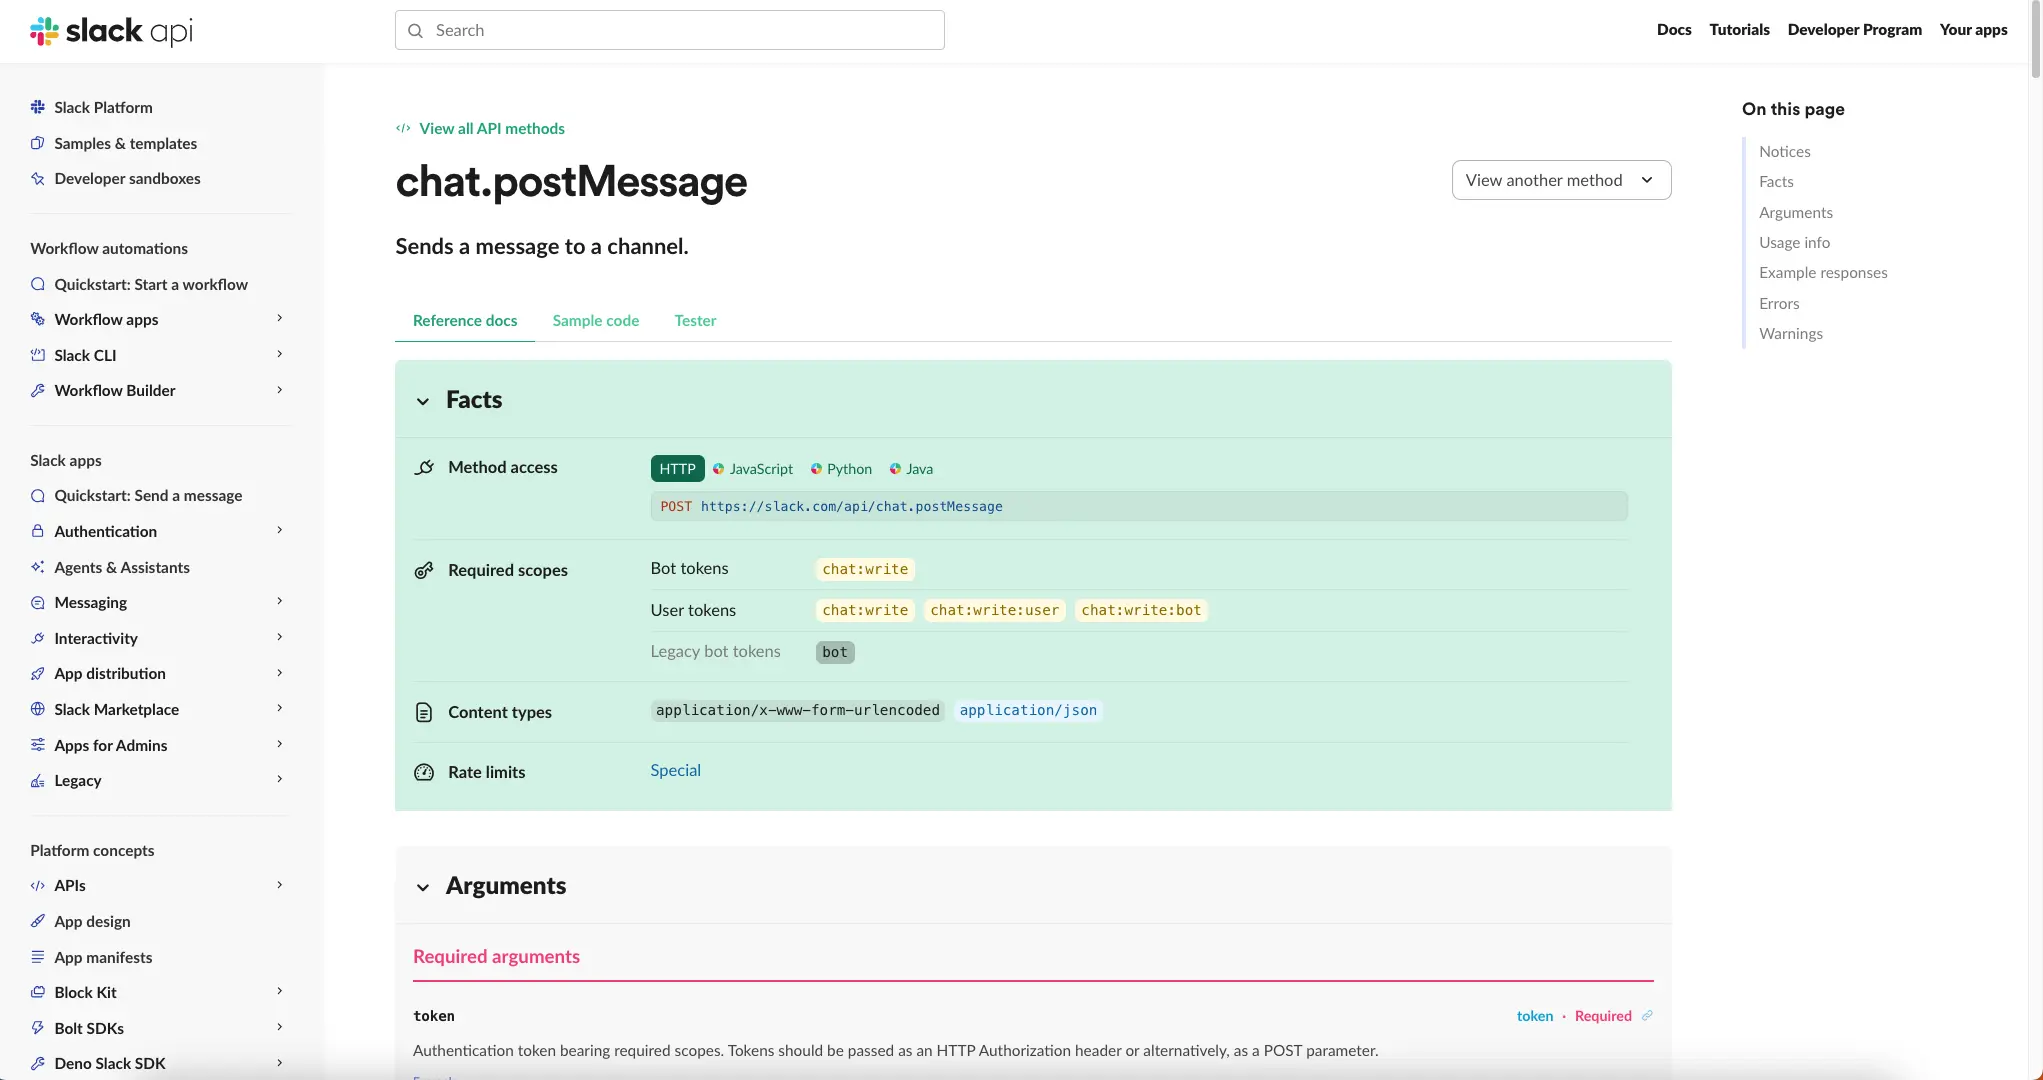 From this page, we will learn that:
-
The endpoint to send messages to a Slack channel is:
-
You need an access token with the right permissions to use this endpoint. For sending messages, you typically need the chat:write scope.
-
The endpoint supports several parameters, but the ones we care about are:
channel: The channel name (e.g. #general) or the channel ID (e.g. C024BE91L) of the channel you want to post the message to.text: The content of the message you want to send.
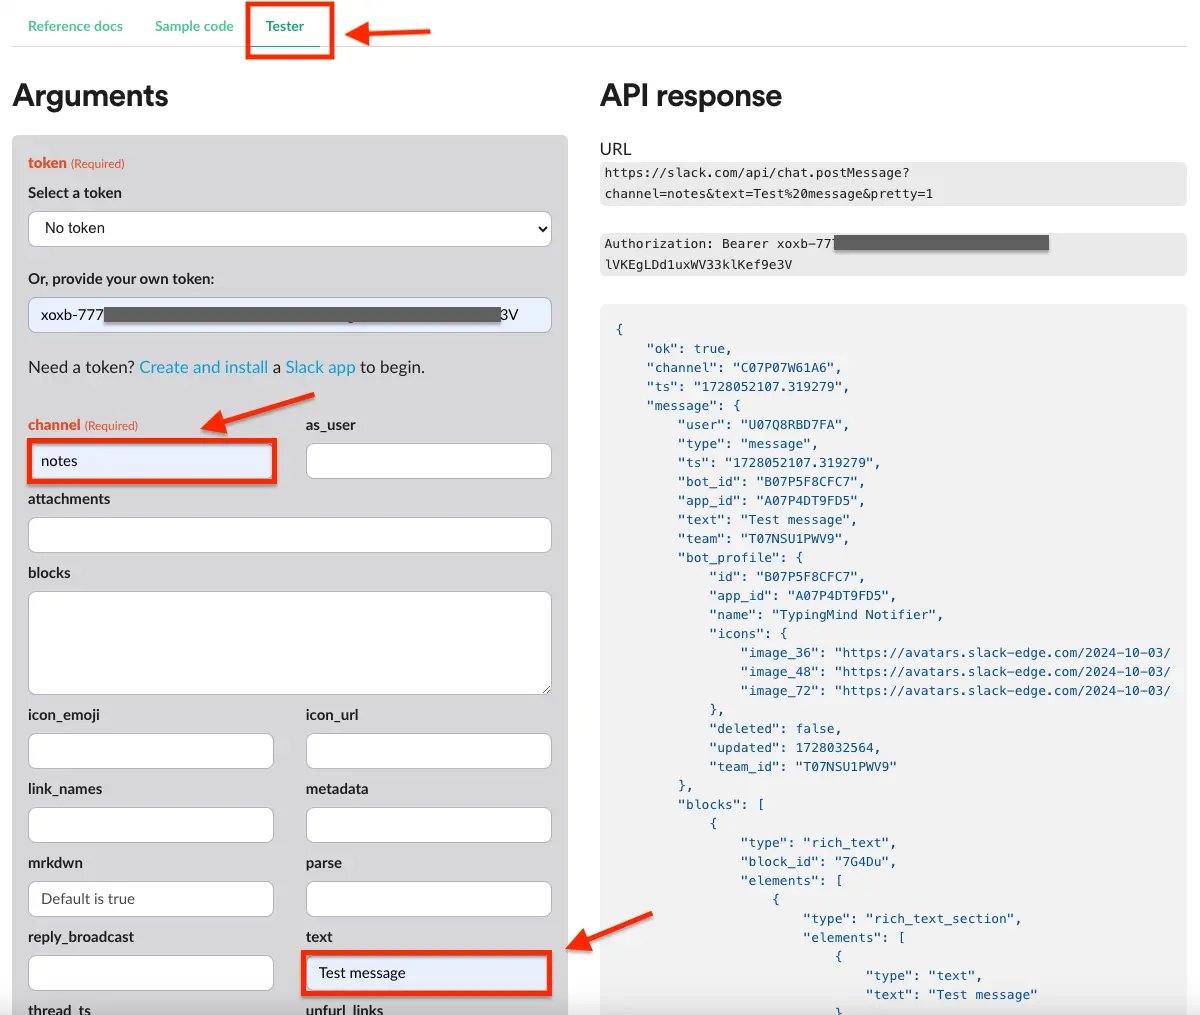
- Set up your Slack App with OAuth (see the “Prepare the Slack app for OAuth” section)
- Go to the OAuth & Permissions tab
- Find and copy the Bot User OAuth Token
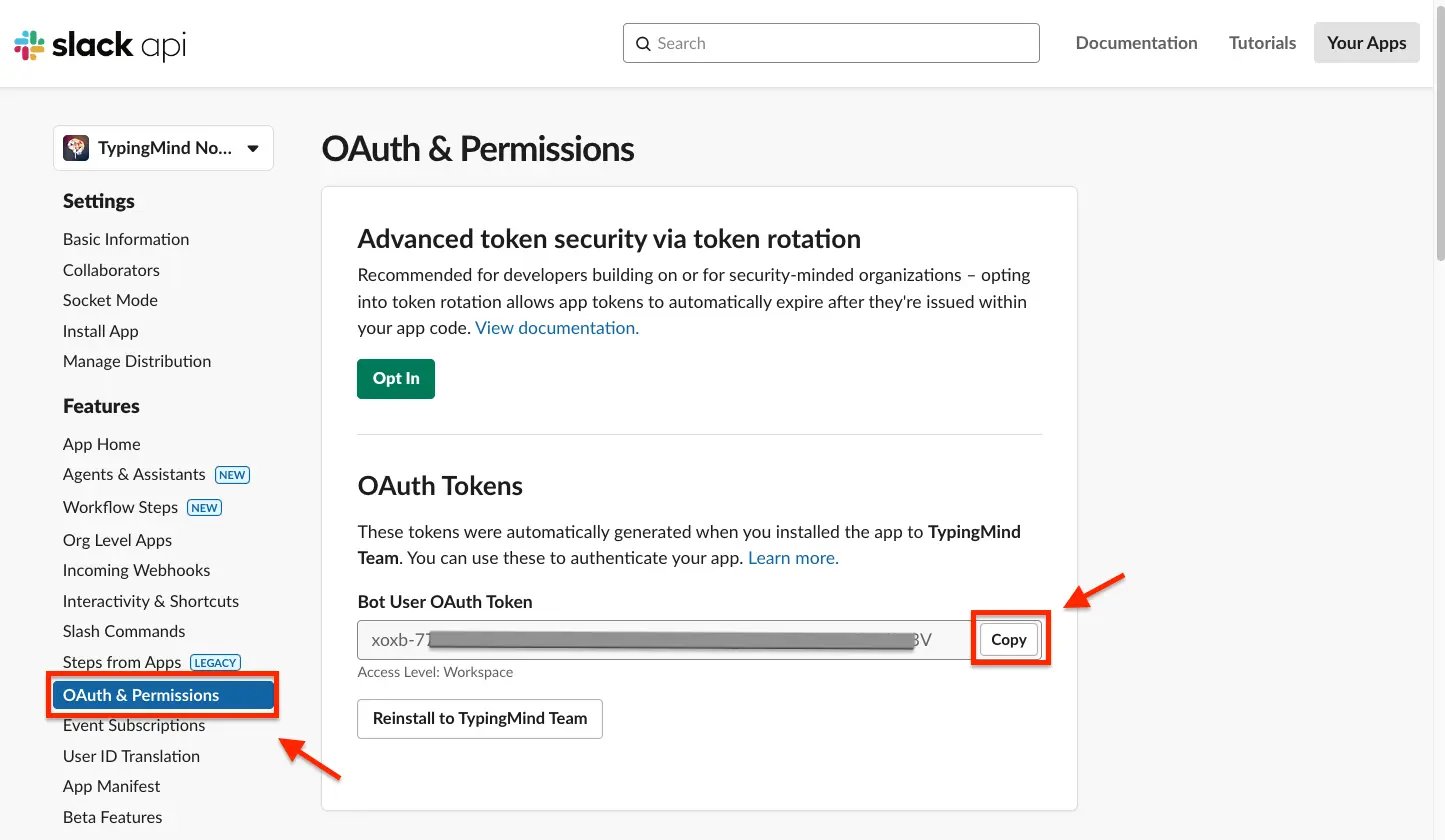
{{ACCESS_TOKEN}}with your actual Slack access token and{{CHANNEL}}with either the name or ID of the Slack channel where you want to send the message.
Now that we understand what is needed to send messages to Slack channels, let’s start creating the “Slack Message Notifier” plugin.
Creating a new plugin on TypingMind
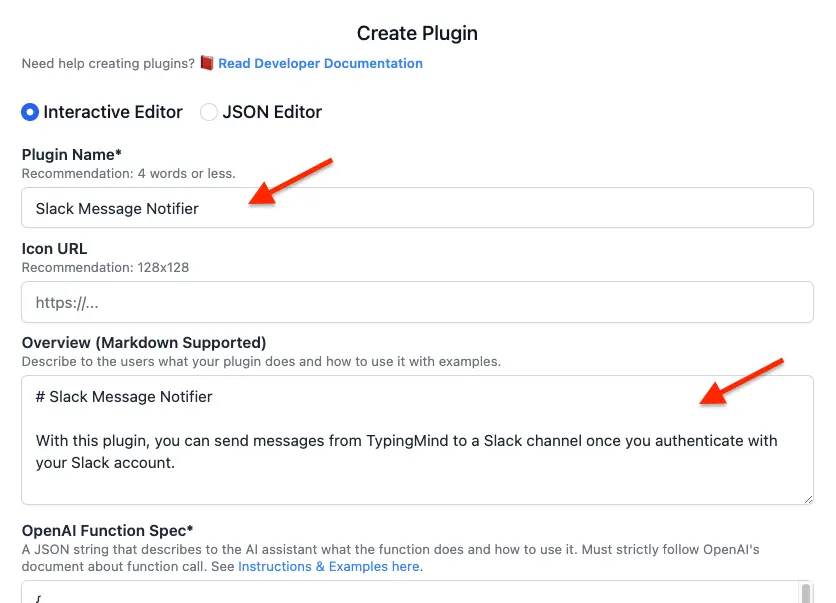
The easiest way to create a new TypingMind plugin is to use the editor provided by TypingMind. You can access the editor via the Admin Panel.- Go to your Admin Panel → Plugins → Create New Plugin.
- Name the plugin “Slack Message Notifier”
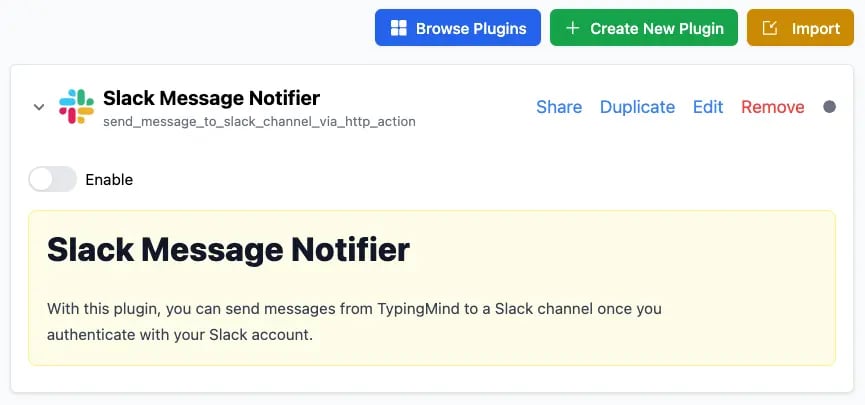
- Description: “With this plugin, you can send messages from TypingMind to a Slack channel once you authenticate with your Slack account”
OpenAI Function Spec
In this plugin, we want to enable the AI to send messages to a Slack channel. We’ll name the functionsend_message_to_slack_channel_via_http_action with two parameters:
• channel
• message
The full function spec is as follows:
Authentication
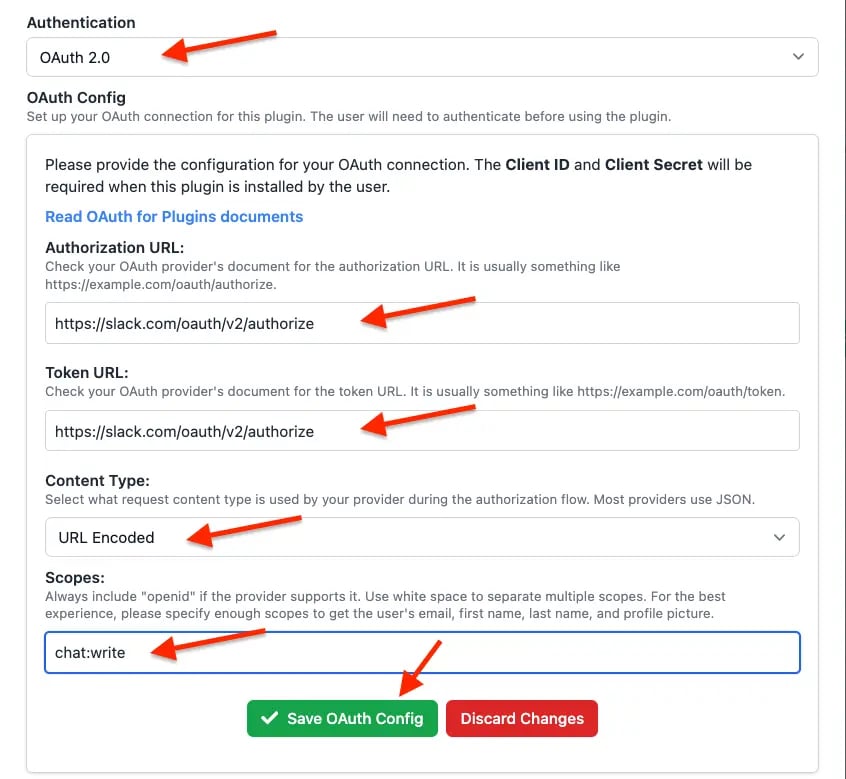
For authentication, let’s choose “OAuth 2.0” and set up the OAuth configurations. For OAuth configurations, we will need the following information:- Scopes: the permissions we need from the user. In this case, we already know the scope needed is
chat:write - Content Type: JSON or URL-encoded. In this case, we use URL-encoded.
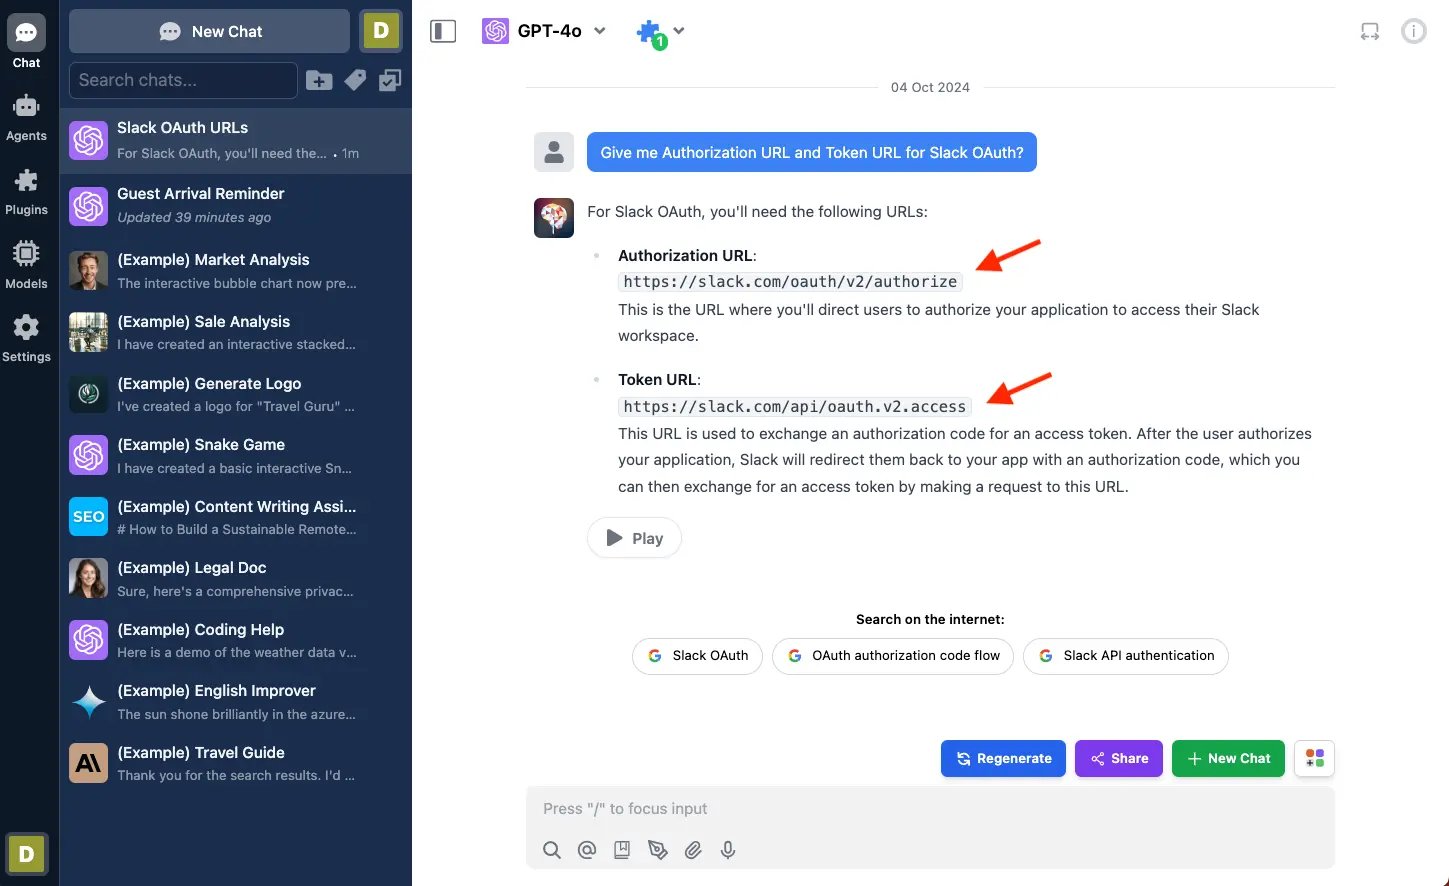
- Authorization URL: The URL where users are redirected to grant permission to the Slack app. This is the first step in the OAuth flow.
- Token URL: Endpoint to get access token.
Implementation
Now, let’s implement our plugin using the HTTP Action as planned. This approach allows us to easily send messages to Slack channels without complex coding.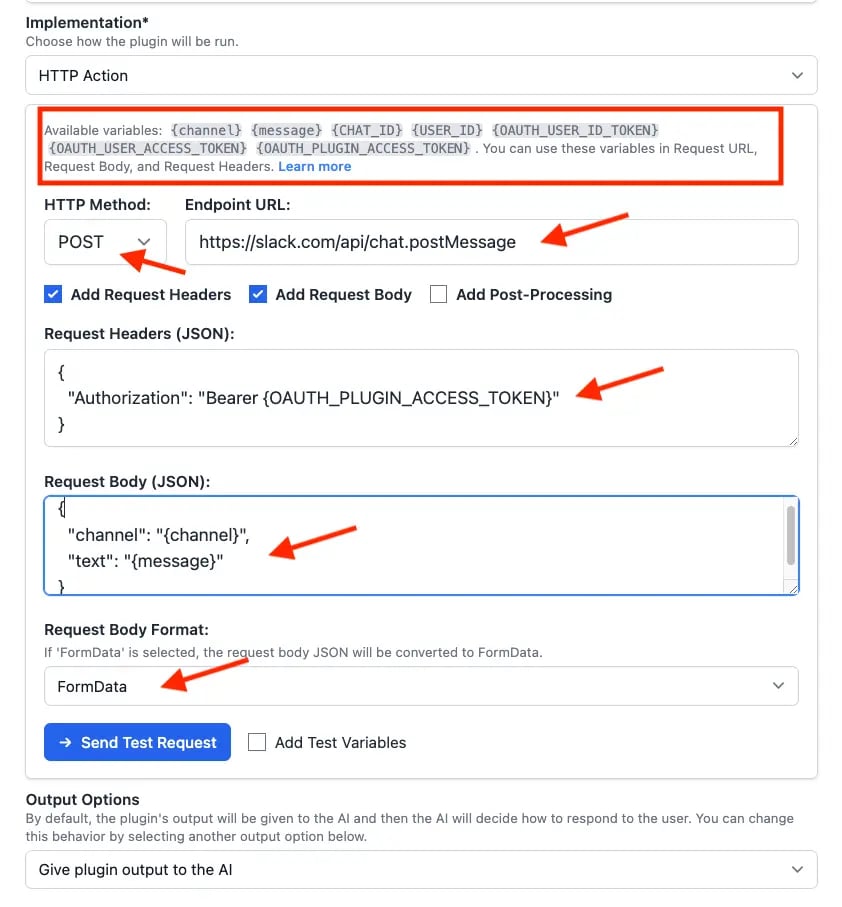
channelandmessagefrom the OpenAI function spec.OAUTH_PLUGIN_ACCESS_TOKENfrom the OAuth authentication type. This token will be provided when the user authorizes the plugin’s access to Slack.
- Method:
POST - Endpoint URL:
https://slack.com/api/chat.postMessage - Request headers:
- Request body:
Test the implementation
You can add some test variables and click “Send Test Request” to verify that all of your settings are correct. Here I use the same test access token I got from the Slack app: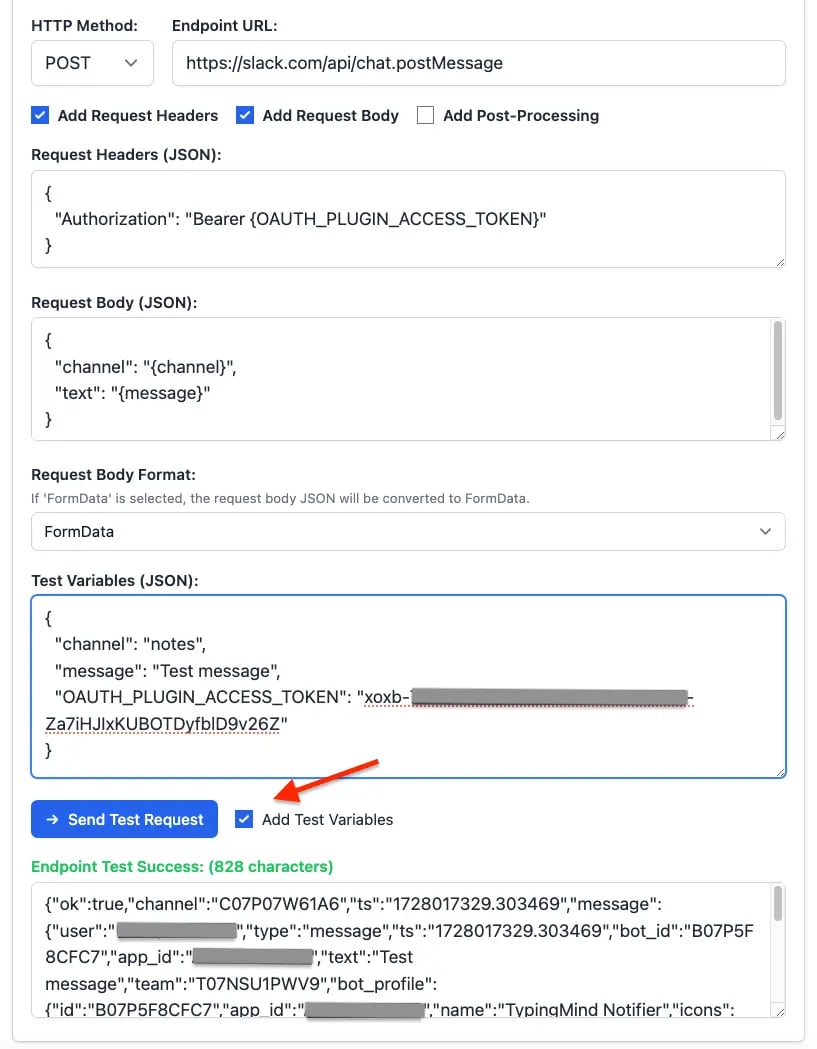
Finish creating the plugin
For the Output Options, we select “Give plugin output to the AI”. This allows the AI to read the information in the response JSON and present the result to the user in a friendly format.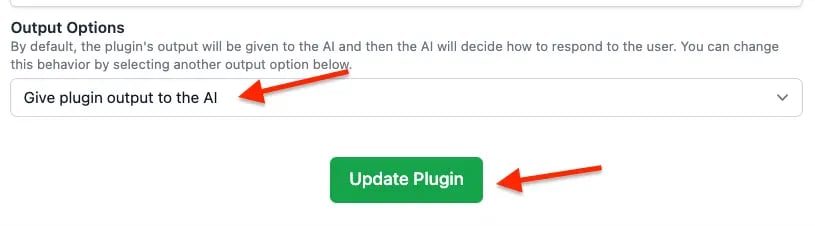
Part 2: Install and setup the plugin
In this step, we will act as an Admin User. We will install the Slack Message Notifier to our TypingMind instance, enable it, and set it up OAuth with our Slack App.
Prepare your TypingMind instance
In this example, I will create a new TypingMind instance named “Example AI” hosted at exampleai.app (you can also create private instance like this using TypingMind Custom). Example AI will be a private AI platform that I created to provide AI access to my teammates at my company. I will invite my teammates to this platform and let them use the AI with the Google Calendar plugin.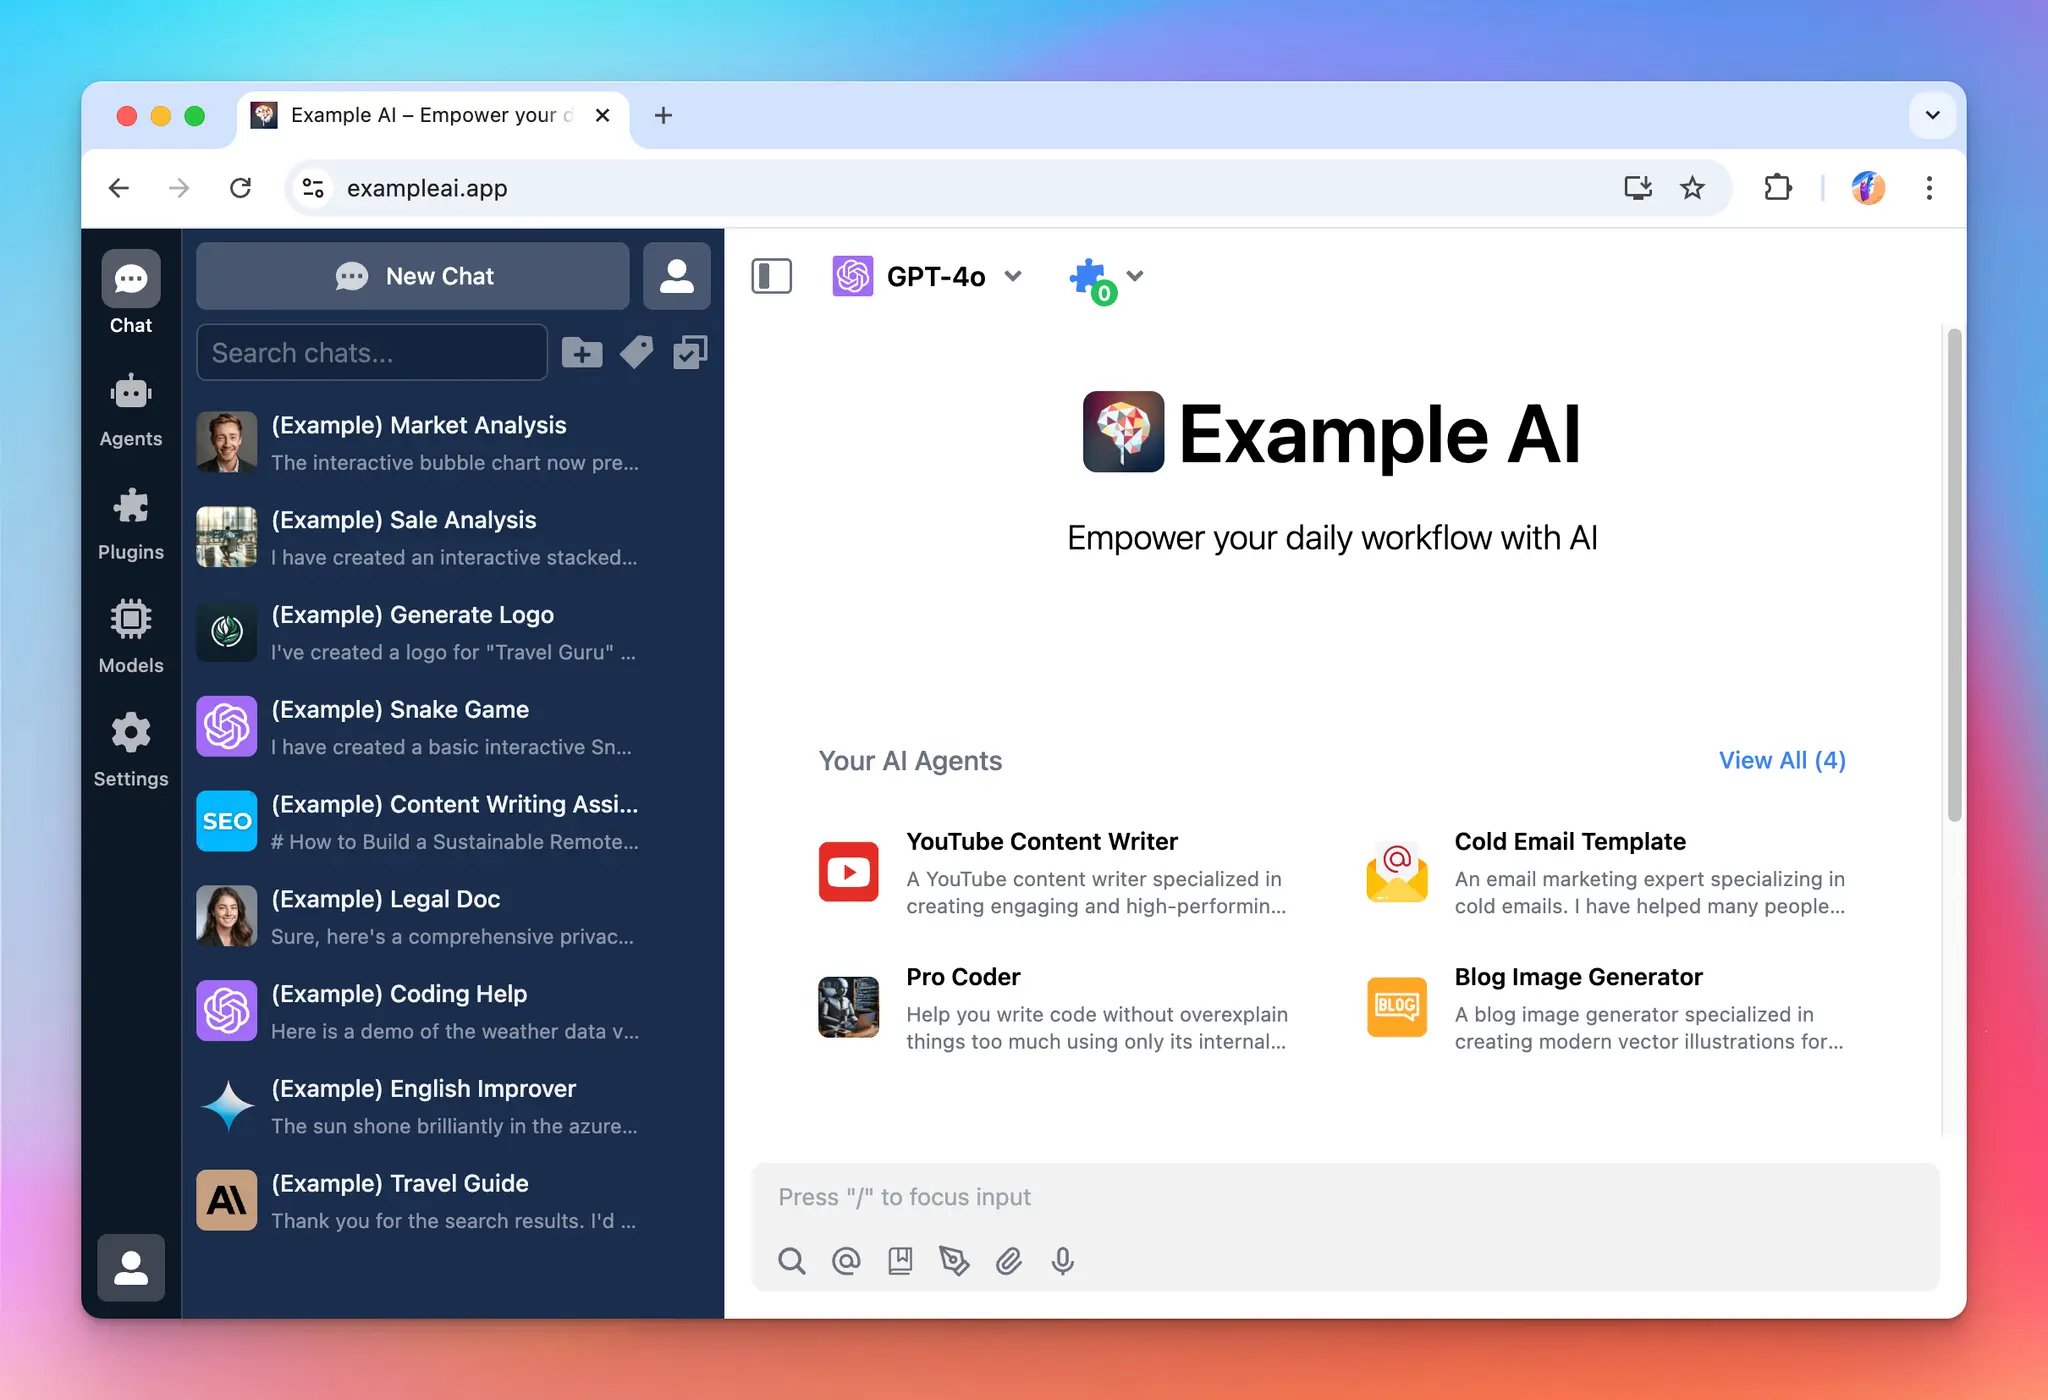
Create the Slack app for OAuth
To use the Slack Message Notifier plugin, I need a Slack app configured with OAuth. To begin, we need to create a Slack App. Visit the Slack API website (https://api.slack.com/apps) and click on “Create an App”.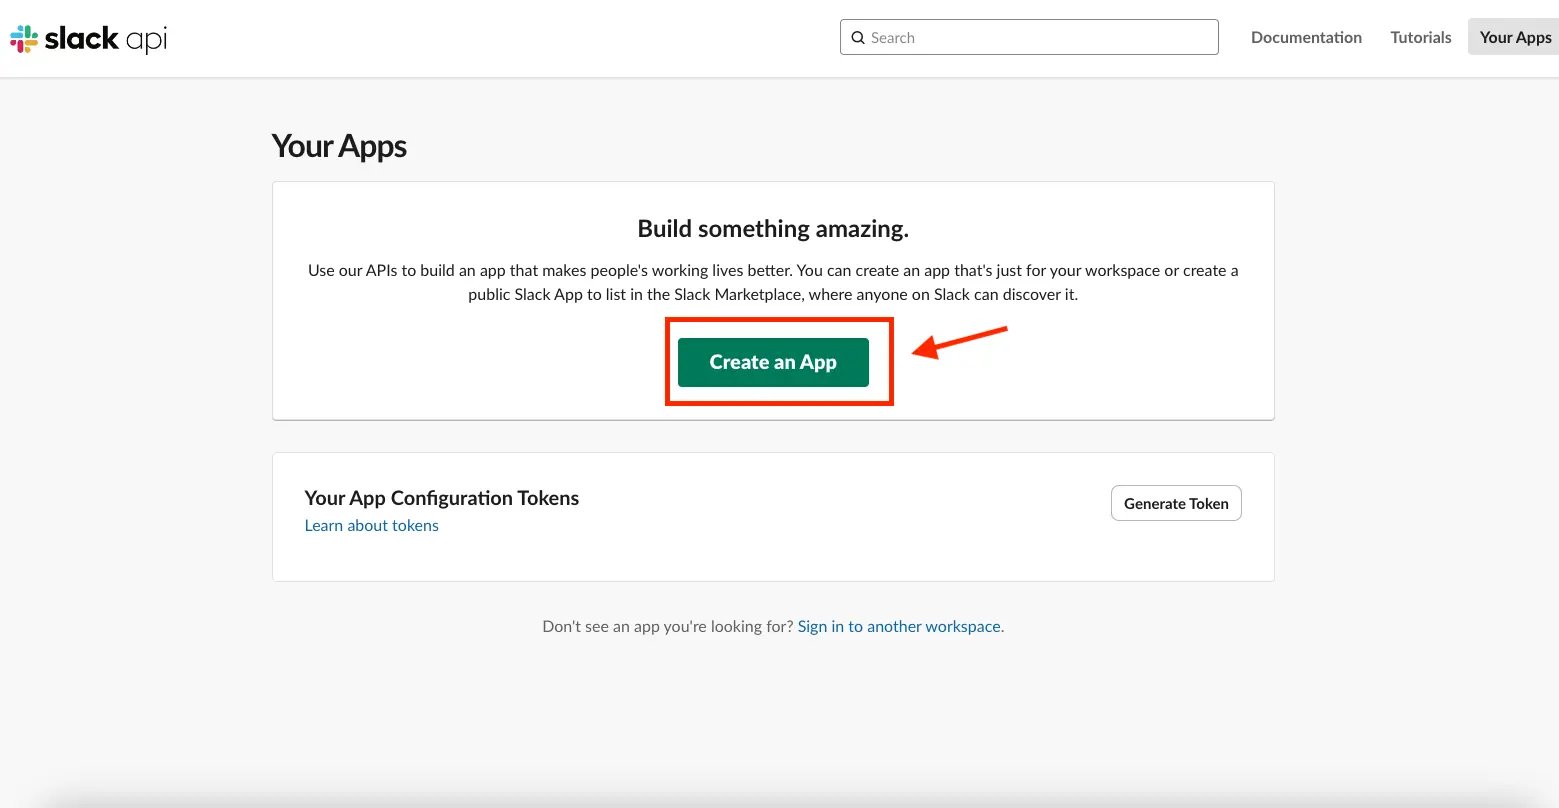
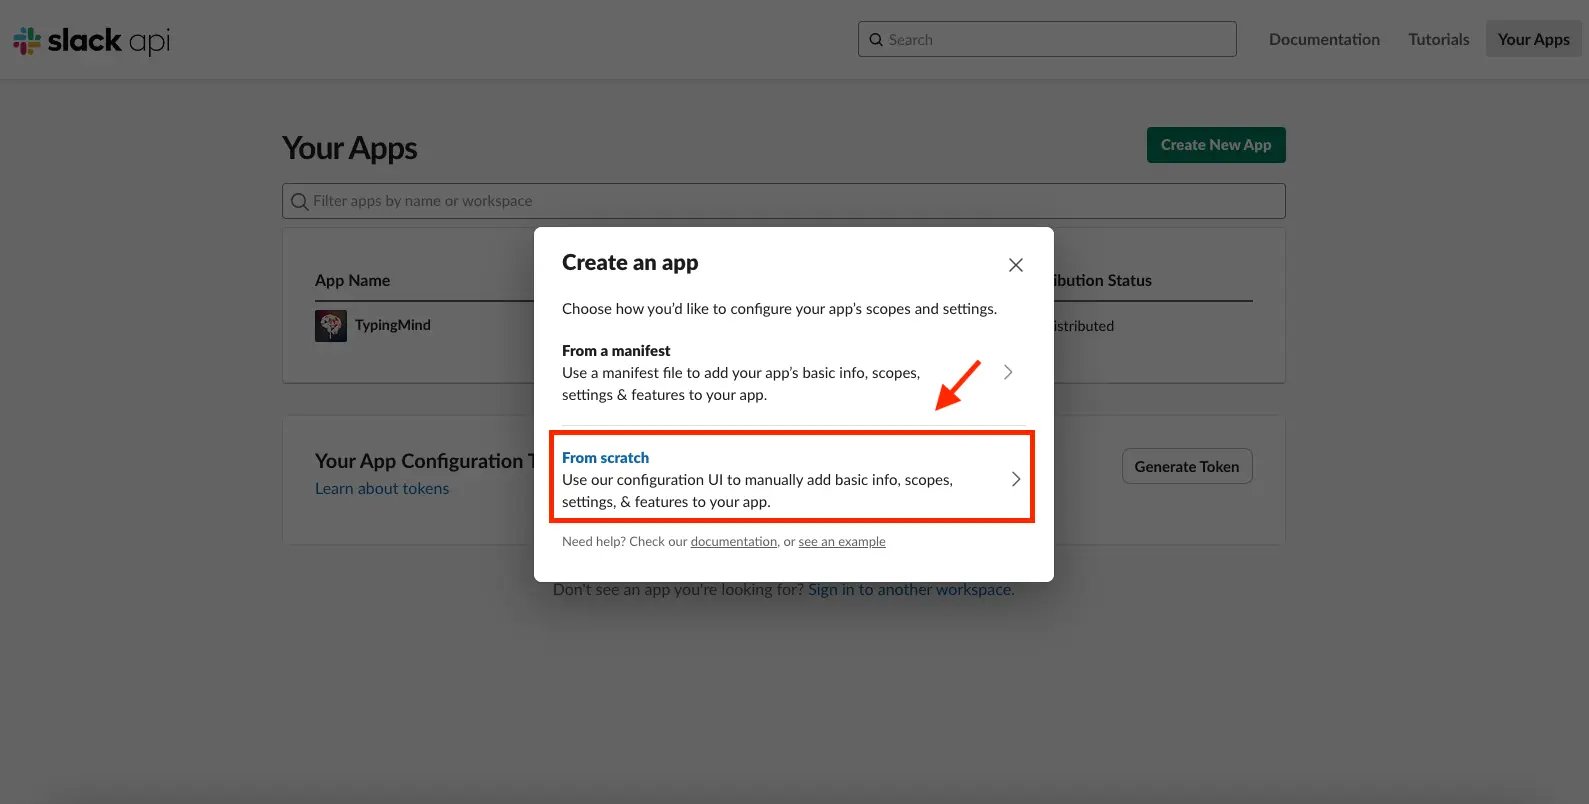
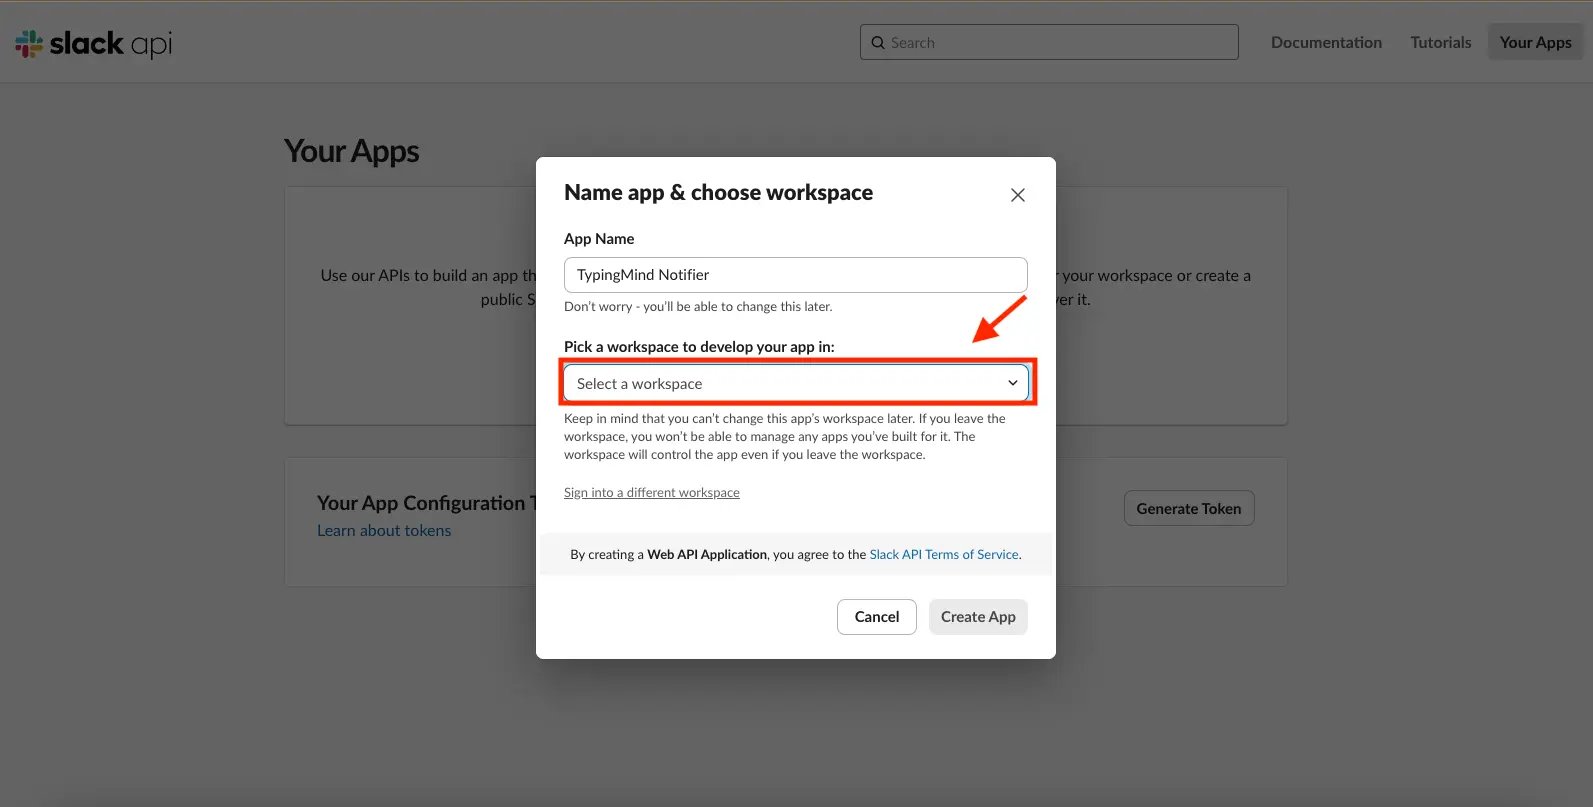
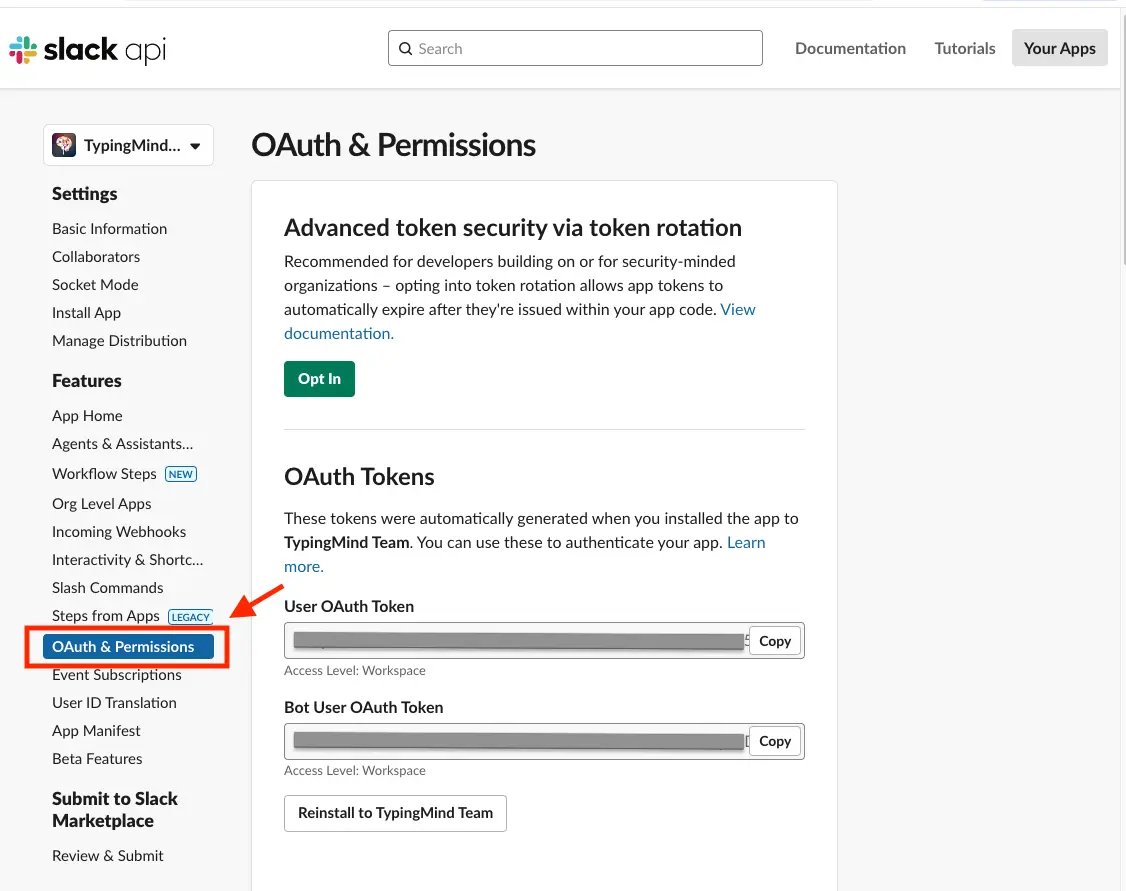
chat:write scope to your Bot Token Scopes.
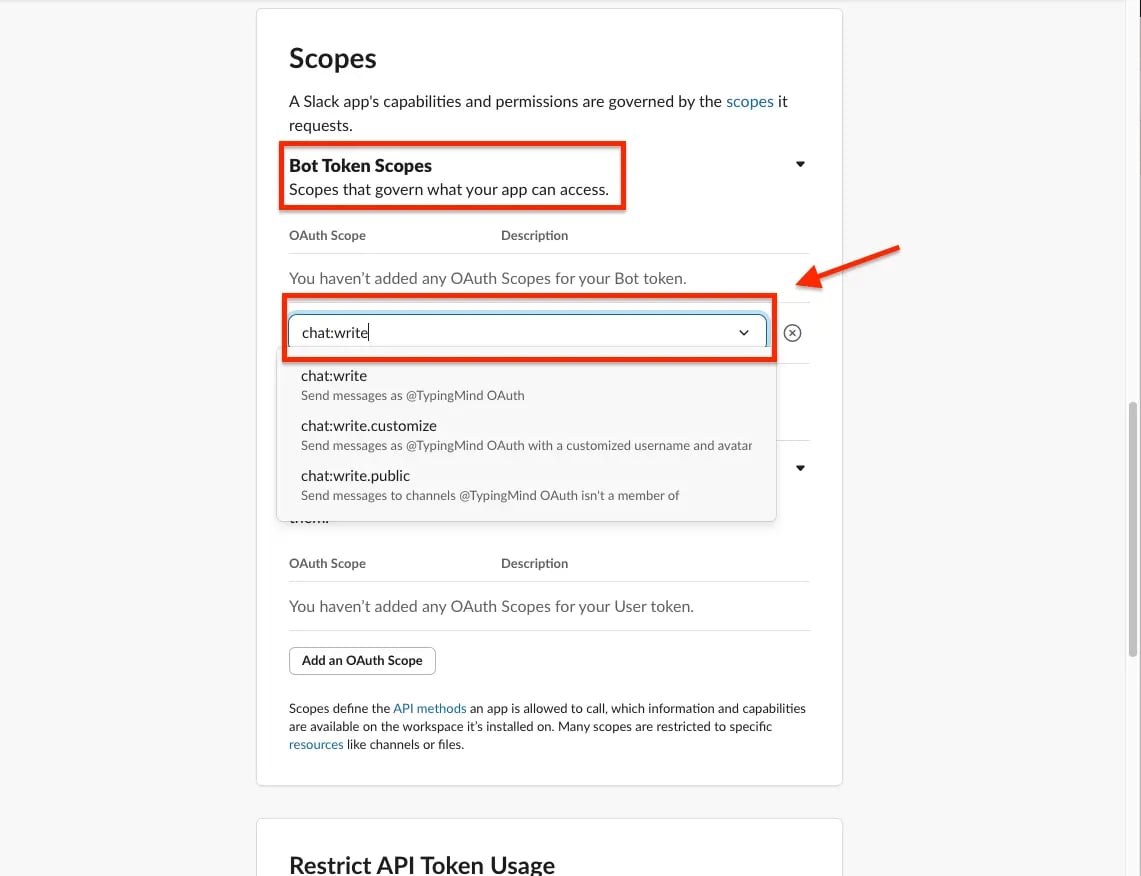
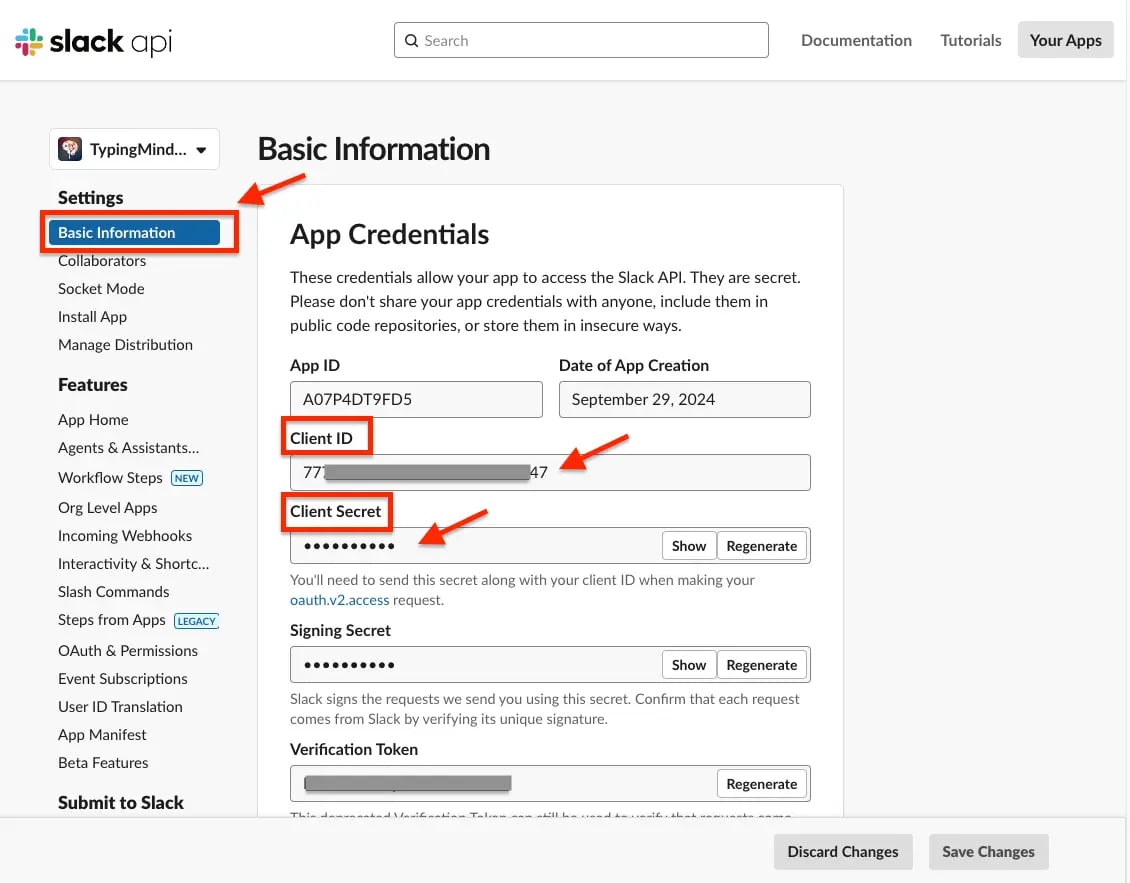
Integrate Slack App with Designated Channels
To enable sending messages to Slack channels, we need to integrate our app with the specific channels where we want to send messages. Let’s log in to your Slack Workspace and integrate the Slack app to your channel #general Click on the “Menu” icon in the top right, then choose “Edit settings”.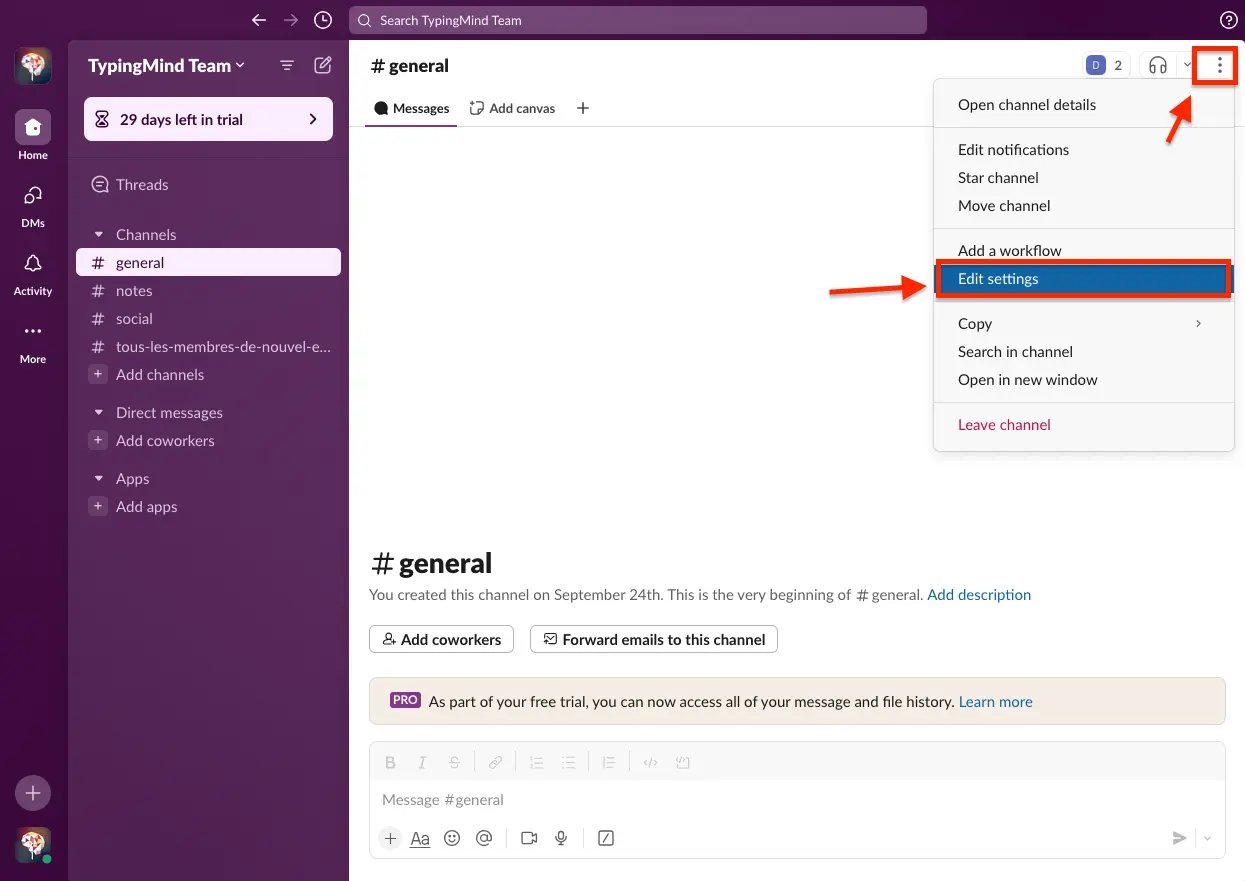
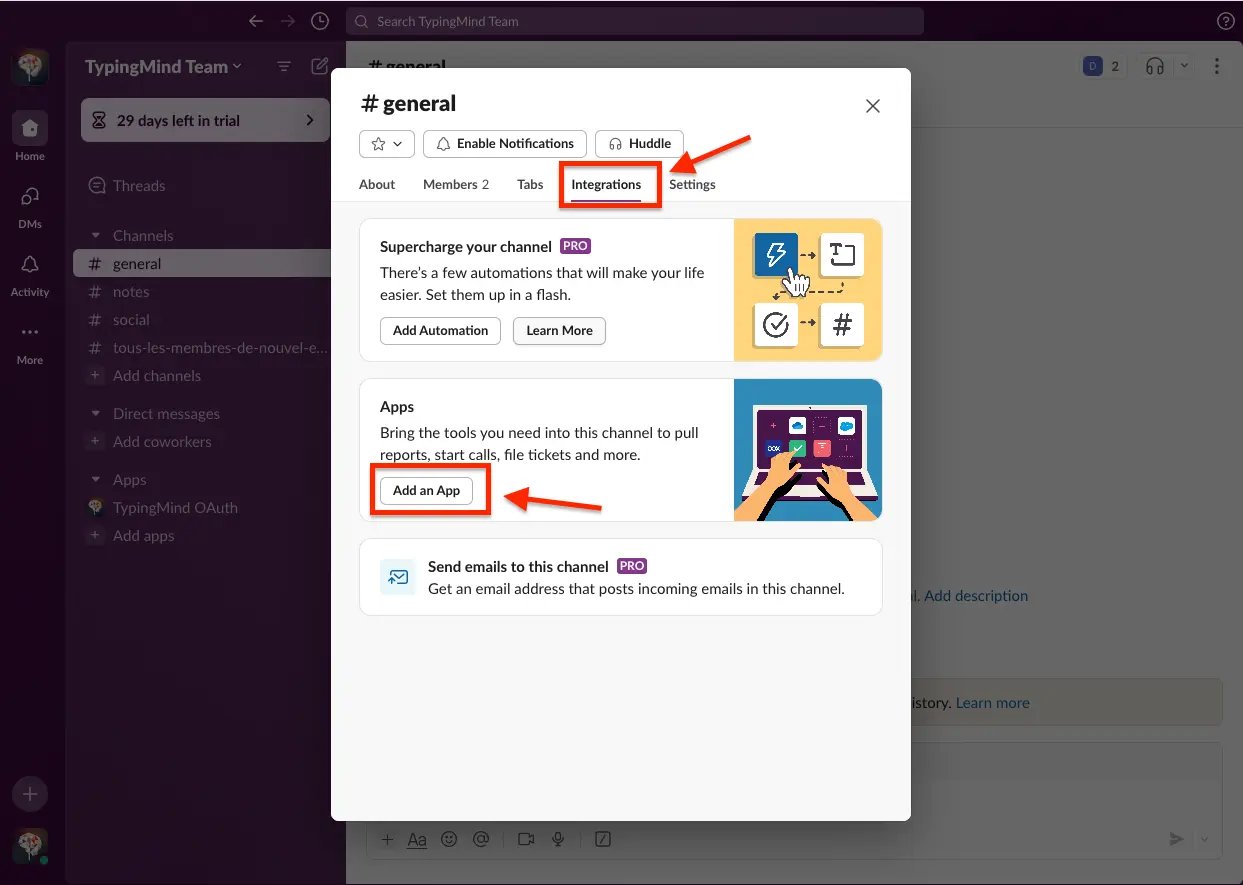
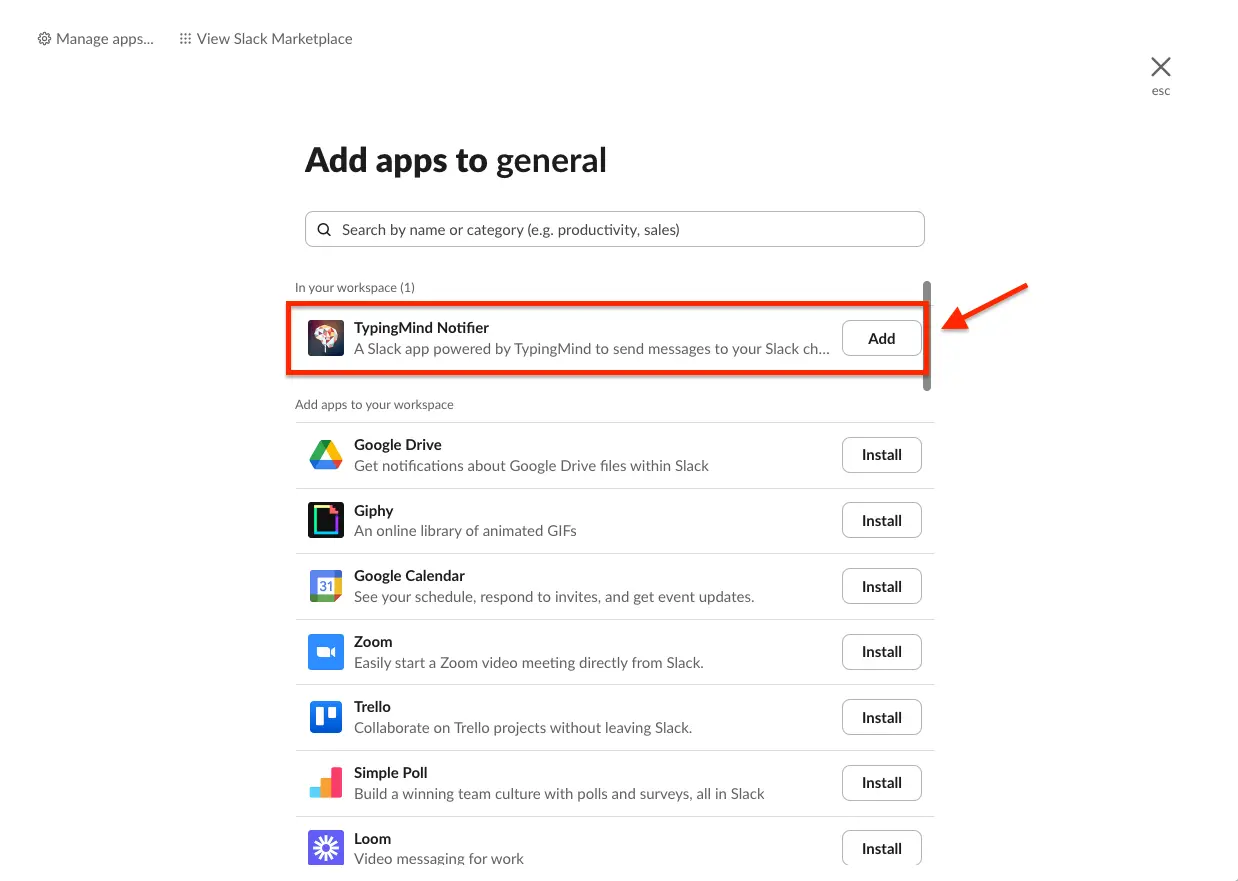 You can also set up for other channels based on your needs
Install the Slack Message Notifier plugin
Now that we have configured our Slack App for OAuth and integrated it to your channels. we can add the Slack Message Notifier plugin created at the beginning of this tutorial. Let’s go to the Plugin Repo URL and install it on your Plugins Page. When the plugin turned on, it asks for two things: the OAuth Client ID and OAuth Client Secret. Enter the Client ID and Client Secret you got in the previous step, then click “Save Credentials”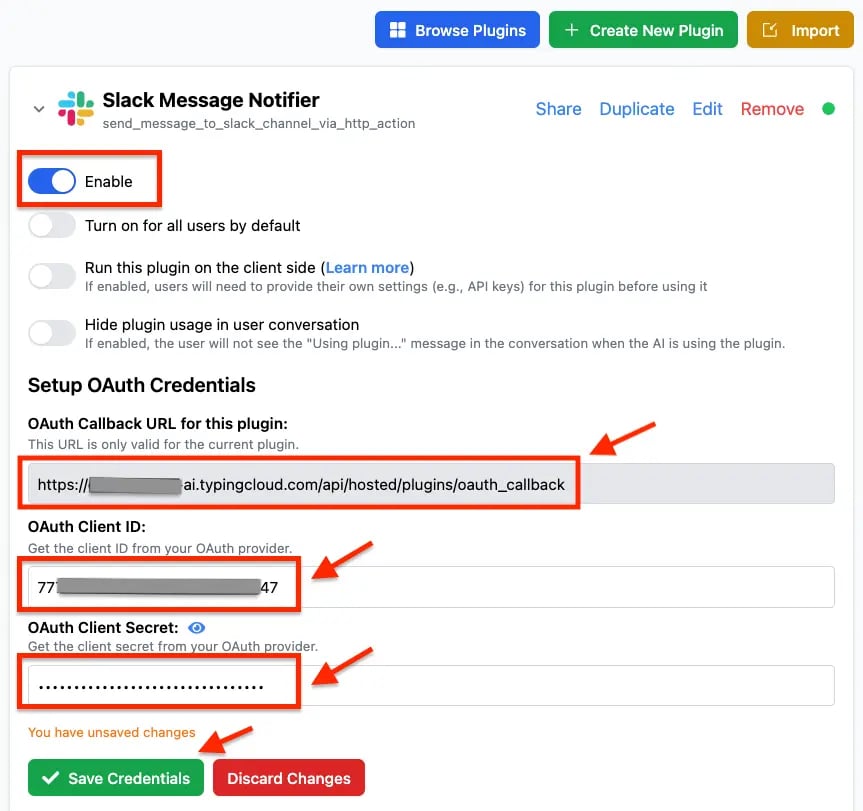
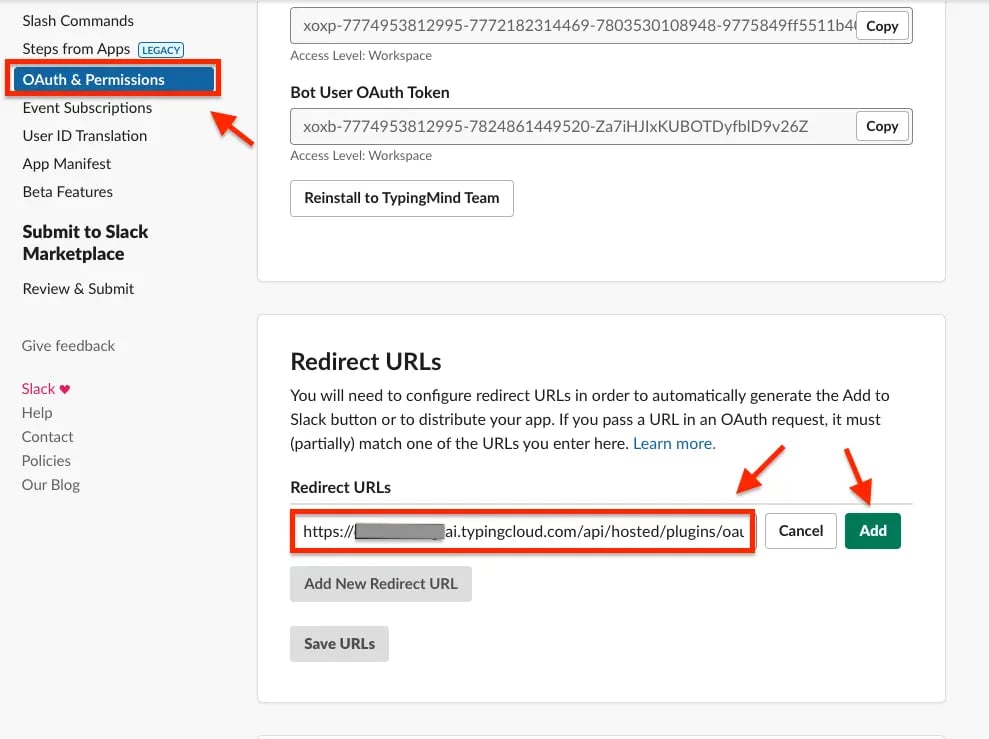
Part 3: Users use the plugin
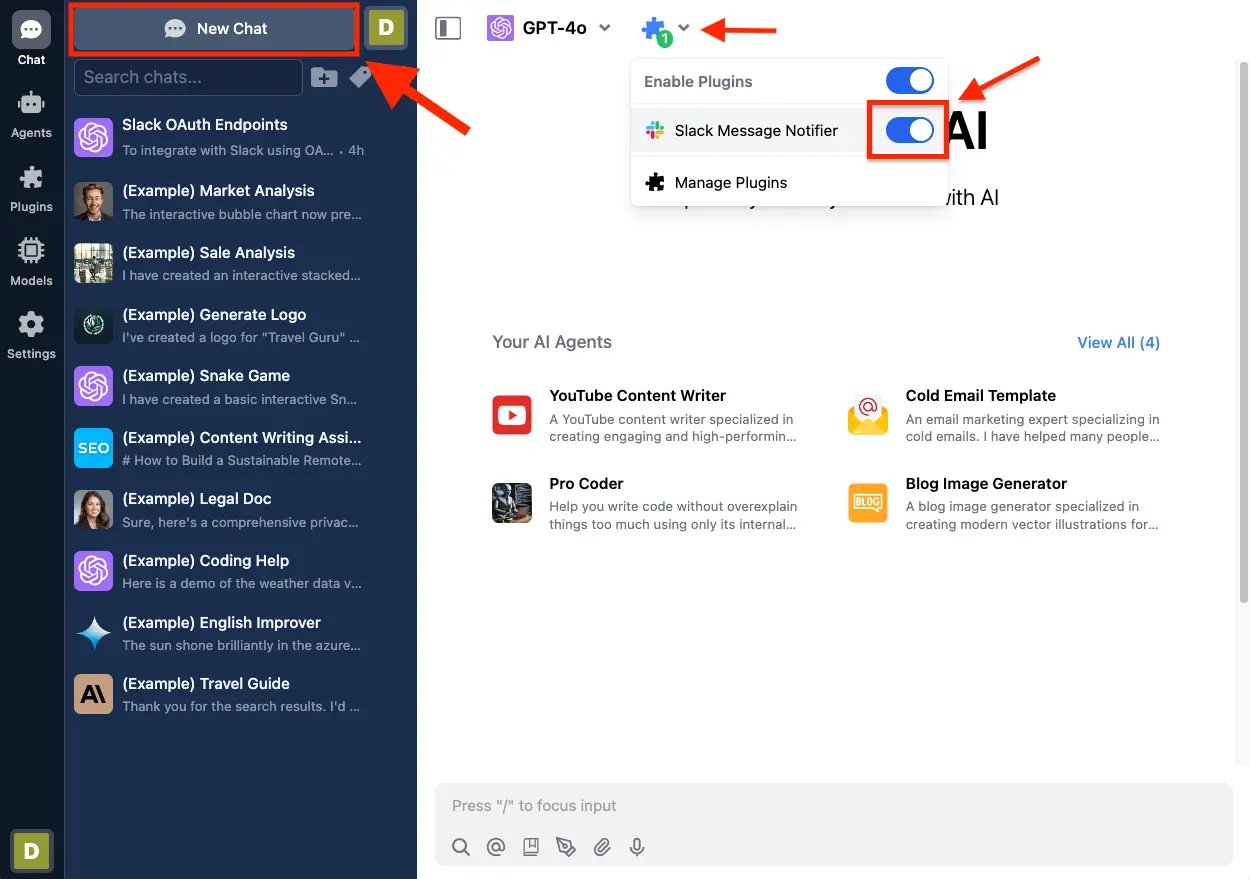
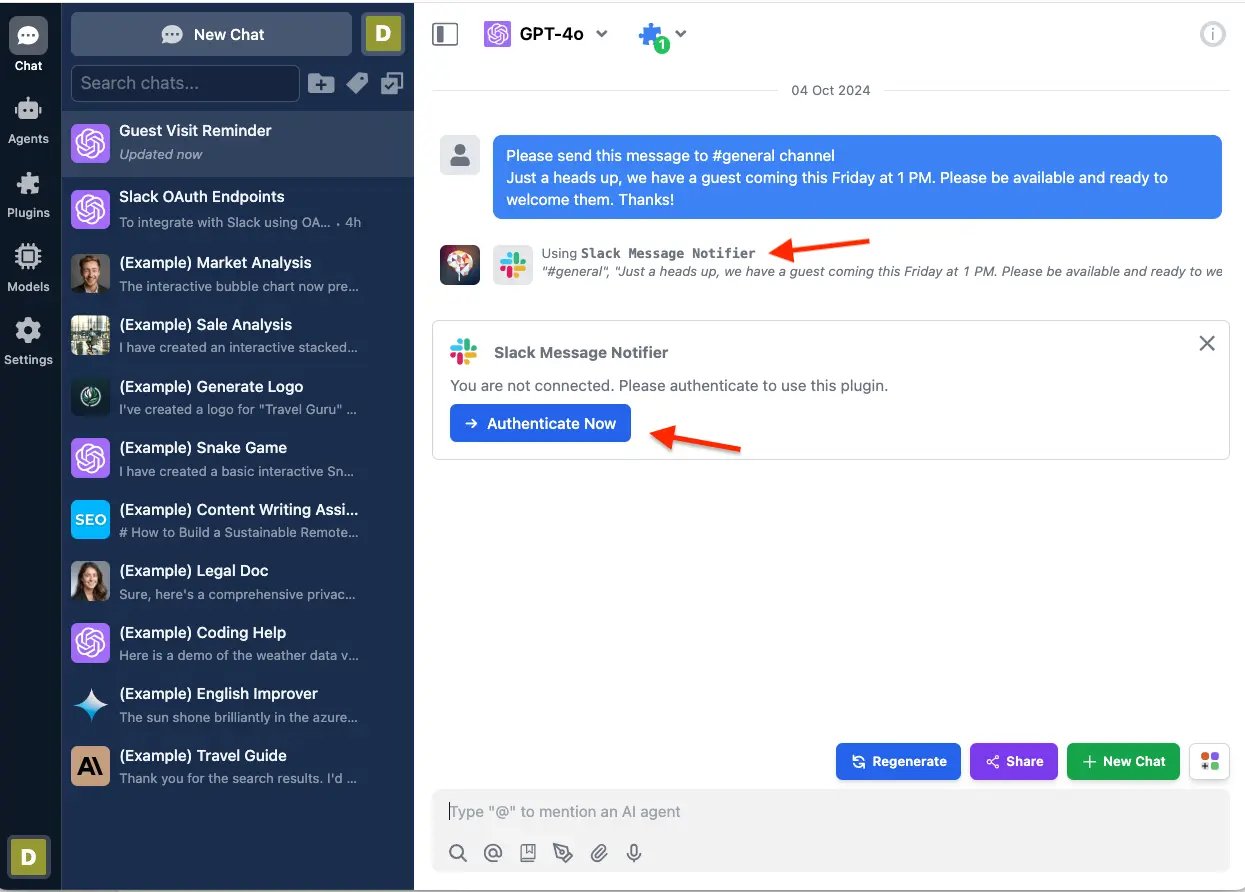
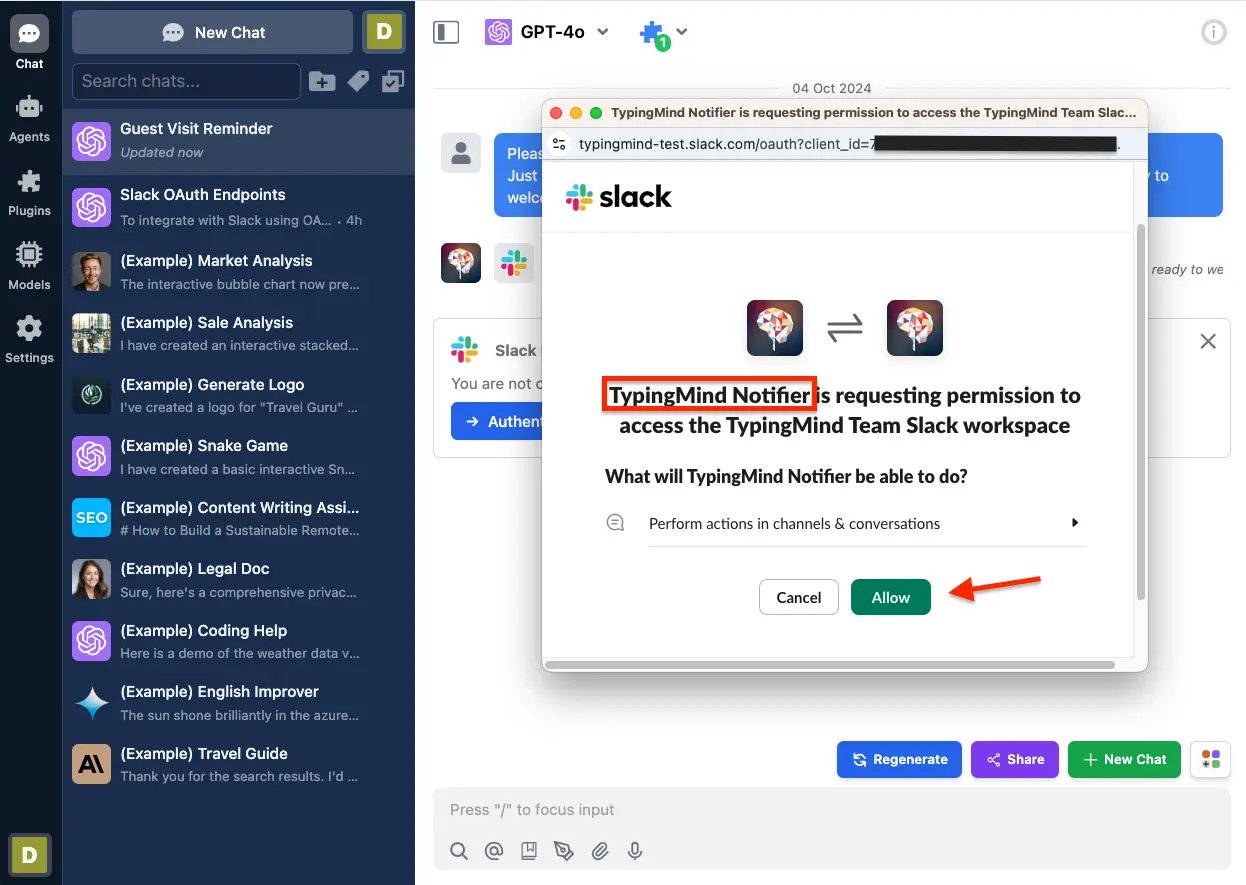
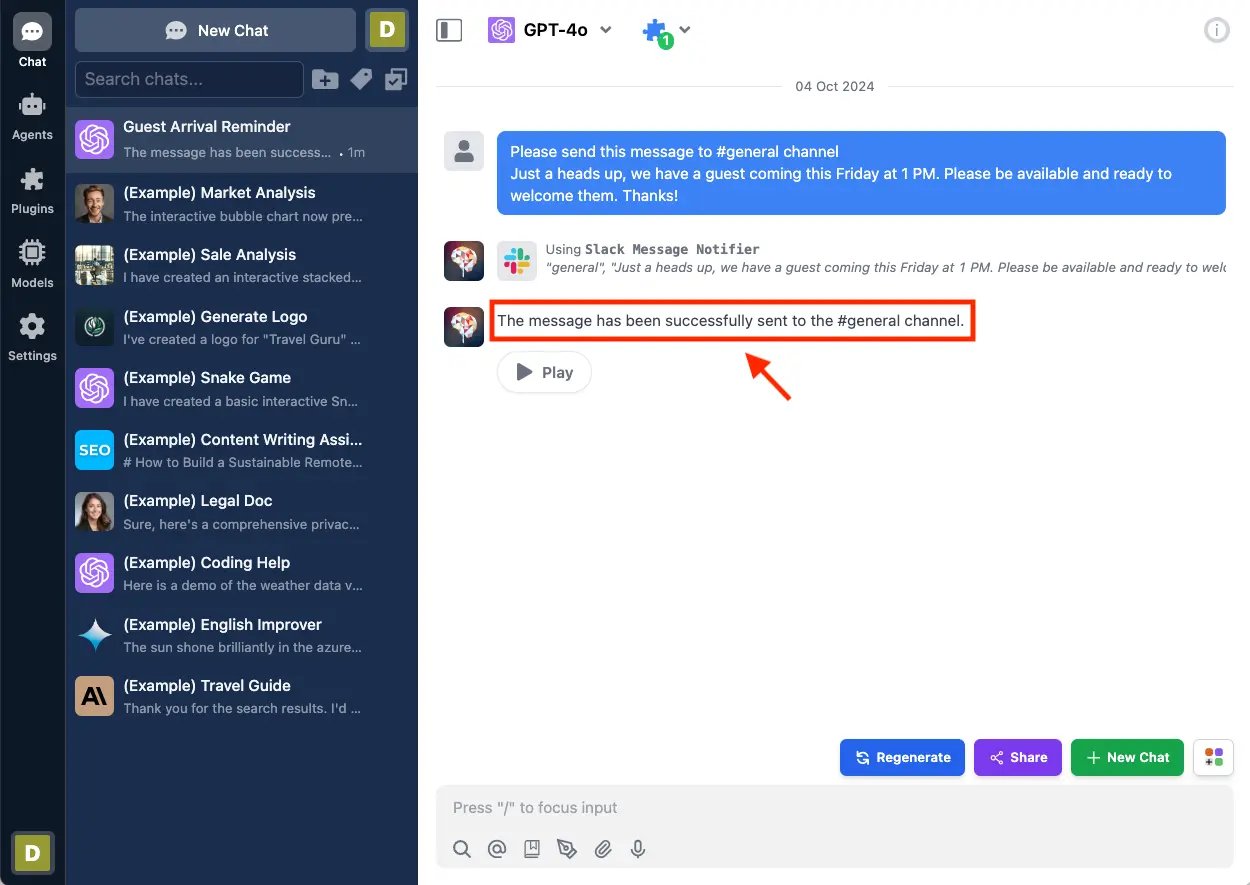
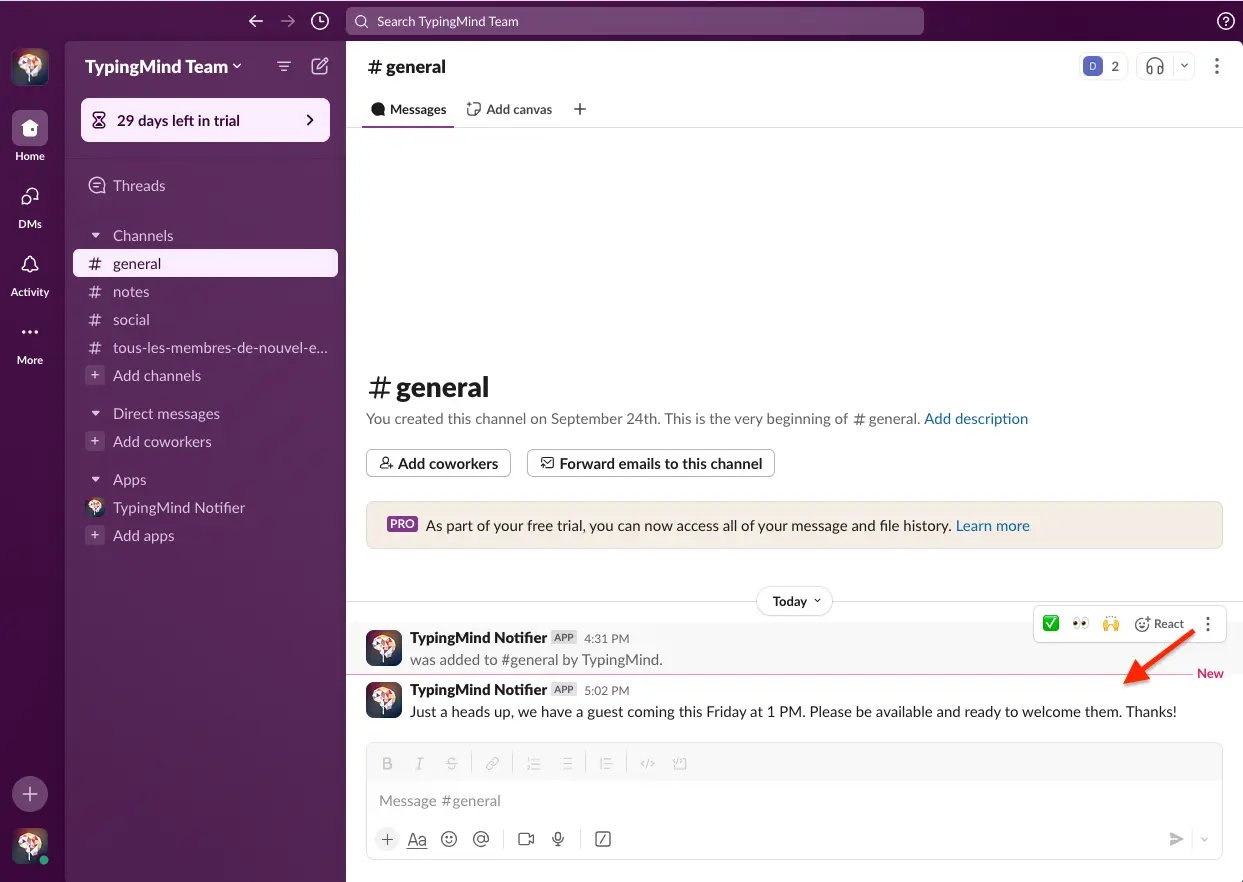
As a user, I will login to the Example AI instance and start using the Slack Message Notifier plugin.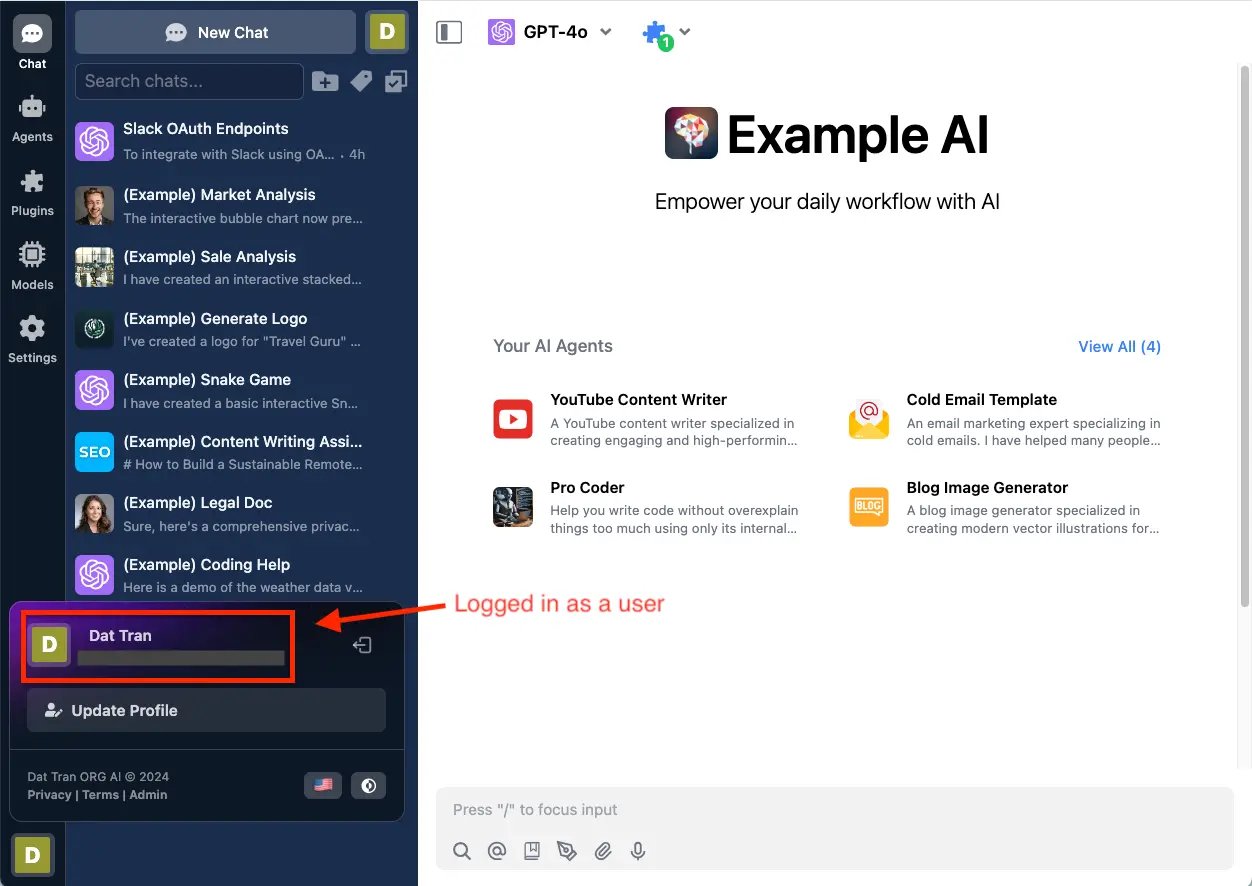
Conclusion
This tutorial covers three main roles in creating and using the Slack Message Notifier plugin:1. As a Plugin Developer:
- Create the Slack Message Notifier plugin for TypingMind
- Set up the plugin structure and functionality
2. As a User Admin:
- Create and configure a Slack app for OAuth authentication
- Install and set up the plugin in a TypingMind instance
- Integrate the Slack app with specific channels
3. As a User:
- Enable the Slack Message Notifier plugin in TypingMind chat
- Authenticate with Slack when first using the plugin
- Use the AI to send messages to Slack channels