
TypingMind Team is an ultimate AI solution designed for teams, businesses, and communities.
With TypingMind Team, you can create a chat instance under your domain with custom branding, connect it to your training data, and gain full control and customization via the Admin Panel, all while ensuring maximum privacy and security.
Let’s dive into the details of what you can do with TypingMind Team and a step-by-step to set up your own chatbot with TypingMind Team.
What can you do with TypingMind Team?Build a collaborative AI workspace for your team under your brand nameCentralized control with the Admin DashboardConnect to your internal knowledge baseLeverage multiple AI modelsTrack usage and monitor performanceOptimize your workflow through task automationIntegrate into your existing workflowsStep-by-step to set up TypingMind TeamStep 1: Create a new chat instanceStep 2: Set up API Keys Step 3: Choose and subscribe to a plan to activate your 14-day trialStep 4: Your chat instance is now activated!Step 5: Invite members to your chat instanceStep 6: Customize your chat instance1. Customize the AI workspace with your branding2. Control which features should be available on the workspaceStep 7: Train the AI assistant with your company knowledge baseStep 8: Build shared resources for your team1. Create Prompt Library2. Develop an AI Agents collection and pin them on the chat UI3. Pre-configure pluginsStep 9: Restrict member's access to specific chat models and resourcesStep 10: Access controlStep 11: Integrate your chat instance into your existing workflow1. Embed as a chat widget on your website2. Use our APIStep 12: Test and monitor your AI workspace1. Test the output quality2. Monitor user - AI model interaction 3. Track user usageThat’s it!
What can you do with TypingMind Team?
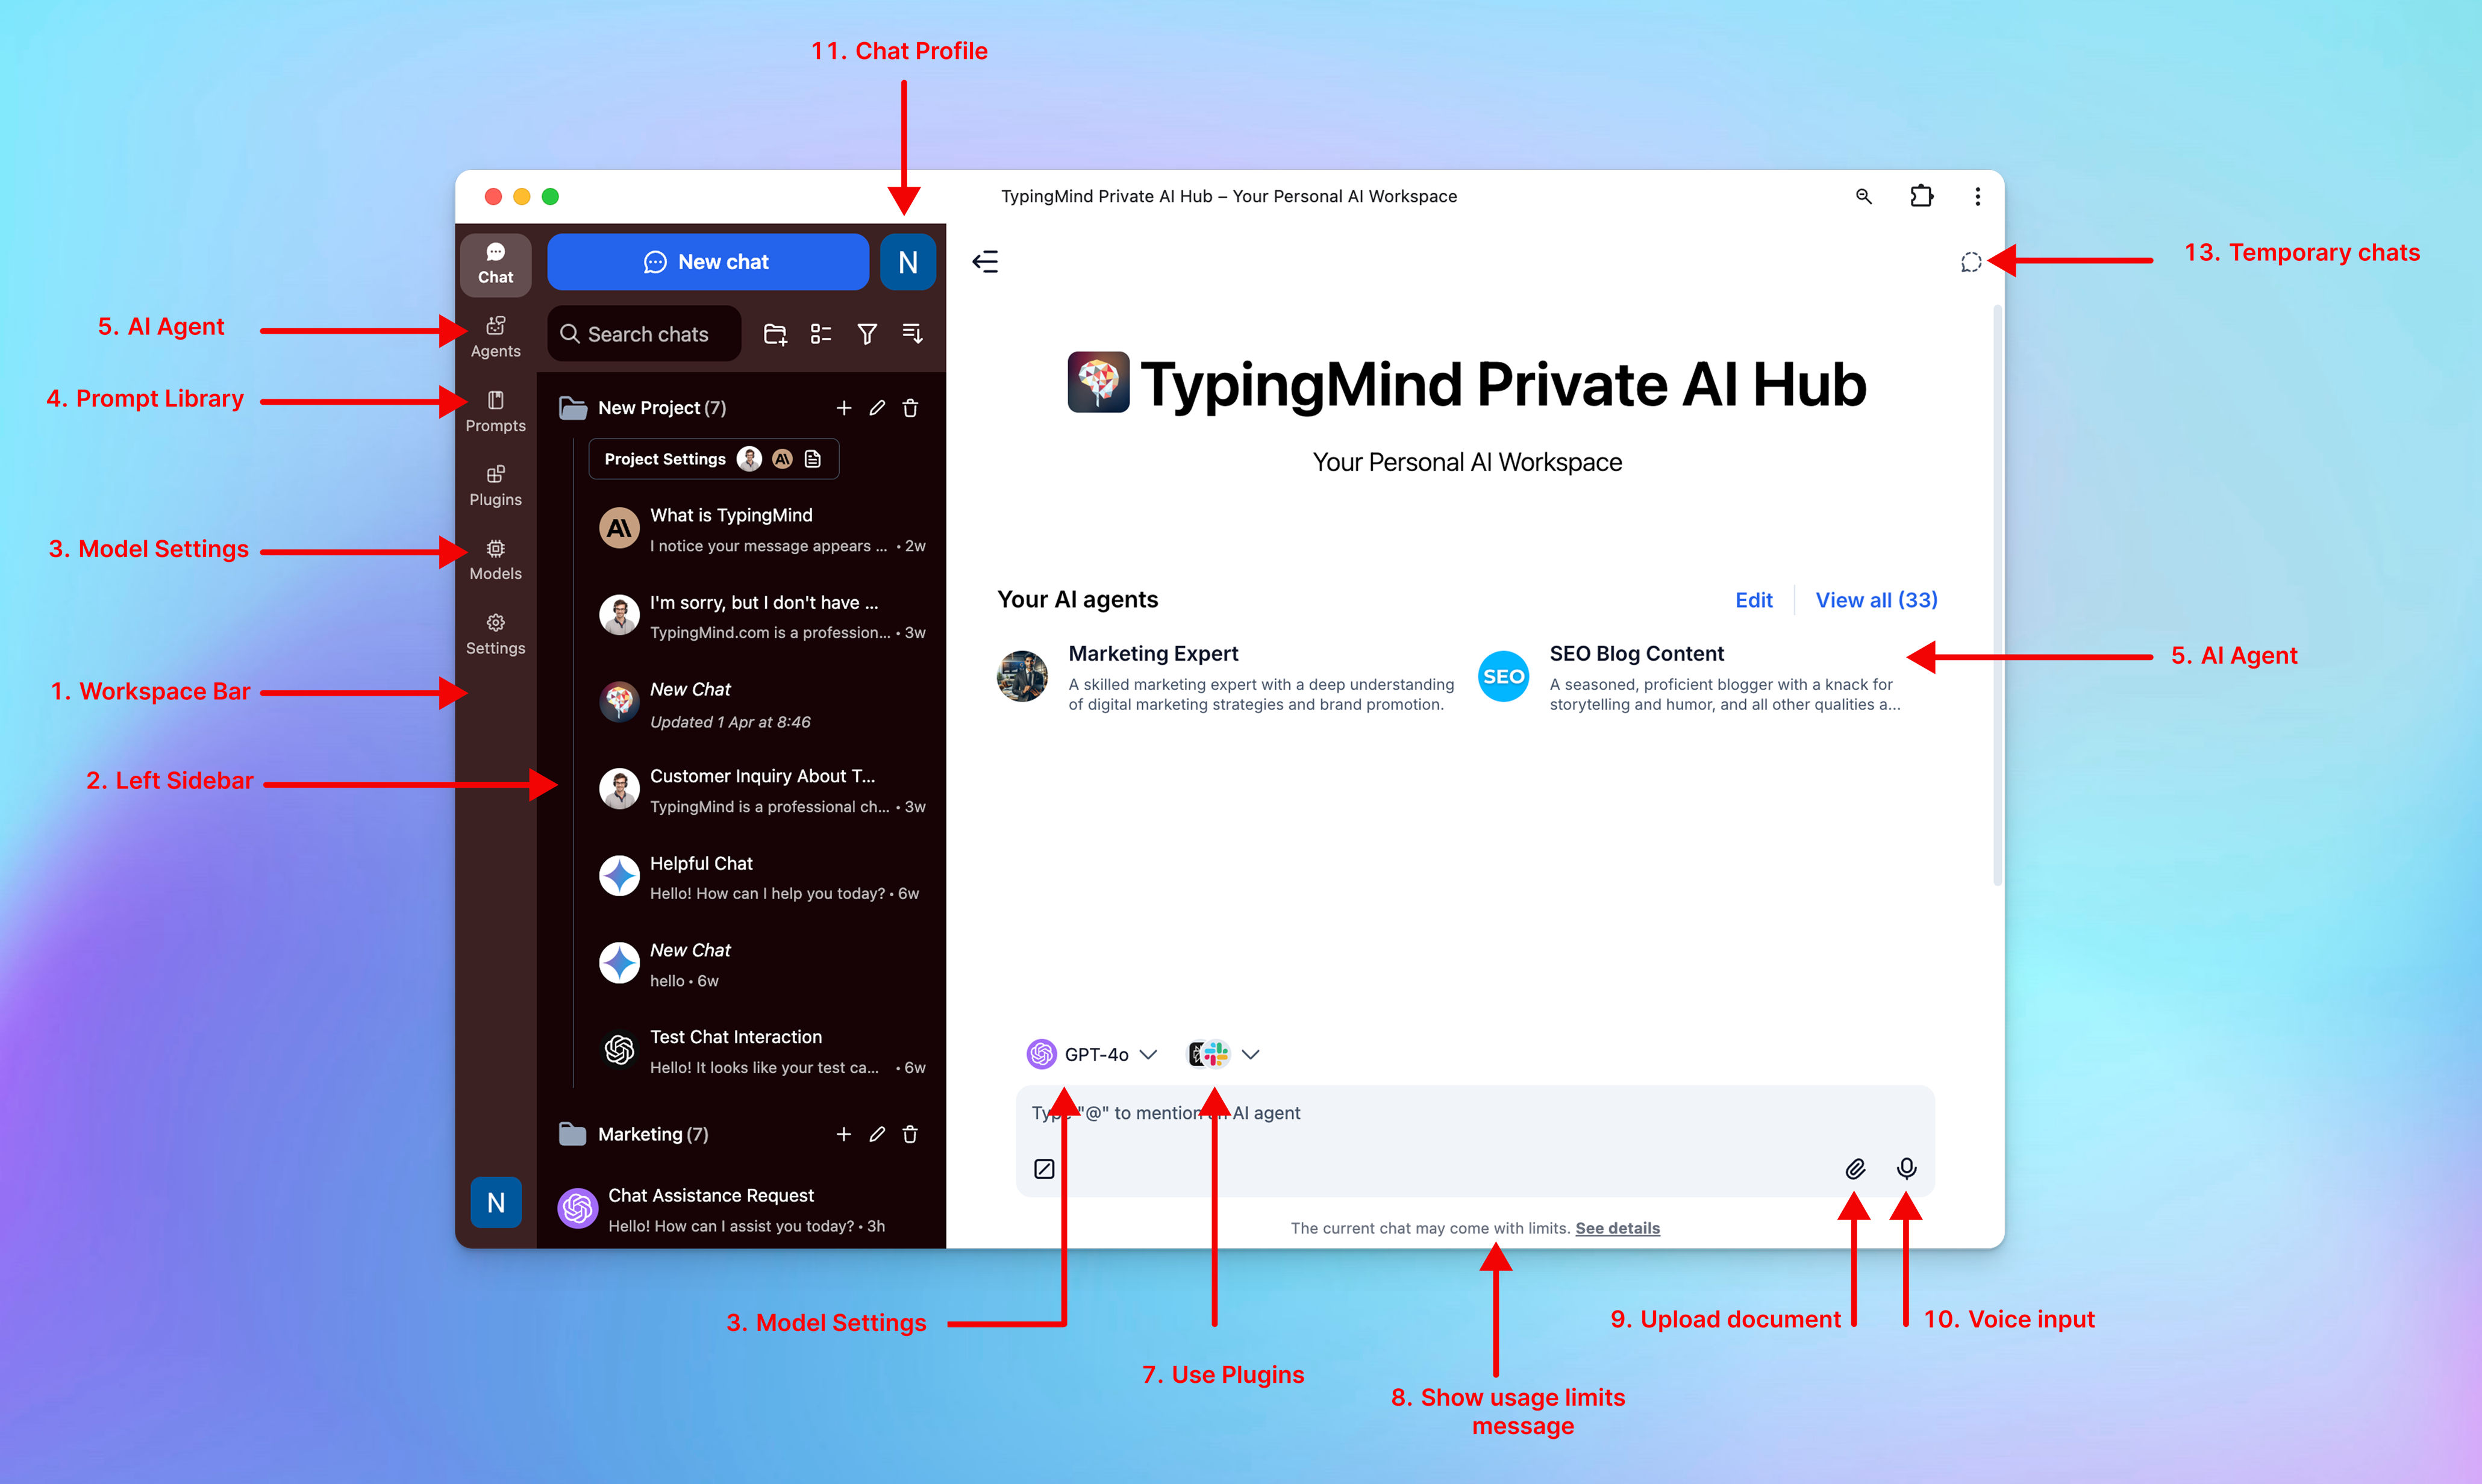
Build a collaborative AI workspace for your team under your brand name
TypingMind Team offers a shared AI workspace with:
- Built-in prompt library
- Built-in AI agents
- Built-in plugins
And you can also provide custom branding and domain for the chat interface!
Centralized control with the Admin Dashboard
As an Admin, you can fully customize and control the AI Agent with the following options:
- Branded interface and custom domain
- Manage team members and their access
- Prepare shared prompts, AI Agents, and Plugins
- Set up Single Sign-on, JWT authentication, etc.
- Monitor model usage insights

Connect to your internal knowledge base
Integrate the AI with your custom knowledge base to get more personalized and accurate responses to your domain-specific queries.
Leverage multiple AI models
Each model offers specific advantages, pick your preferred models for optimal performance such as:
- OpenAI: GPT-5, GPT-4.5, GPT-4.1, etc.
- Anthropic Claude: Claude Sonnet 4.5, Claude Haiku 4.5, etc.
- Google Gemini: Gemini 2.5 Pro, Gemini 2.5 Flash, etc.
- Grok: Grok 4, Grok Code
- and more!
Track usage and monitor performance
Maintain control over your AI Agent:
- Cost management: set usage limits to control AI usage across teams.
- Chat logs: review chat logs of all AI-generated content, conversations, and analytics to ensure quality.
- Analytics dashboard allows you to track user usage more easily.

Optimize your workflow through task automation
Reduce repetitive, manual workloads by using our API or custom plugins:
Integrate into your existing workflows
Easily integrate TypingMind Team into platforms like Telegram, Slack, and Discord for quick access to useful information.
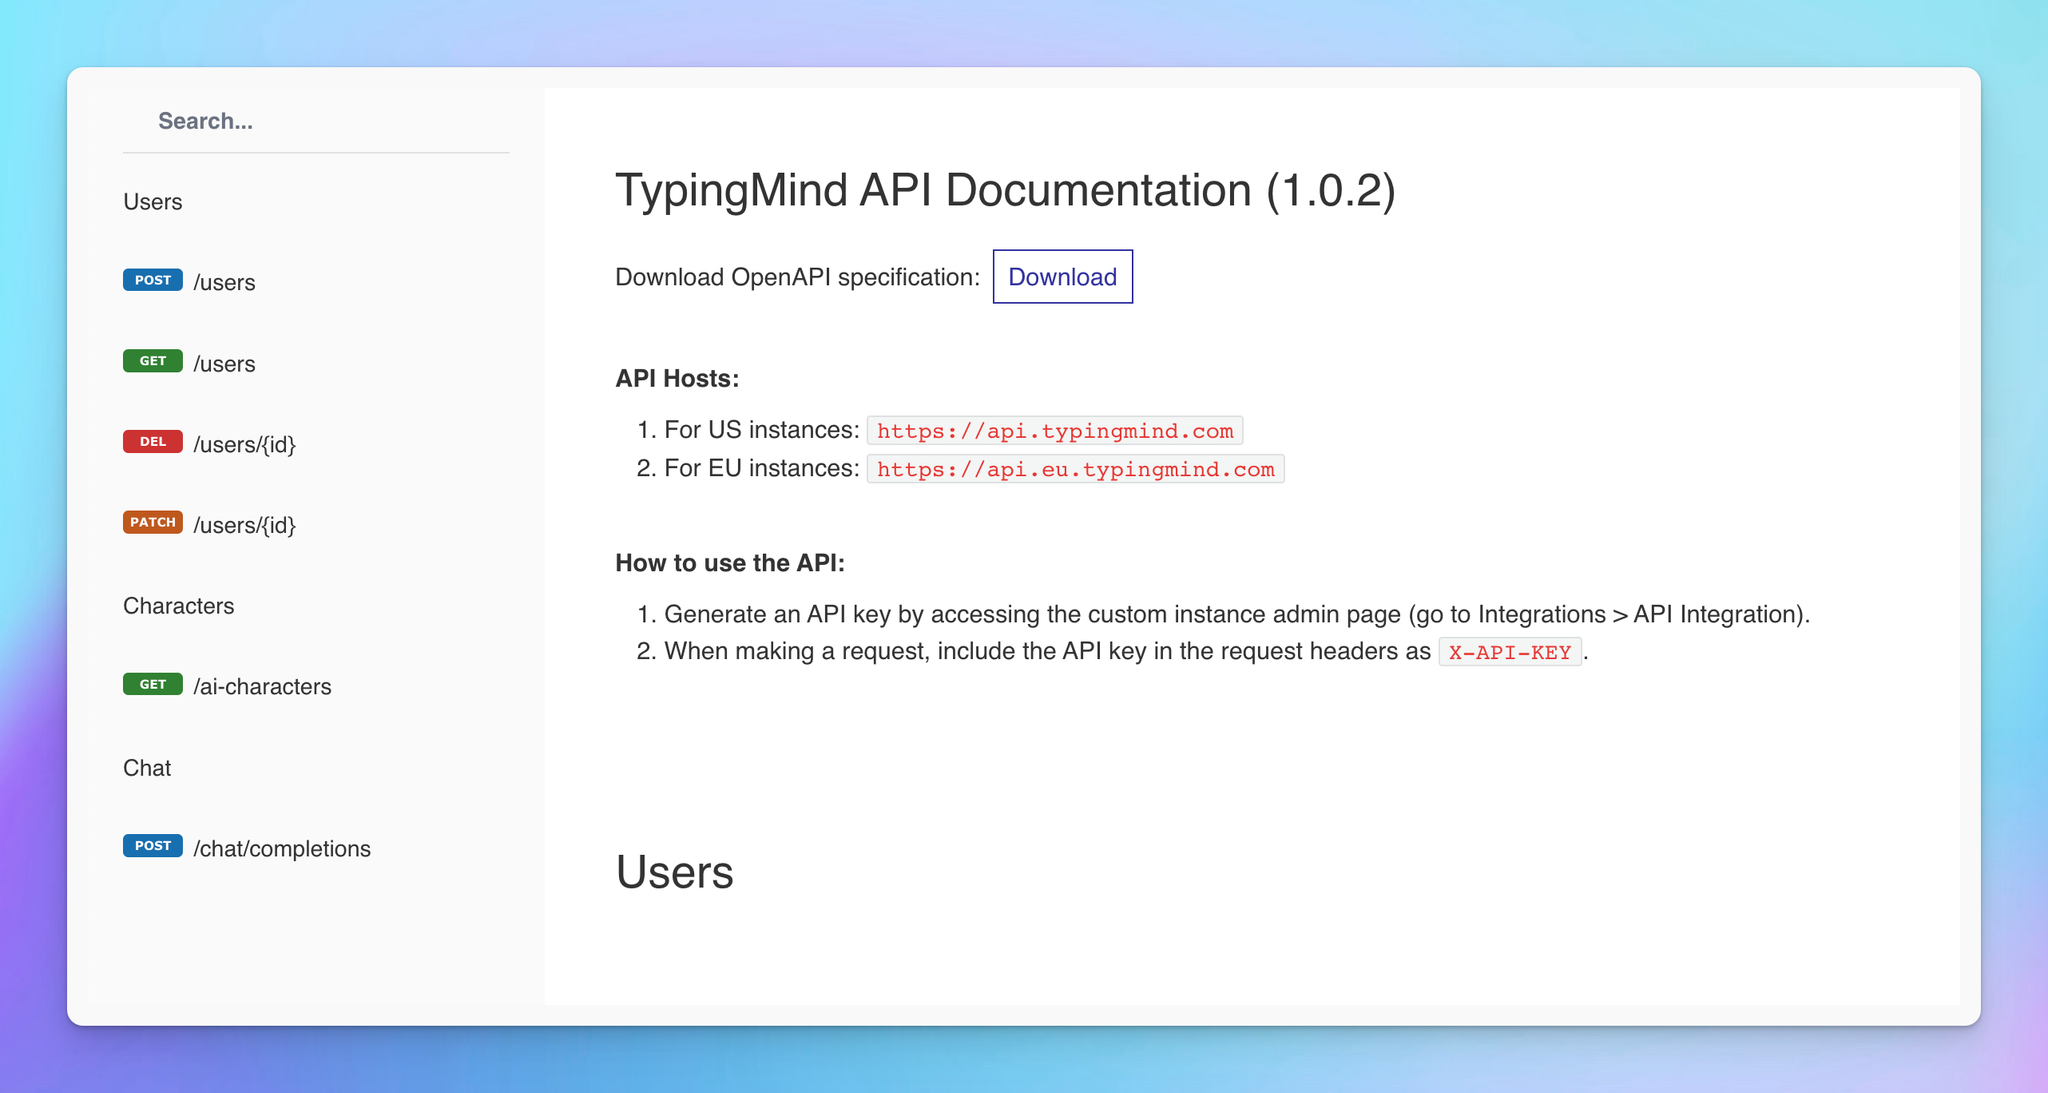
Our API doc: https://api.typingmind.com/docs
Let’s see how to implement these features on TypingMind Team!
Step-by-step to set up TypingMind Team
Step 1: Create a new chat instance
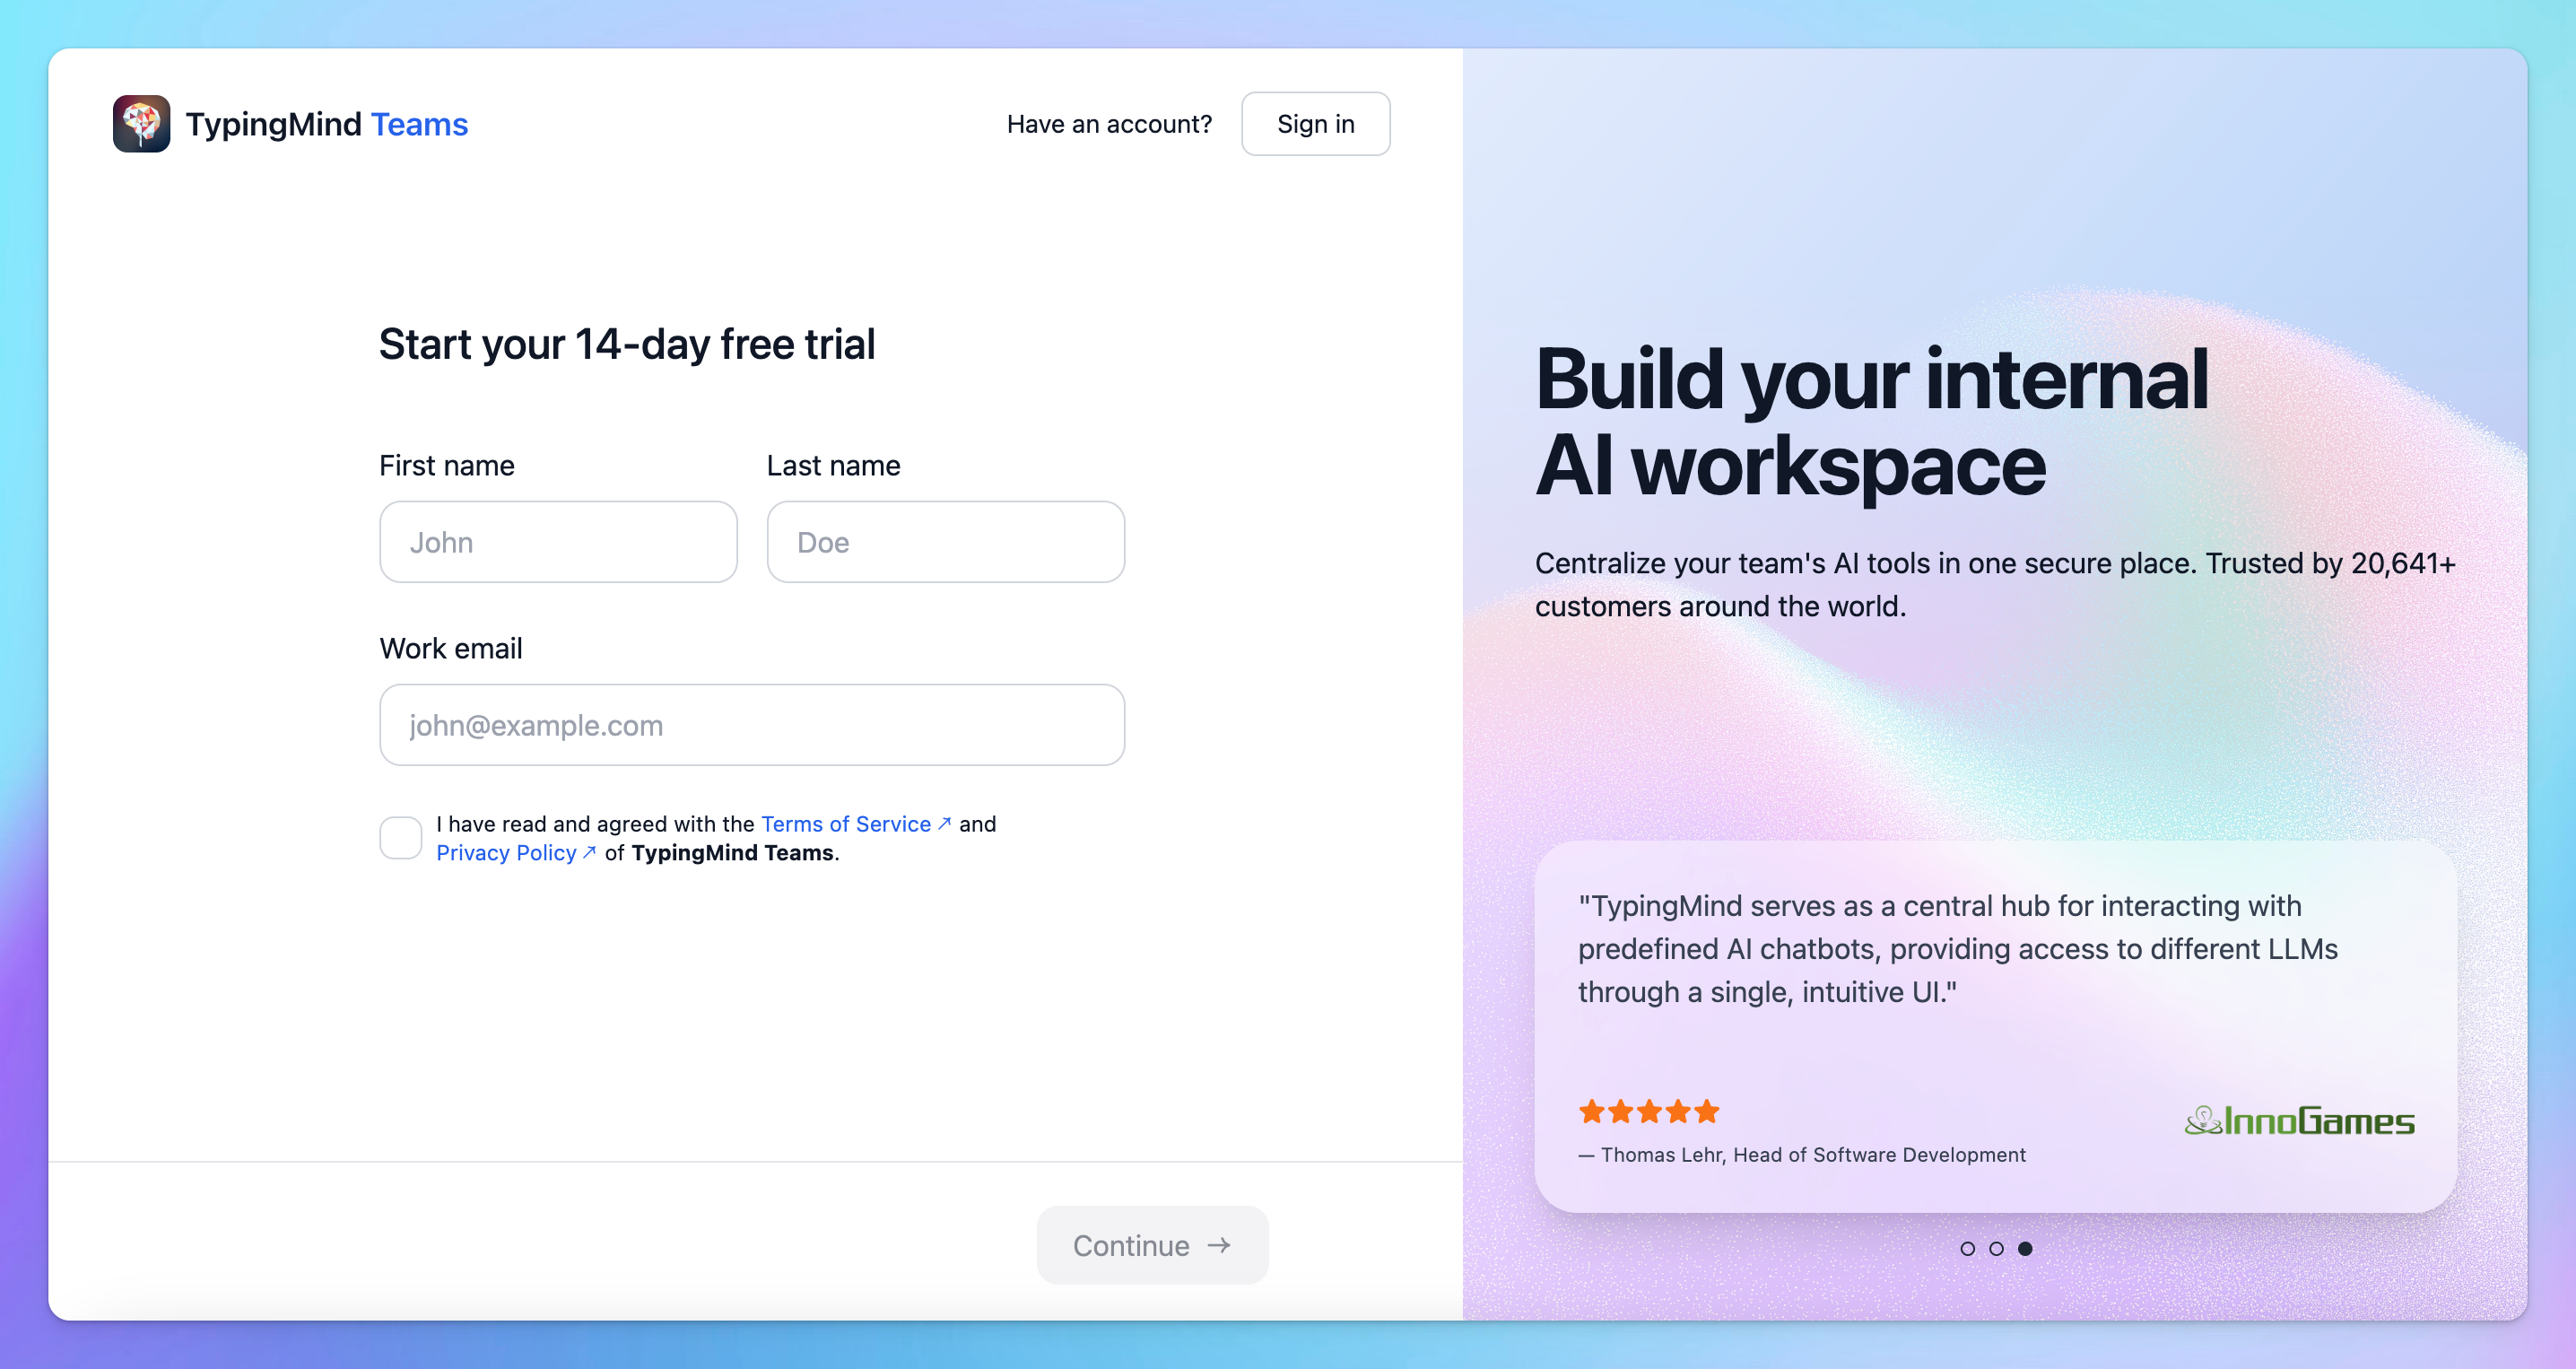
Start by creating a new chat instance at Start by creating a new chat instance at https://custom.typingmind.com/signup (14-day free trial, no upfront cost)
A "Chat instance" or an "instance" is a chat interface you created when signing up for an account on TypingMind Custom. You can create multiple chat instances for multiple purposes. Each Chat instance is tied to one subscription, different set of API keys, and runs on one domain.
- After filling in all the needed information, a verification email will be sent to your inbox so you can verify the newly created chat instance.
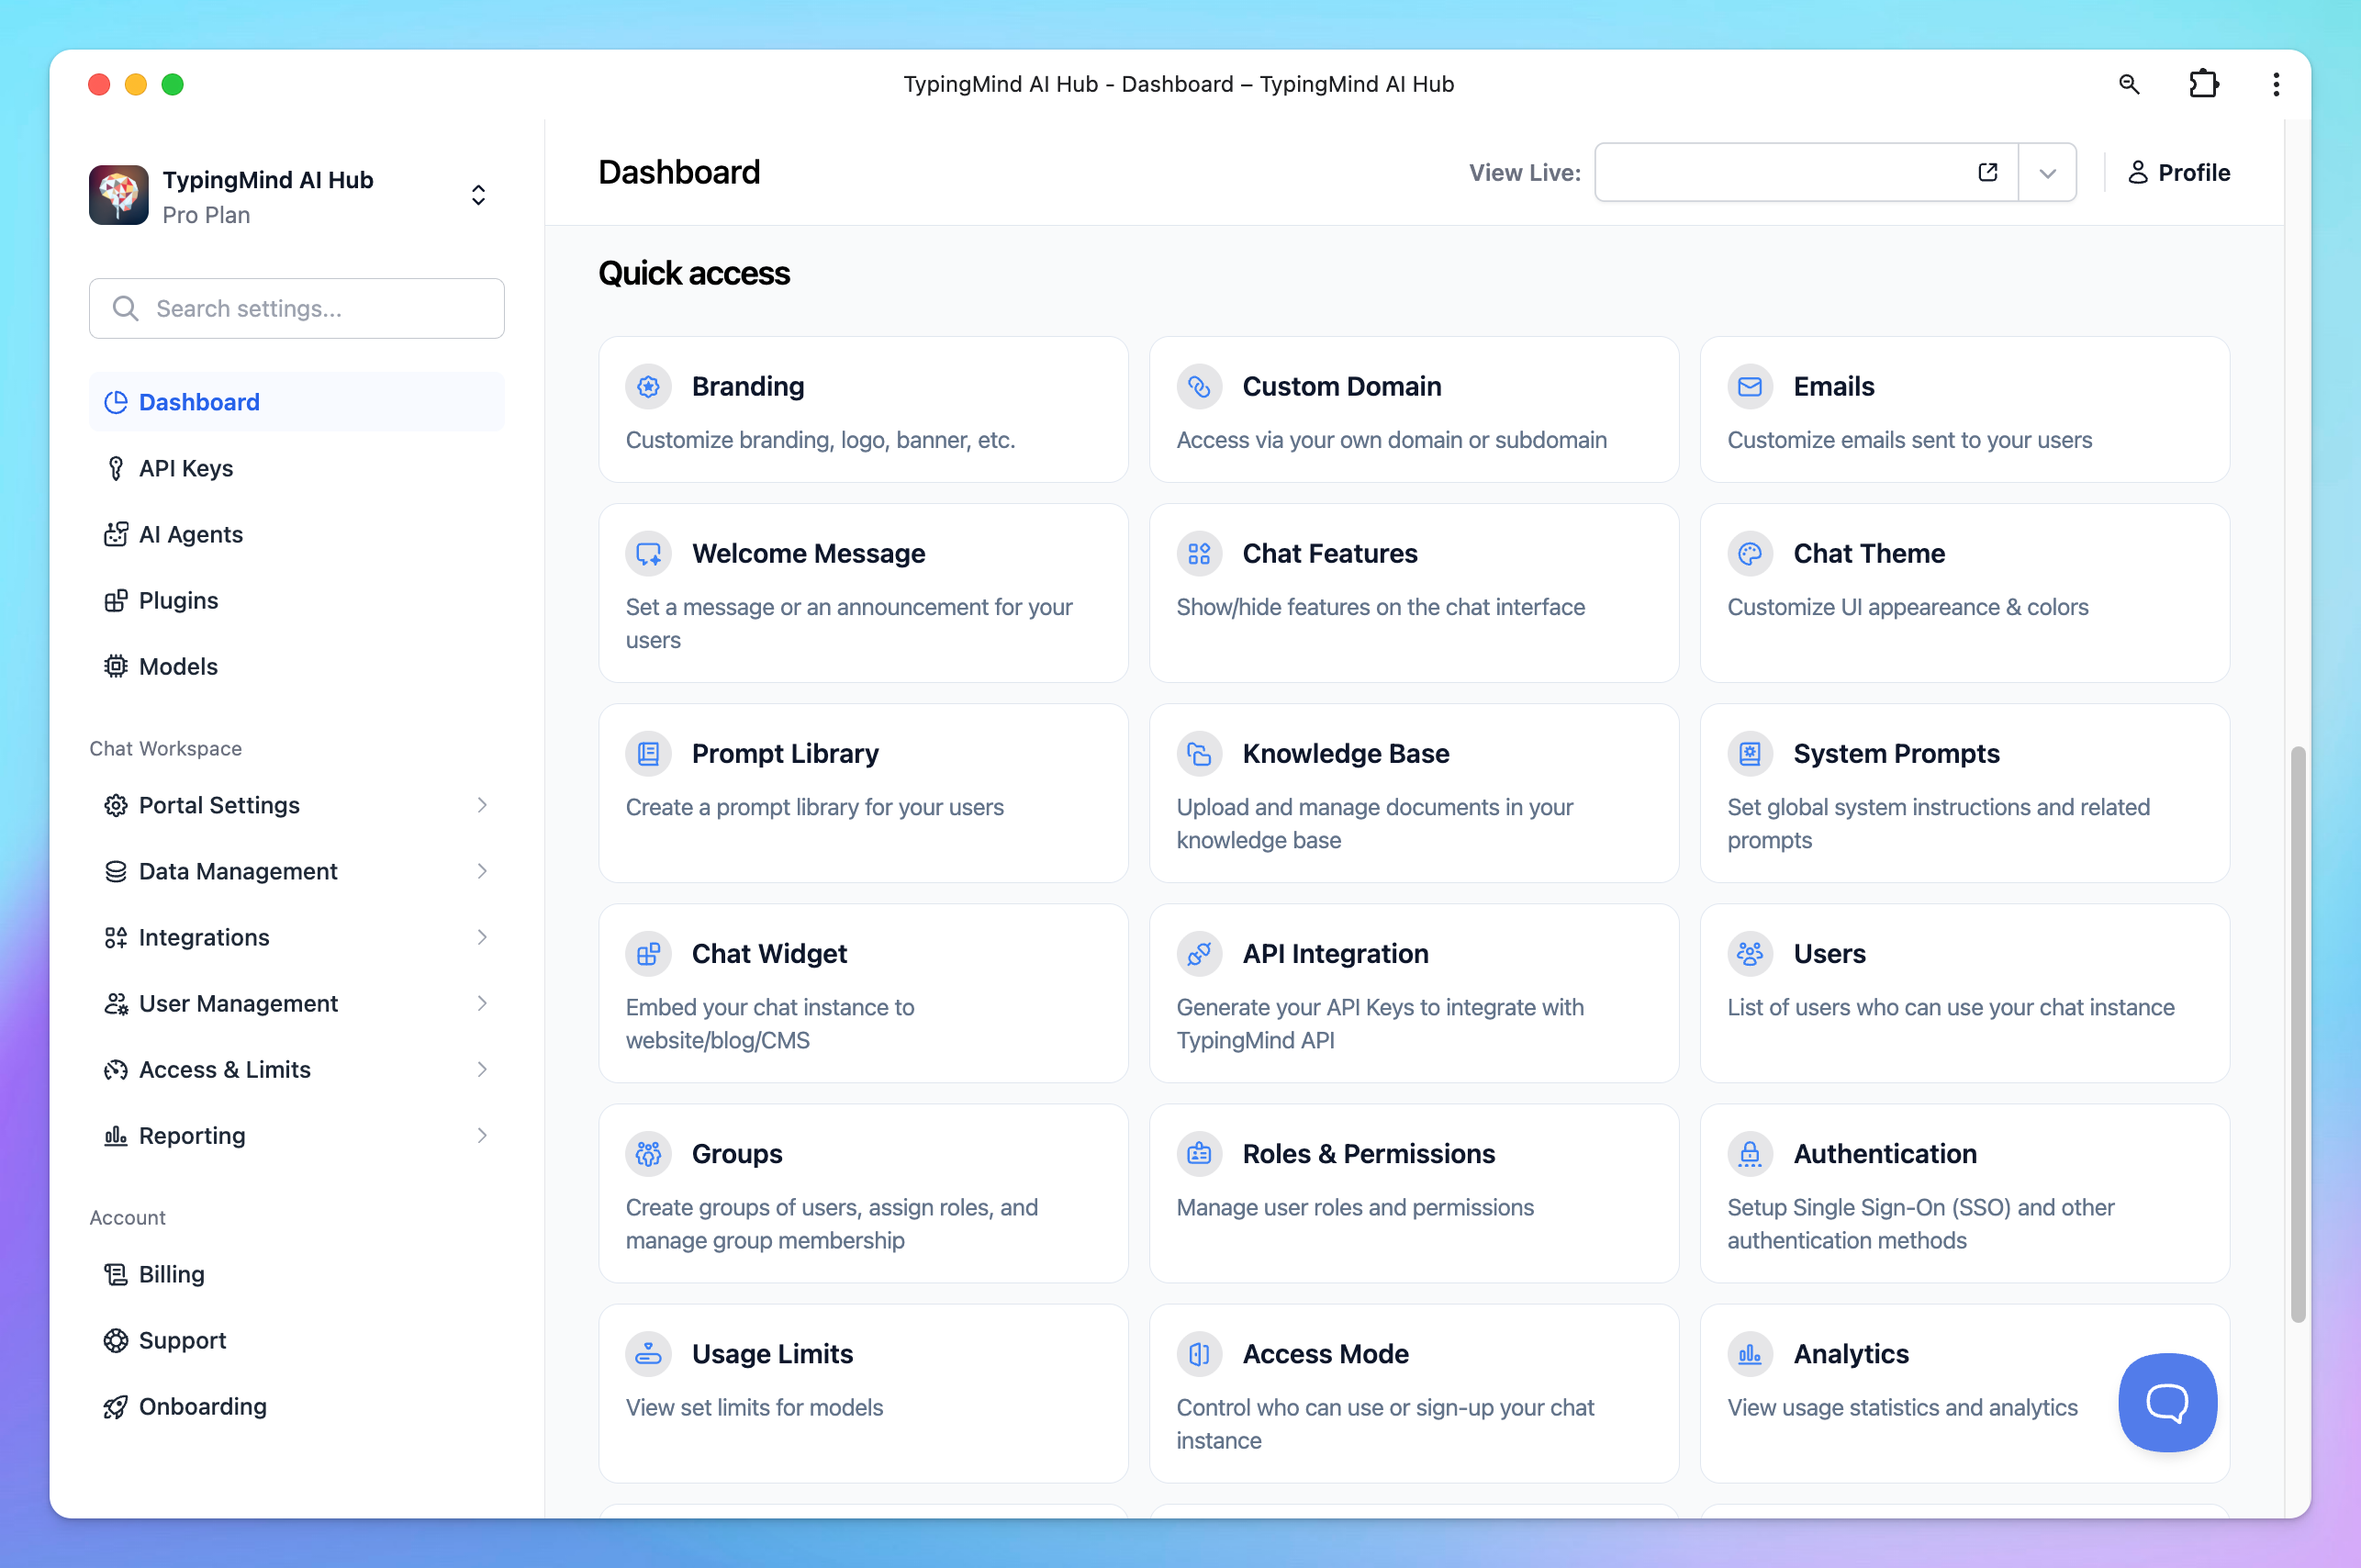
- By following the verification link, you'll access the Admin Panel, where you can manage API keys, chat features, prompts, AI Agents, etc. available on the chat interface:
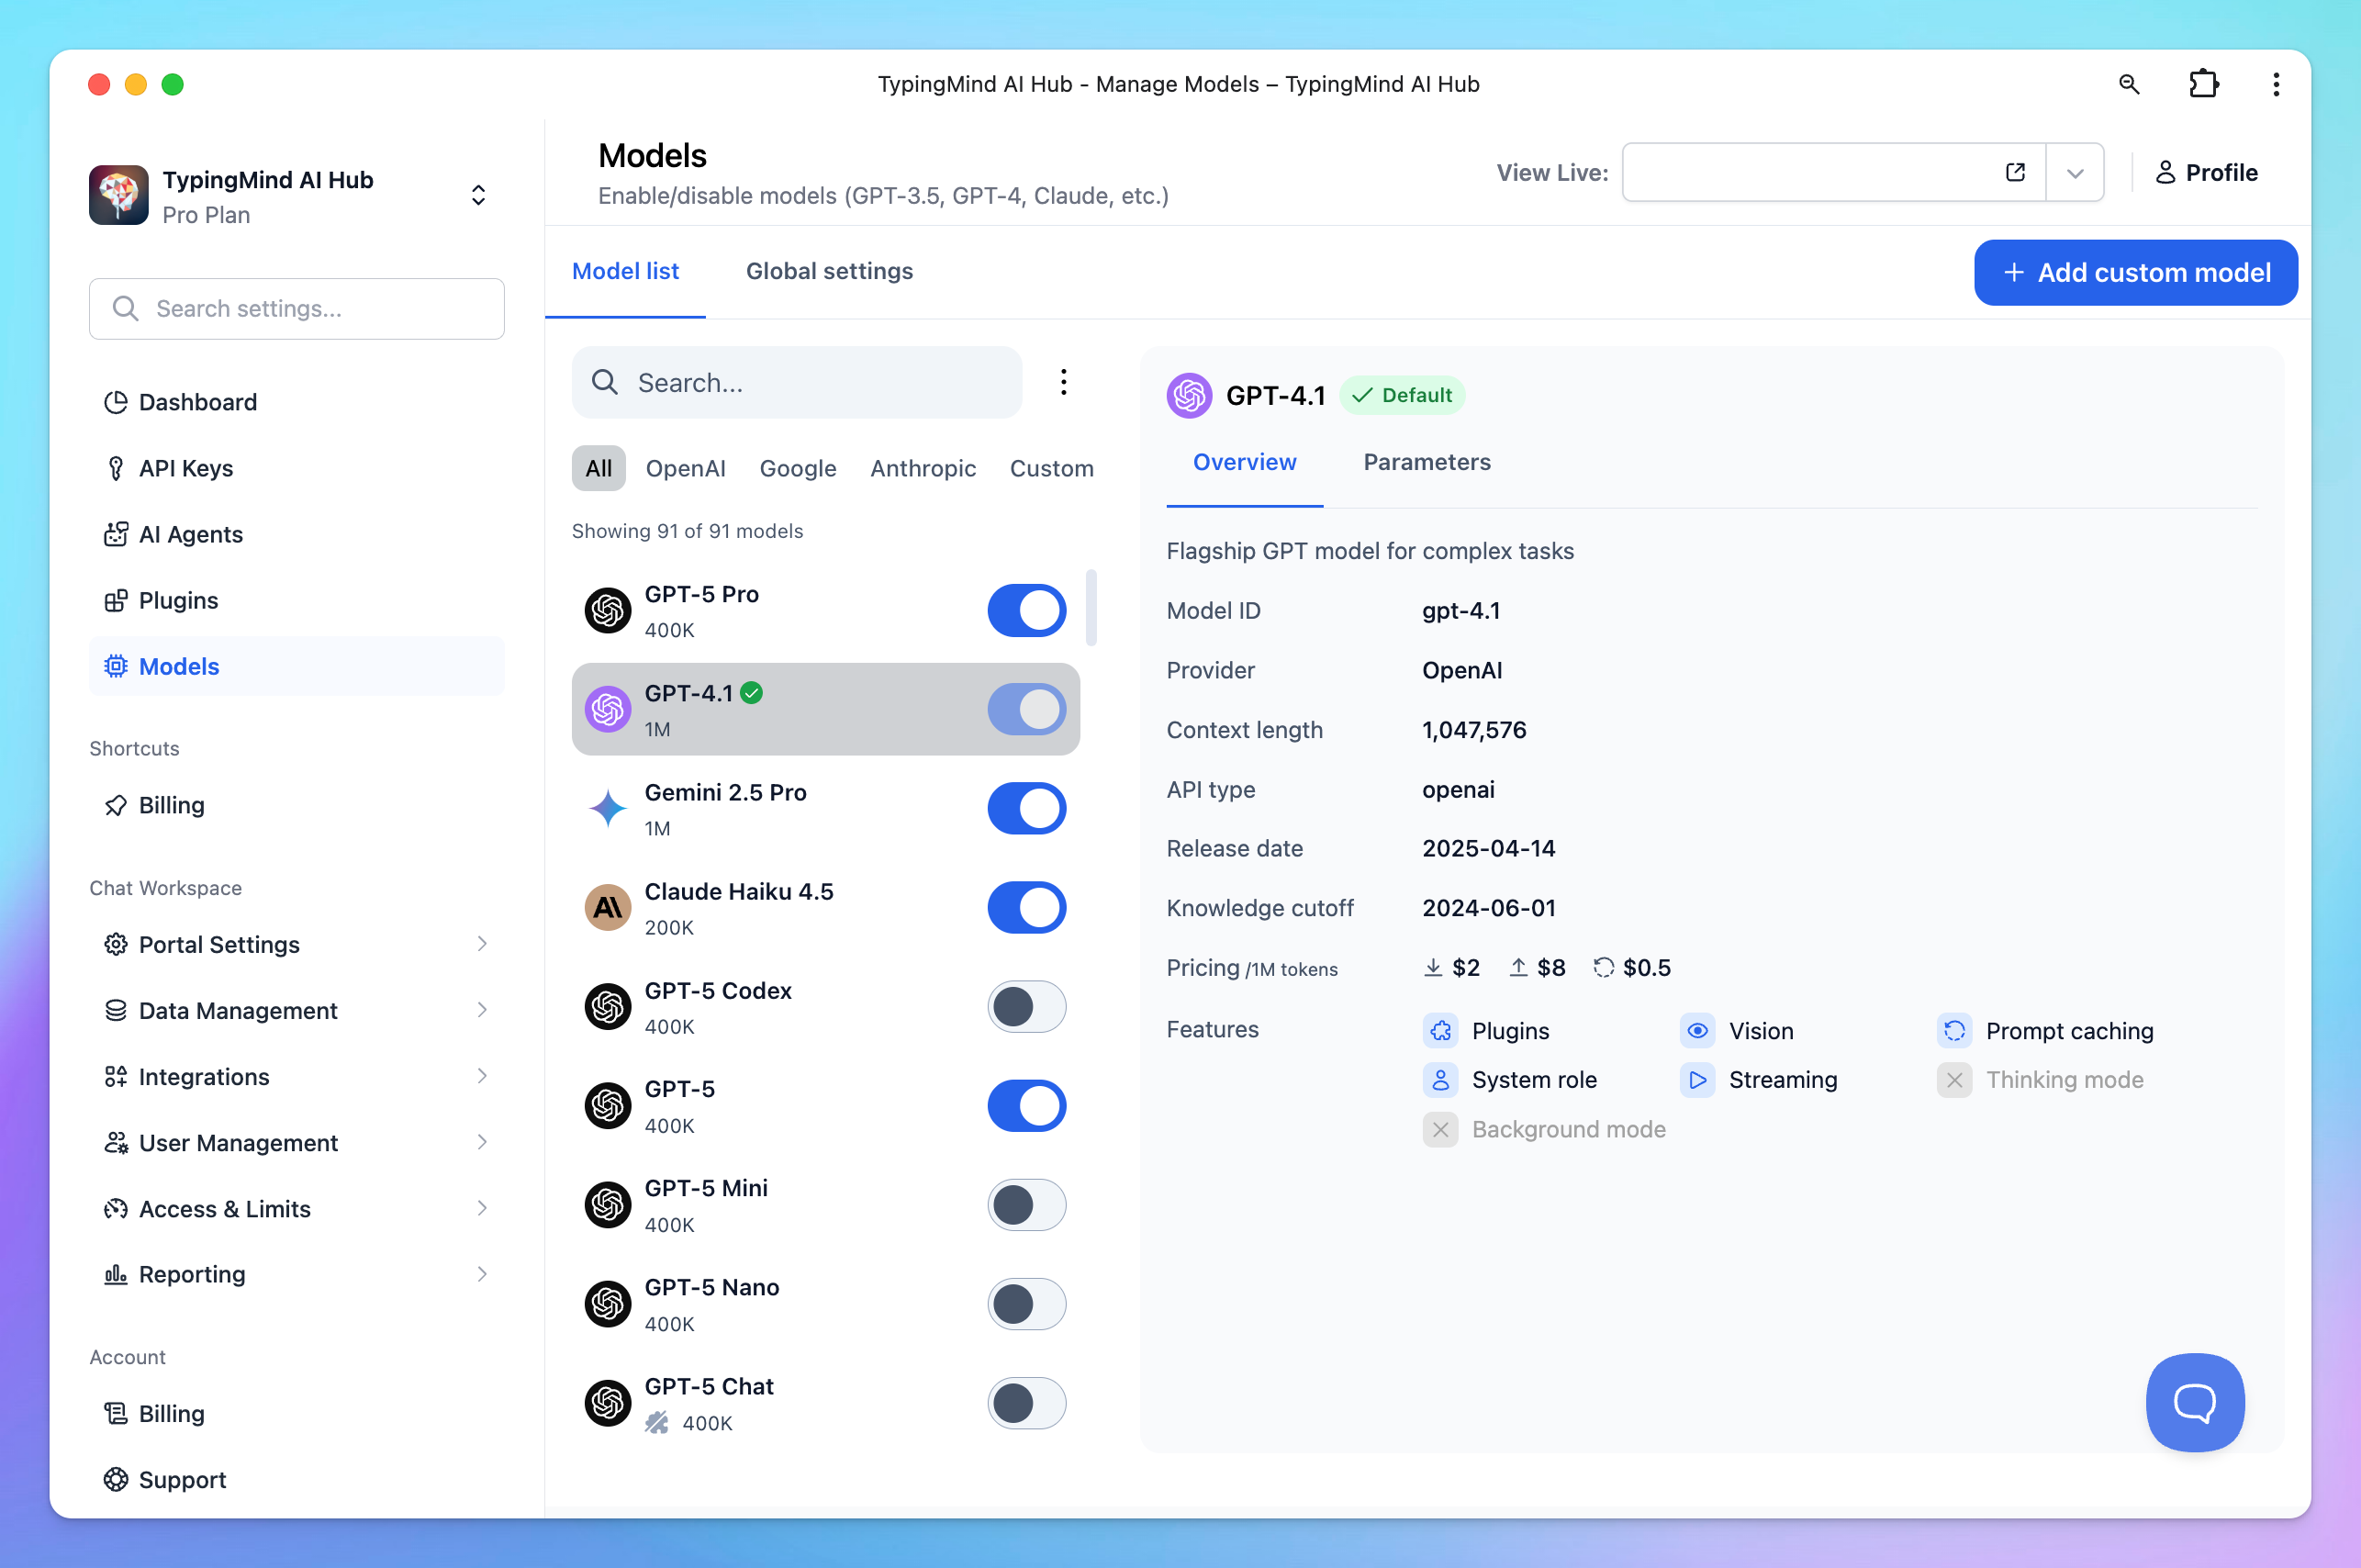
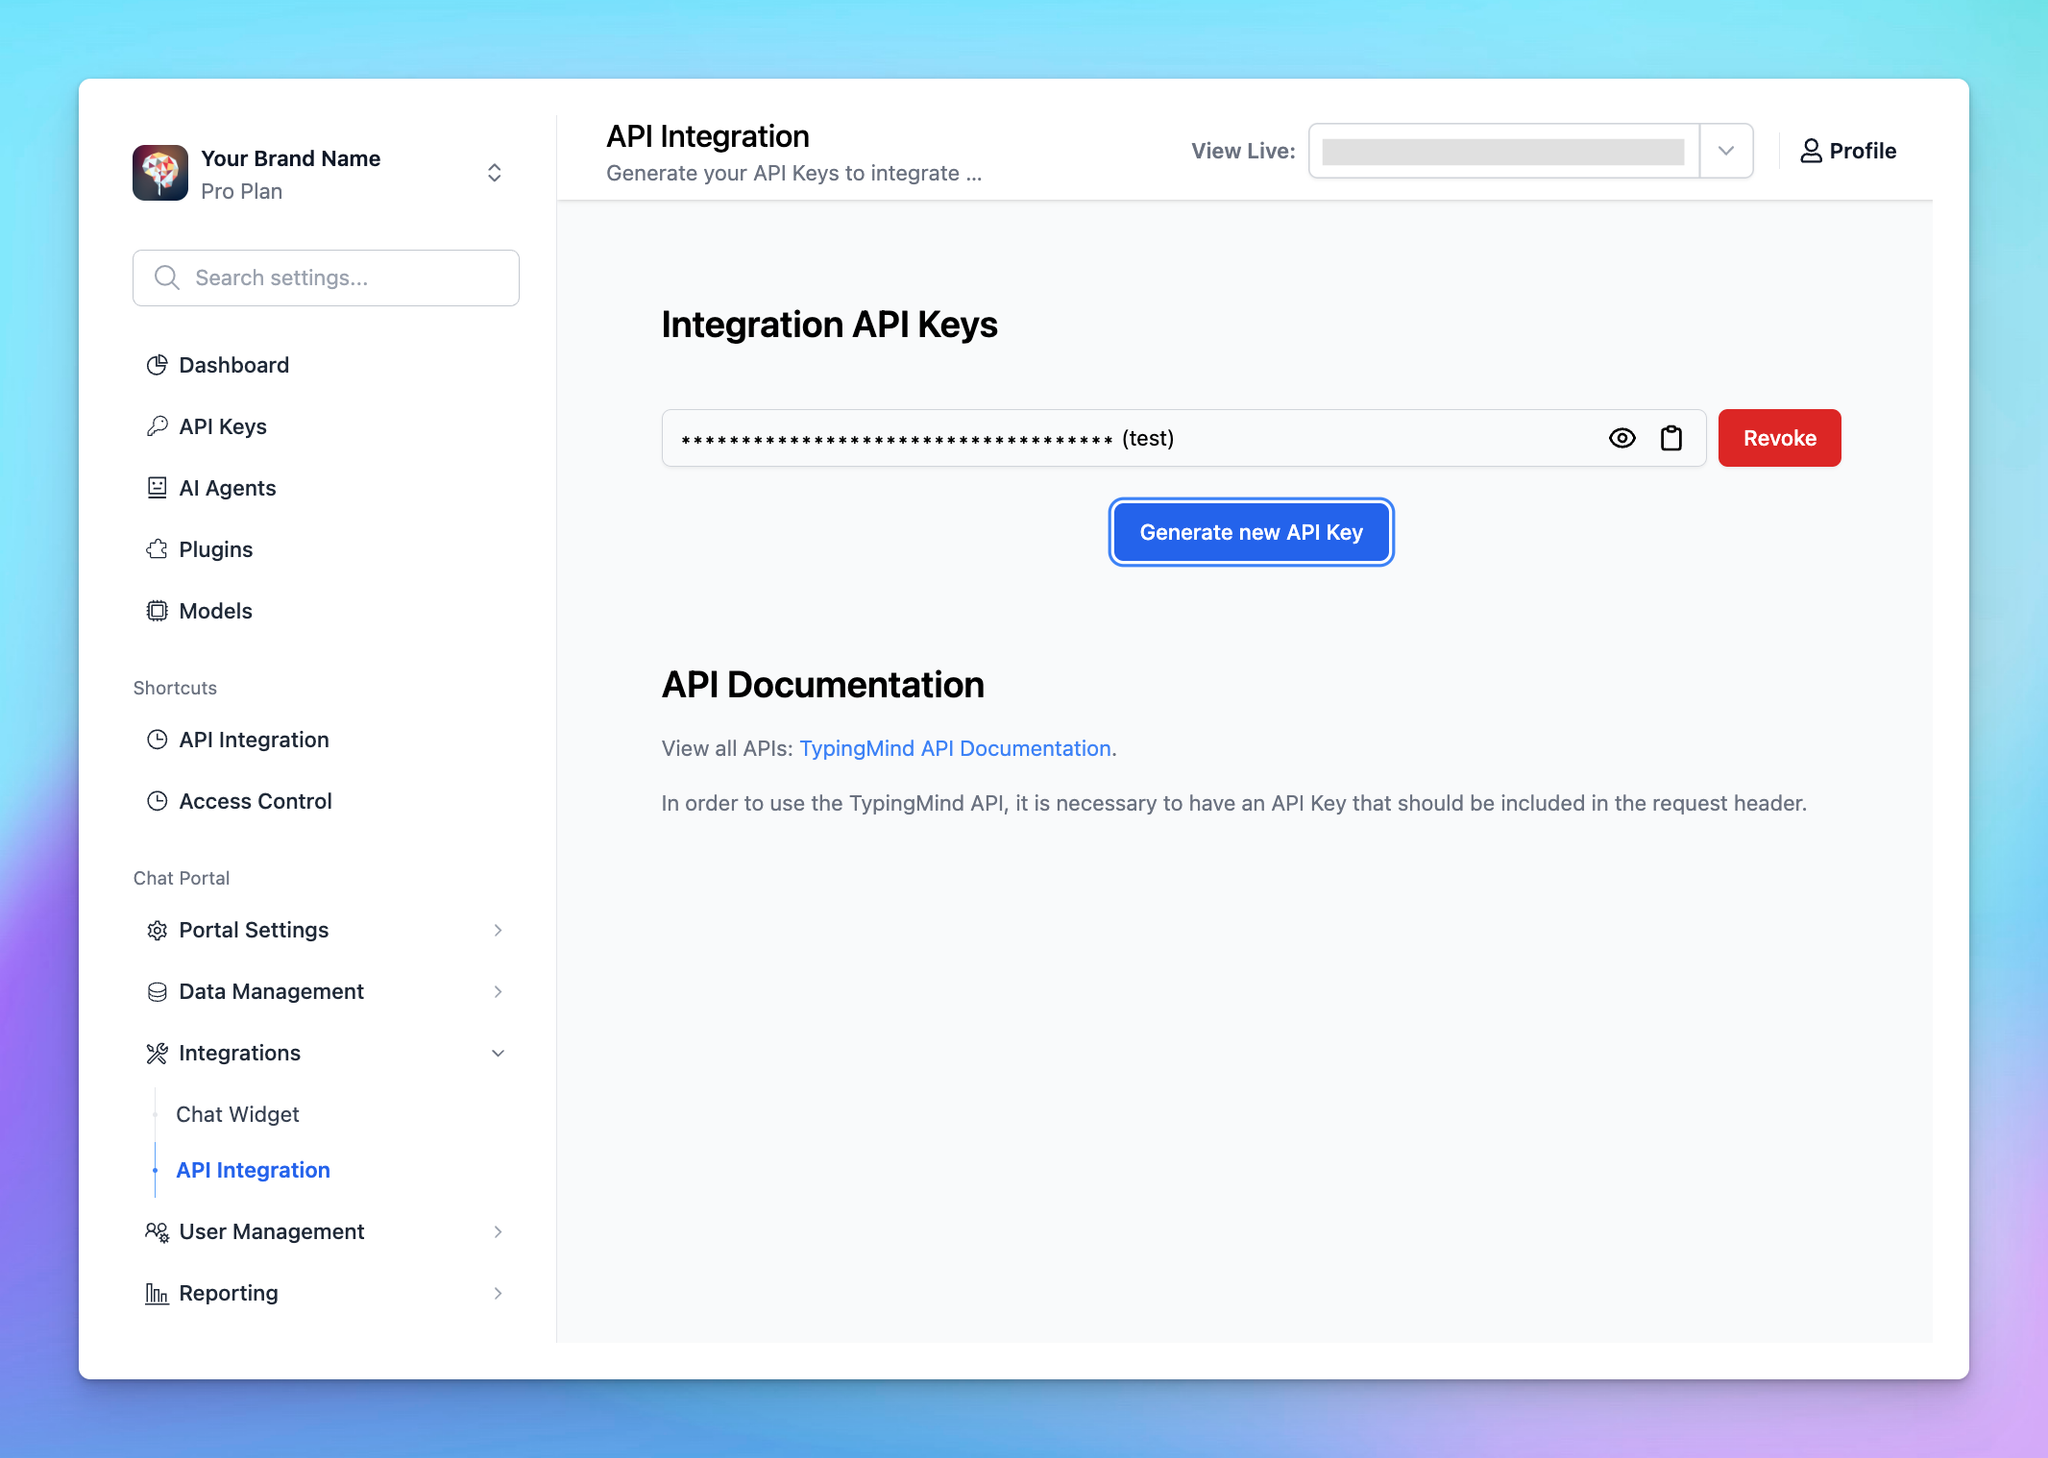
Step 2: Set up API Keys
After signing up, you will be landed in the Admin Panel, where you can customize almost everything on the chat interface.
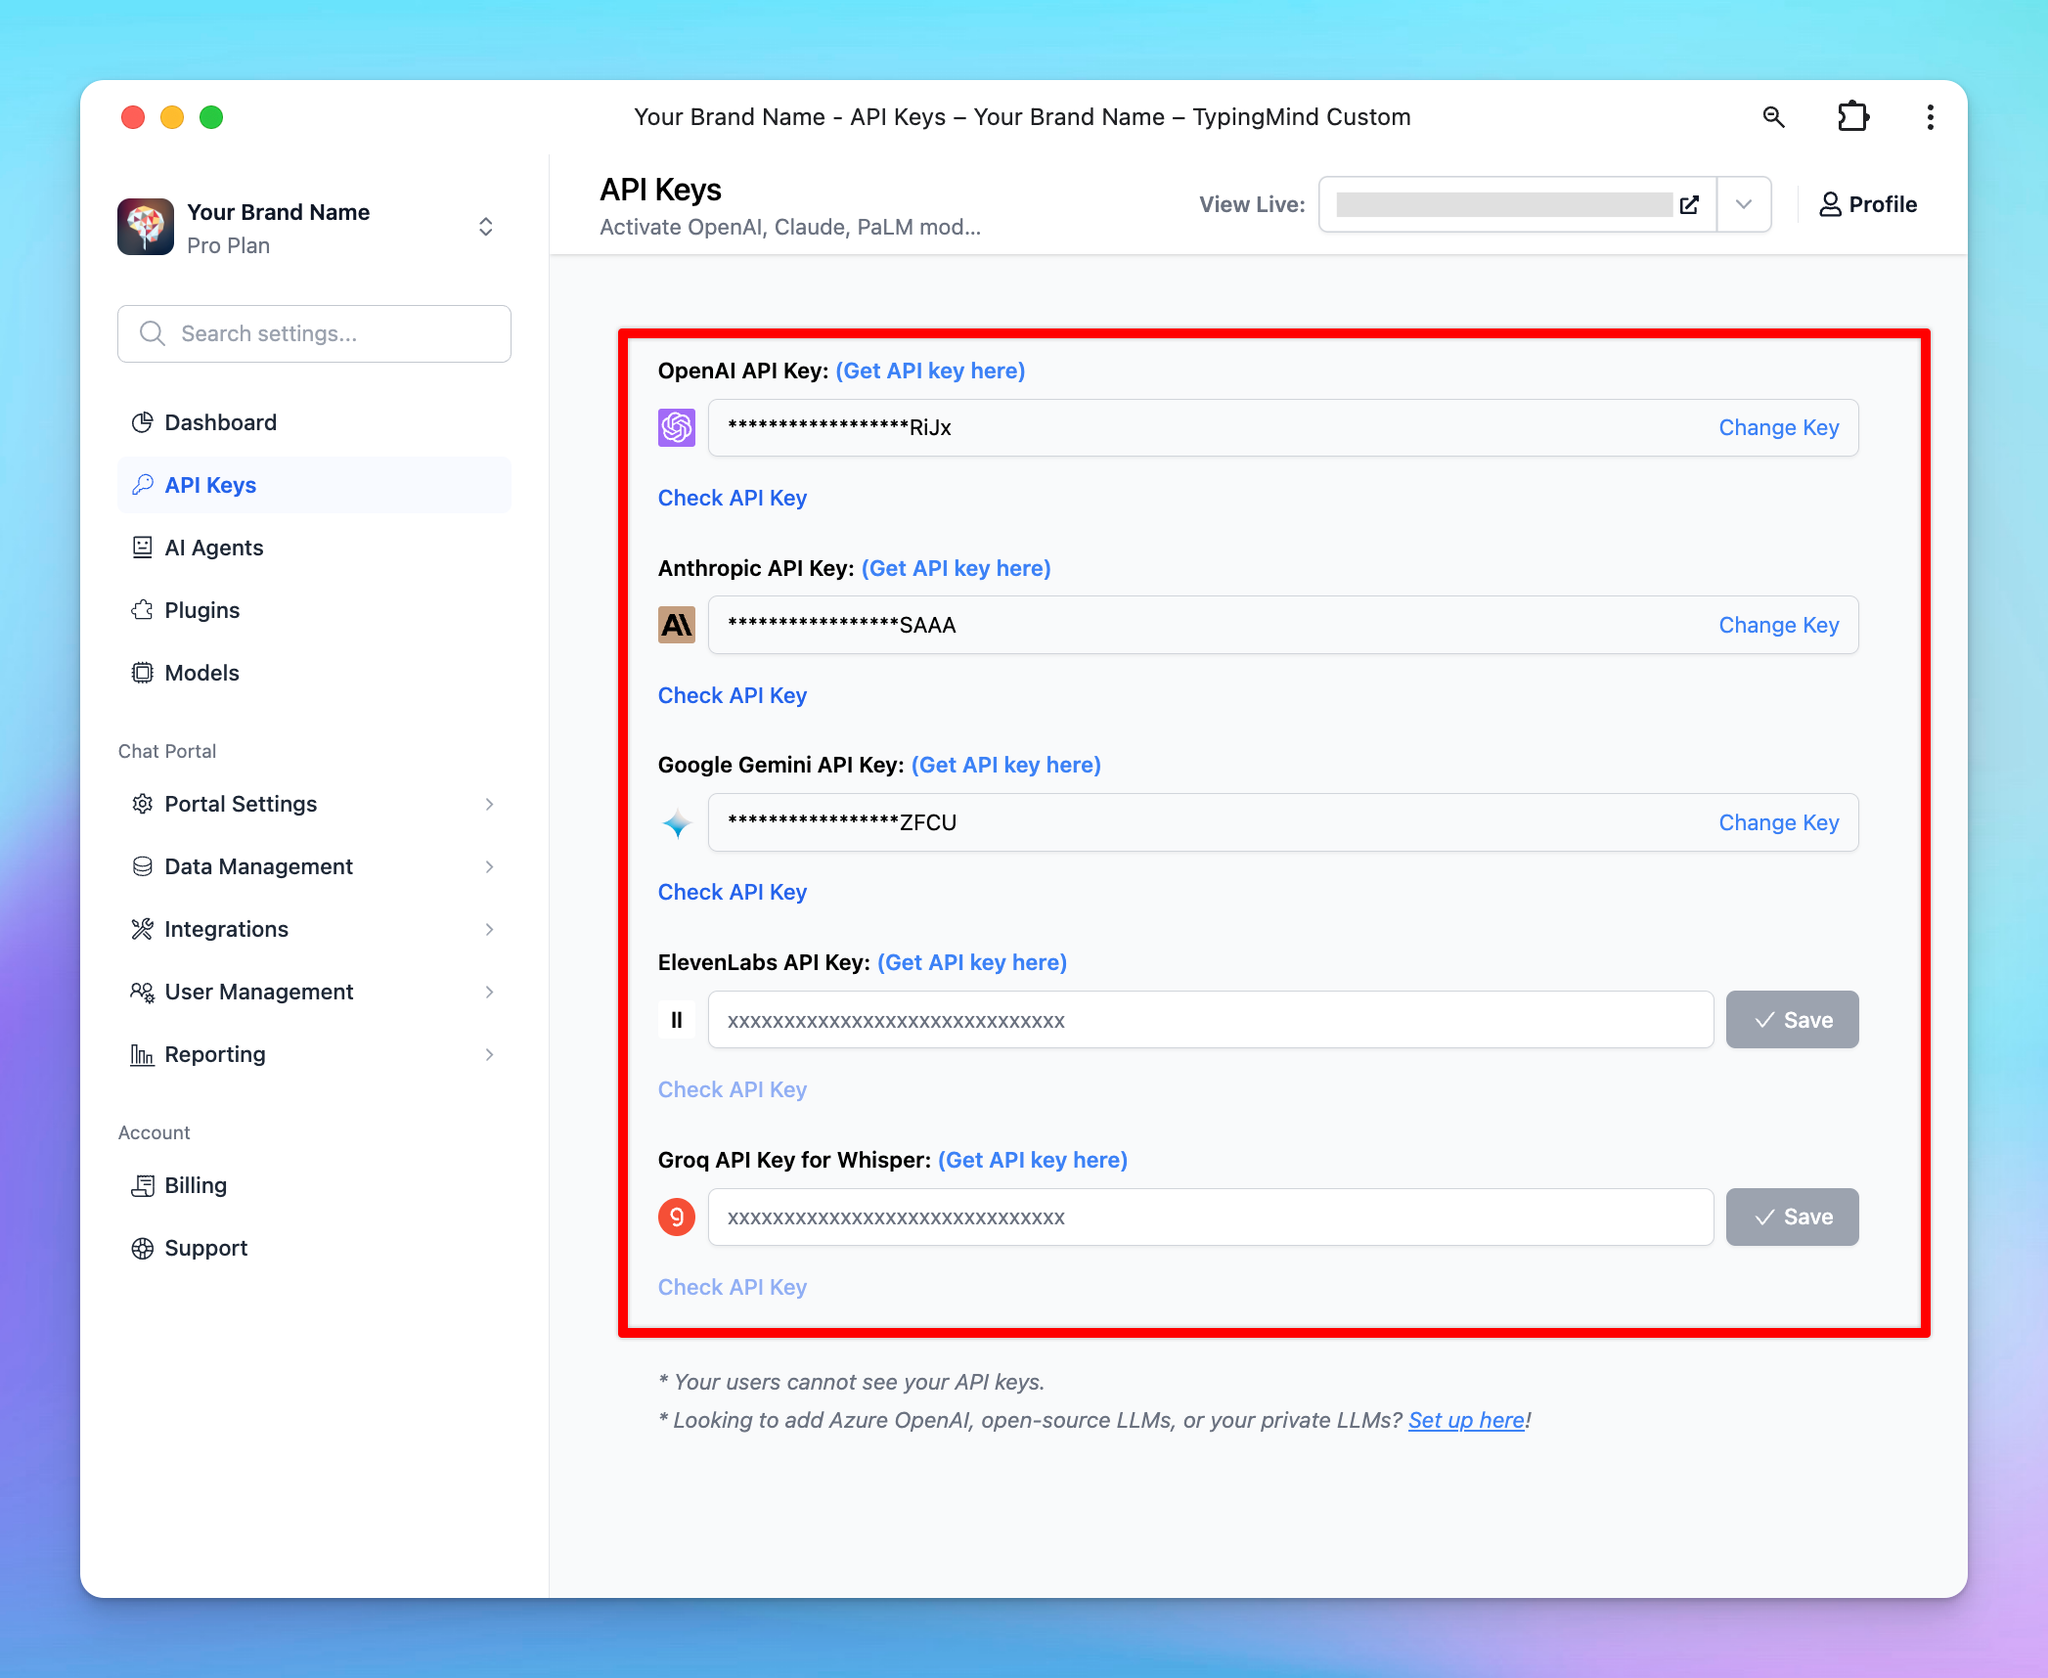
To get the chatbot to work properly, you will need to connect it with the chat model’s API key:
- Go to API keys menu and enter your API key, currently, we offer:
OpenAI models: GPT-5, GPT-4.5, GPT-4.1 etc.Anthropic Claude: Claude Sonnet 4.5, Claude Haiku 4.5, etc.Gemini models: Gemini 2.5 Pro, Gemini 2.5 Flash, Nano Banana, etc.
Please note that each API key gives you access to multiple AI models from the same provider.
We’ll update newly released models as soon as they become available via API, so you can simply select the model you want to use — no need to update your API key.
- Go to Models menu to enable or disable models you want to use on the chat interface.
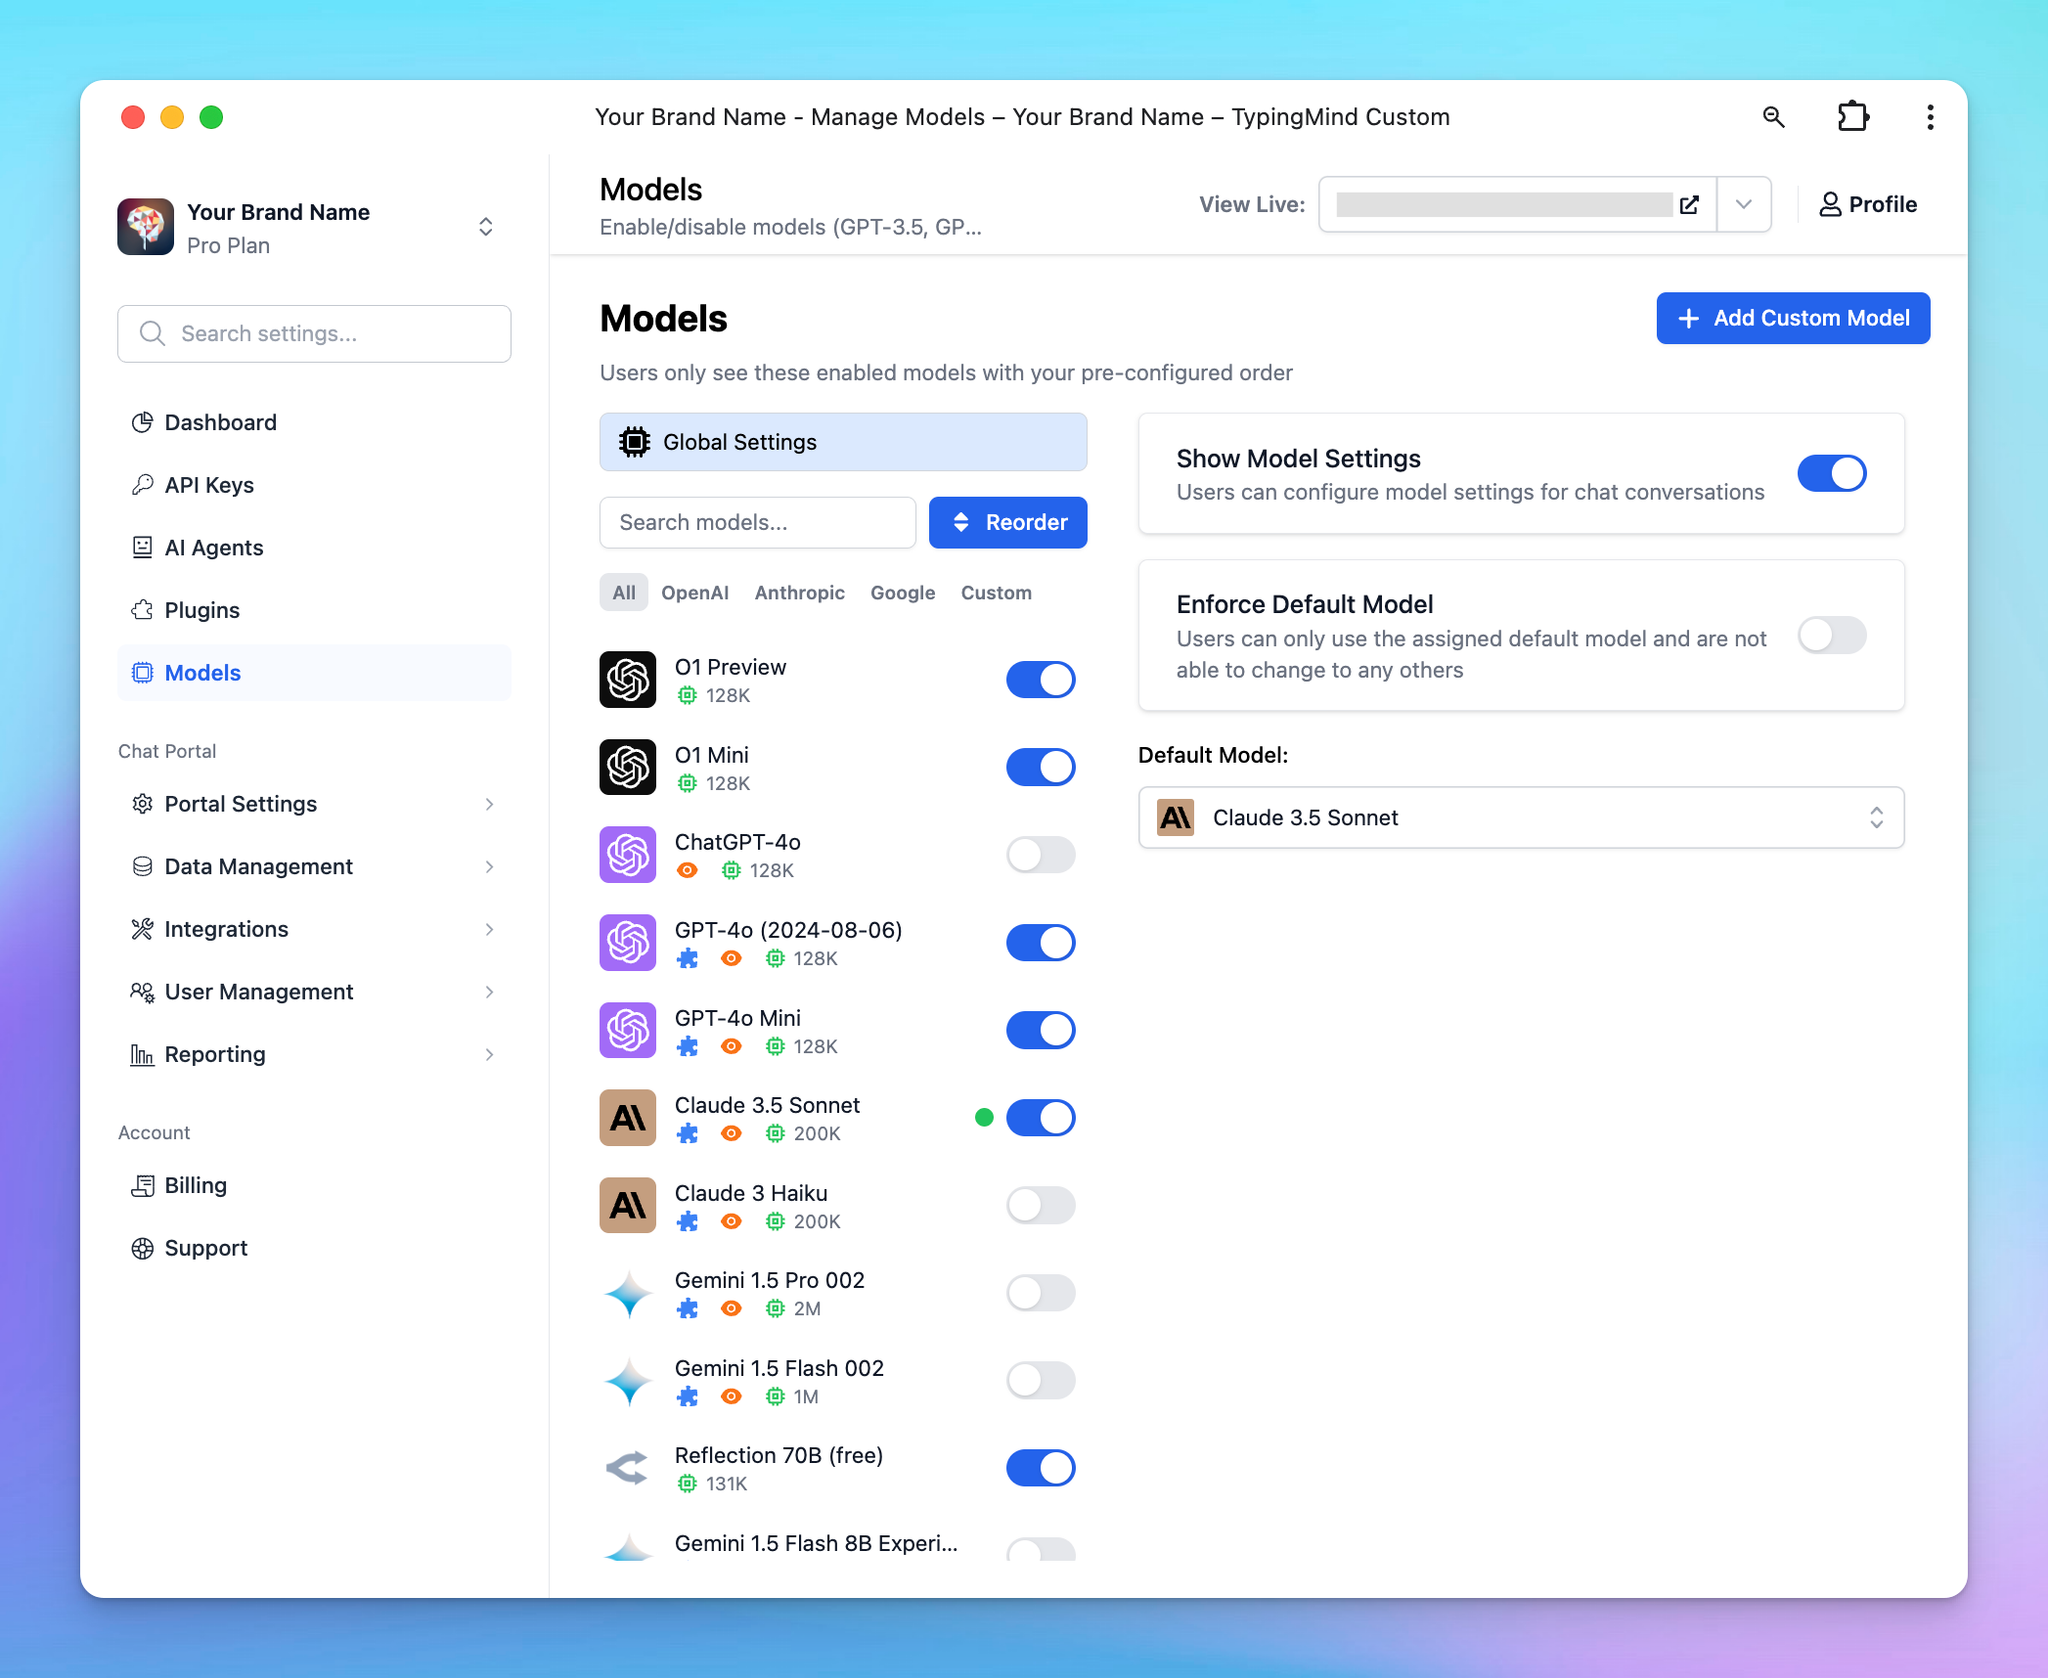
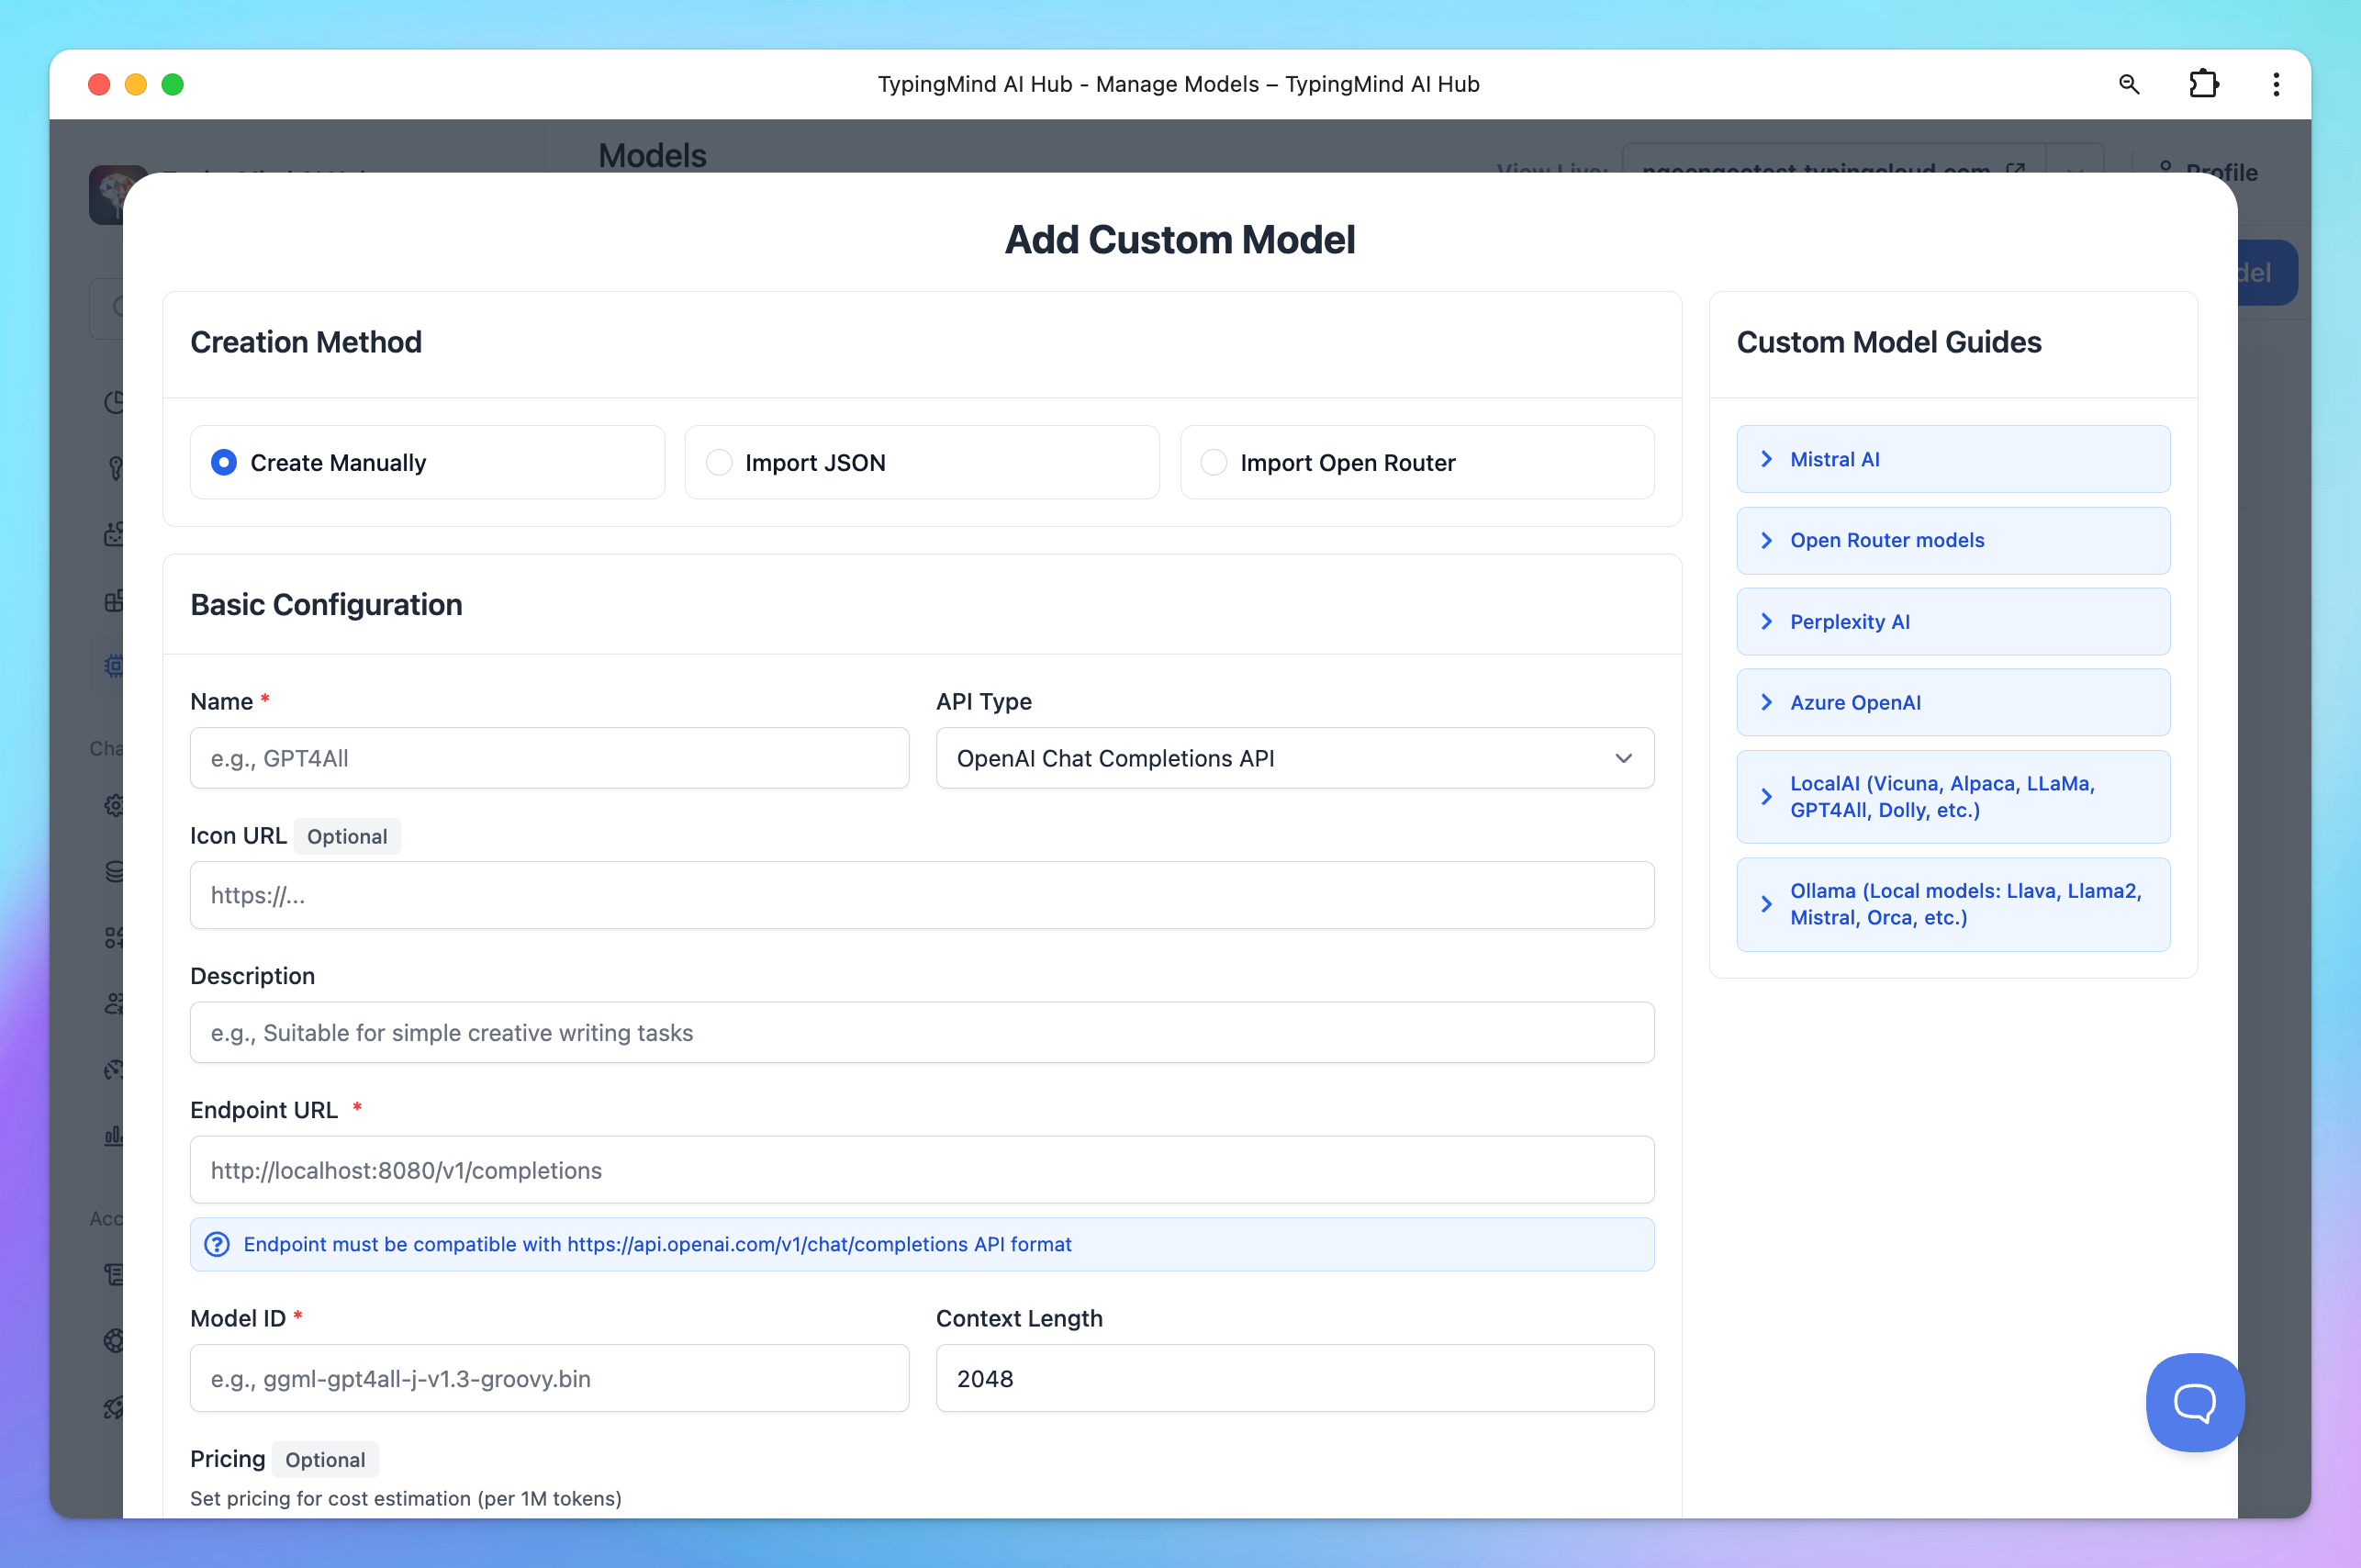
If you’d like to use models that aren’t listed in the default model list, click “Add Custom Models” and follow the guide here to add your desired models: https://docs.typingmind.com/manage-and-connect-ai-models
Step 3: Choose and subscribe to a plan to activate your 14-day trial
To activate your chat instance with 14-day free trial, go to Billing, select and subscribe to a suitable plan.
Subscription options are also accessible via the Buy Subscription button at the top bar notification. The plans include:
- Starter plan ($99)
- Growth plan ($199)
- Professional plan ($299)
Learn more about what you can get for each TypingMind Team plan here

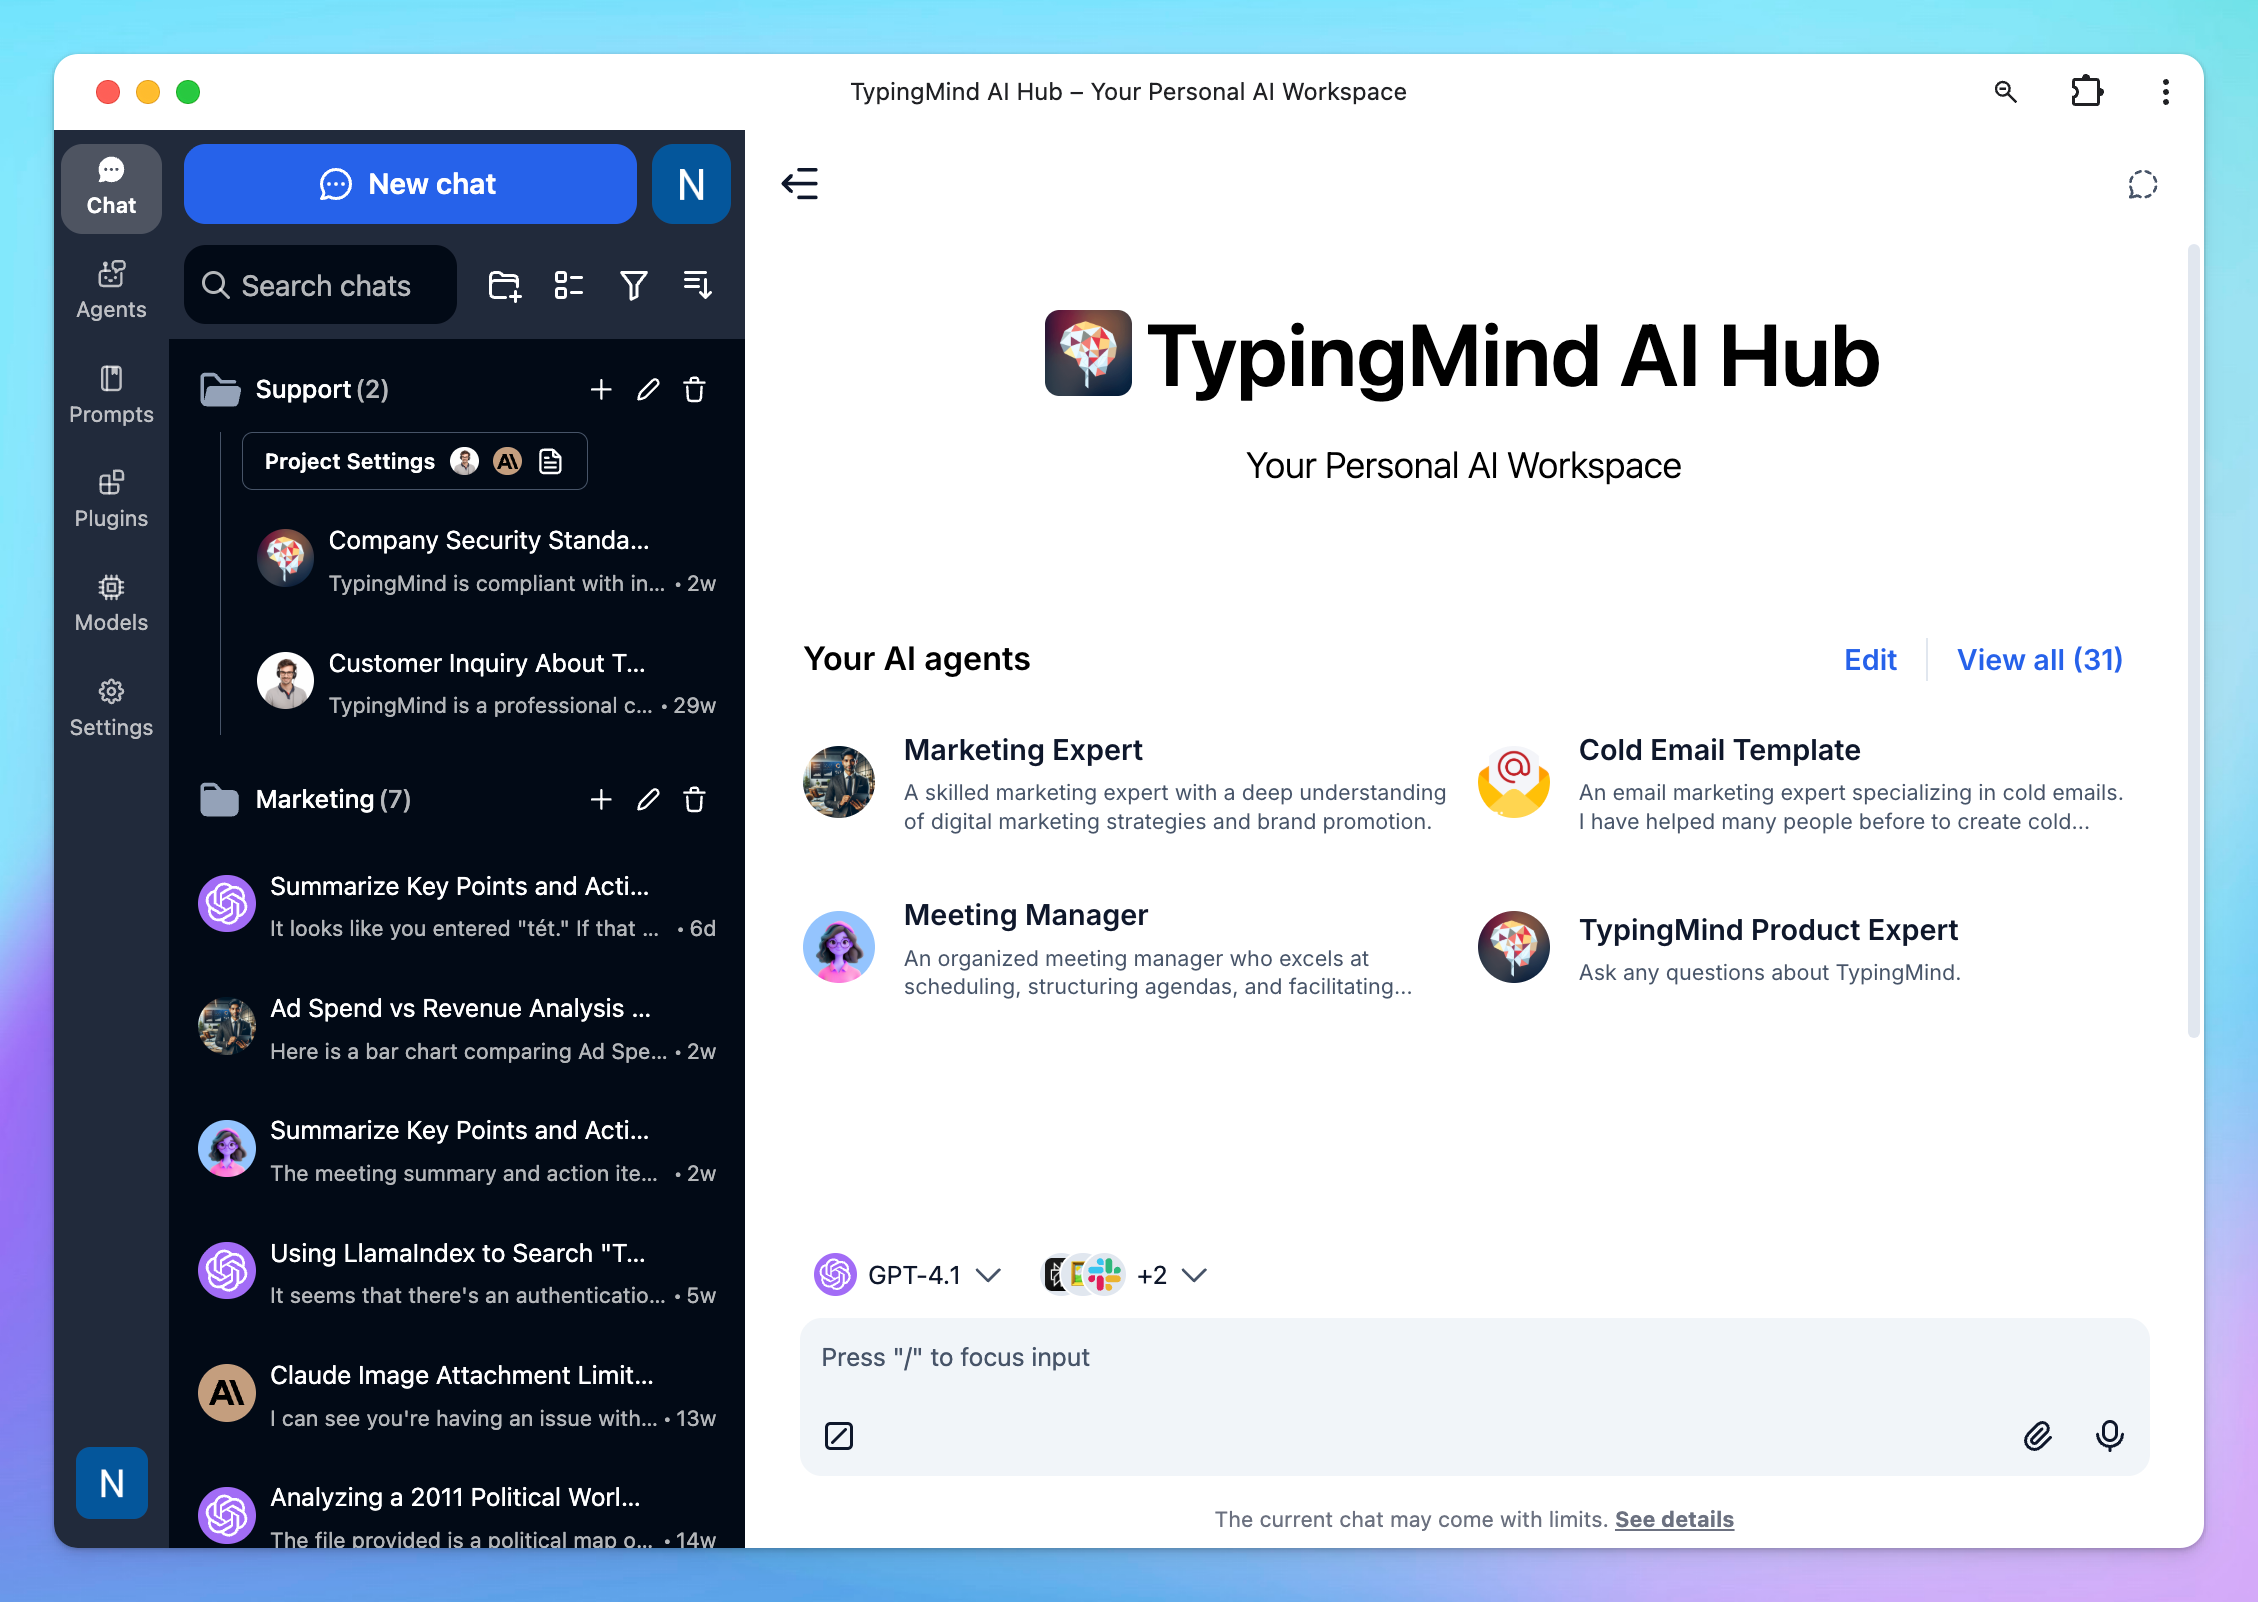
Step 4: Your chat instance is now activated!
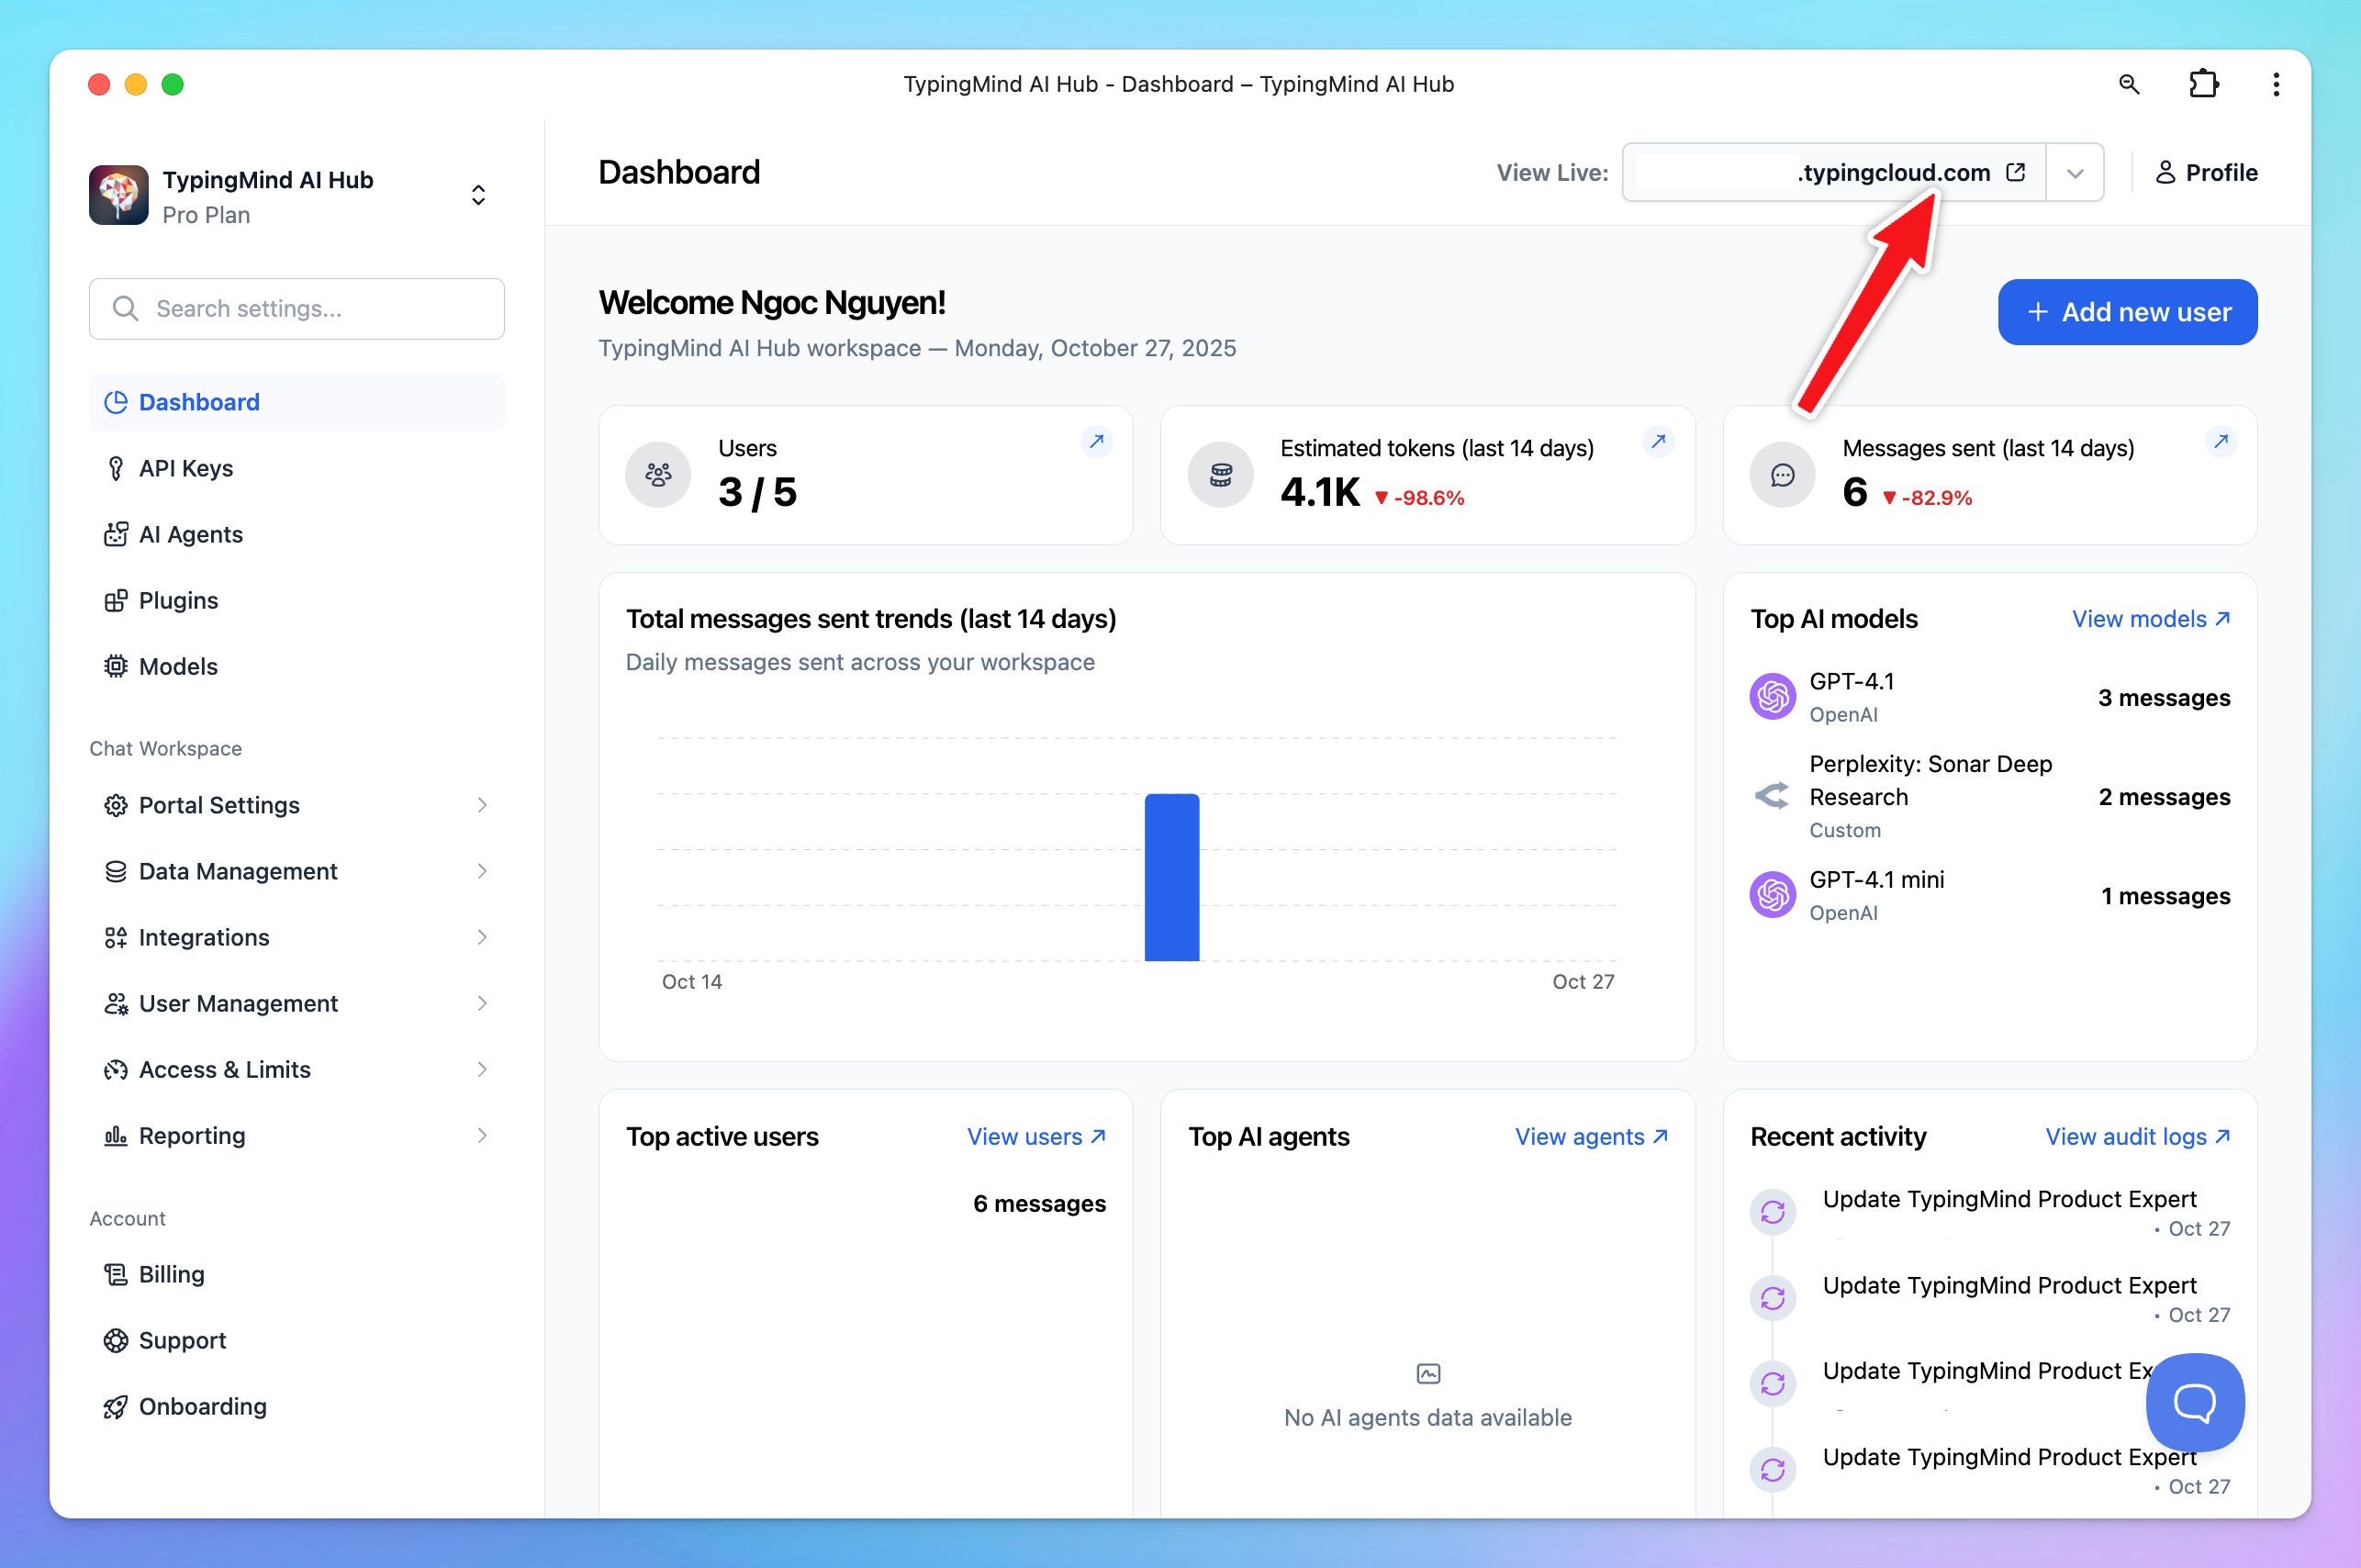
You can now click the "View Live" link to preview your chat instance.
Step 5: Invite members to your chat instance
Once your chat instance is set up, you can invite members of your team to start collaborating.
To add new members:
- Go to the User under the User Management section
- Input the email addresses of the people you want to invite
Your team members will receive instructions to log in and access the chat instance.
You can invite up to 5 members for a chat instance, if you want to invite more, you can buy extra seats by clicking on Buy More Seats.
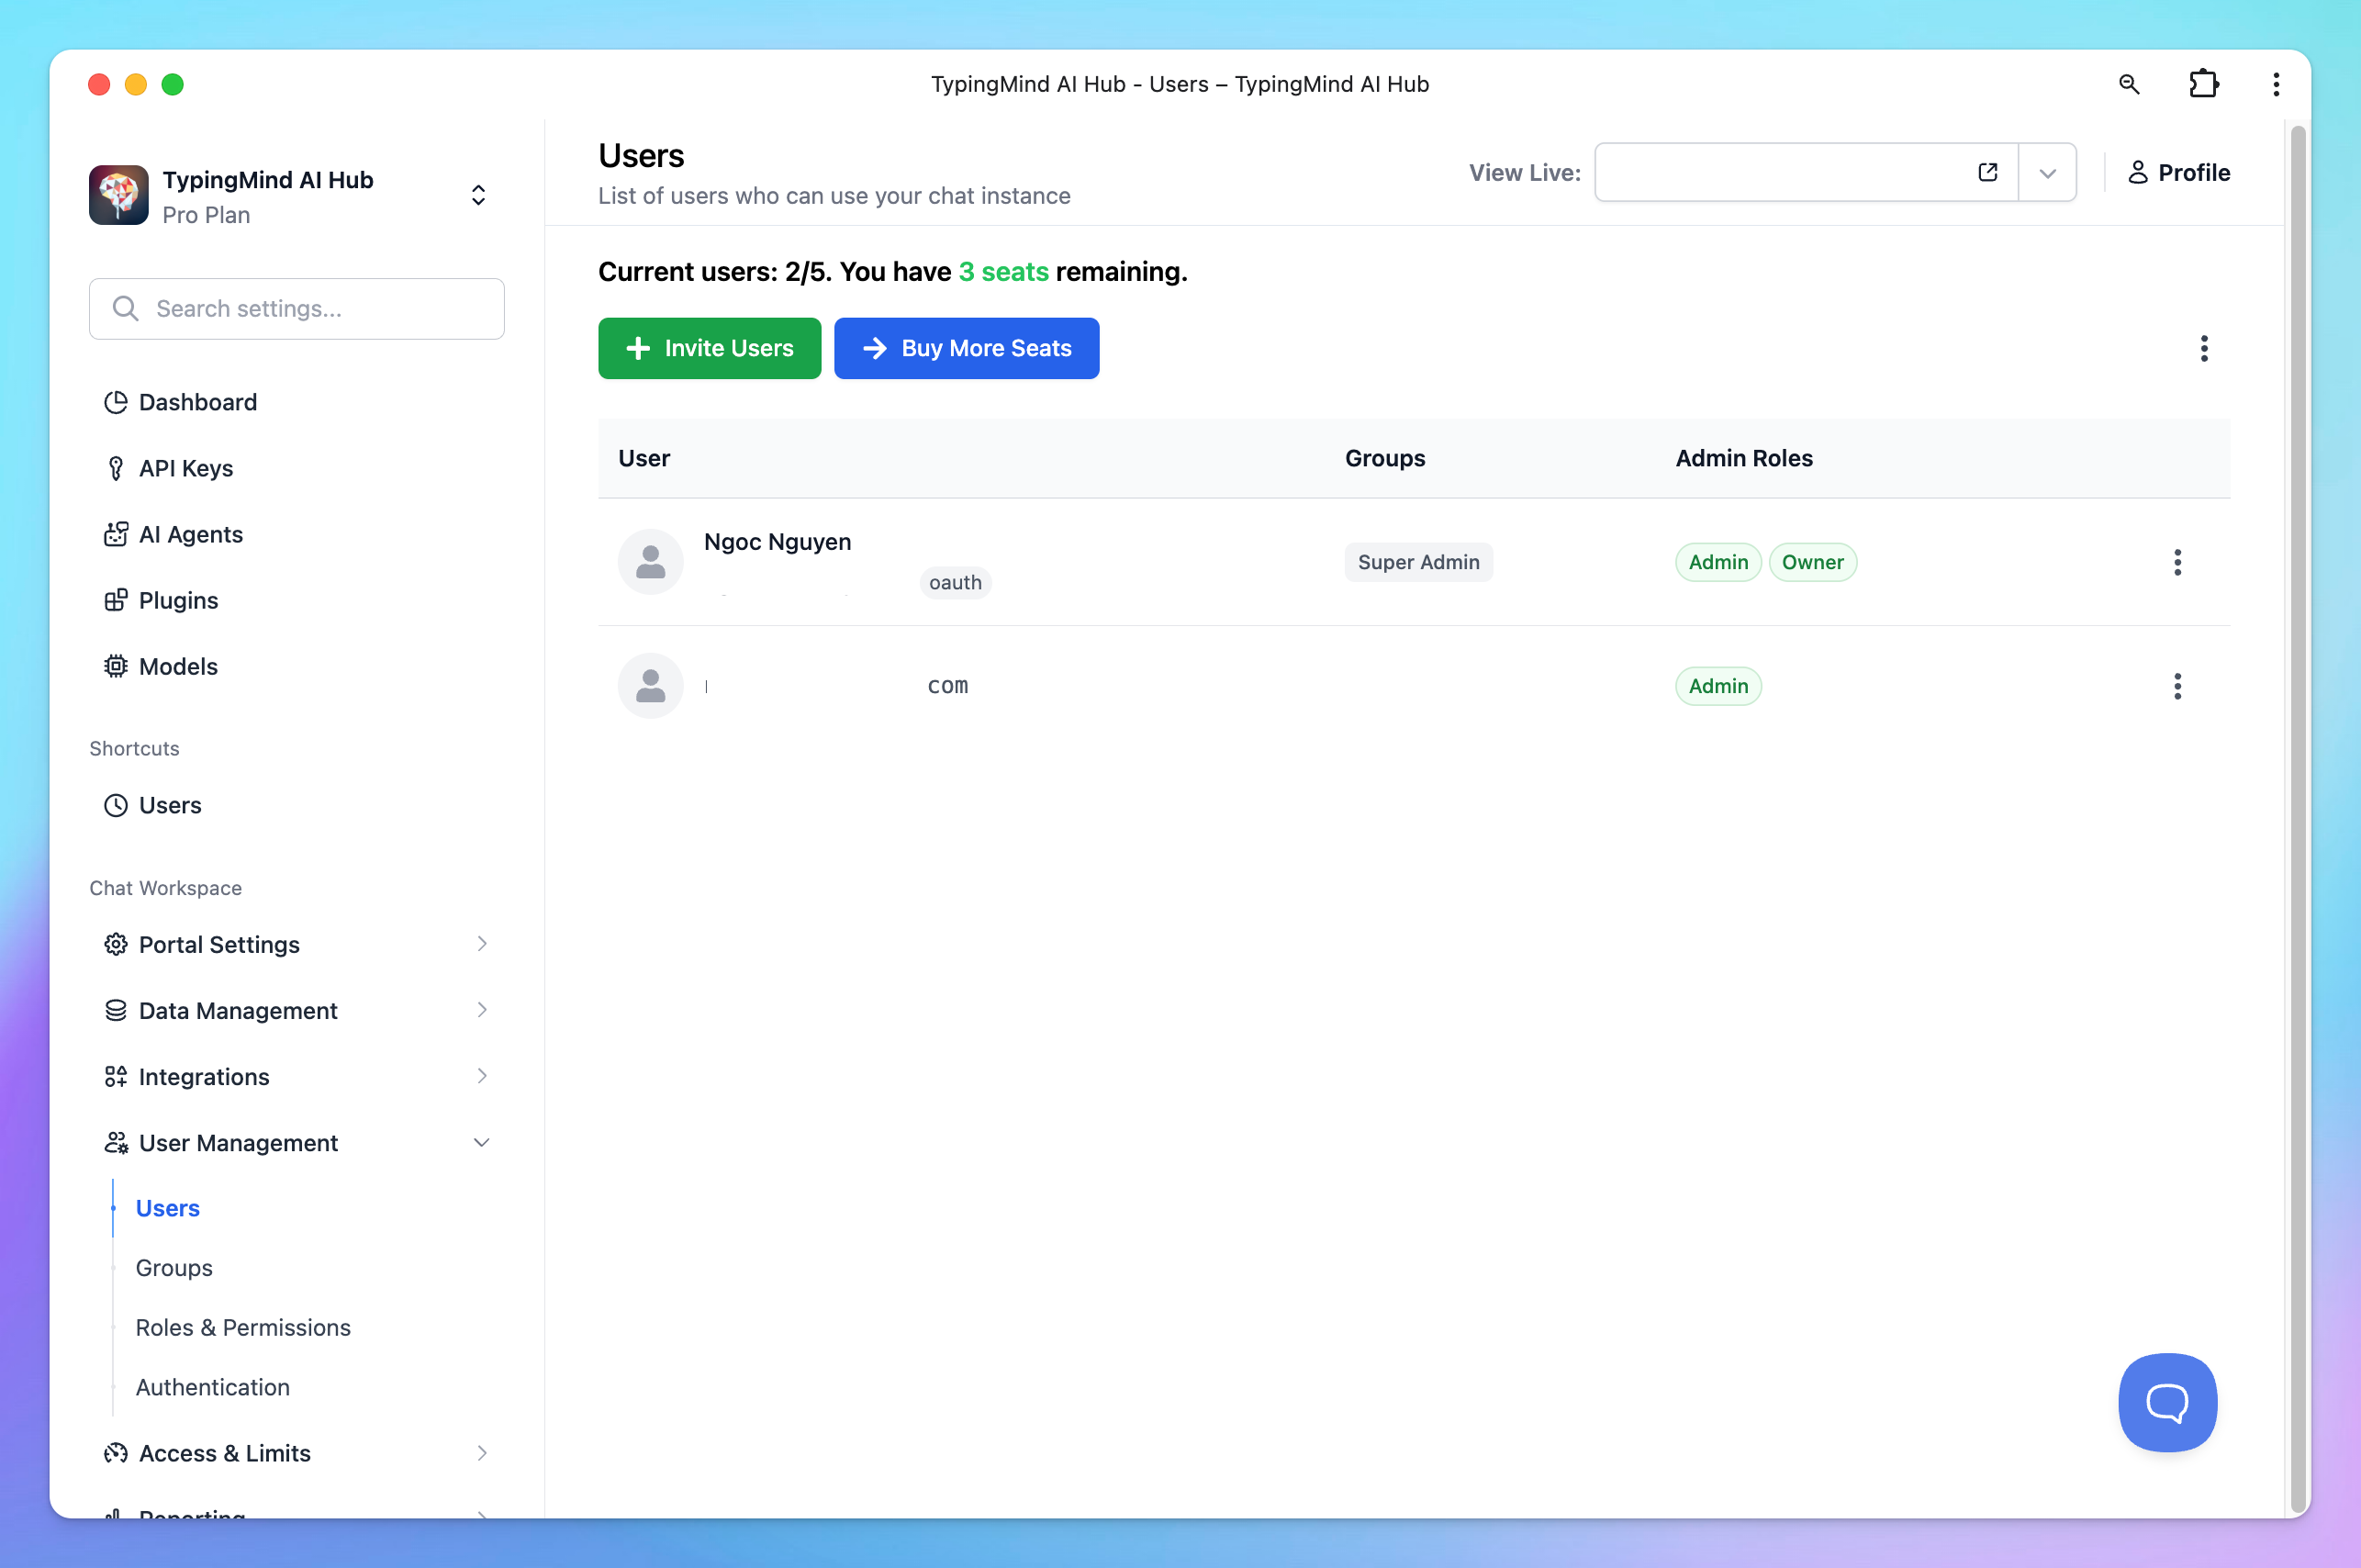
By default, invited members can only access your chat UI, however, you can also set them to be an Admin like you to control the chat UI, or assign them to any specific Roles and Permissions to only access to specific resources.
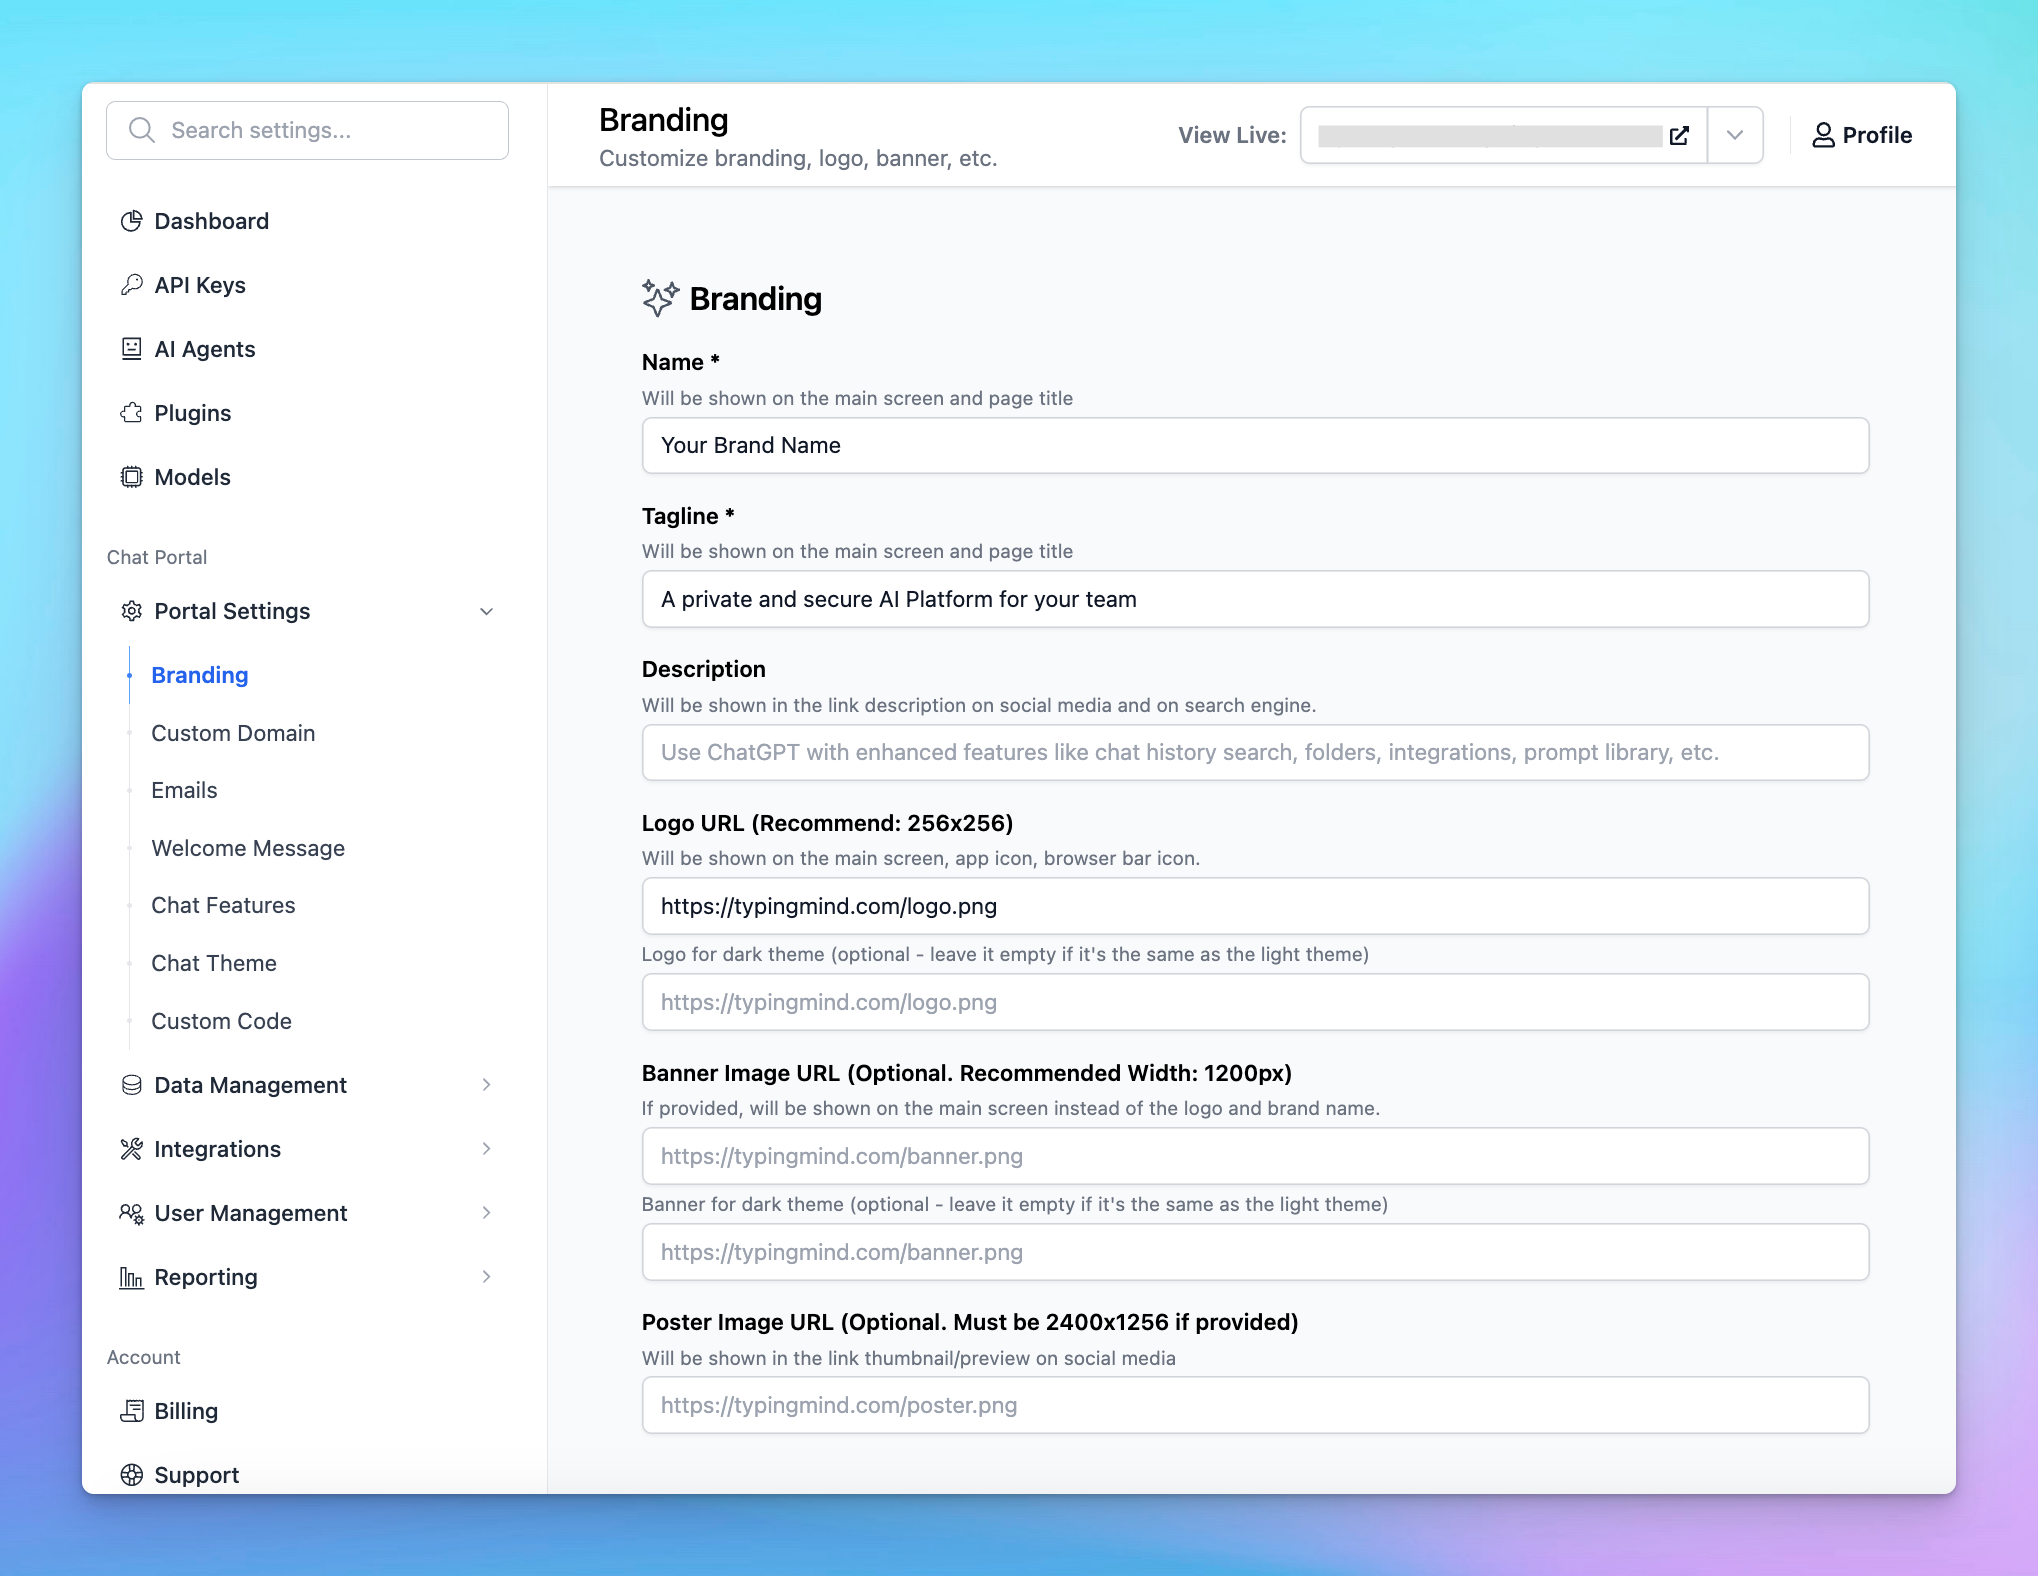
Step 6: Customize your chat instance
As an Admin, you can fully control and customize the chat instance to suit your team's brand theme.
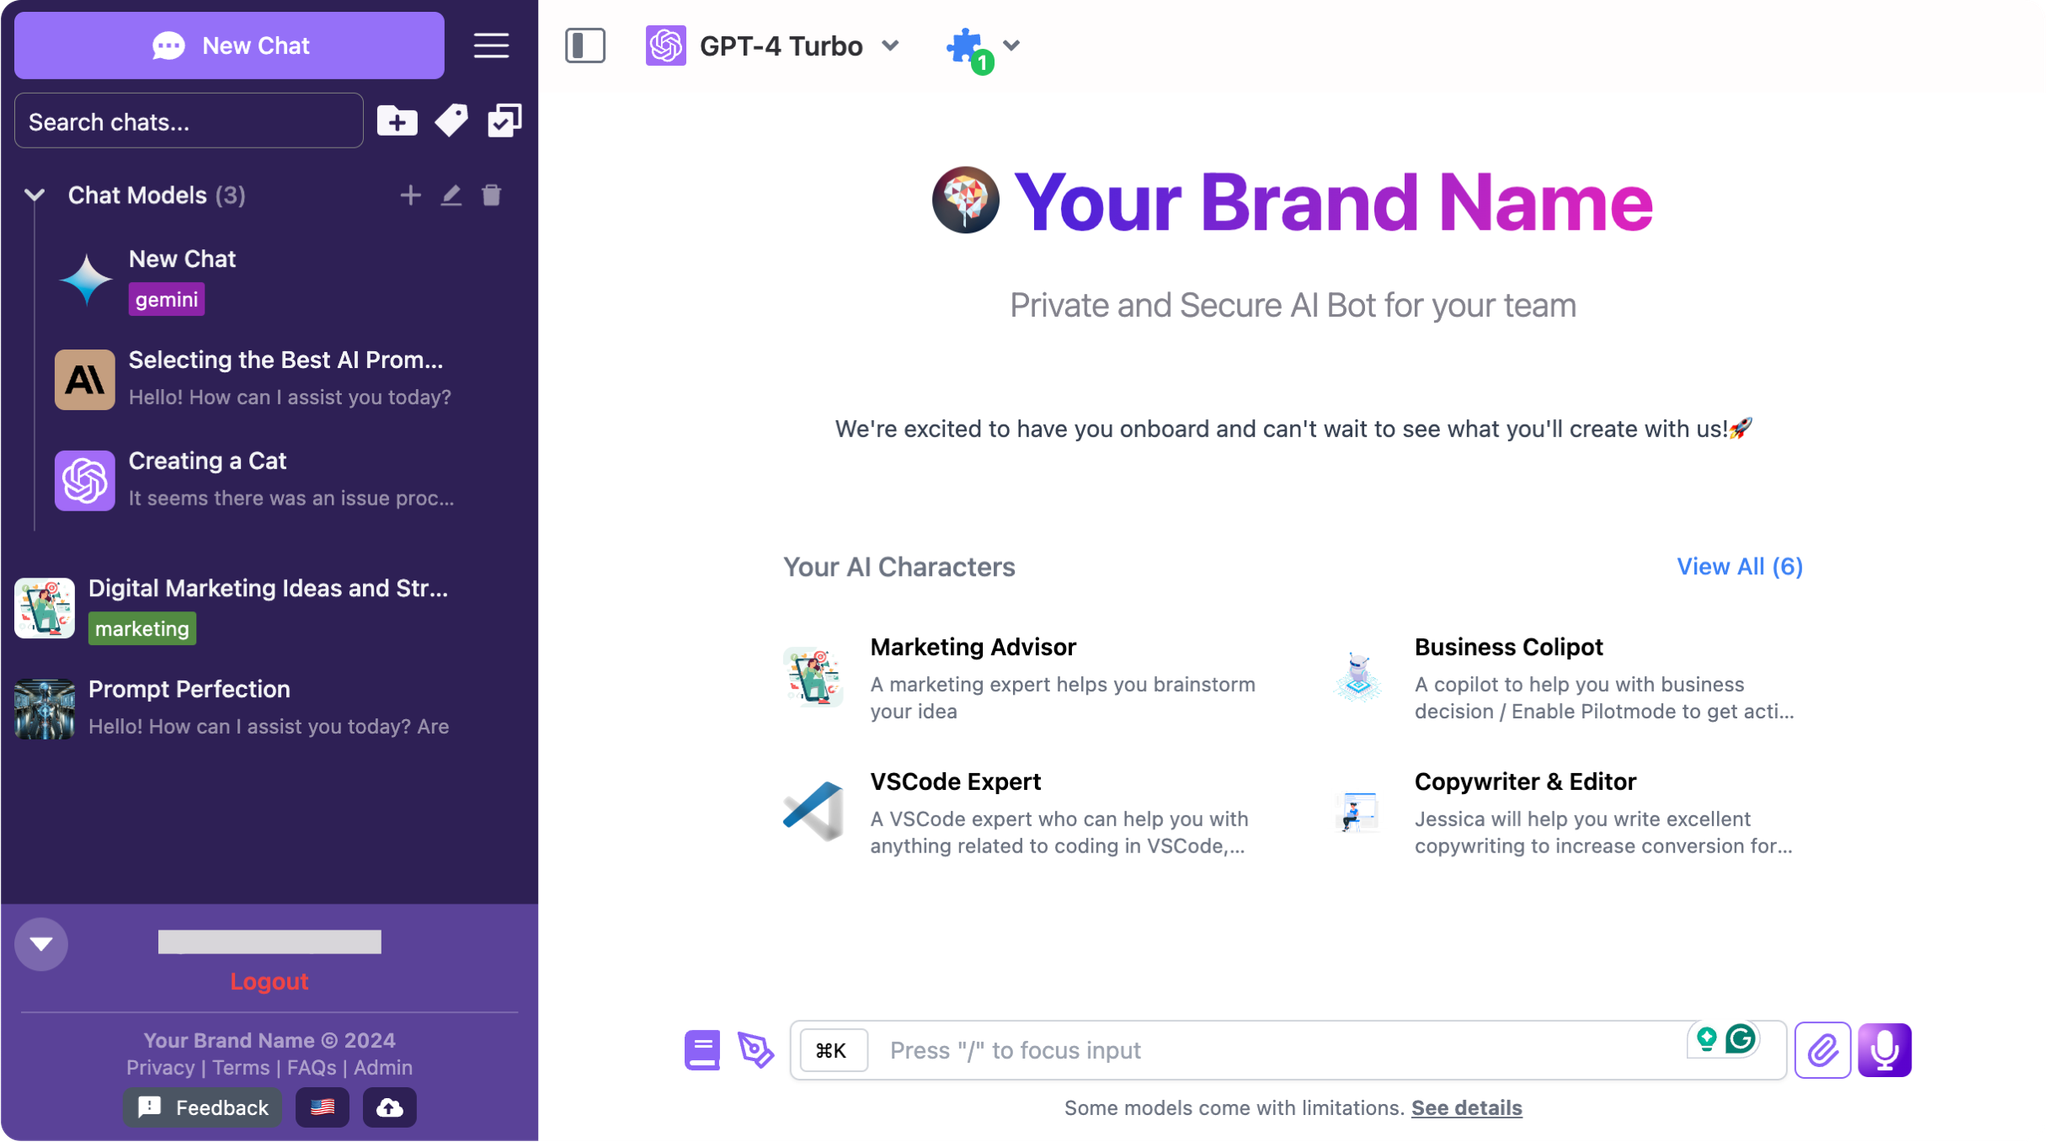
1. Customize the AI workspace with your branding
Customize the chat interface to align with your brand style, including:
- Brand name, logo, tagline
- Custom domain
- Custom theme
- Language
- Links
All of these options can be done at Portal Settings > Branding
2. Control which features should be available on the workspace
Determine which features should be visible in the chat interface. Navigate to the "Chat Features" section to enable or disable features on the user interface (UI).
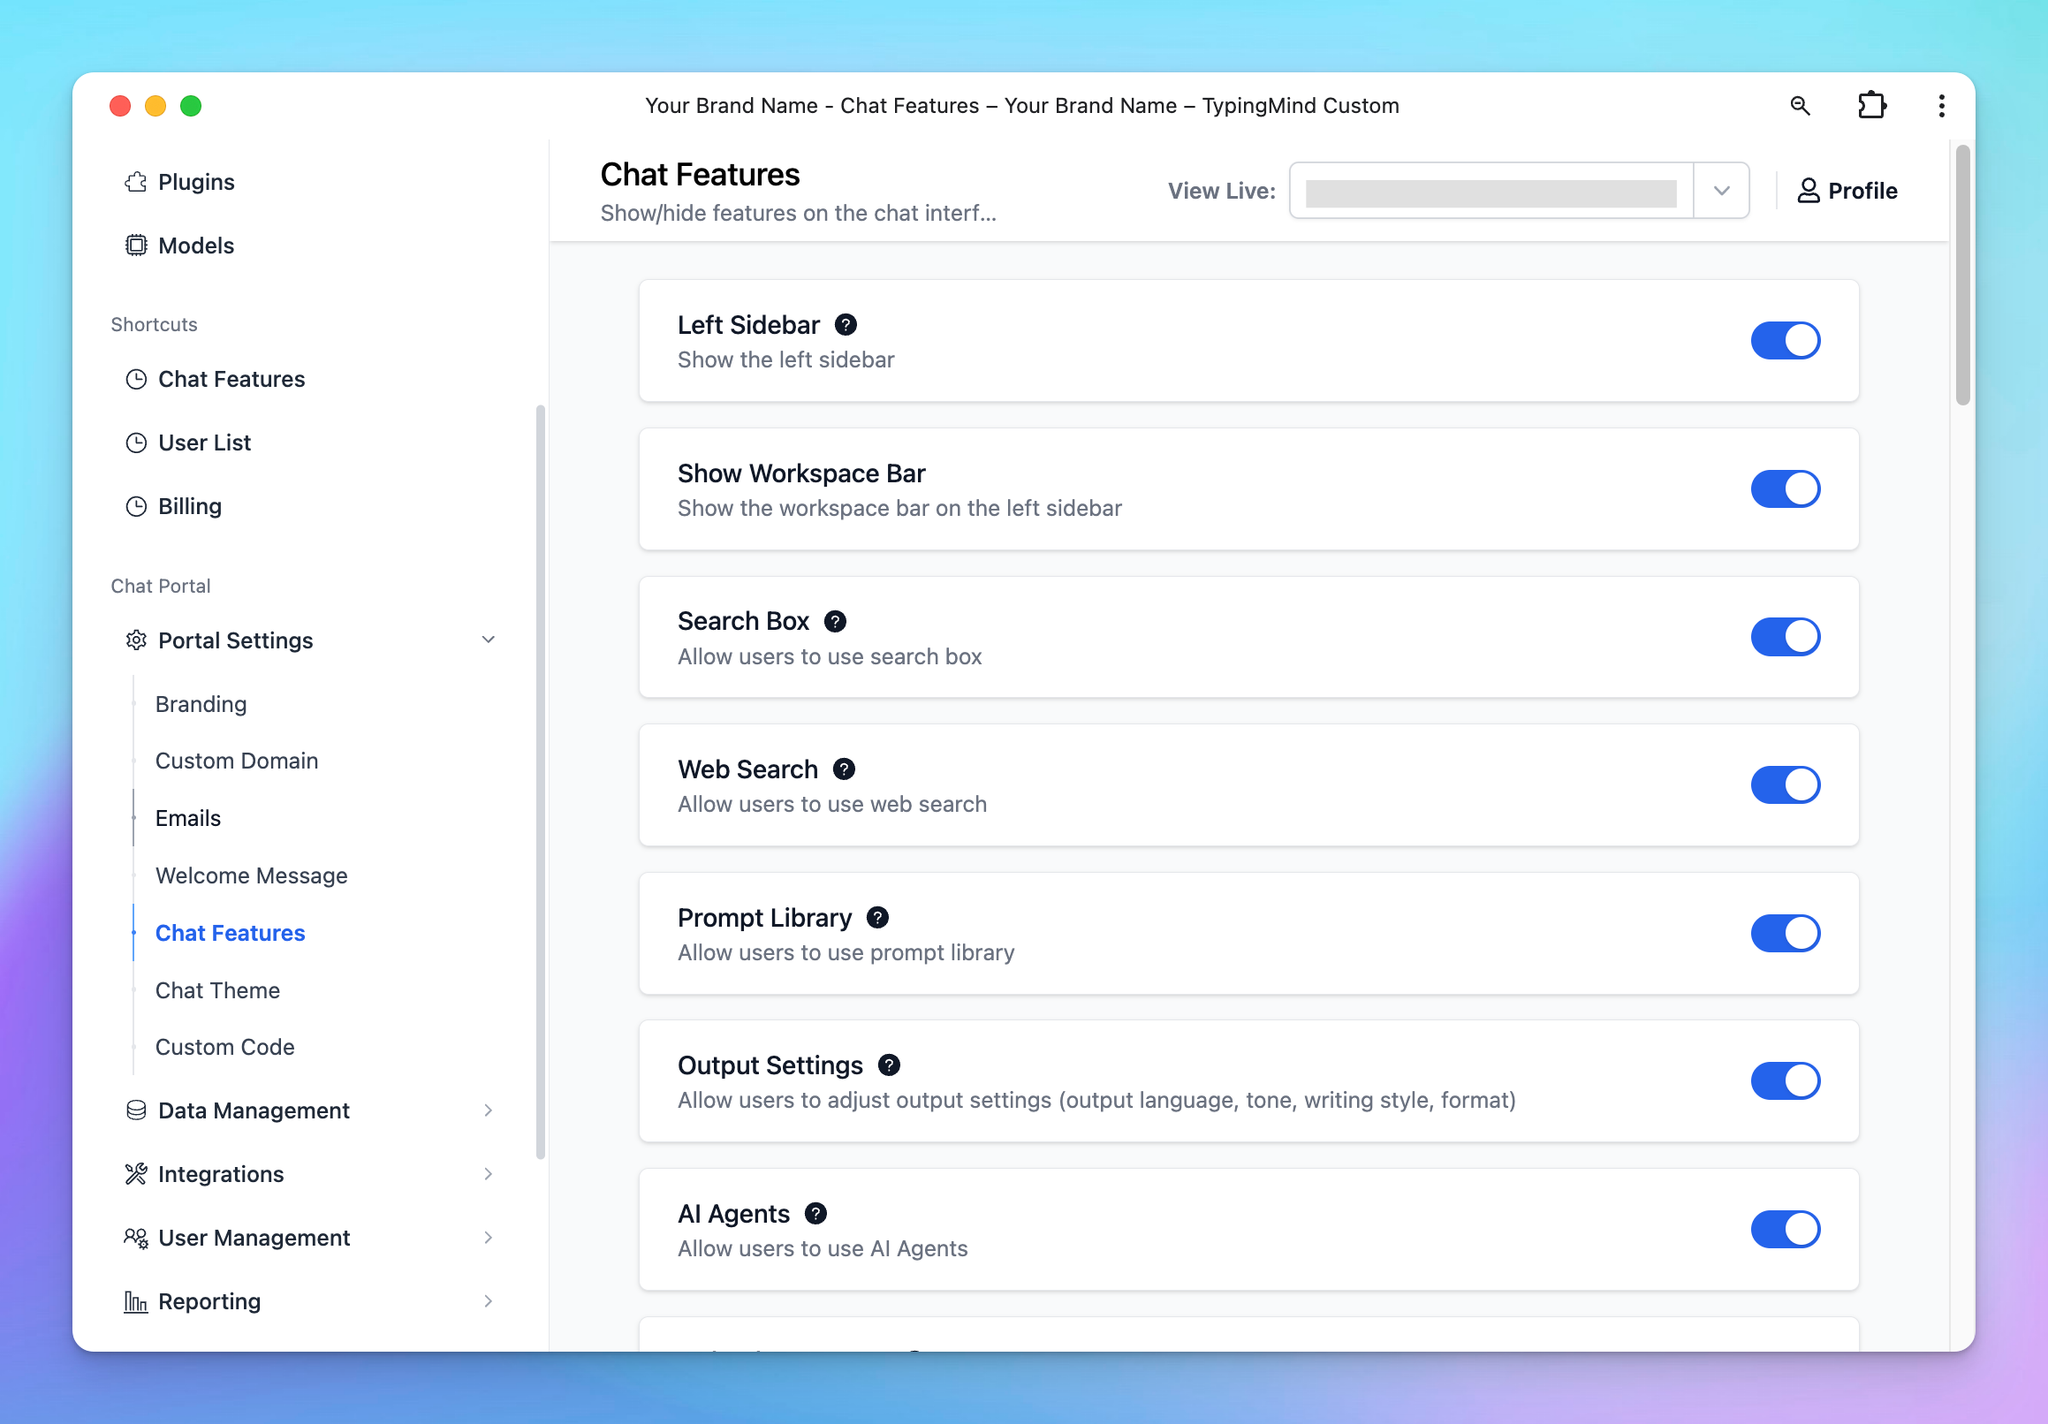
Once a feature is disabled, it will no longer appear on the chat interface, meaning that your members will not be able to see or use it.
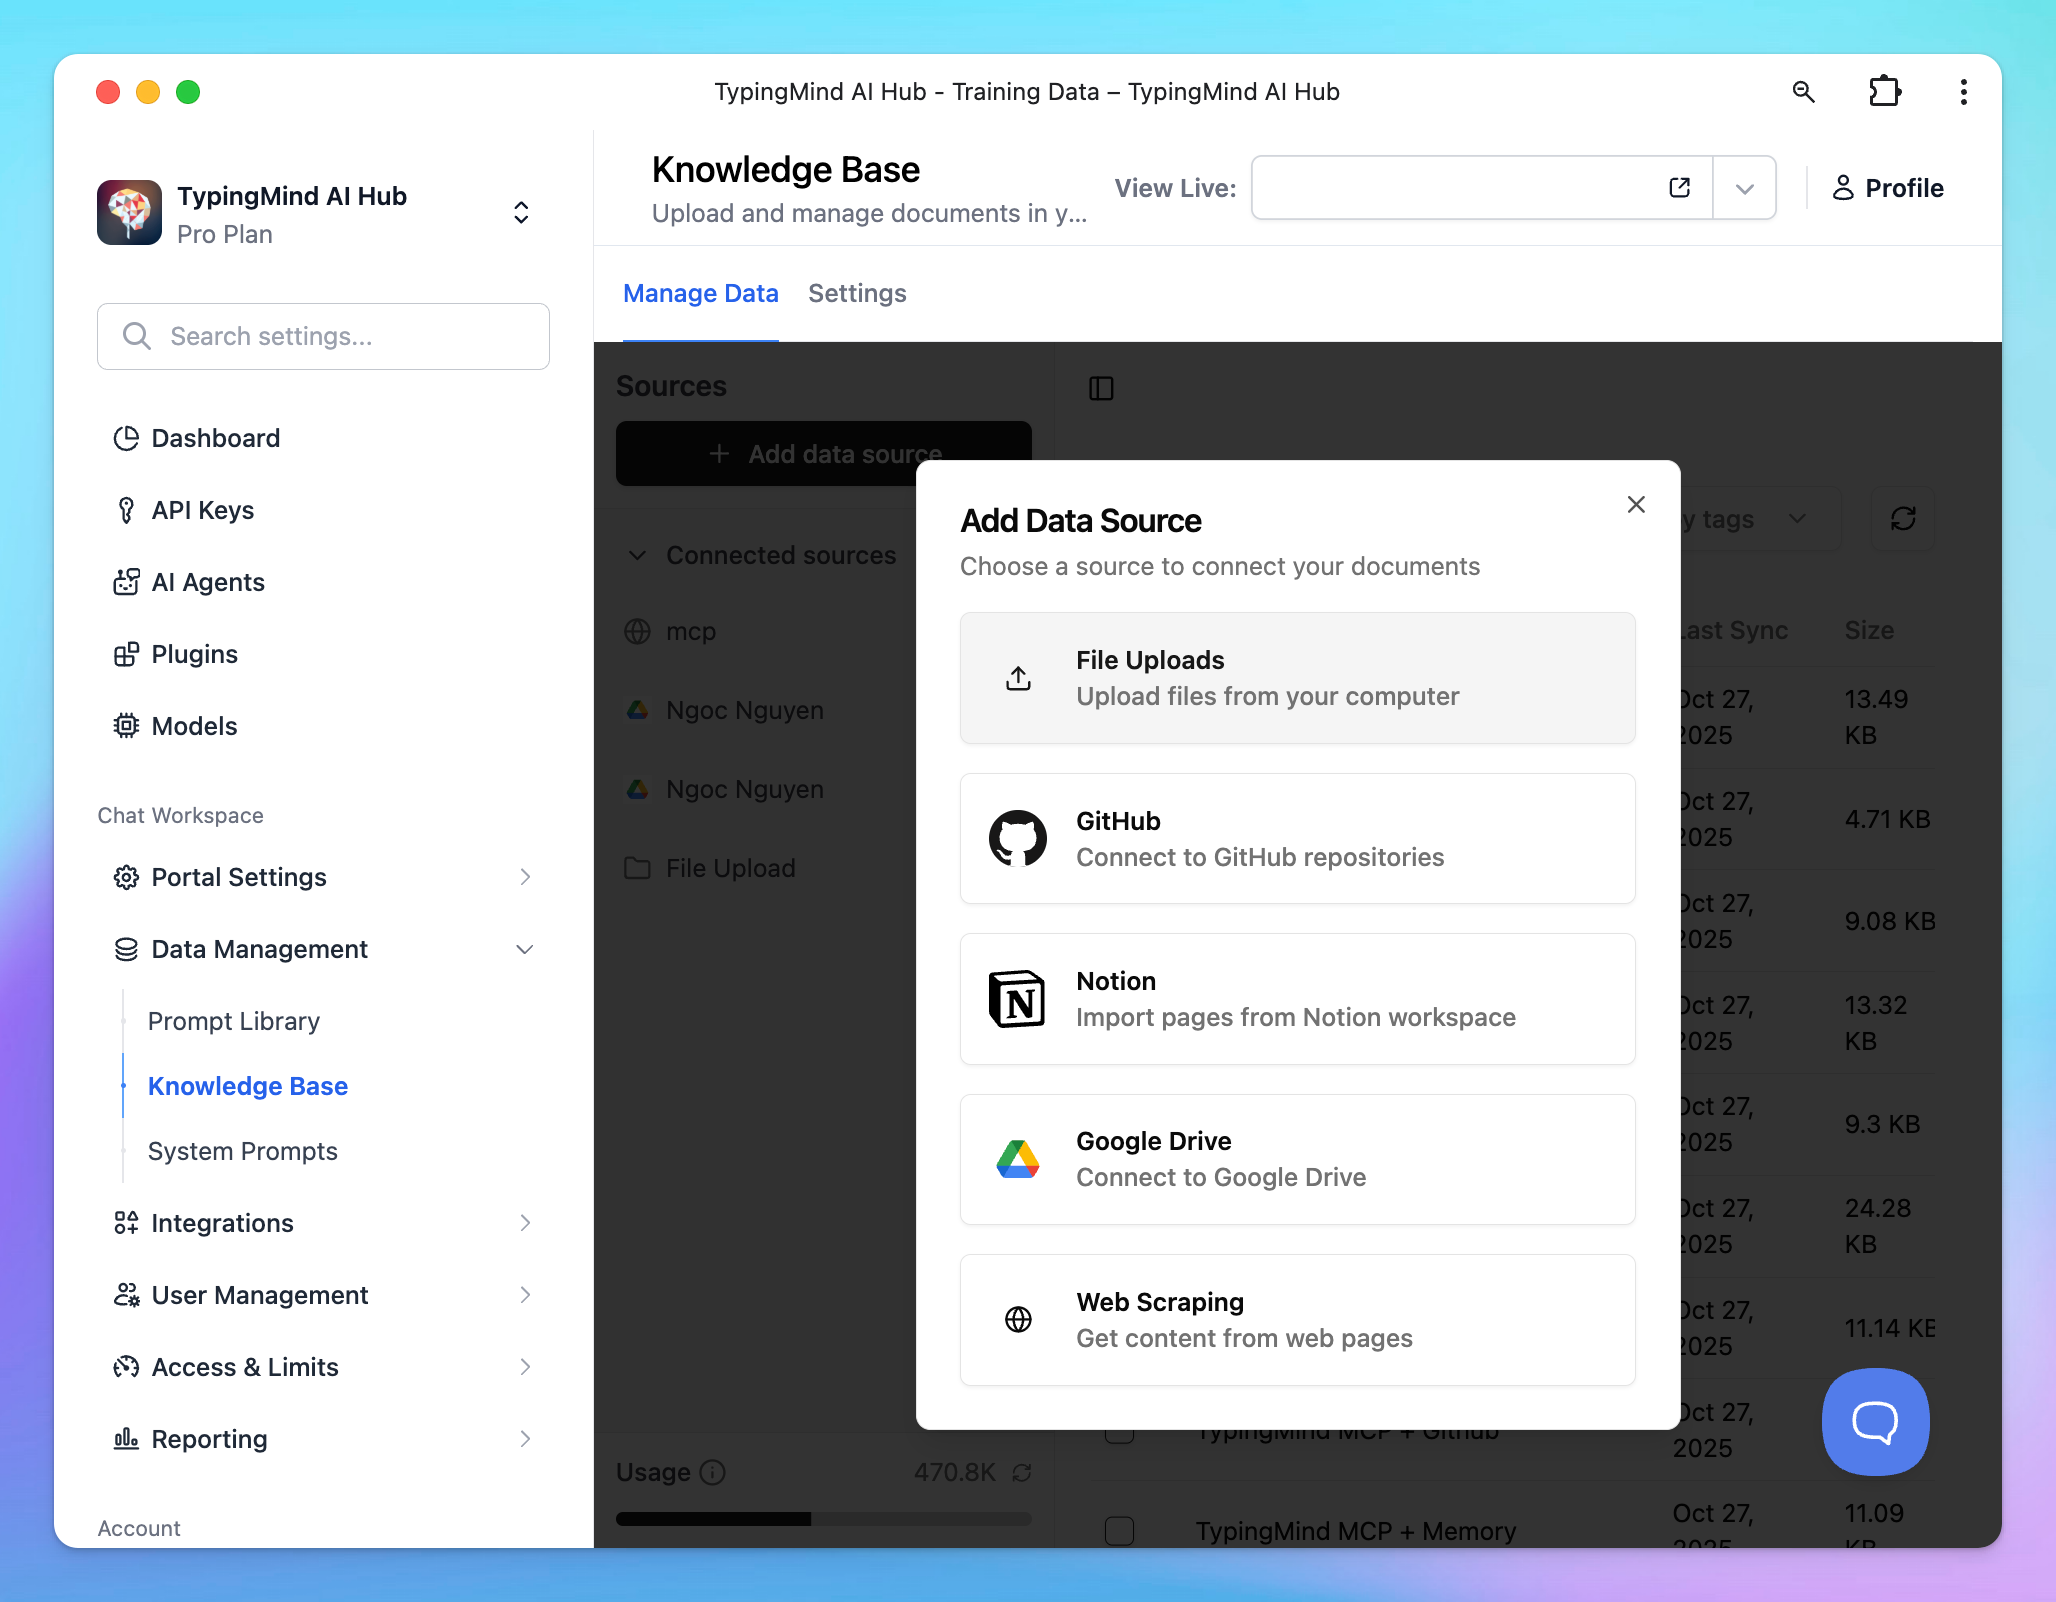
Step 7: Train the AI assistant with your company knowledge base
Train the AI assistant with custom knowledge base to let it work as a private chatbot that can answer personalized questions to your team.
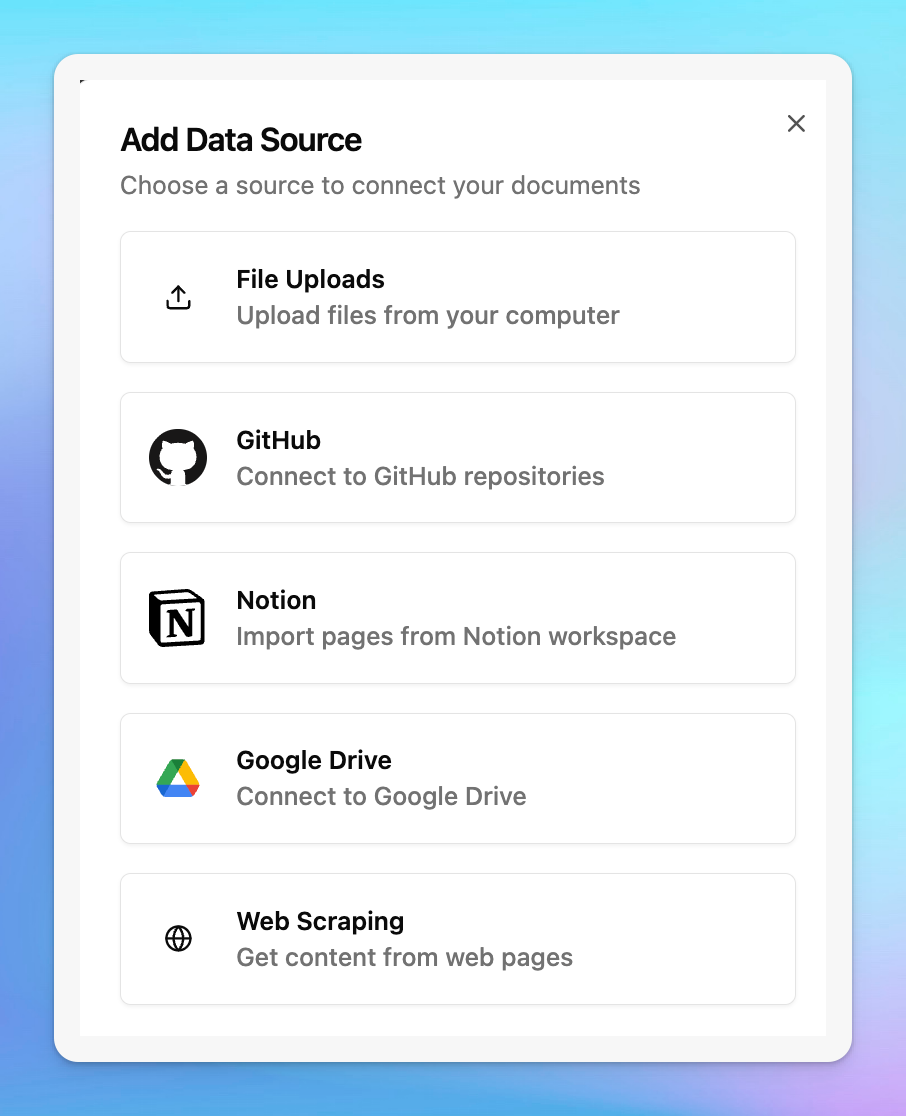
You can connect knowledge base from multiple sources, including Notion, Github, Google Drive, PDF, CSV, TXT, and more:
- Go to Knowledge Base under the Data management system
- Click on the “Add Data Source” button
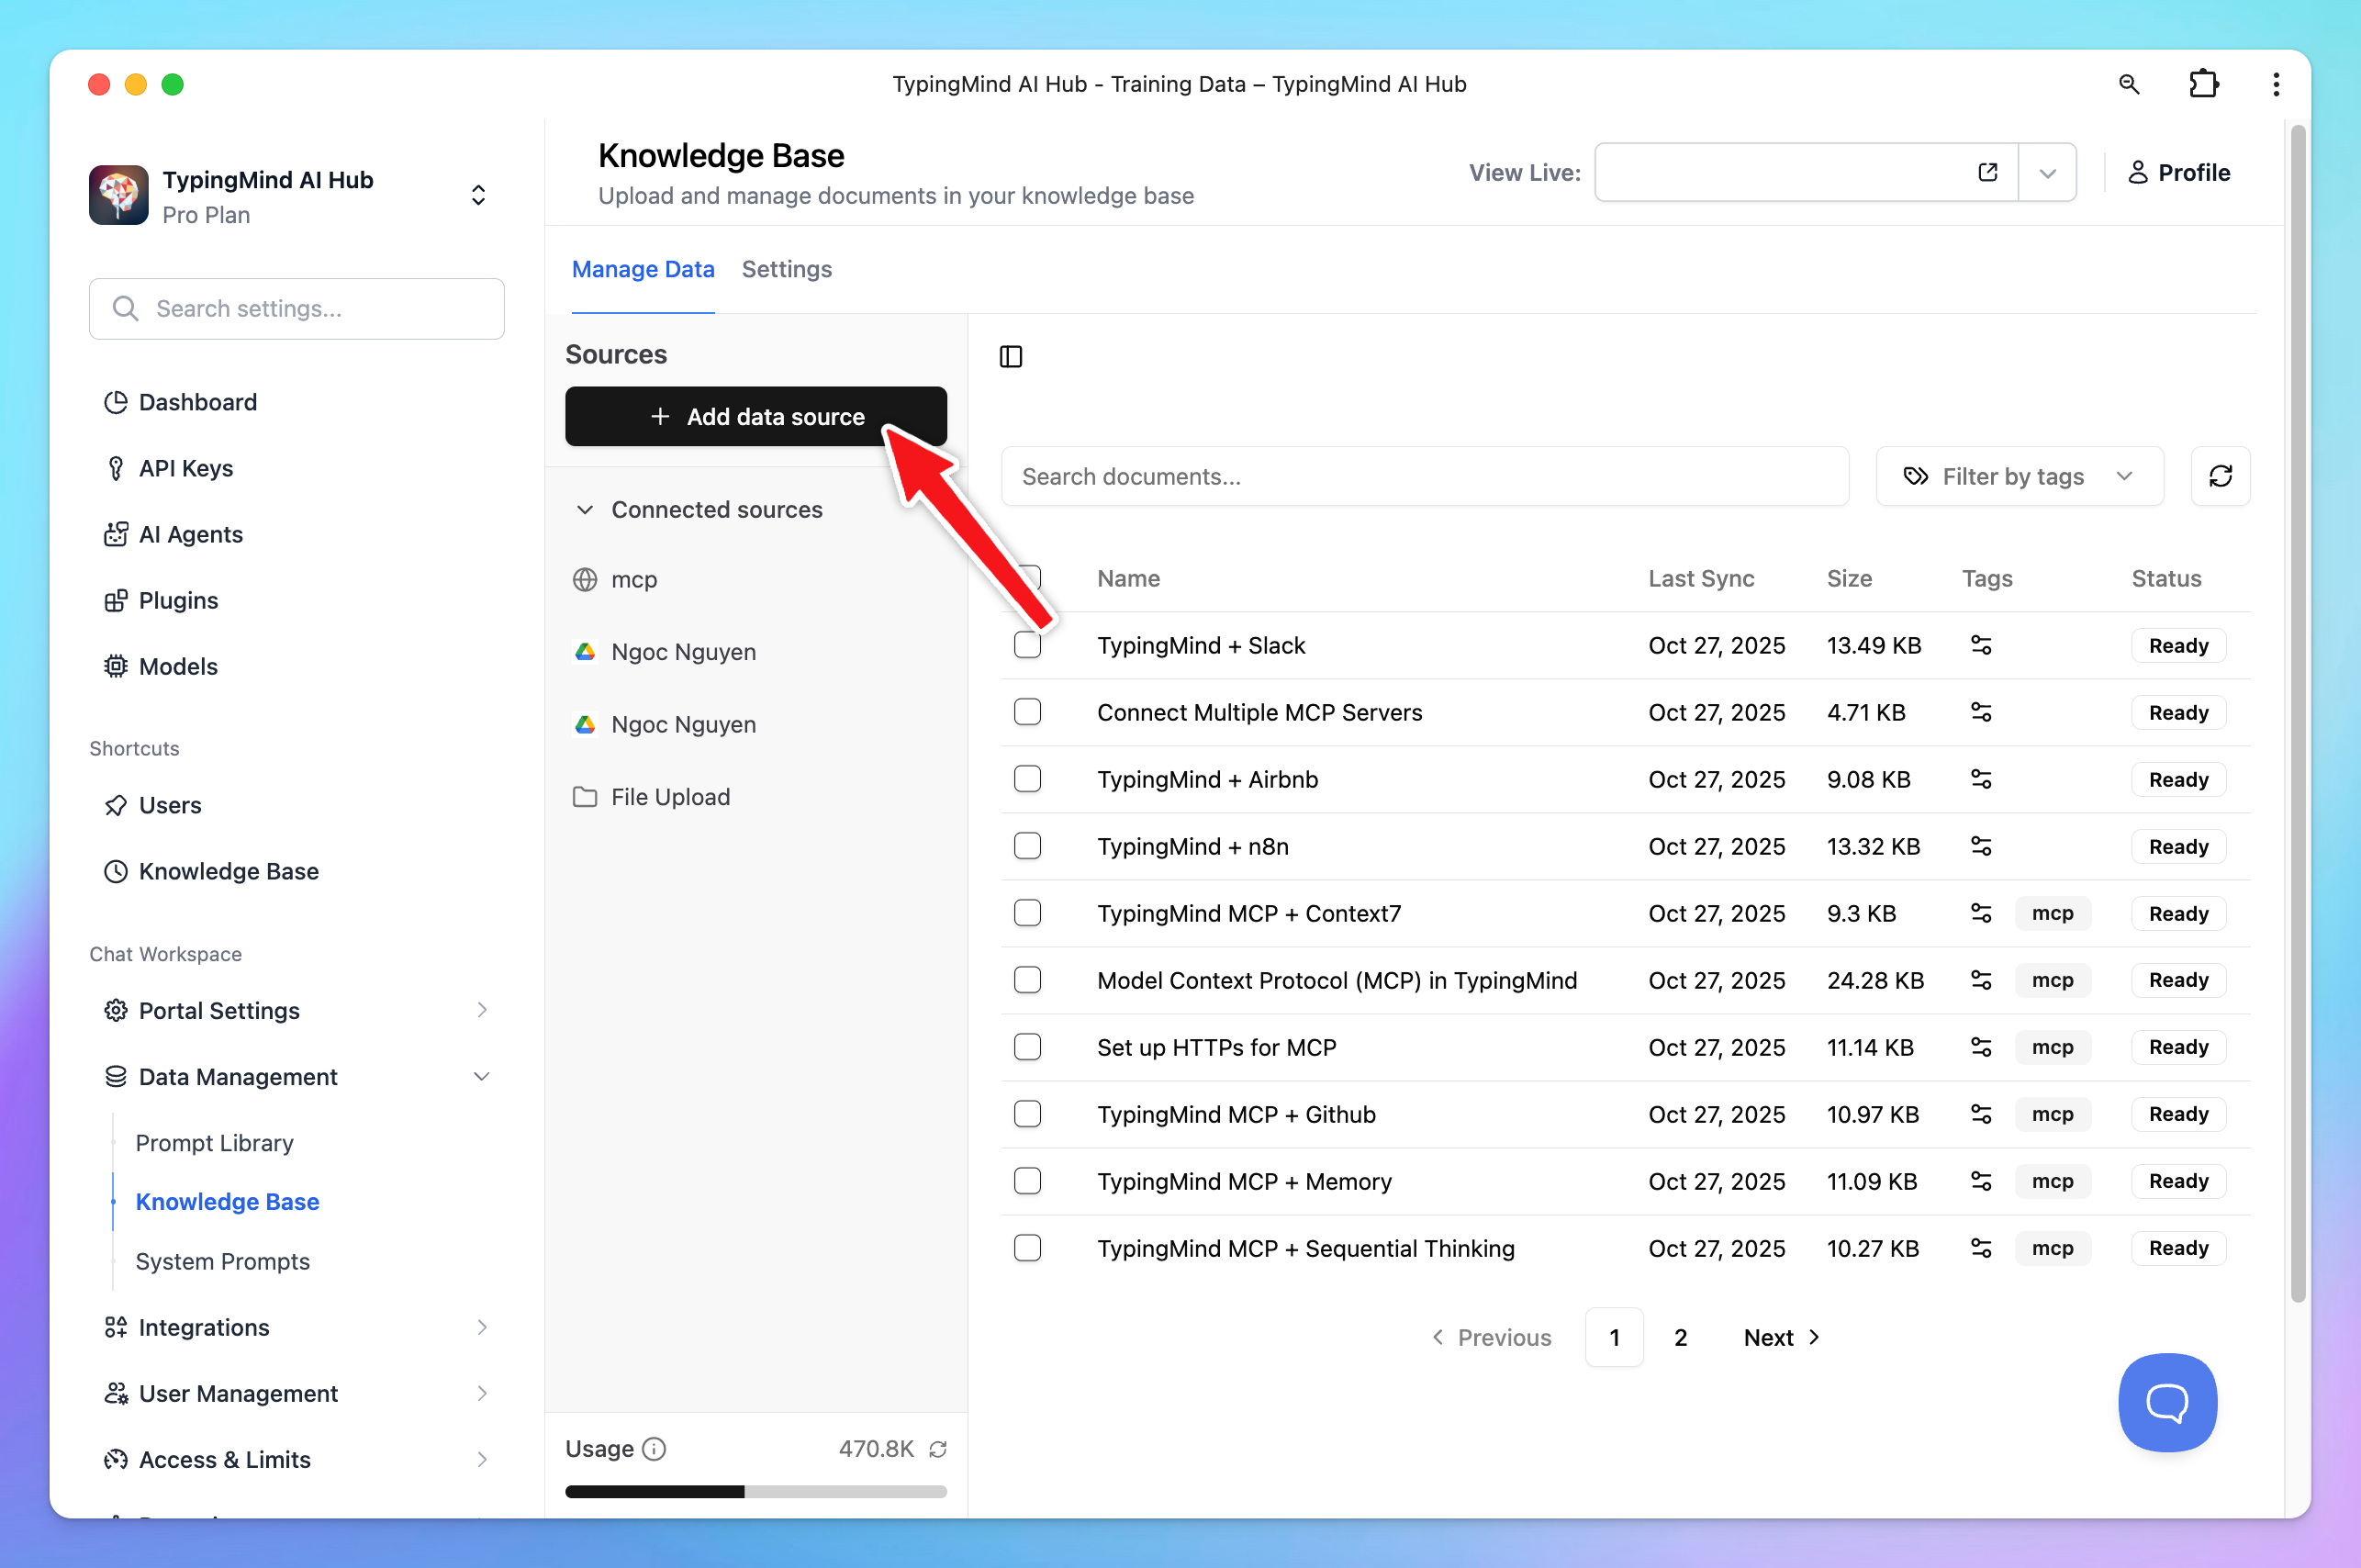
- Select a source of knowledge base to connect with your AI assistant:
In case you are not sure how we retrieve data so the AI model can answer properly, check How Your Knowledge Base Works
Step 8: Build shared resources for your team
Build shared Prompts, AI Agents, and Plugins so your team can access these resources effortlessly without manually setting them up on their end.
1. Create Prompt Library
Create shared prompts that all team members can utilize and collaborate in your shared AI workspace.
Here’s how:
- Click on Prompts library under the Data Management section in the Admin Panel
- “Add Prompts” to create built-in prompts for your team.
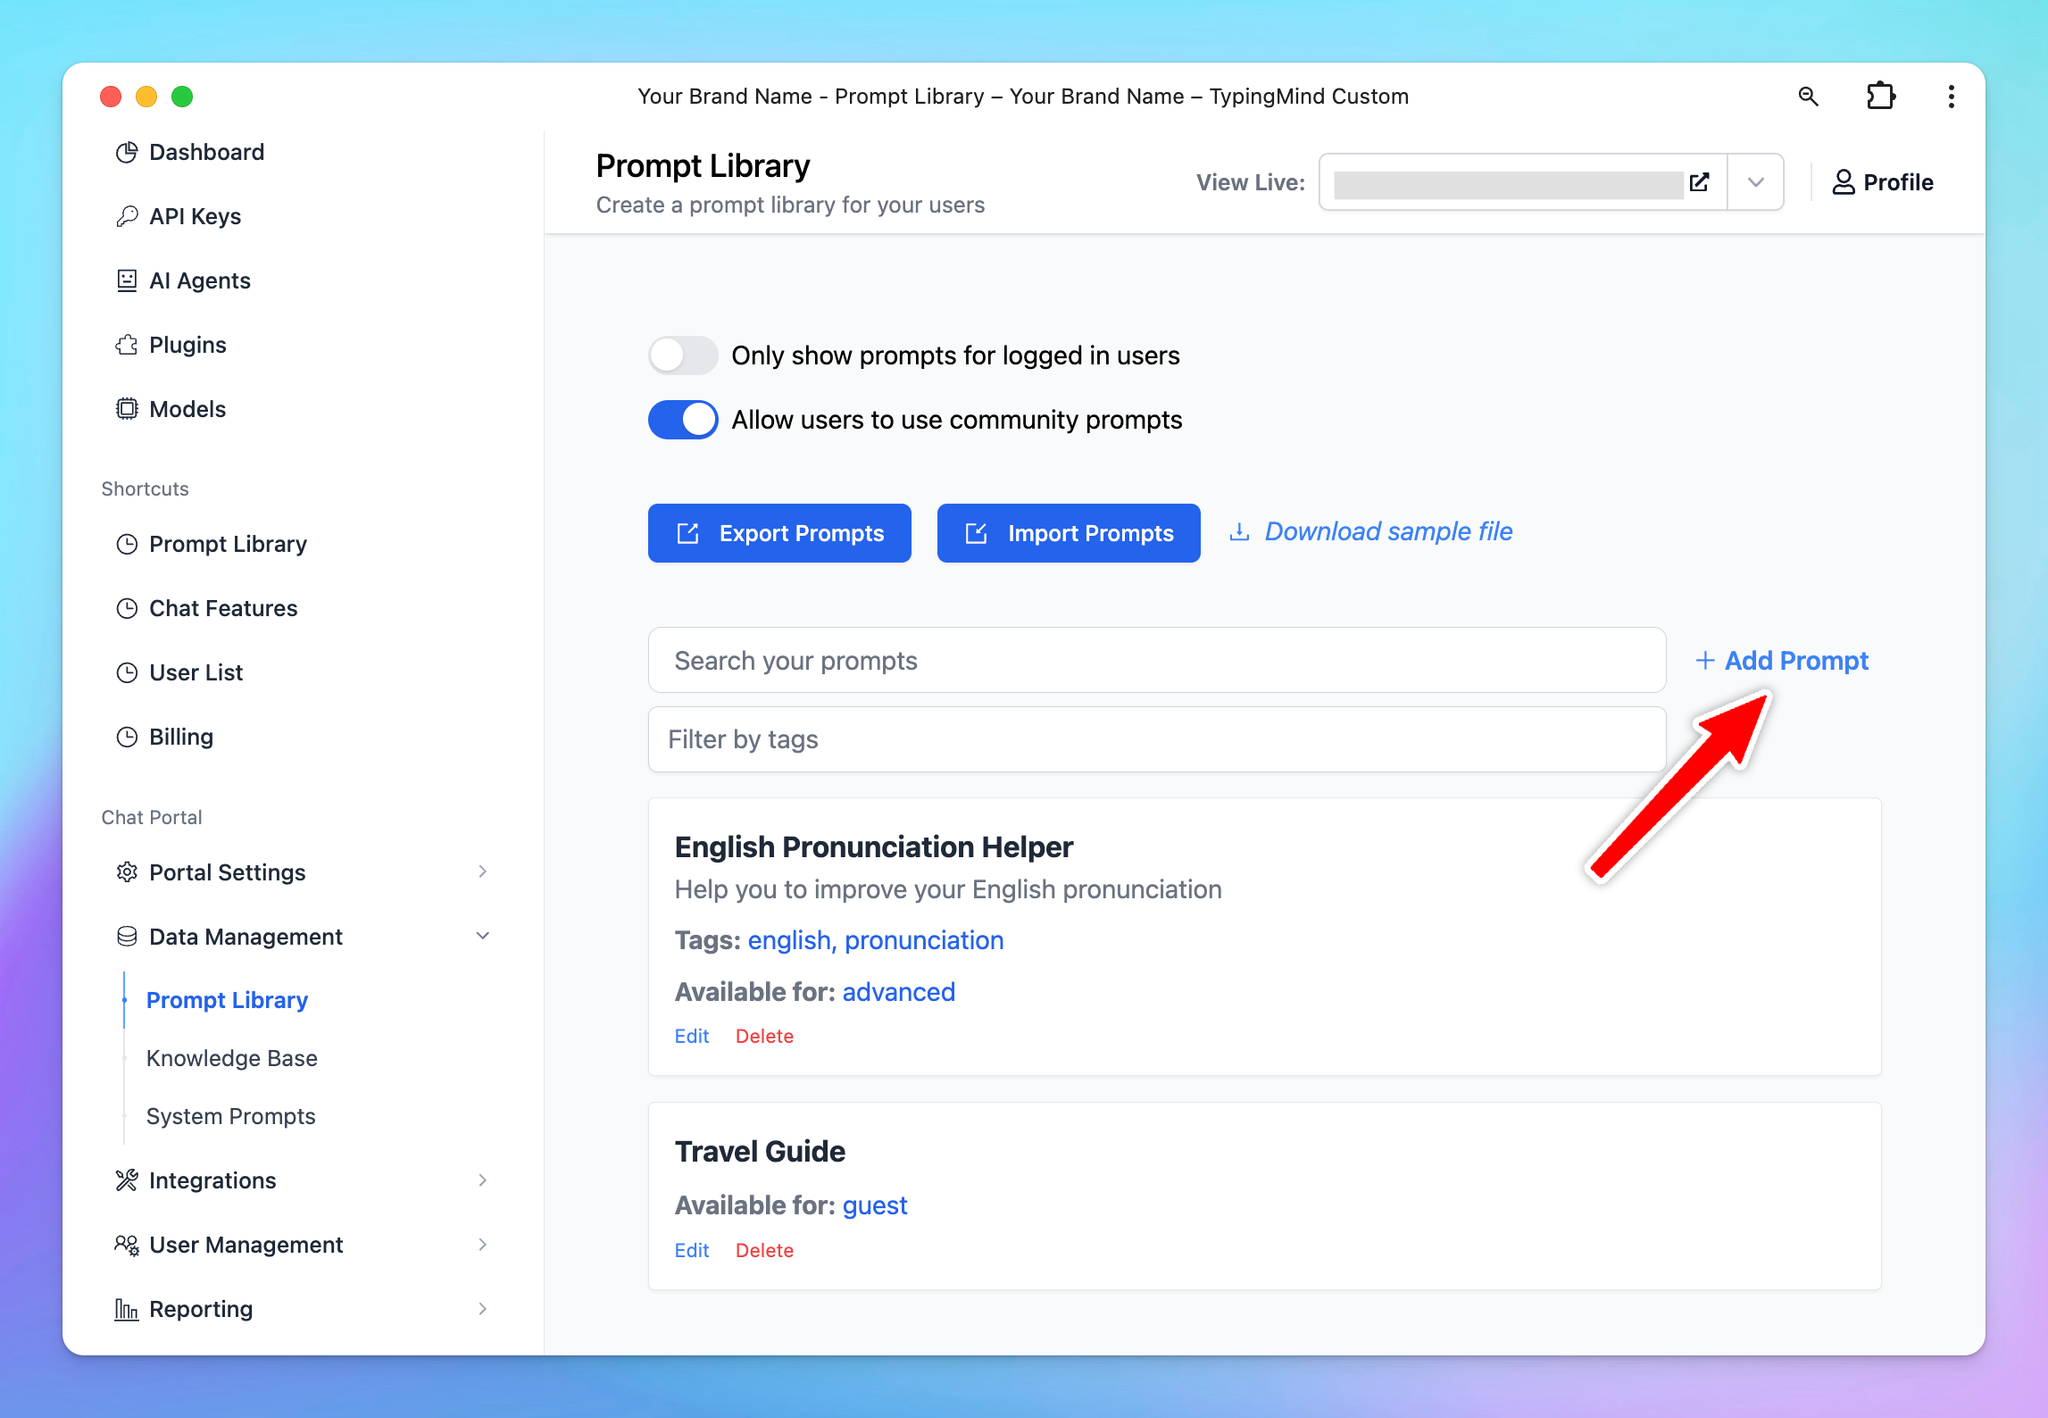
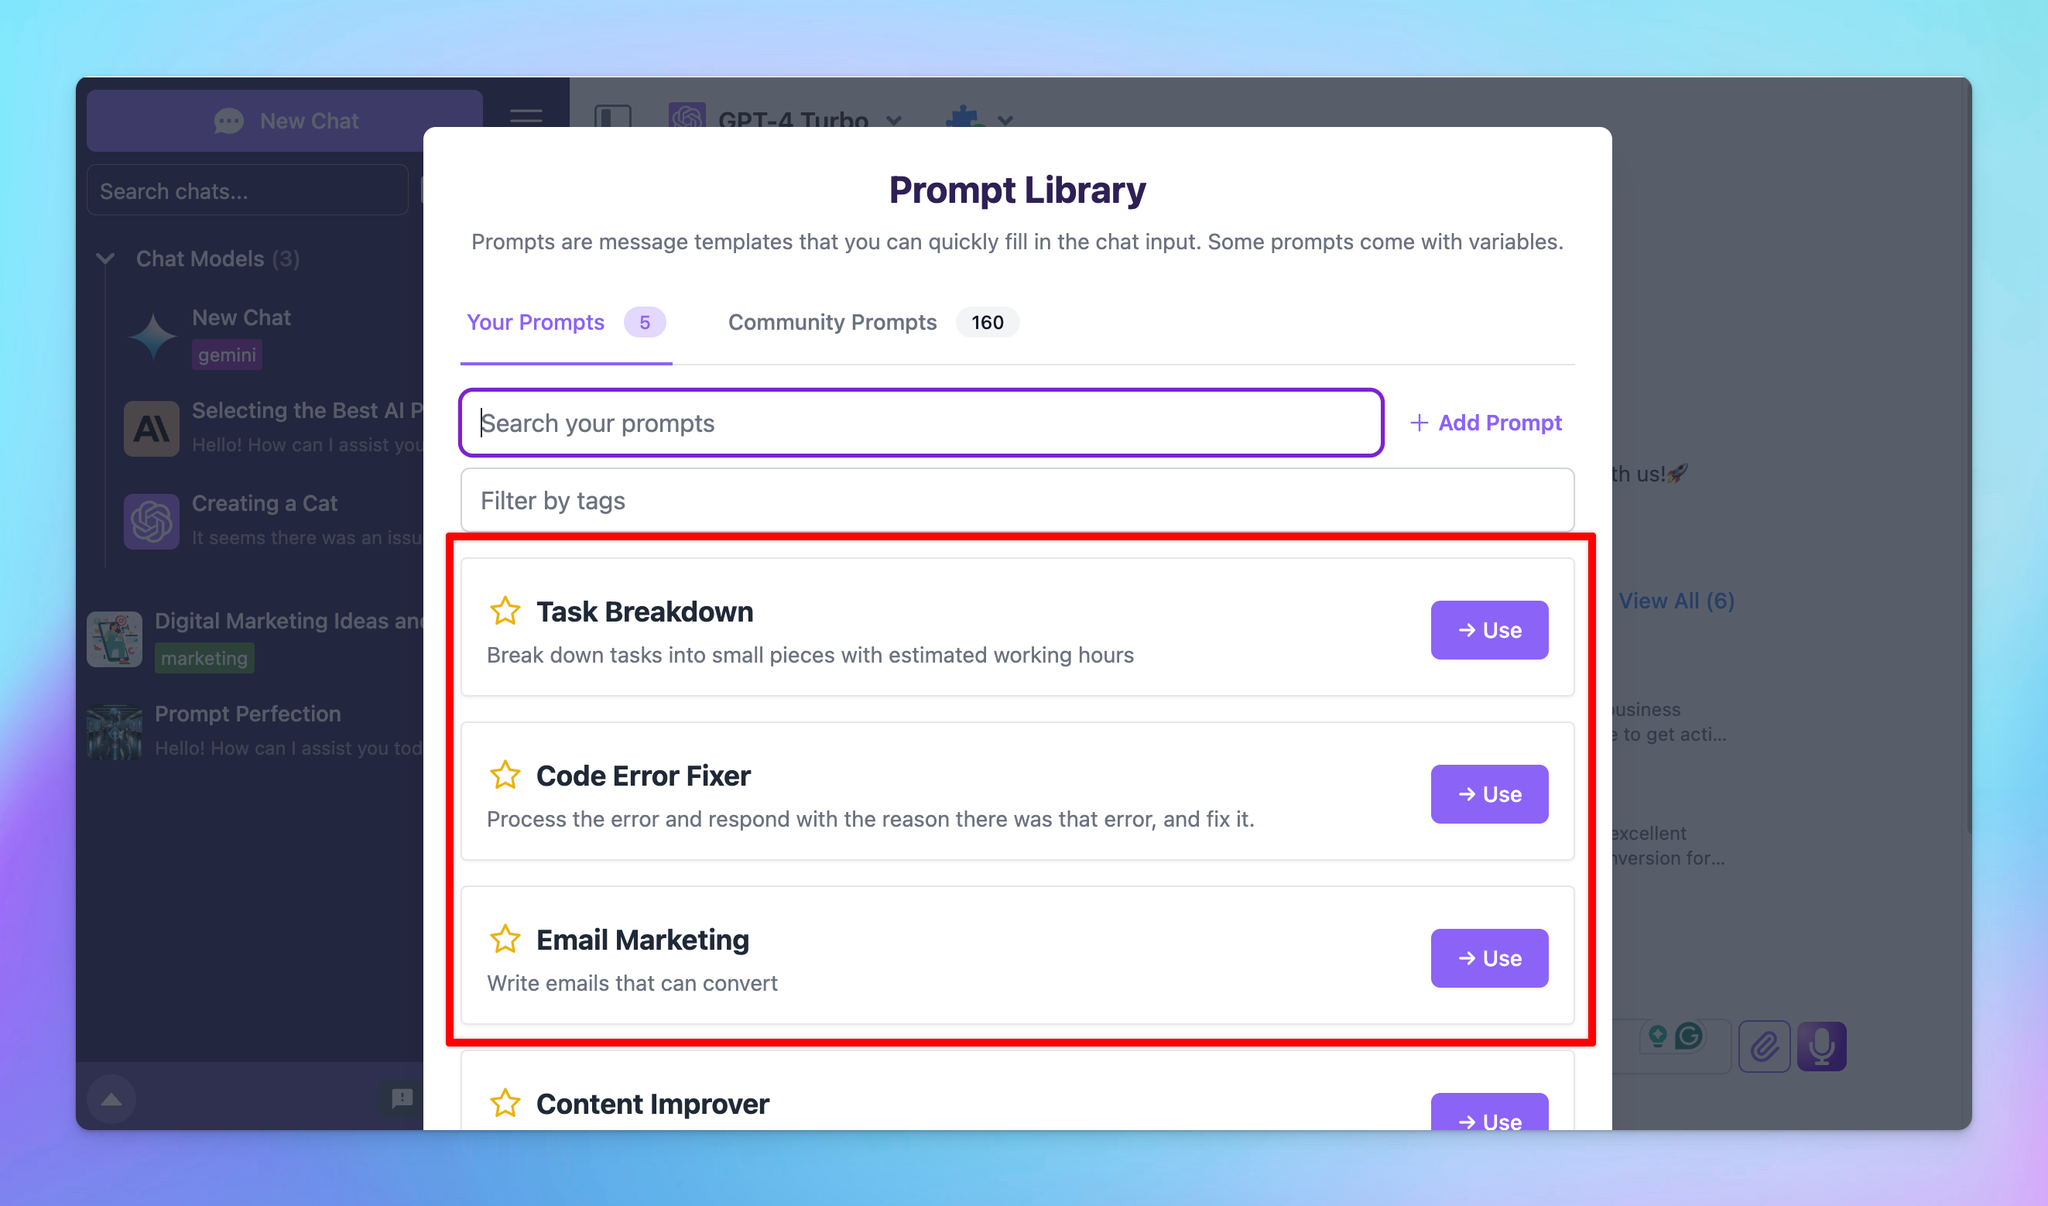
Members will easily access your pre-built prompt library and make use of the prompts to get the best answers.
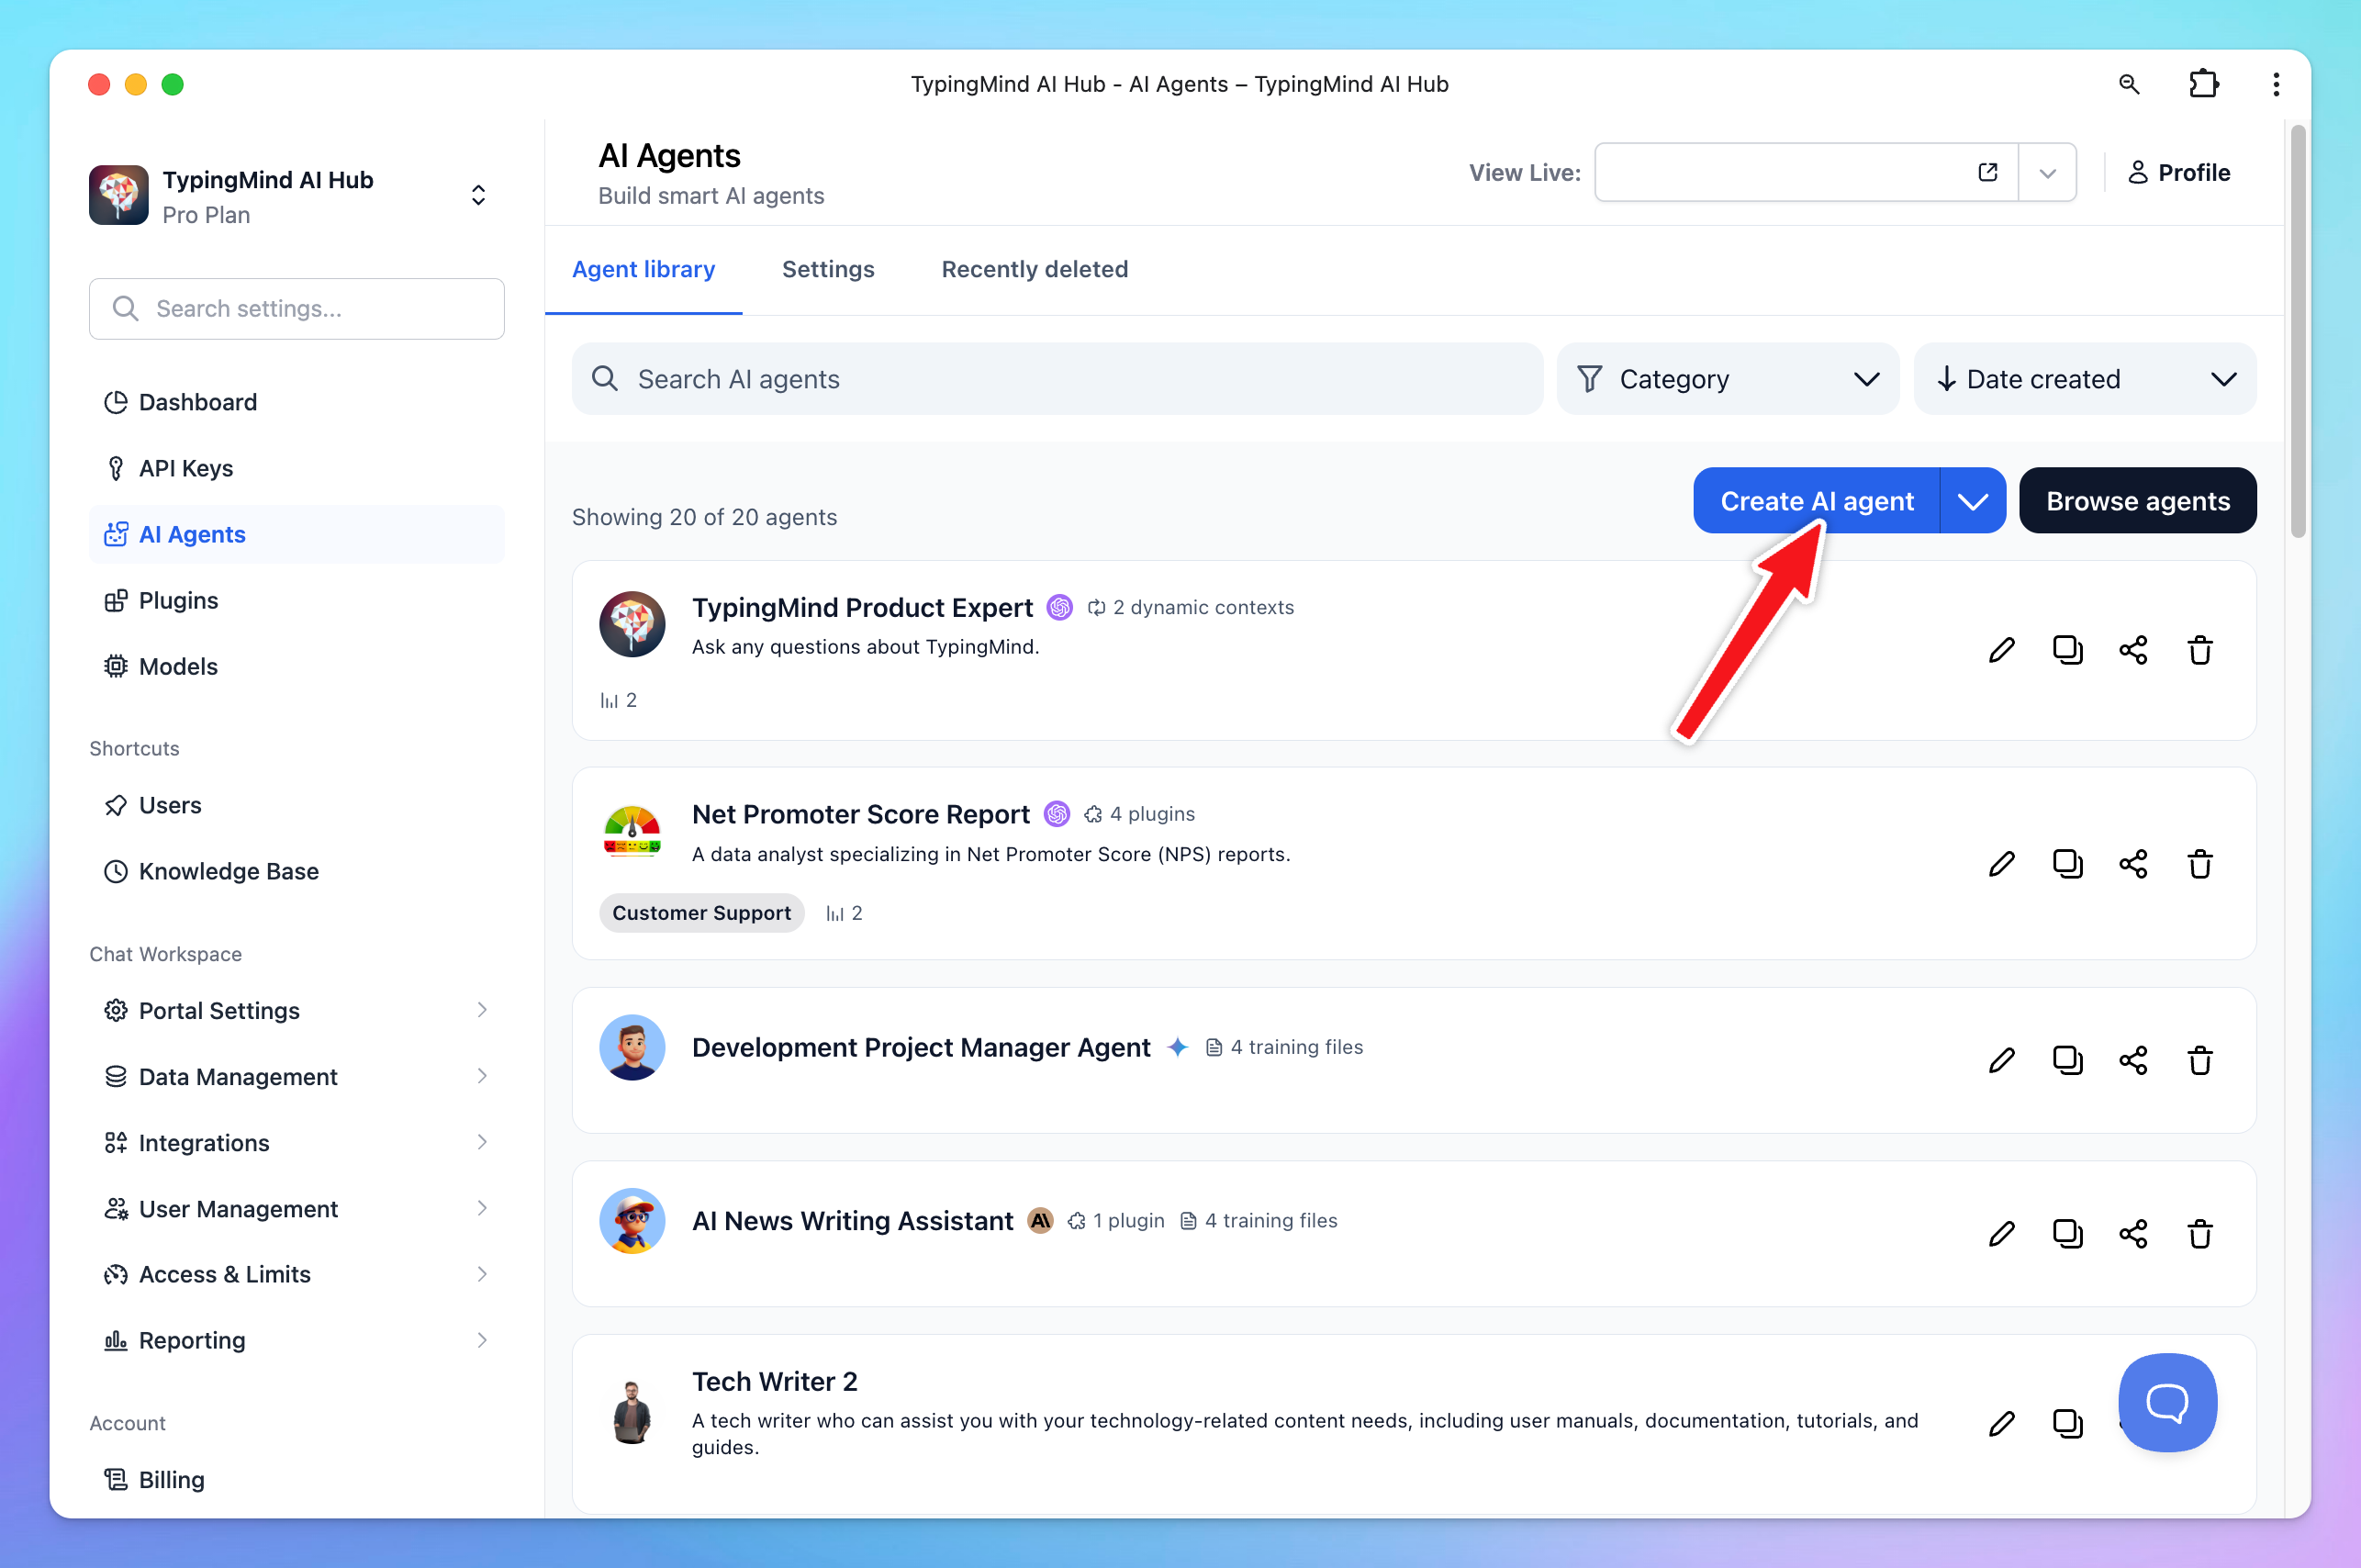
2. Develop an AI Agents collection and pin them on the chat UI
Create a custom AI Agent for your chat instance to serve as a specialized AI assistant for certain tasks. For example, a "Code Expert" AI Agent can help with coding and debugging.
Build as many AI Agents as you need, each designed for a different purpose, to significantly improve your team's workflow efficiency.
To create an AI Agent, follow the steps below:
- Click on "AI Agents"
- Click "Add AI Agent"
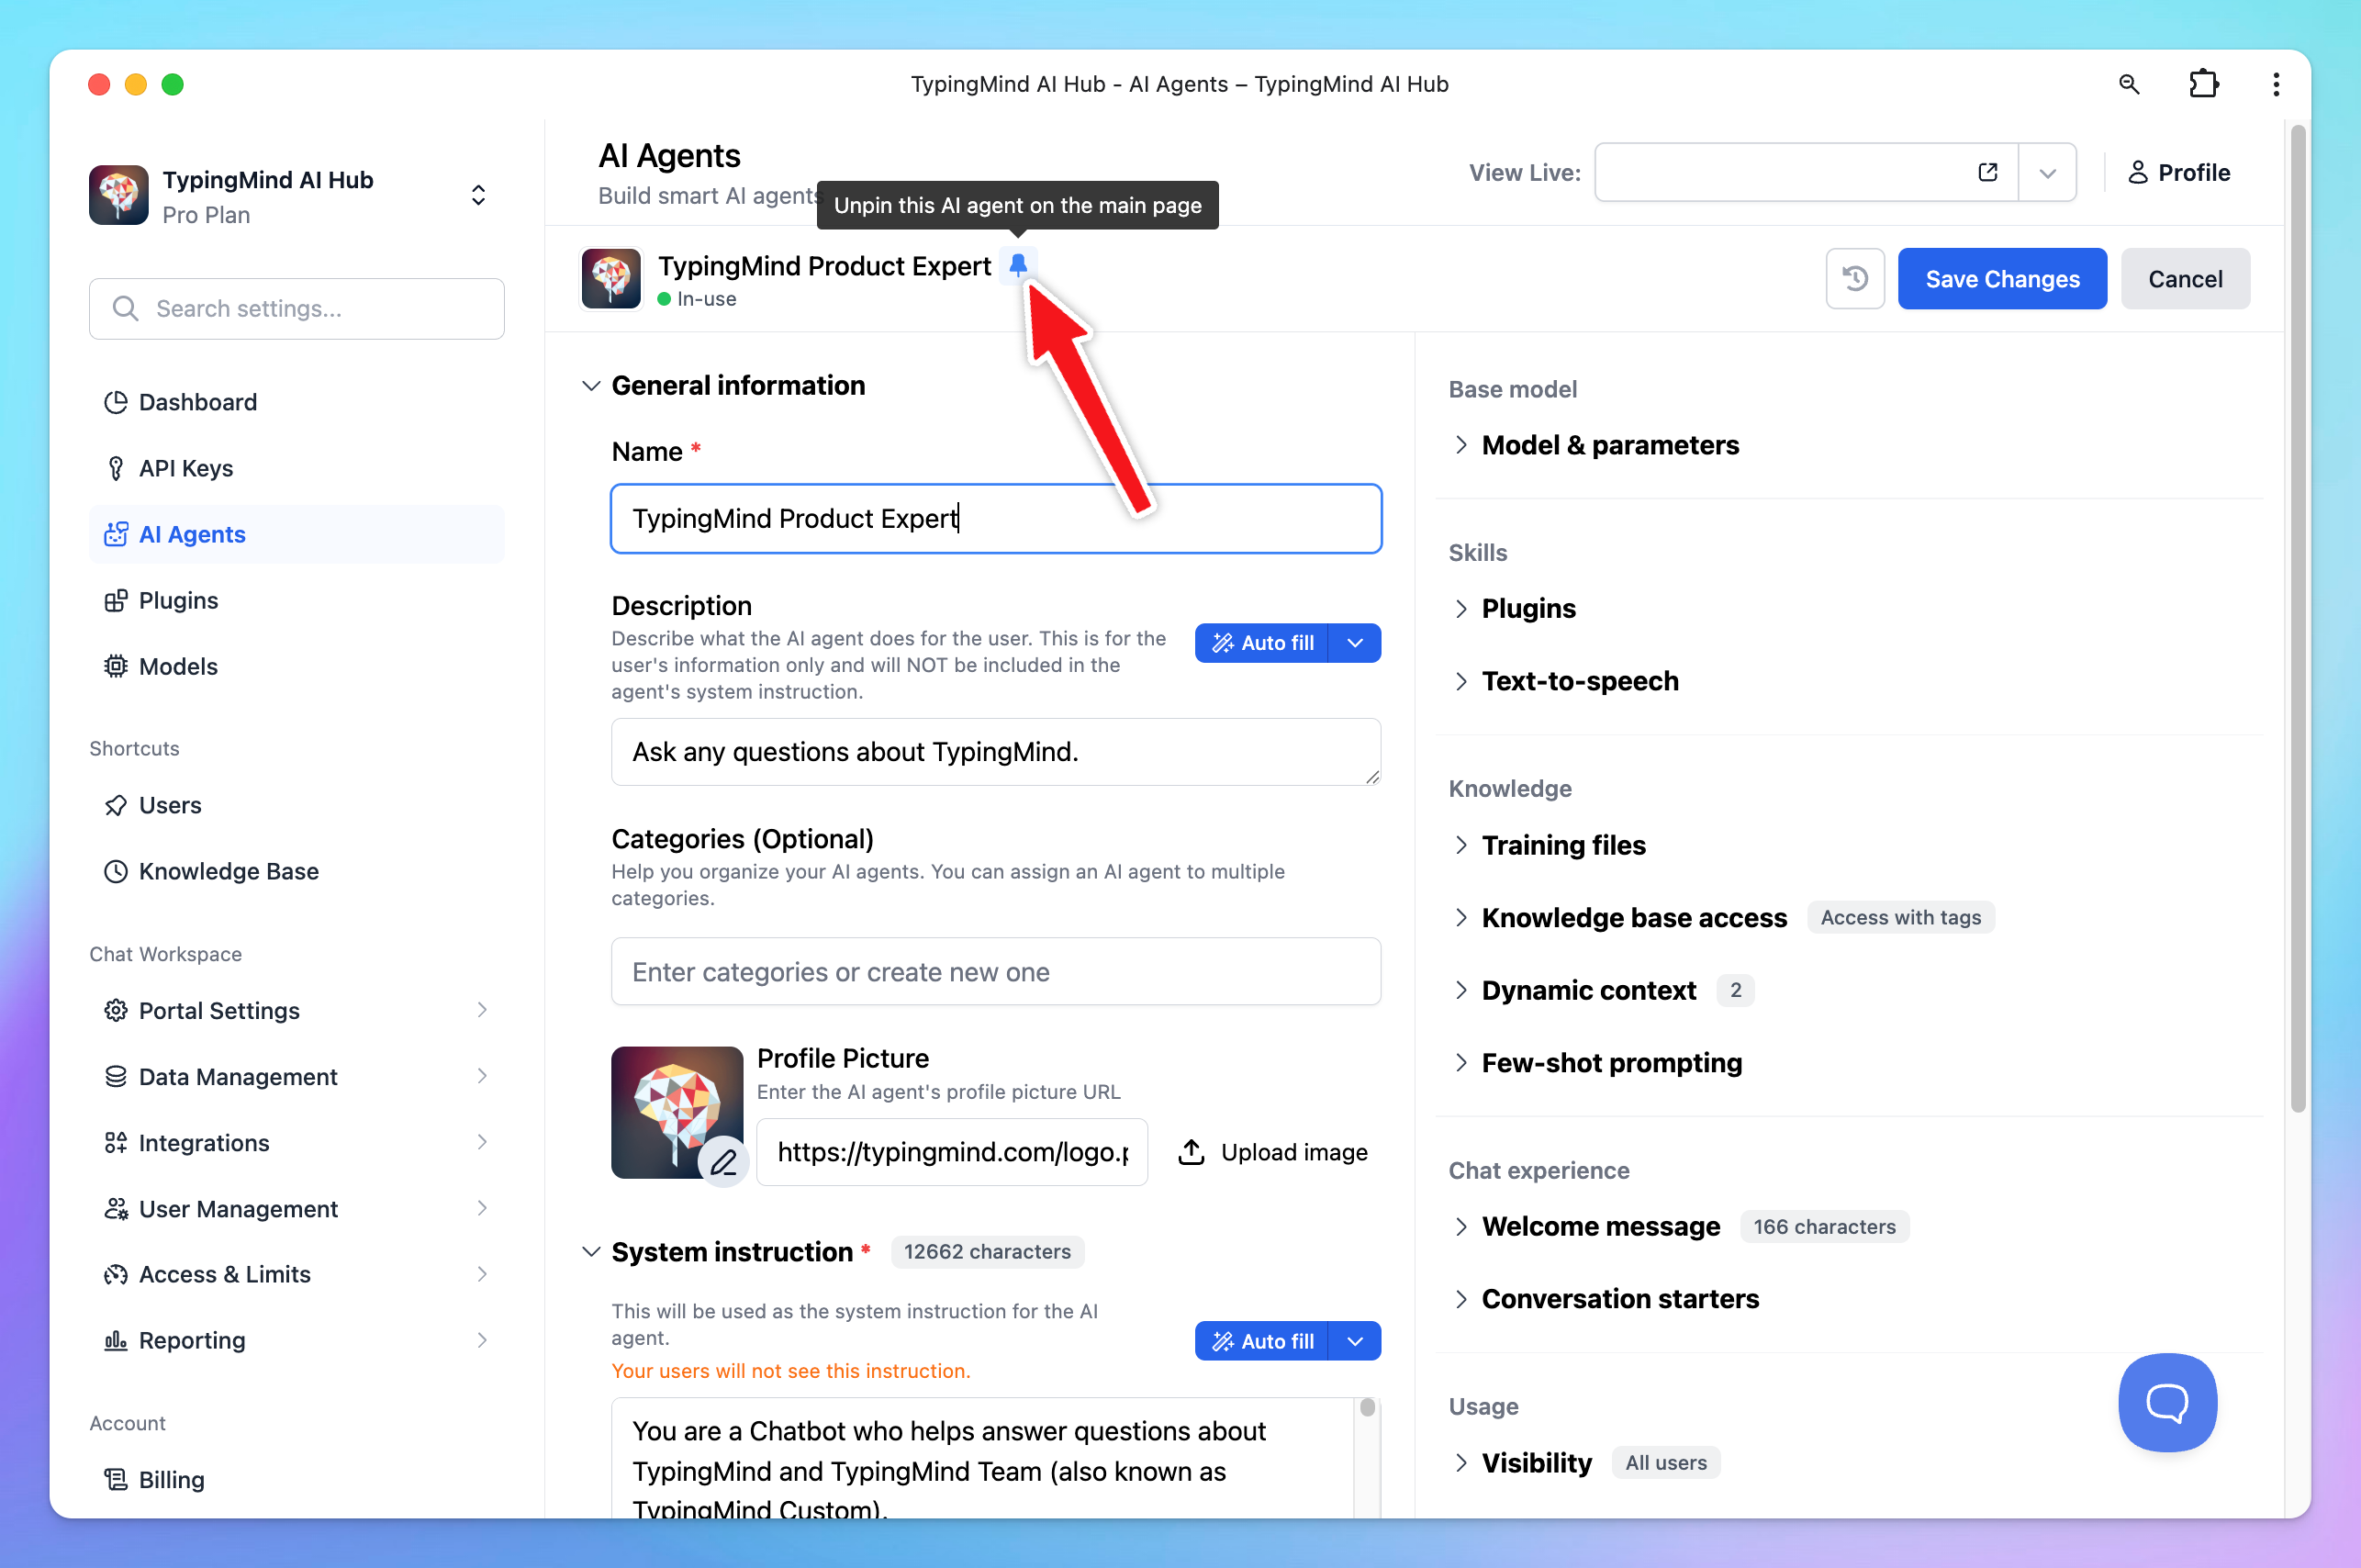
- Enter details such as the Name, Description, and Instructions to direct the AI on what to answer, and set who can access this AI Agent
To ensure your team has easy access to these AI Agents:
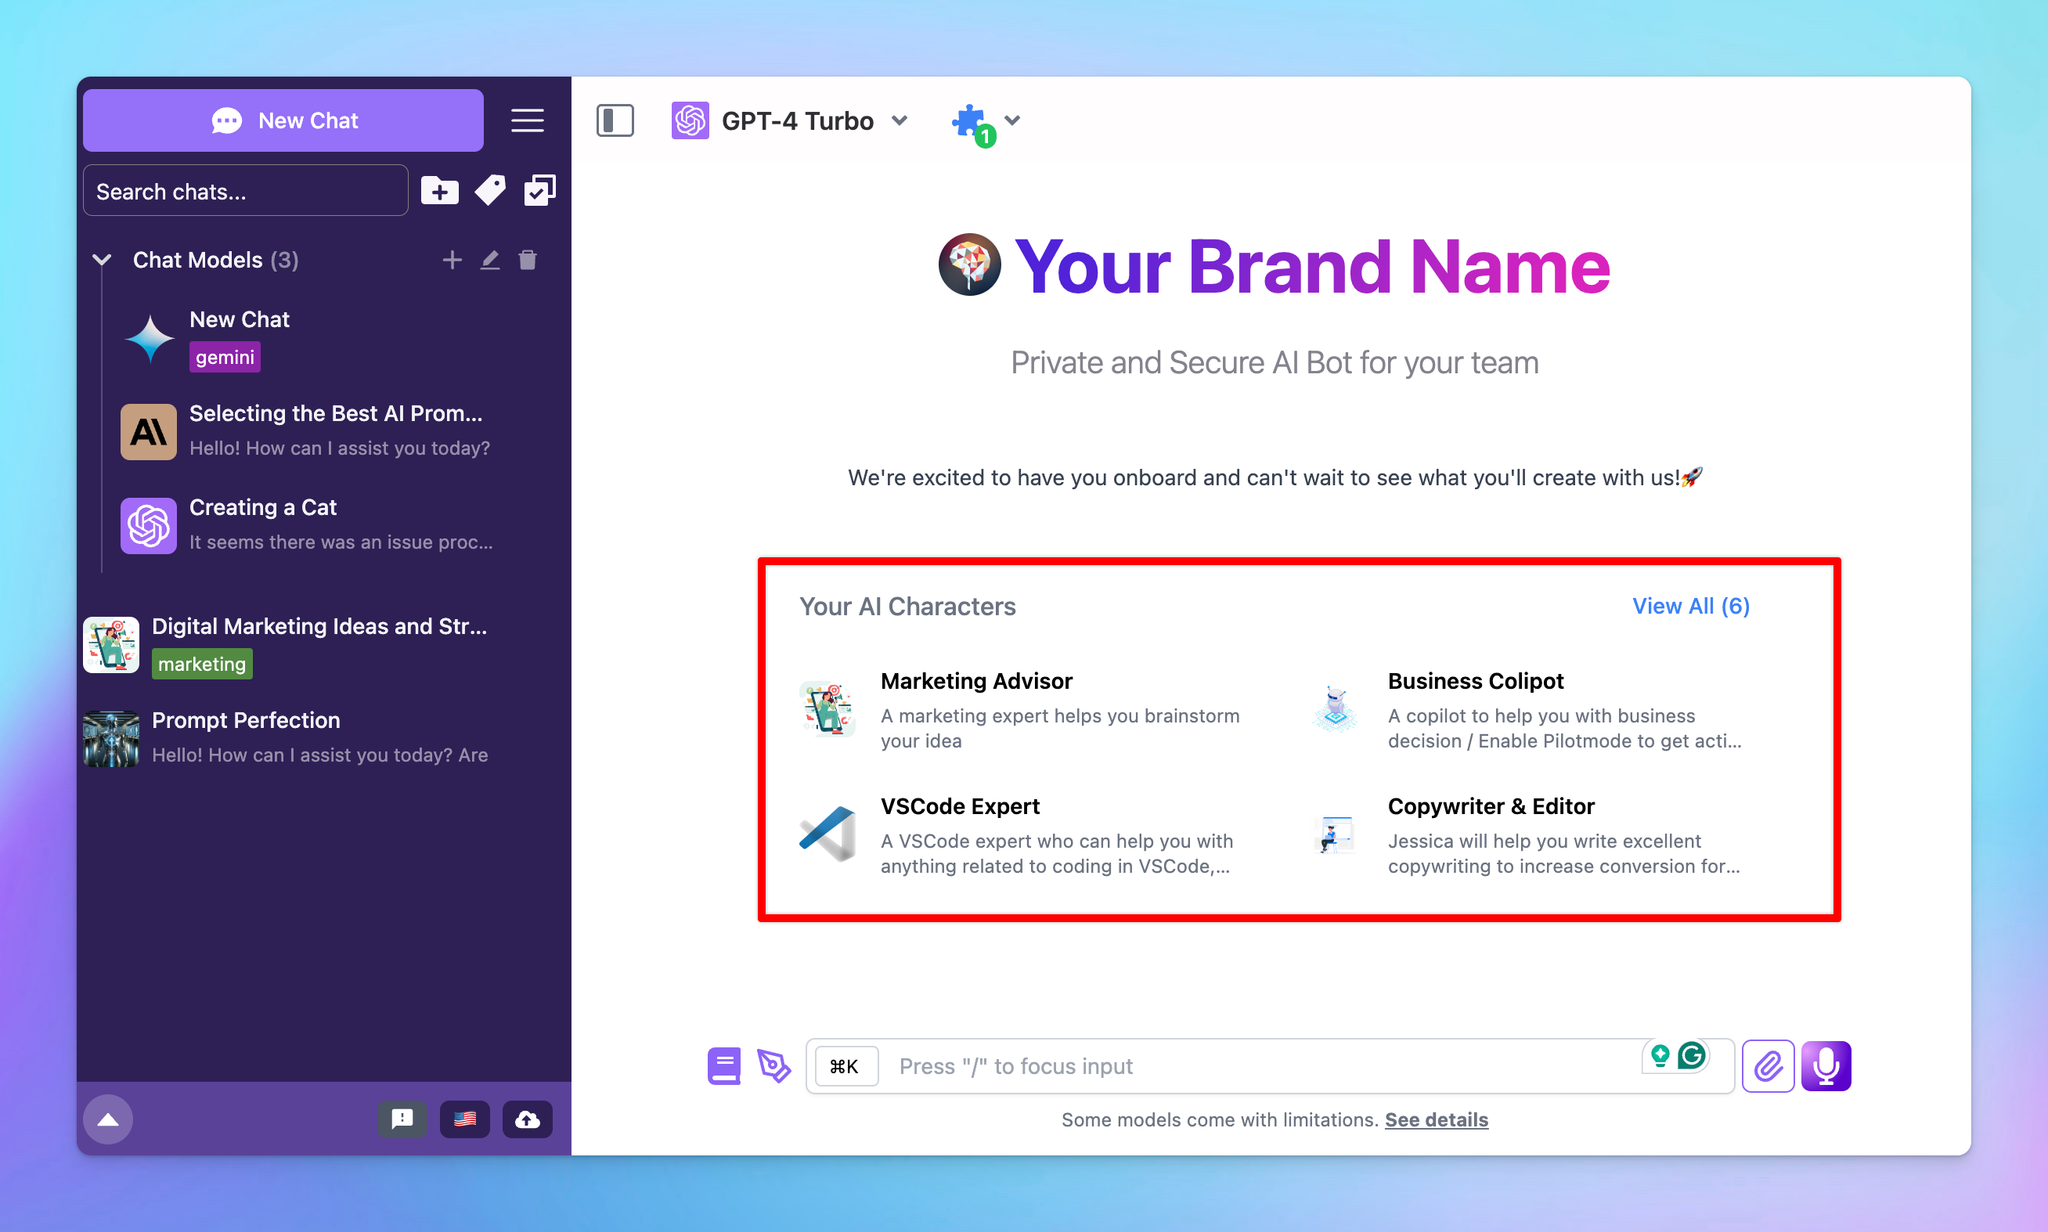
- While creating an AI Agent, you can pin the agent on the main page
- Pinned AI Agents will be displayed on the chat UI where members can see them as they enter or start a new chat.
AI Agents can be customized even further with your own custom knowledge base. This means beyond the instructions you give, you can also train them with your custom knowledge base. Learn more at What you can do with AI Agents
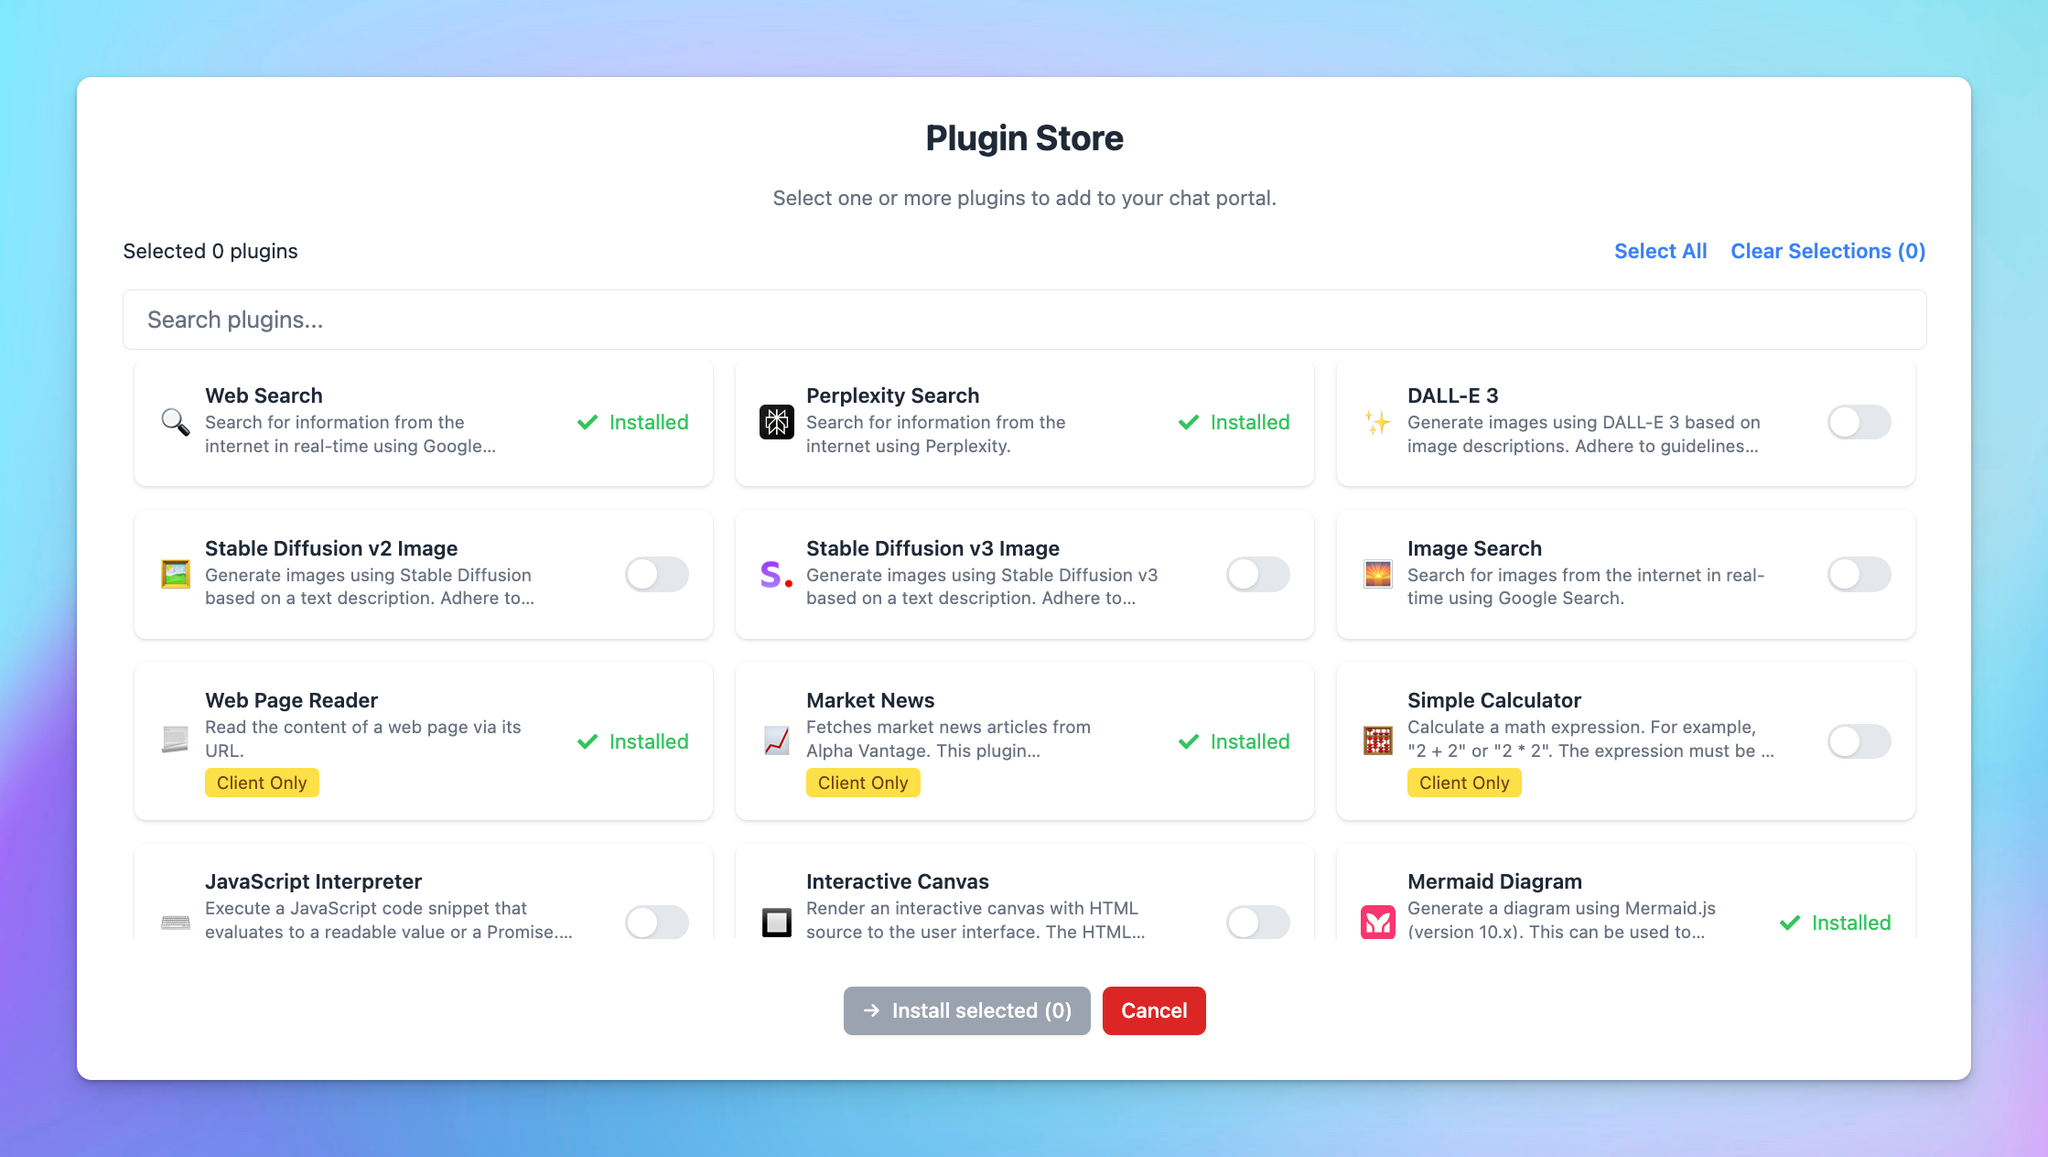
3. Pre-configure plugins
Plugins will extend the functionality of the chat models, which can help the models access up-to-date information, run computations, or use third-party services to generate better responses.
Some plugins require configuration to function properly. For example, the web search plugin needs a search engine ID and API key.
Rather than having each member set this up manually, you can pre-configure these settings in the Admin Panel to streamline the process as following steps:
- Click on Browse plugins
- Install the plugins you want to use for your team members
- or You can Create / Import new plugins that are not provided in the plugin list.
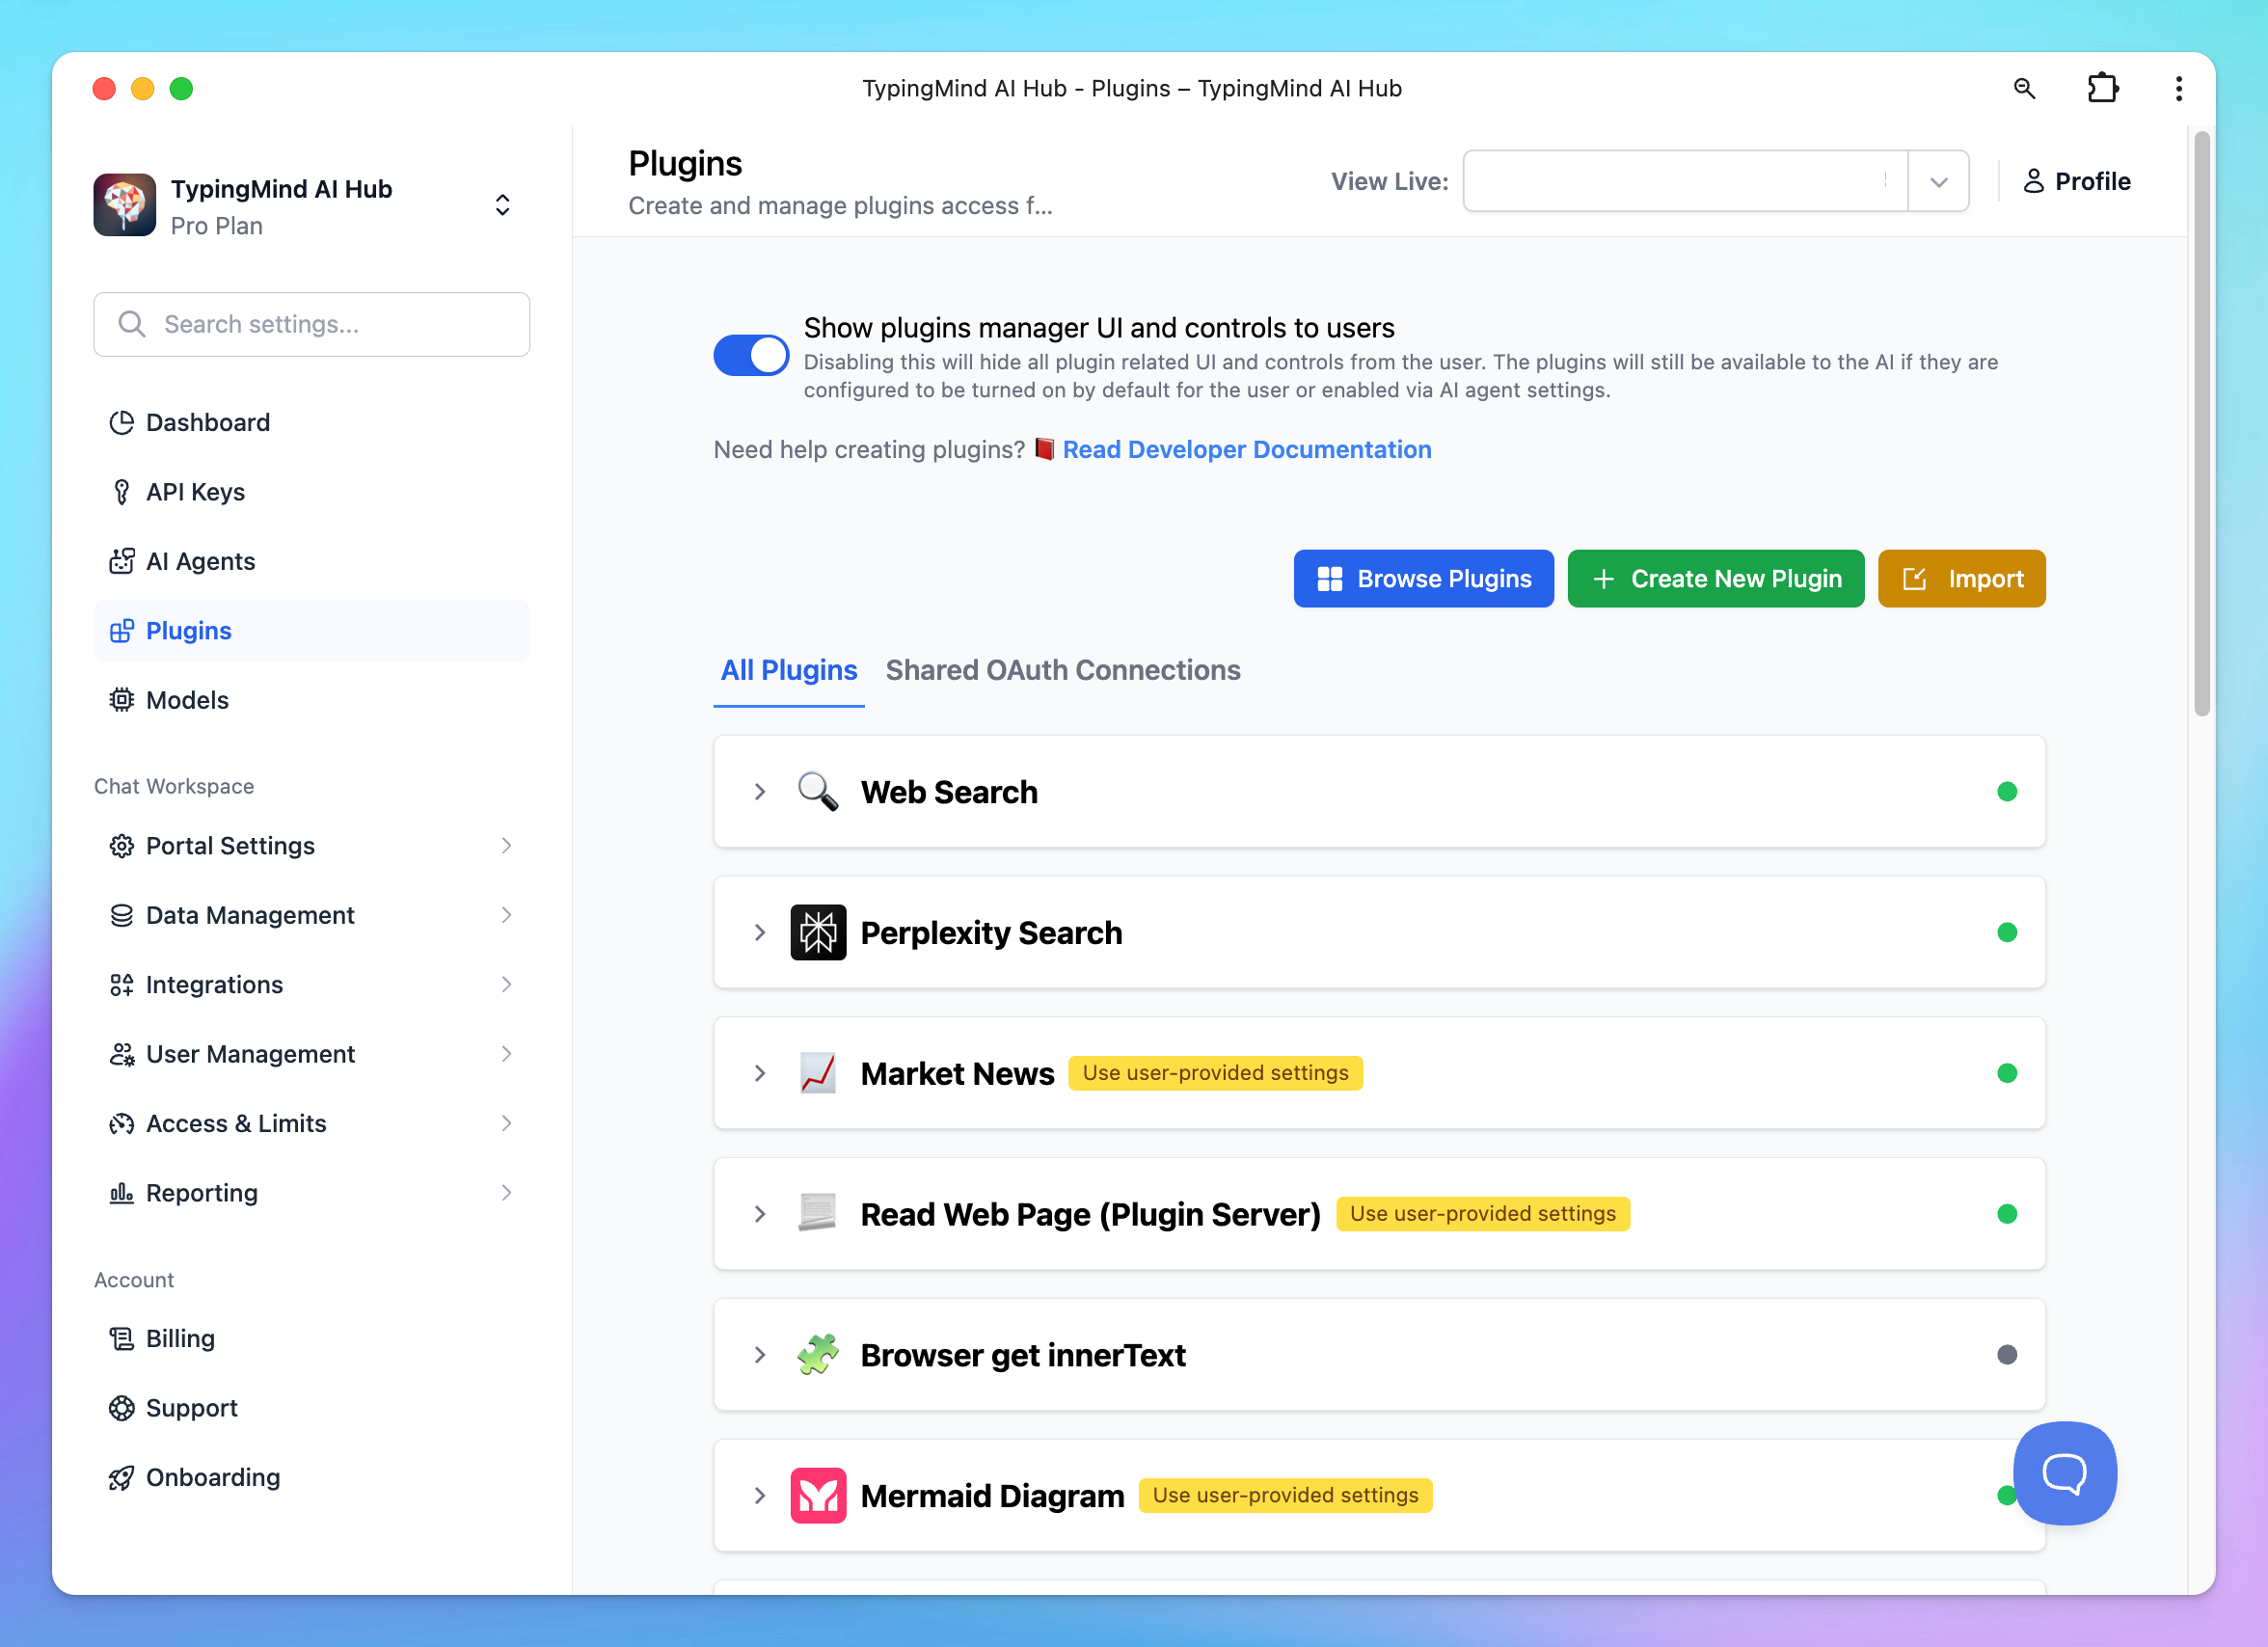
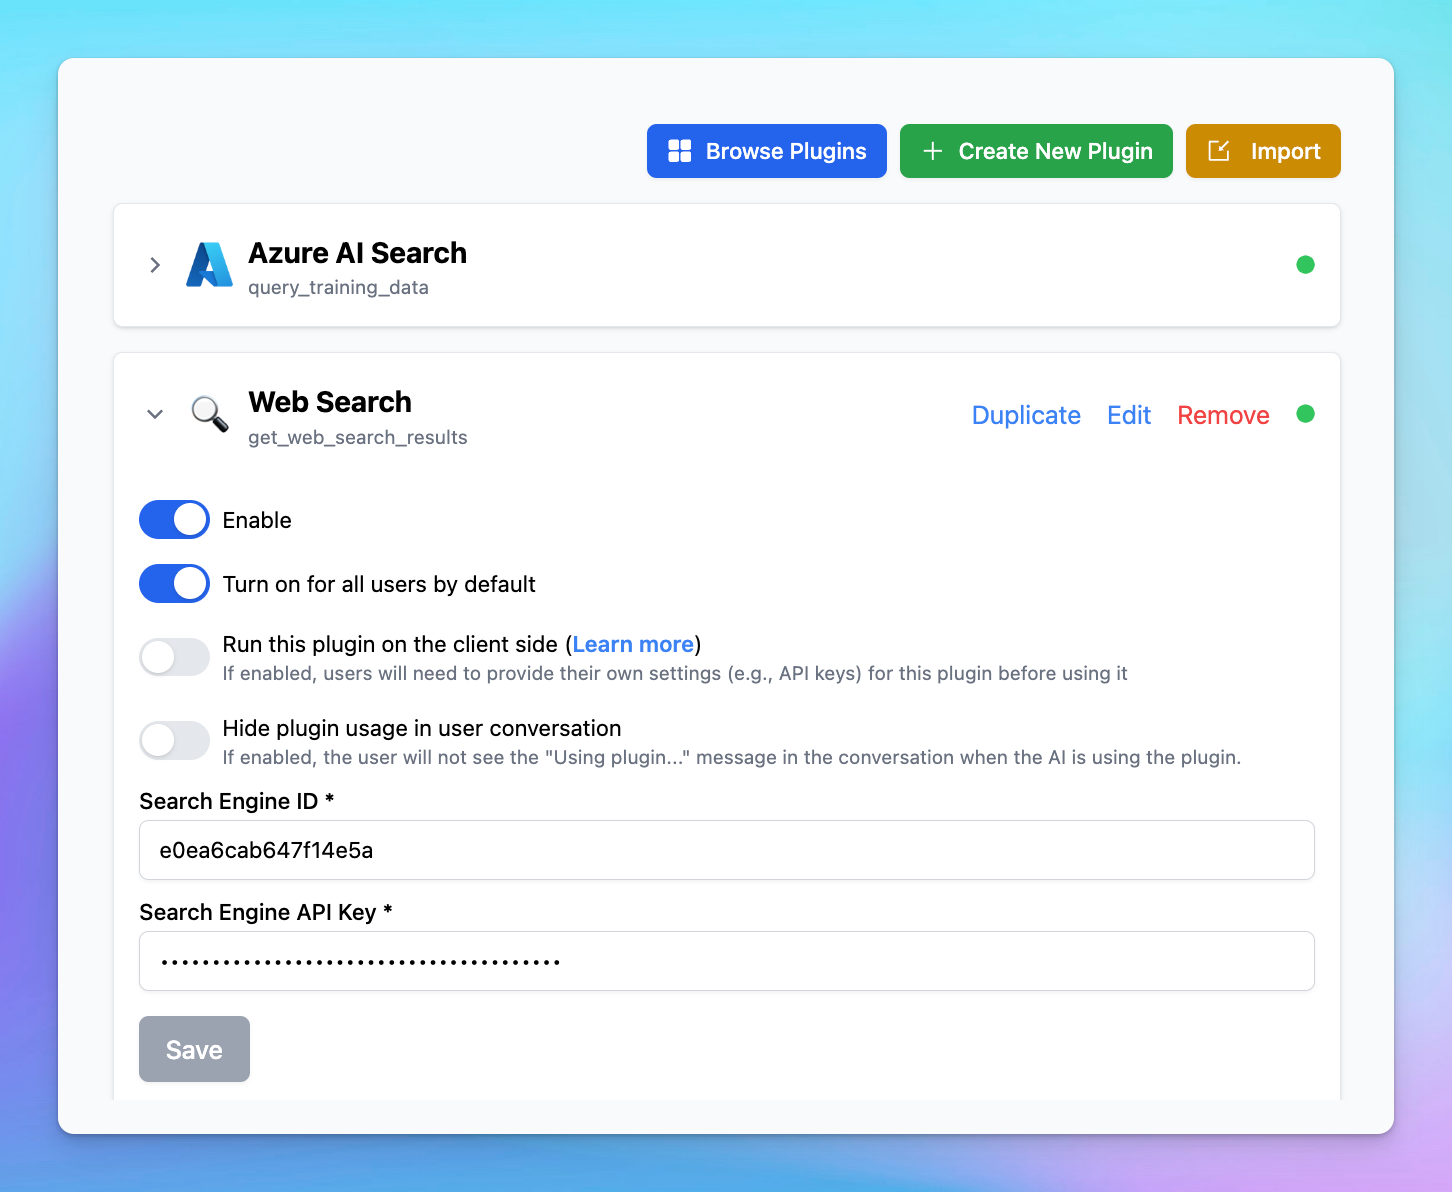
This allows your members to use the plugins without the need to set them up manually.
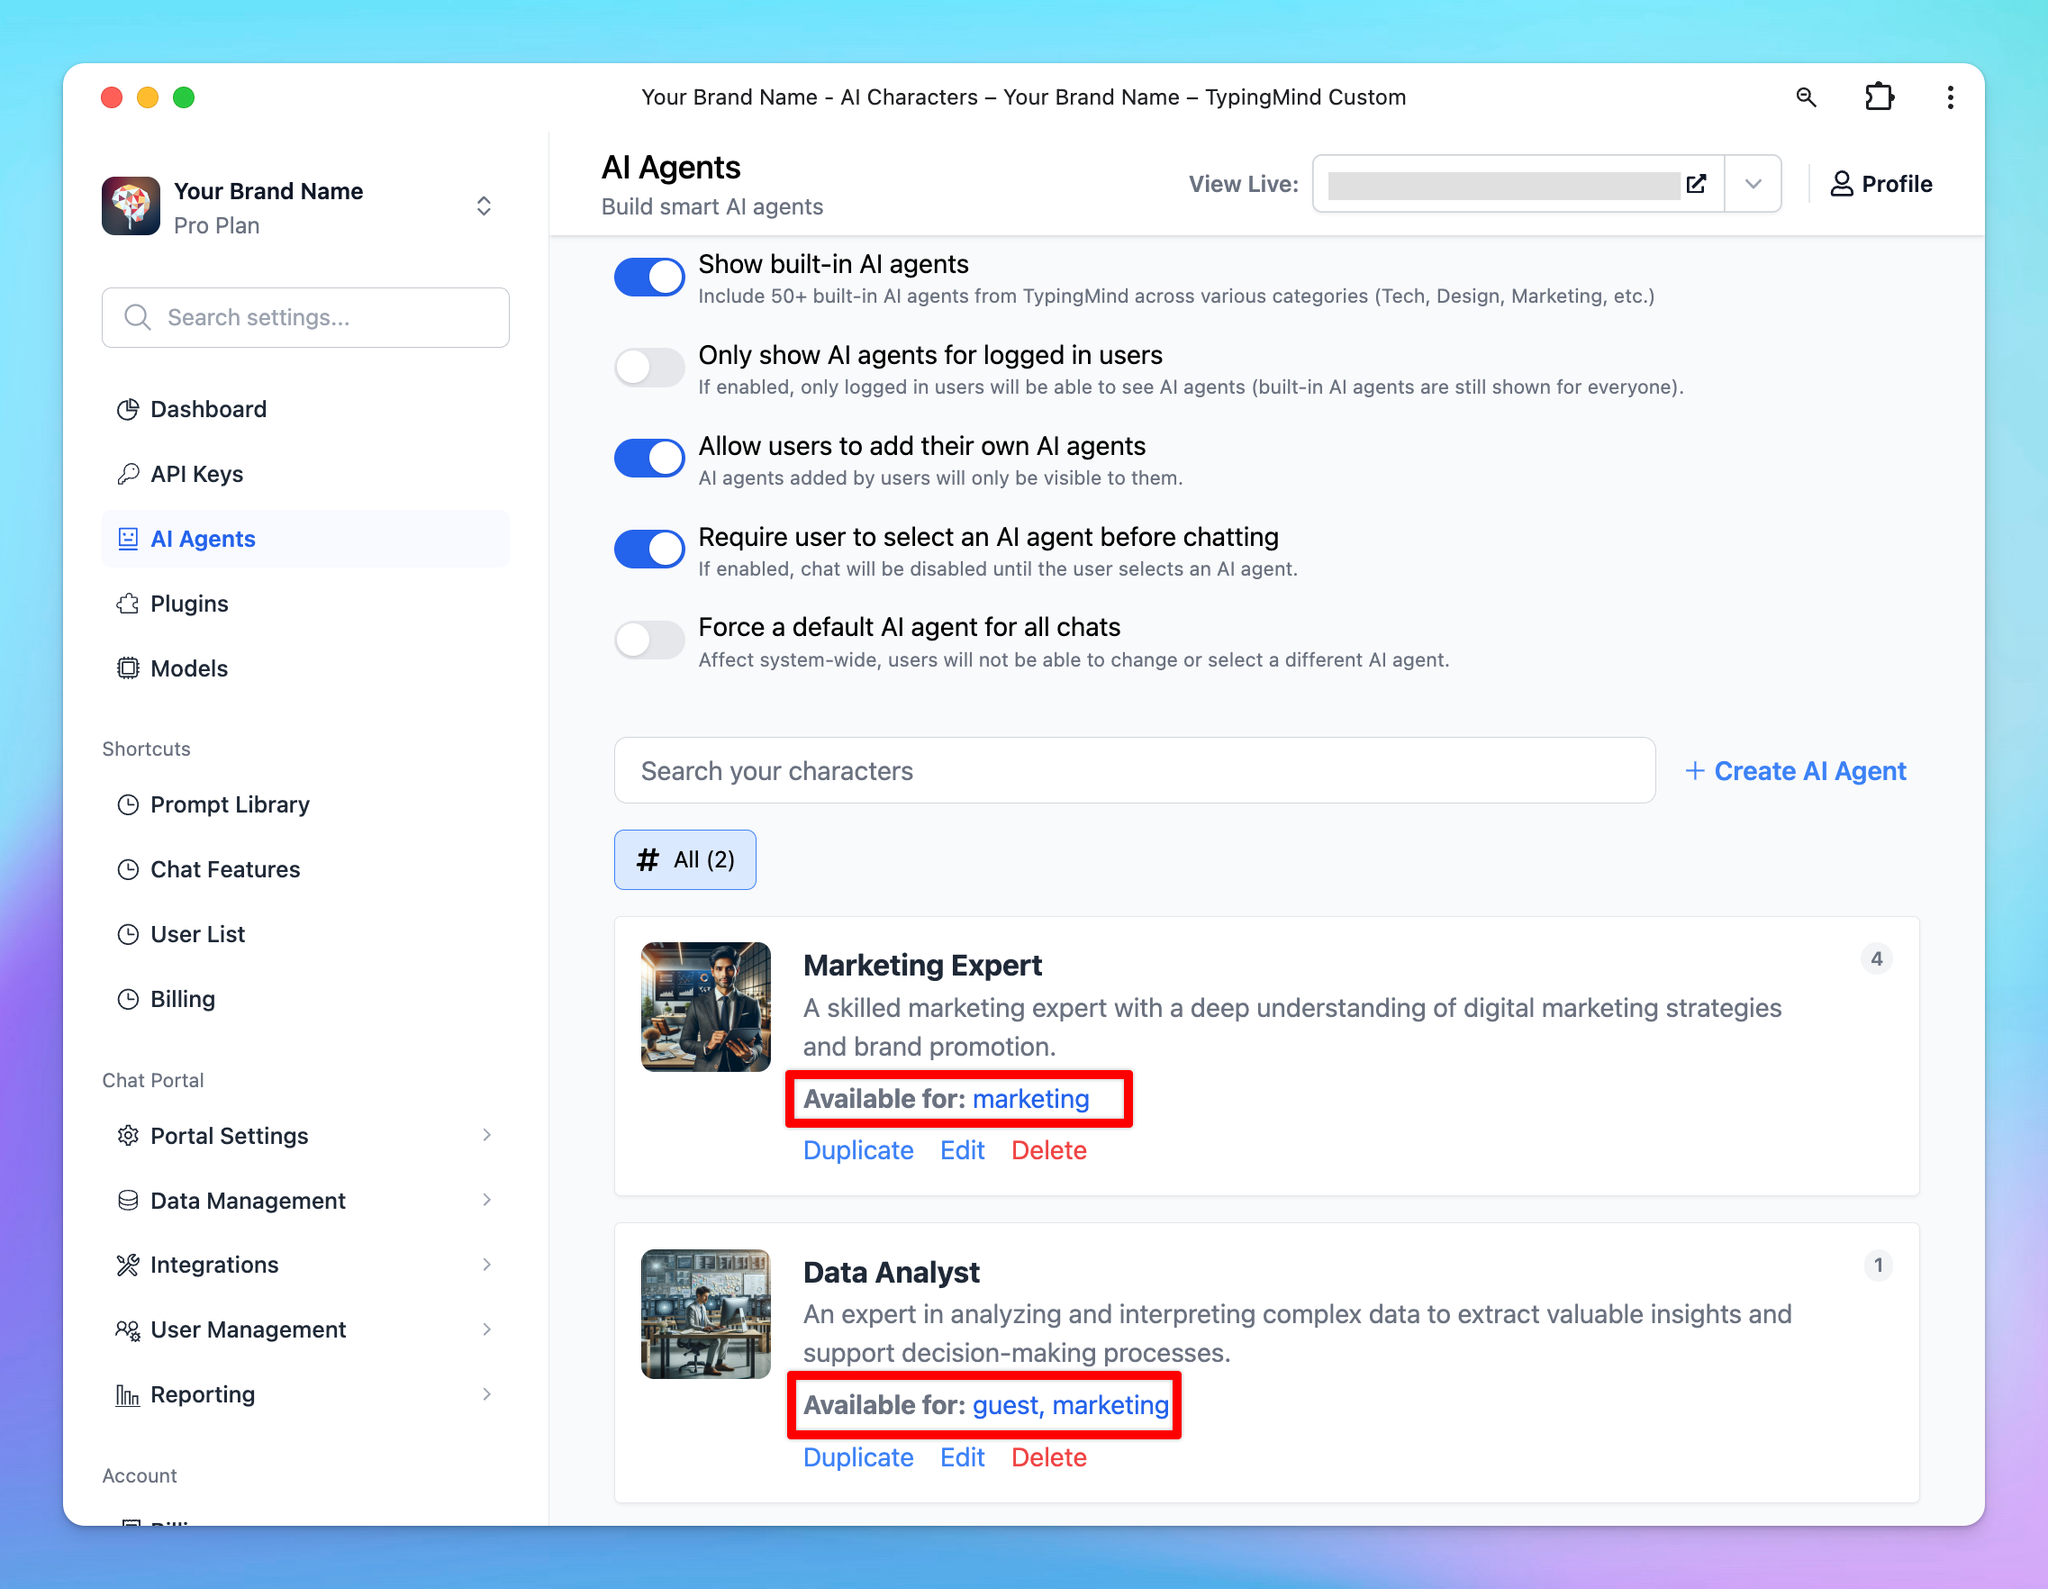
Step 9: Restrict member's access to specific chat models and resources
You can control which users have access to specific prompts, AI Agents, or AI chat models.
TypingMind Team allows you to make the restrictions possible by using the User Group system:
- You add members who have relevant roles or tasks in your team to a dedicated group.
- Within a specific Prompt / AI Agent setting, you assign the User Groups you created above to each prompt / AI Agent. Users not in the assigned group can not see these resources.
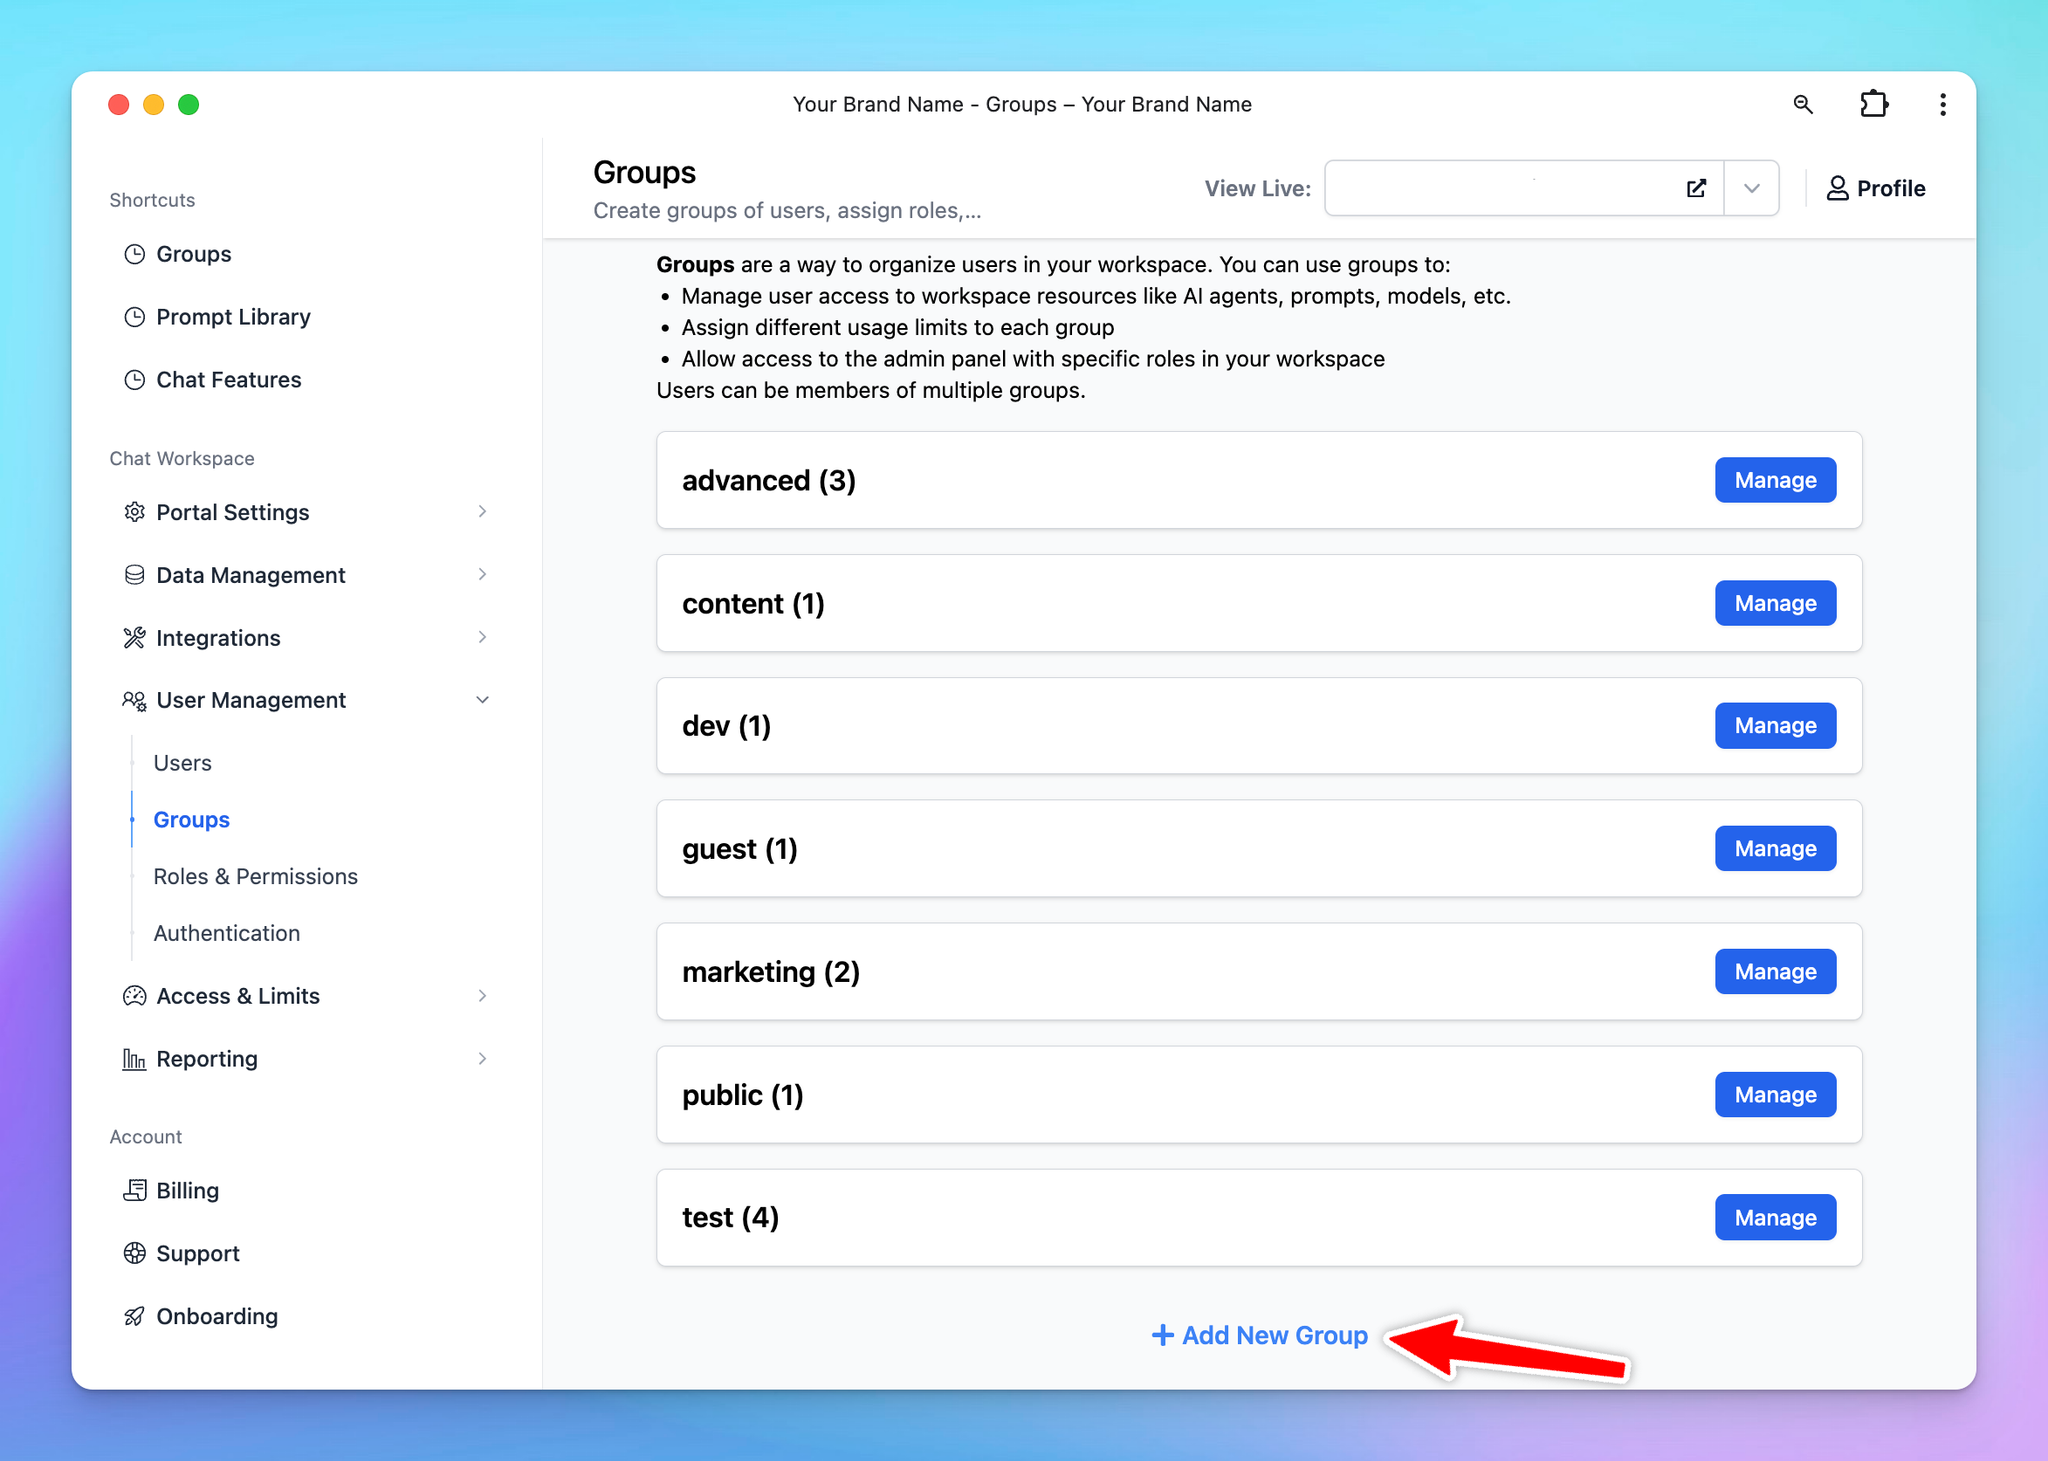
For example:
- The marketing team members could be added to the Marketing group and only allowed to use marketing-related resources such as “Marketing Brainstorm”, “Content Writer”, and “Copywriter” prompt / AI Agents
- Developers could be added to the Developer group and only granted access to GPT-4o and coding-related resources such as “Code Explainer”, “Code Troubleshooter”
Learn how to restrict user access to certain:
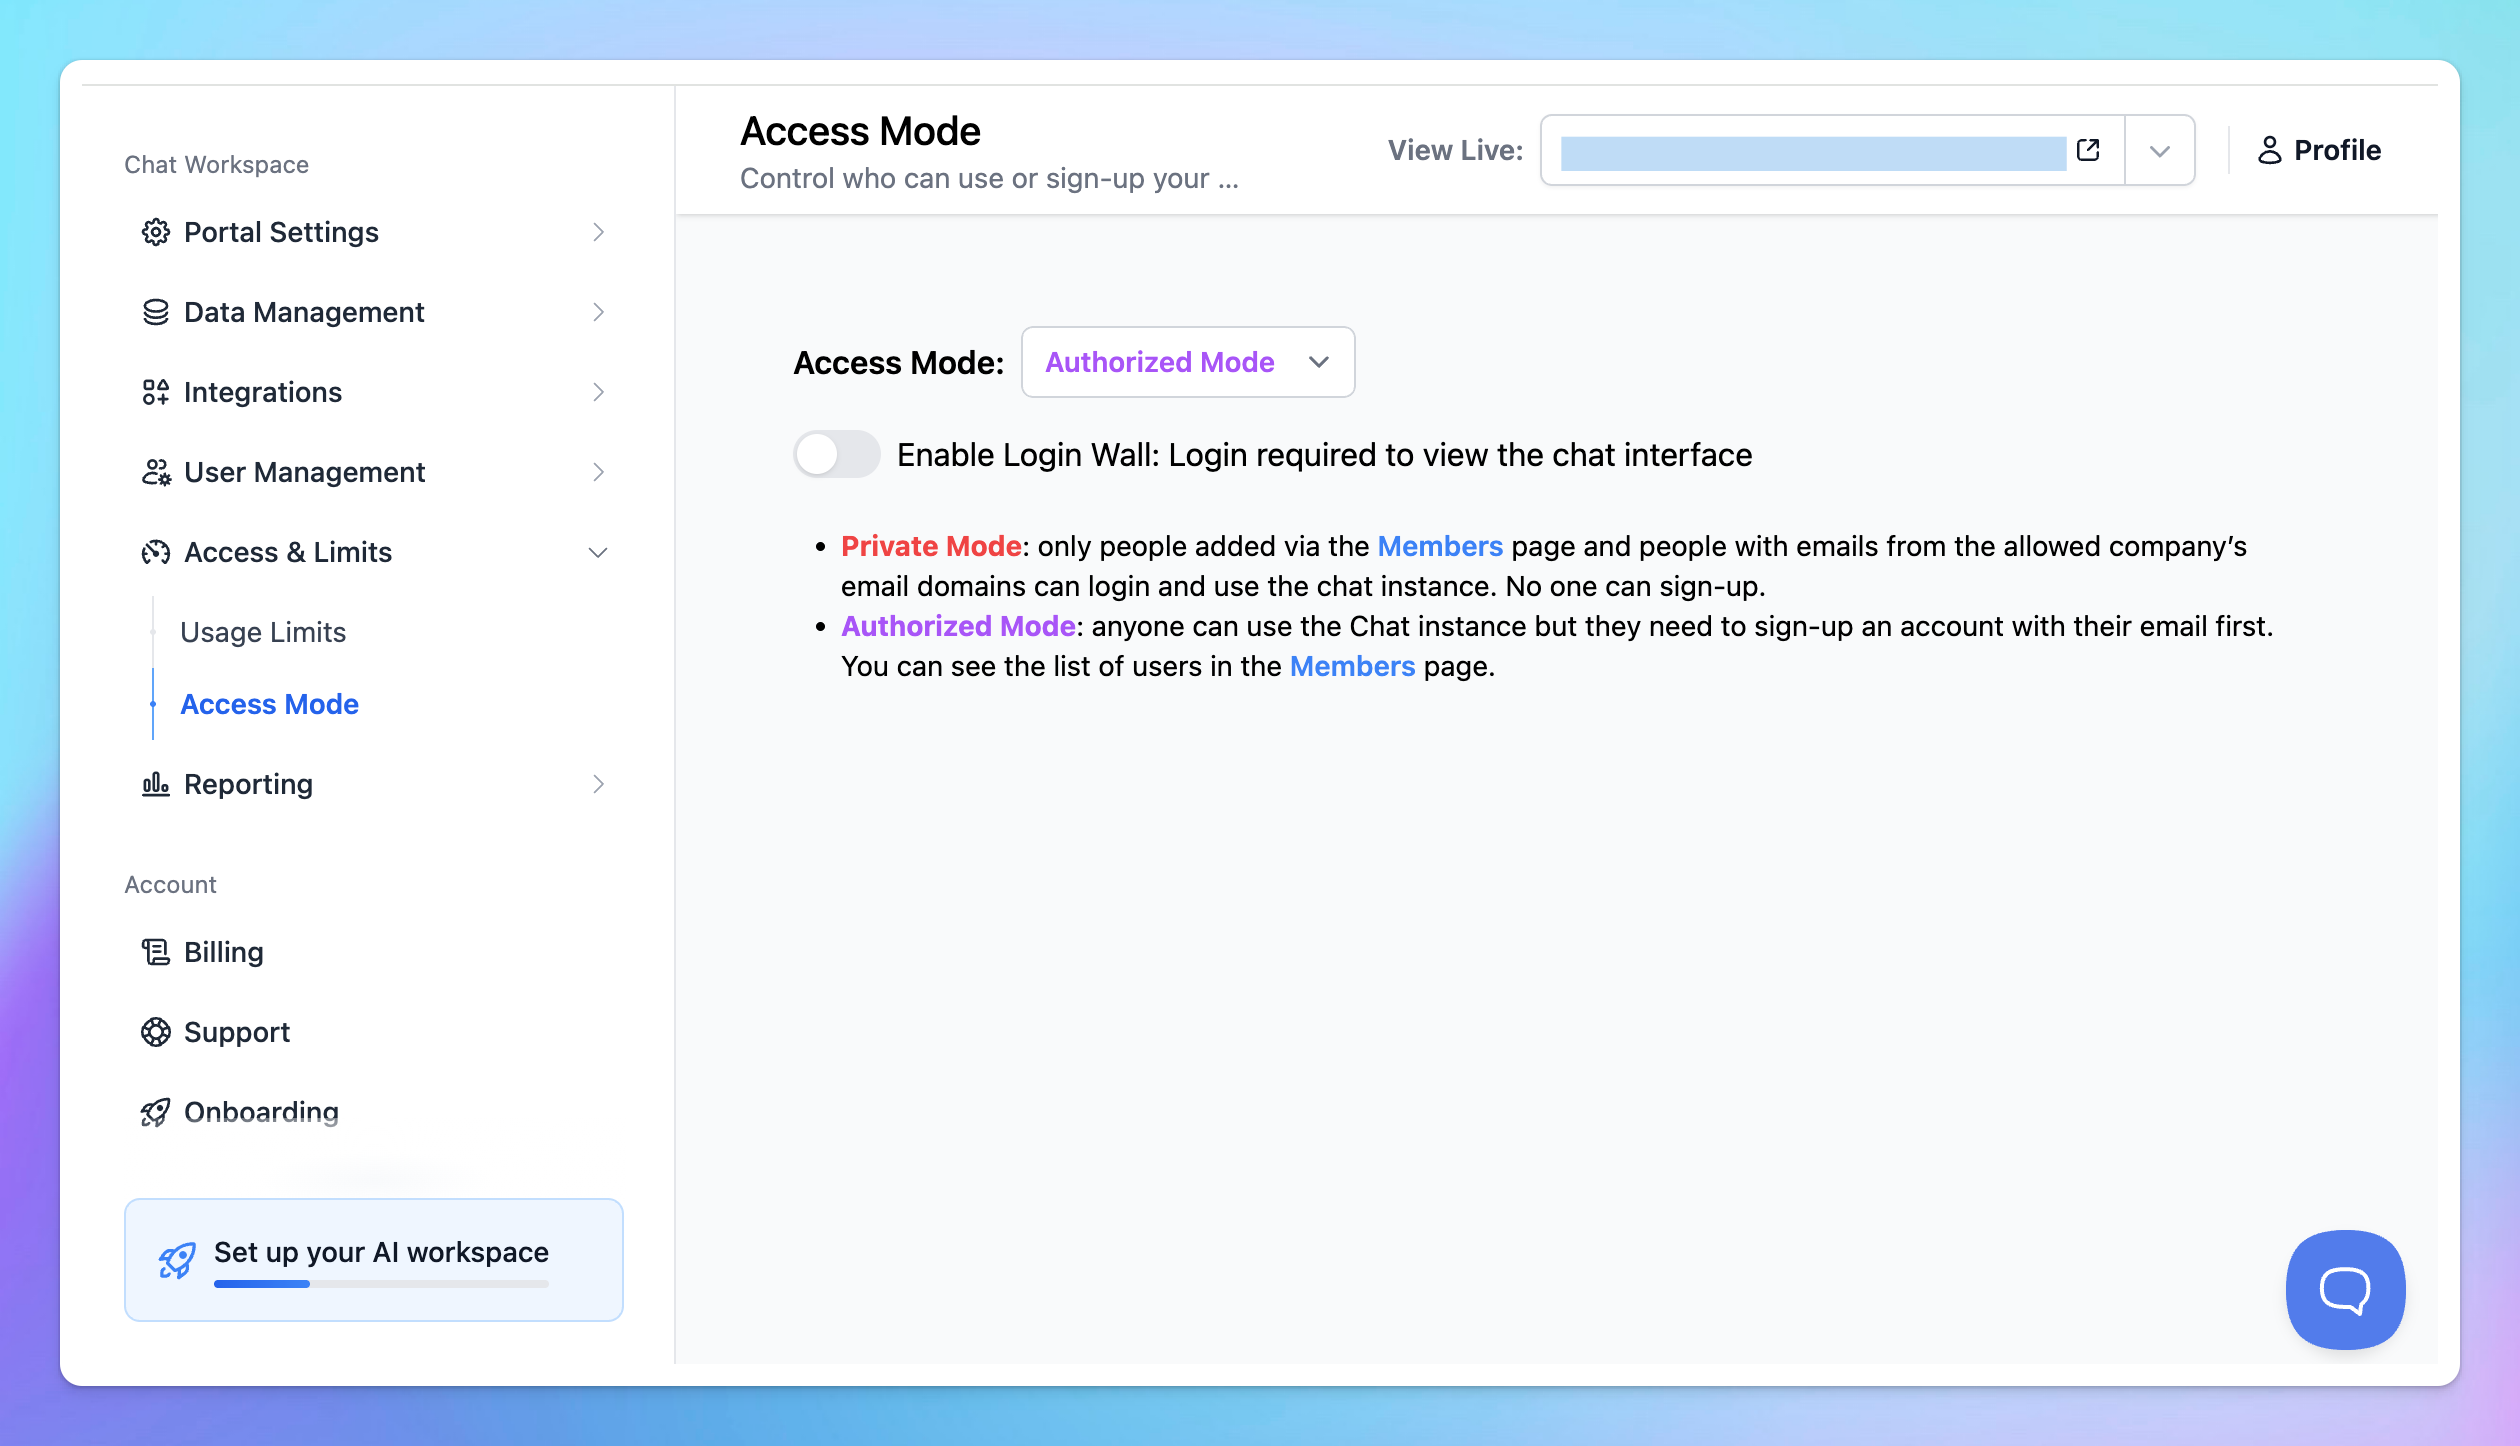
Step 10: Access control
Your chat instance defaults to Private Mode, which means only invited members can log in and access the chat.
However, we provide another additional access option:
- Authorized Mode - Your chat is accessible to anyone with a verified email address.
Step 11: Integrate your chat instance into your existing workflow
You can connect your chat instance to your existing workflow as follows:
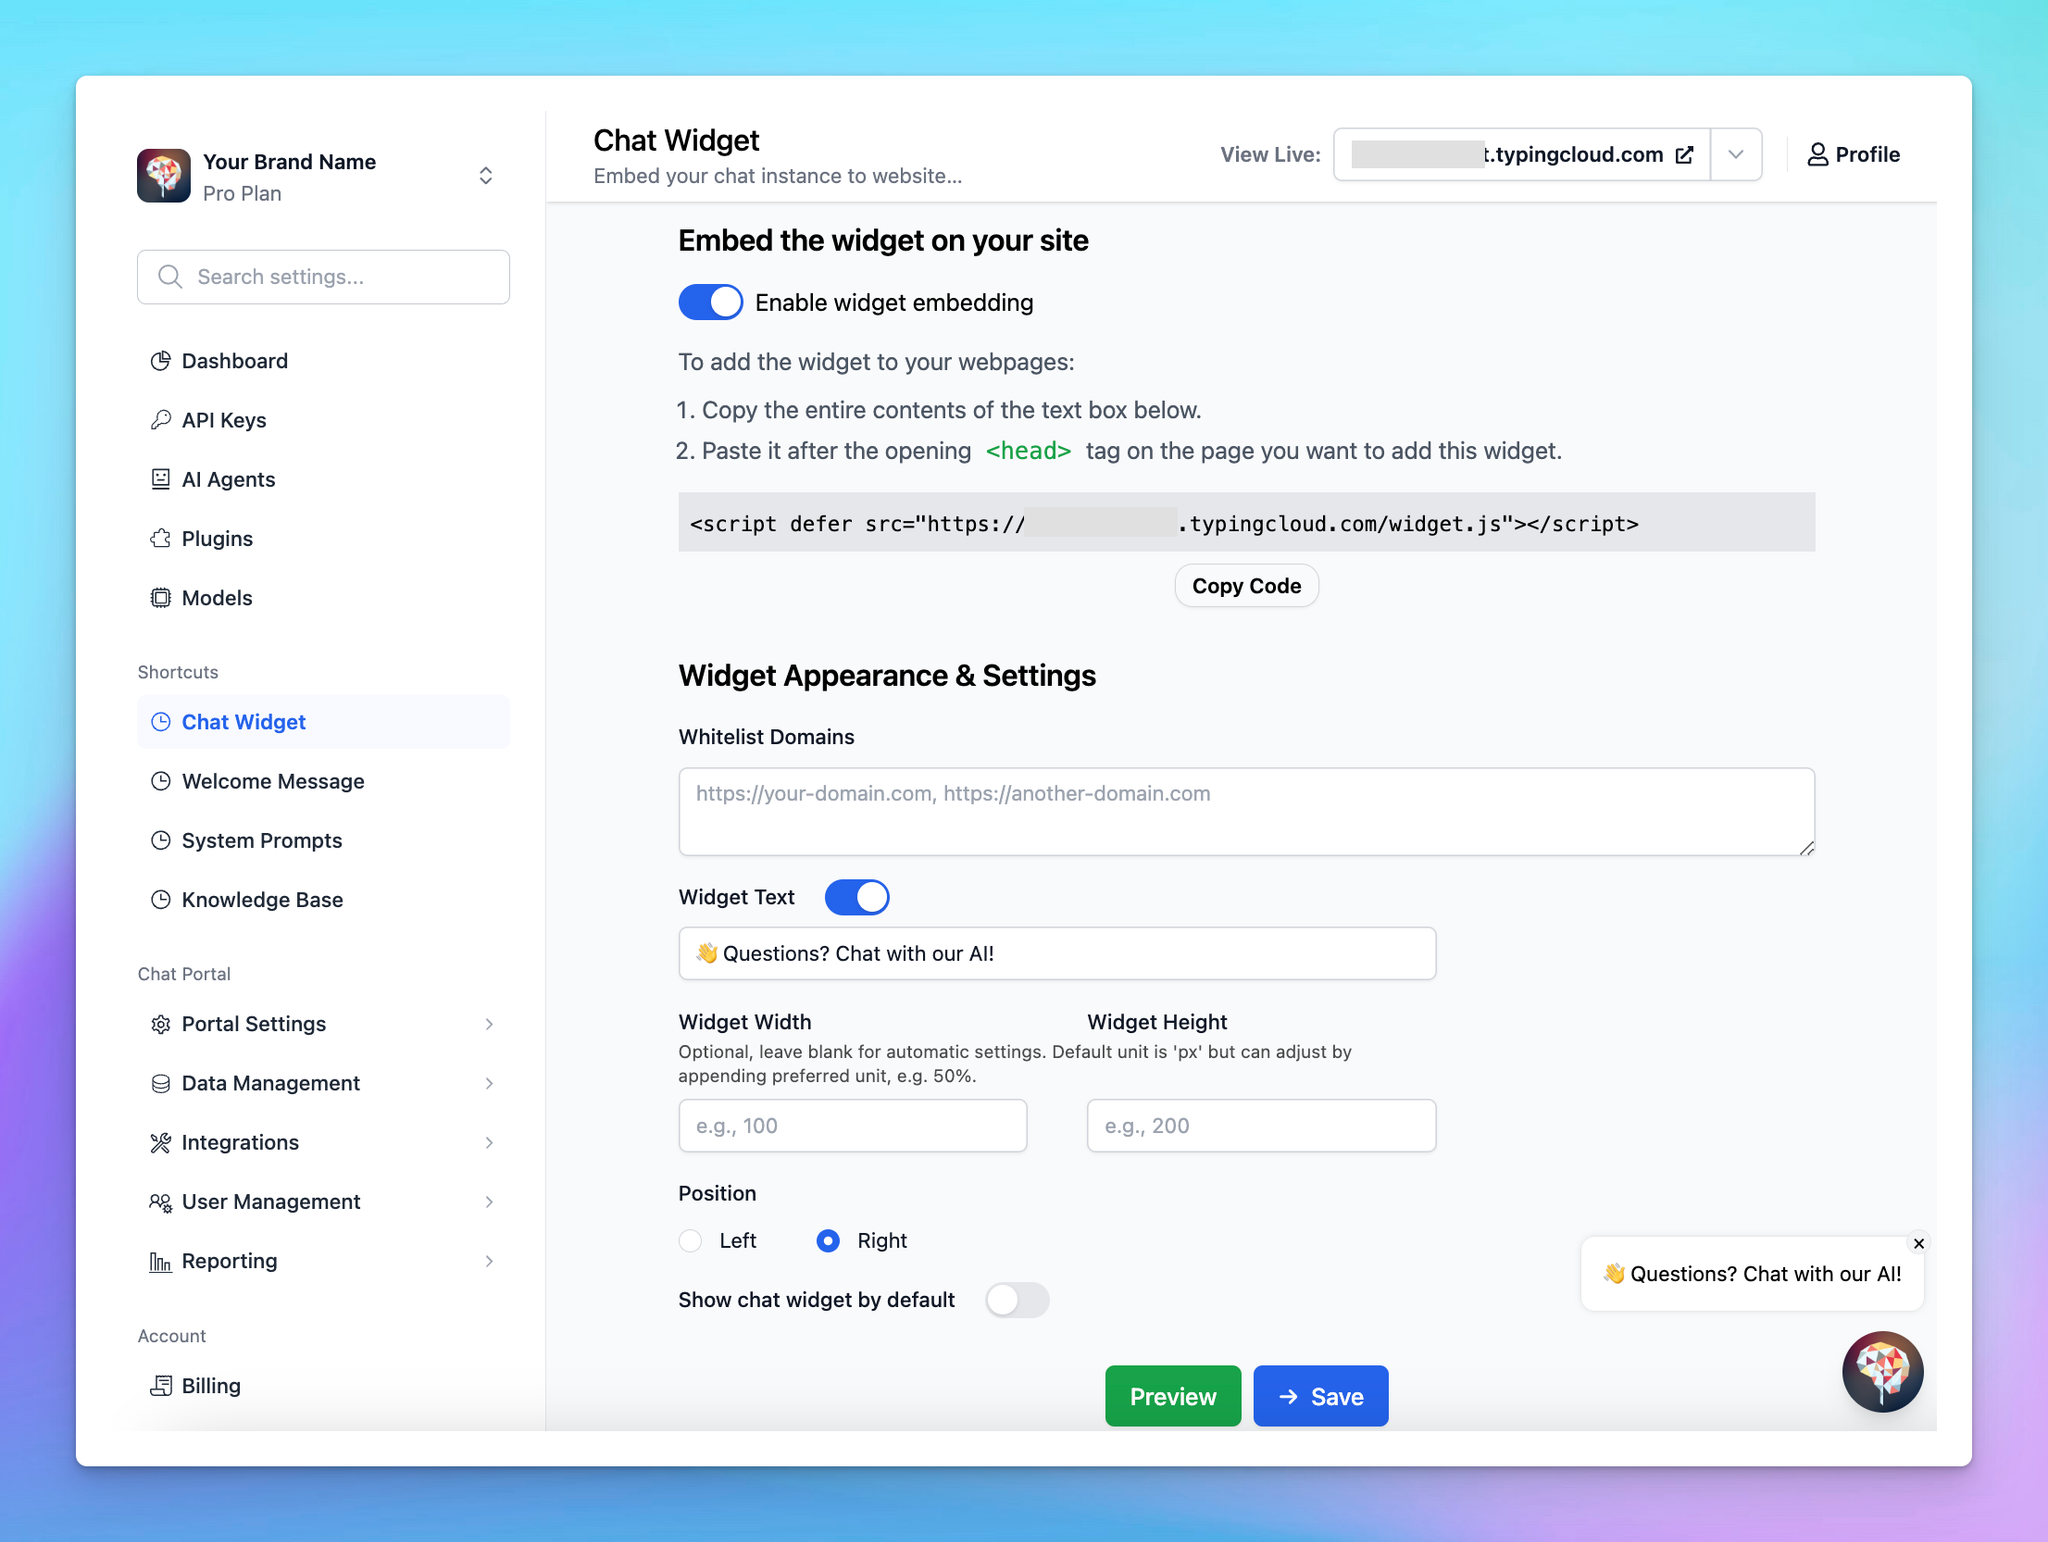
1. Embed as a chat widget on your website
- Go to the Chat Widget section
- Customize the widget appearance
- Click “Copy code” and paste it after the opening
<head>tag on the page you want to add this widget.
2. Use our API
TypingMind Custom API is a REST API that lets you interact with data in the TypingMind system. It uses JSON-formatted data for requests and responses.
The API allows you to:
- Manage Users: add new users, remove users, update a user detail (like user groups)
- Manage Chats: create a model response for a given chat conversation.
More details here: https://api.typingmind.com/docs
Step 12: Test and monitor your AI workspace
1. Test the output quality
Test your chatbot with multiple questions varied in different scenarios to ensure the chatbot answers correctly on your queries.
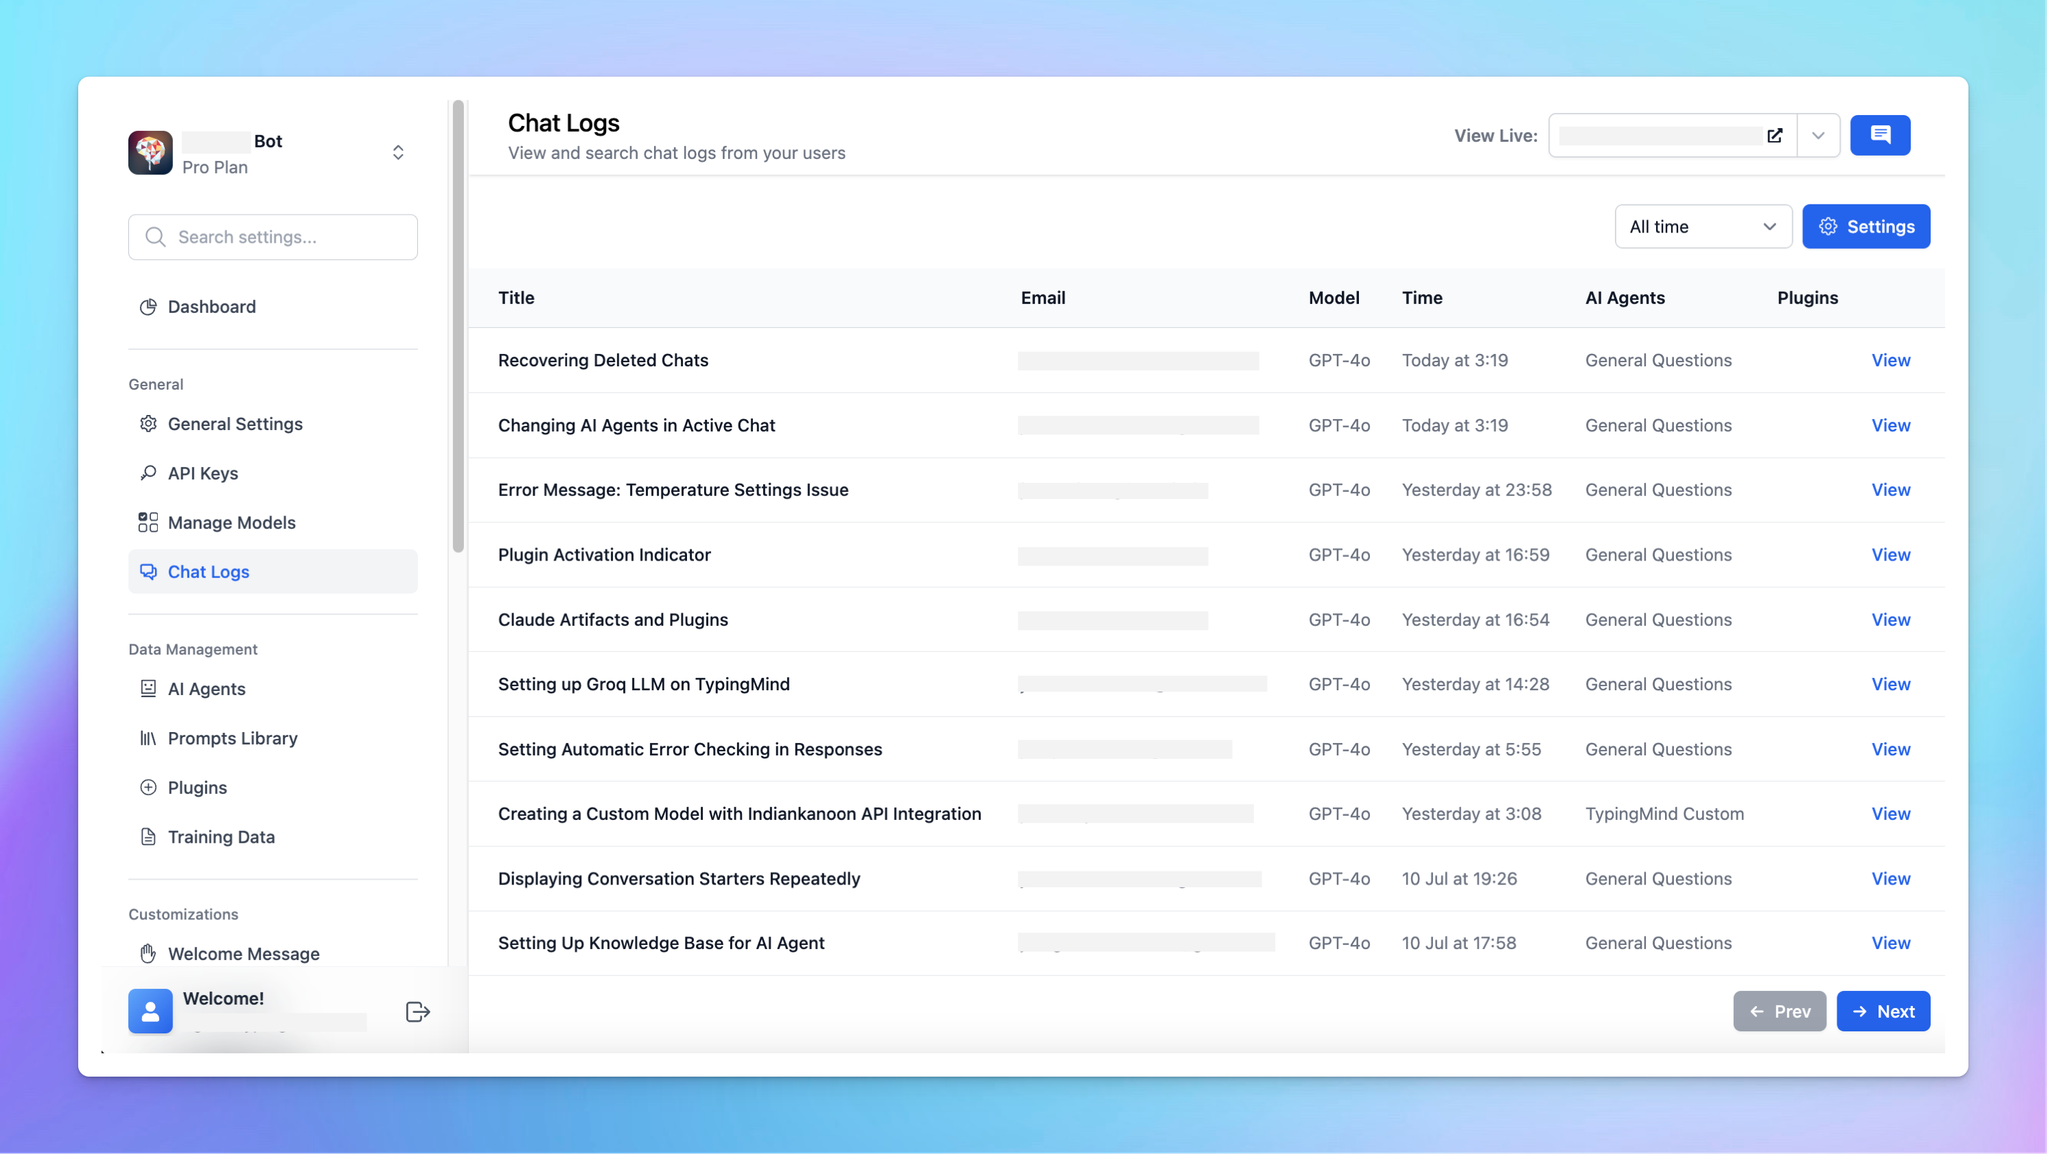
2. Monitor user - AI model interaction
You can also enable Chat Logs to track how members engage with the chatbot. This option allows you to view user chat history to make sure the AI model response as expected and adjust your guidelines accordingly:
- Go to Chat logs
- Click Settings on the top right corner
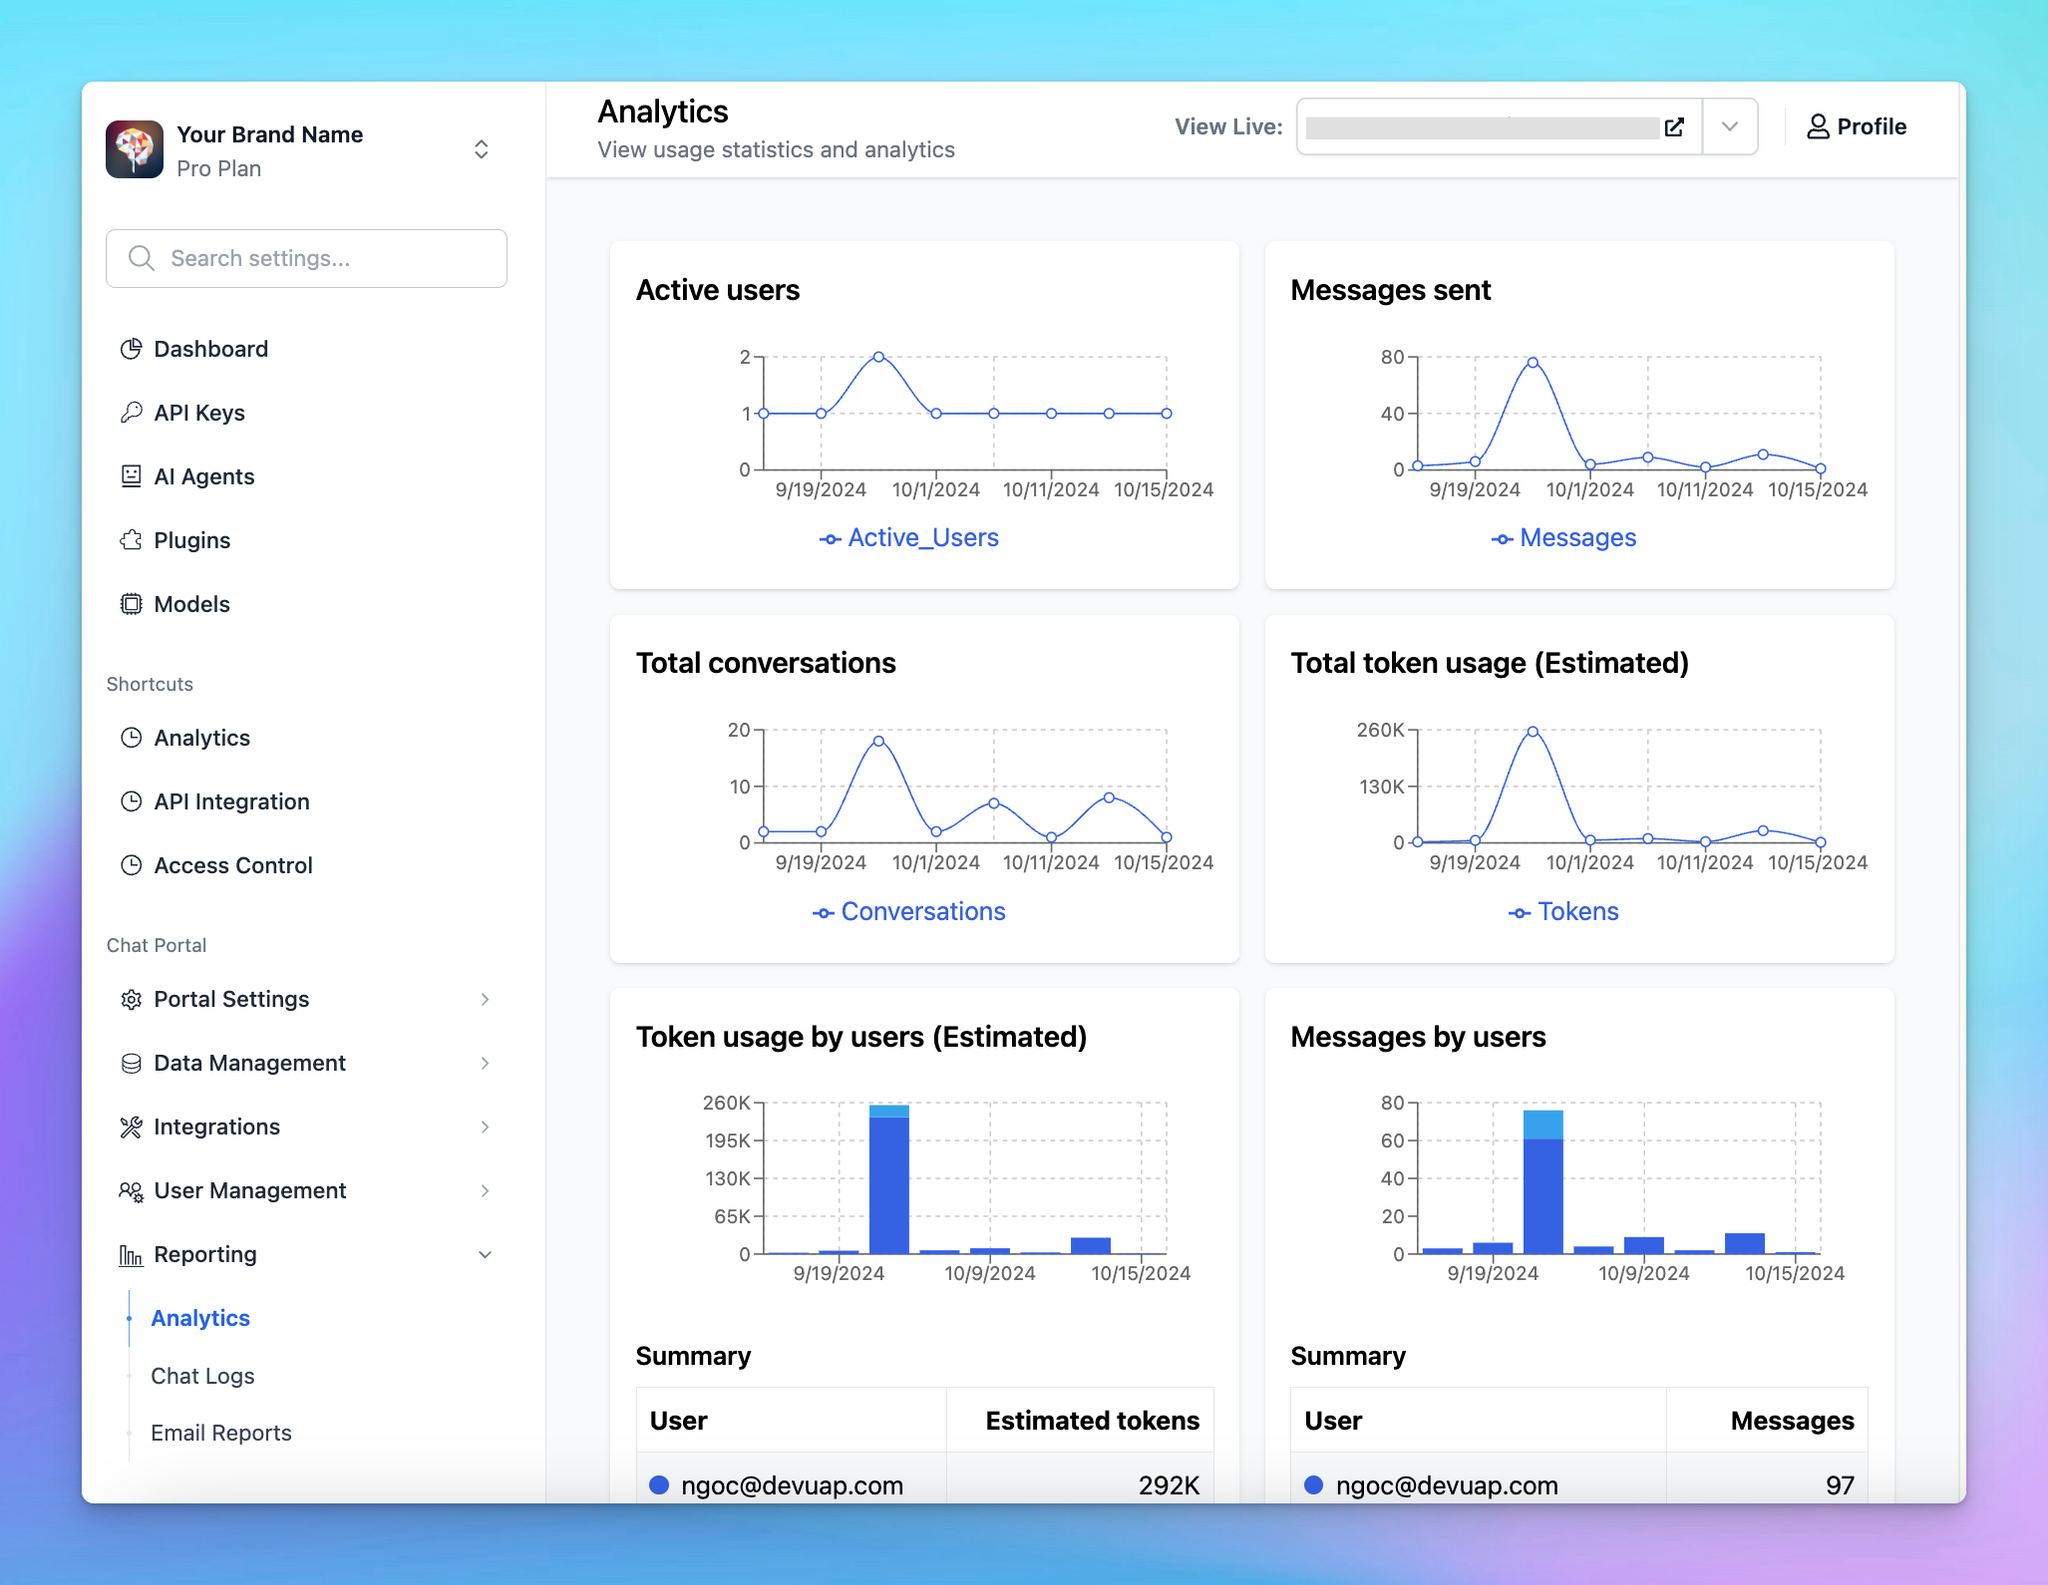
3. Track user usage
- Go to Reporting → Analytics to track how many tokens your members have already consumed and which models they are using
That’s it!
That almost covers the basic steps for easily creating a chat instance for your team and managing it through the Admin Panel with TypingMind Custom. Reach us if you need any further clarification!