> ## Documentation Index
> Fetch the complete documentation index at: https://docs.typingmind.com/llms.txt
> Use this file to discover all available pages before exploring further.
# Slack Message Notifier
## Overview
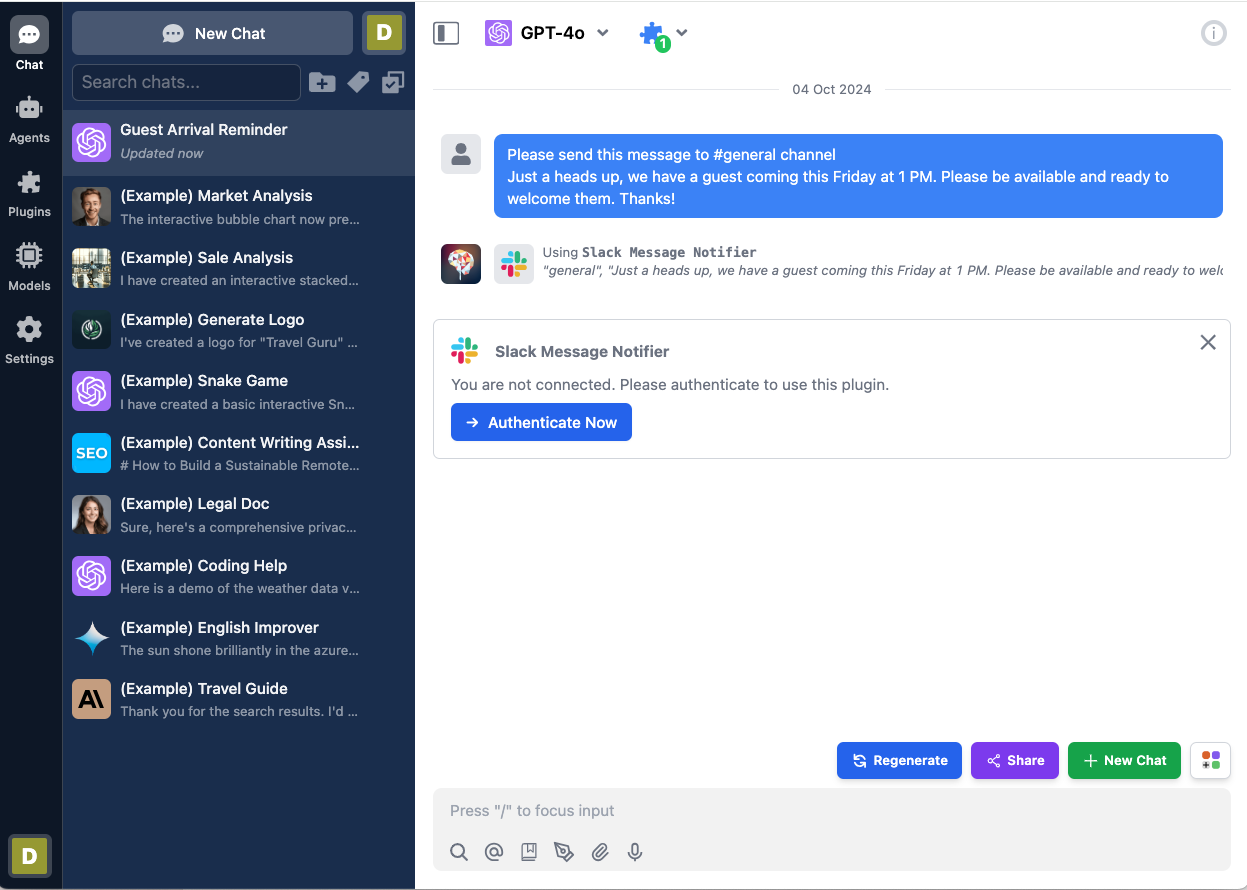
Let's create a **Slack Message Notifier** plugin. This plugin allows you to send messages from TypingMind to a Slack channel. By the end of this tutorial, you'll be able to build a plugin that looks like the one in the screenshot below:
When using this plugin, the user must authenticate with their Slack account. The AI will then use the user's permissions to send messages to their Slack channel.
Here is the link to the repository of the completed plugin:
[https://github.com/TypingMind/plugin-slack-message-notifier](https://github.com/TypingMind/plugin-slack-message-notifier)
In this tutorial, we will go through 3 parts:
* Part 1: Create the plugin (as a plugin developer)
* Part 2: Install and setup the plugin (as an admin user)
* Part 3: Use the plugin (as an end user)
Let's get started!
For clarity, this document is written in context of the [**TypingMind Team Version**](https://custom.typingmind.com/). If you are using the [**TypingMind License Version**](https://www.typingmind.com/), please be aware that it is not supported yet. Read until the end for more details.
### Table of Contents
* Part 1: Create the plugin
* Research Slack Web API
* Creating a new plugin on TypingMind
* OpenAI Function Spec
* Authentication
* Implementation
* Test the implementation
* Finish creating the plugin
* Part 2: Install and setup the plugin
* Prepare your TypingMind instance
* Create the Slack app
* Integrate Slack App with Designated Channels
* Install the Slack Message Notifier plugin
* Part 3: Users use the plugin
* Conclusion
* Learn more
## Part 1: Create the plugin
In this step, **we will act as a Plugin Developer** to create a plugin. This plugin can later be listed on the plugin store or share directly to other people in the community via a share URL or a GitHub repo.
Let's start creating the "Slack Message Notifier" plugin step-by-step.
The easiest way to implement this plugin is by using [**HTTP Action**](https://docs.typingmind.com/plugins/build-a-typingmind-plugin), so let's start by looking at the Slack API we'll be using.
### Research Slack Web API
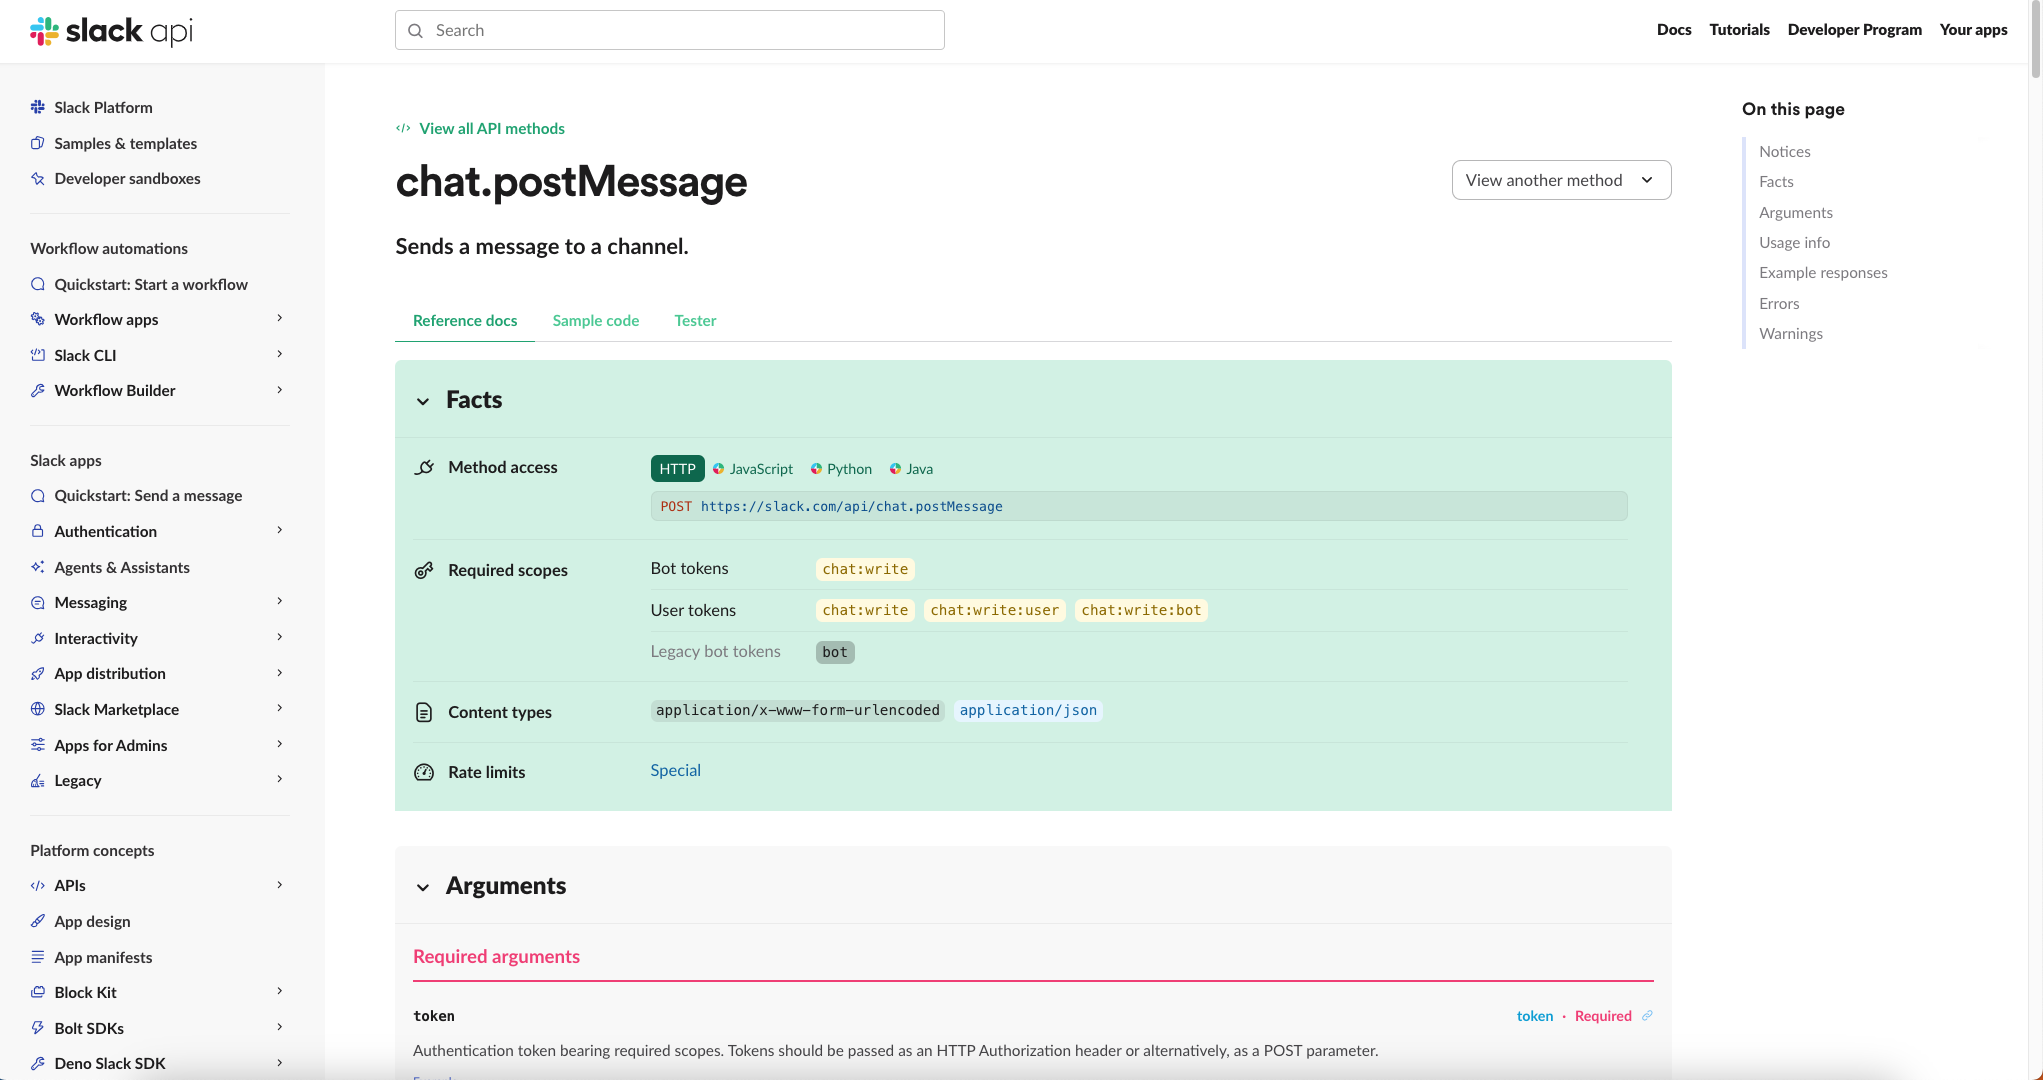
Before we begin, let's find the HTTP endpoint we need to send messages to Slack. A quick Google search reveals the relevant information in the [Slack Web API Documentation](https://api.slack.com/methods/chat.postMessage)
From this page, we will learn that:
1. The endpoint to send messages to a Slack channel is:
```
POST https://slack.com/api/chat.postMessage
```
2. You need an access token with the right permissions to use this endpoint. For sending messages, you typically need the [chat:write](https://api.slack.com/scopes/chat:write) scope.
```bash theme={null}
https://api.slack.com/scopes/chat:write
```
3. The endpoint supports several parameters, but the ones we care about are:
* `channel`: The channel name (e.g. #general) or the channel ID (e.g. C024BE91L) of the channel you want to post the message to.
* `text`: The content of the message you want to send.
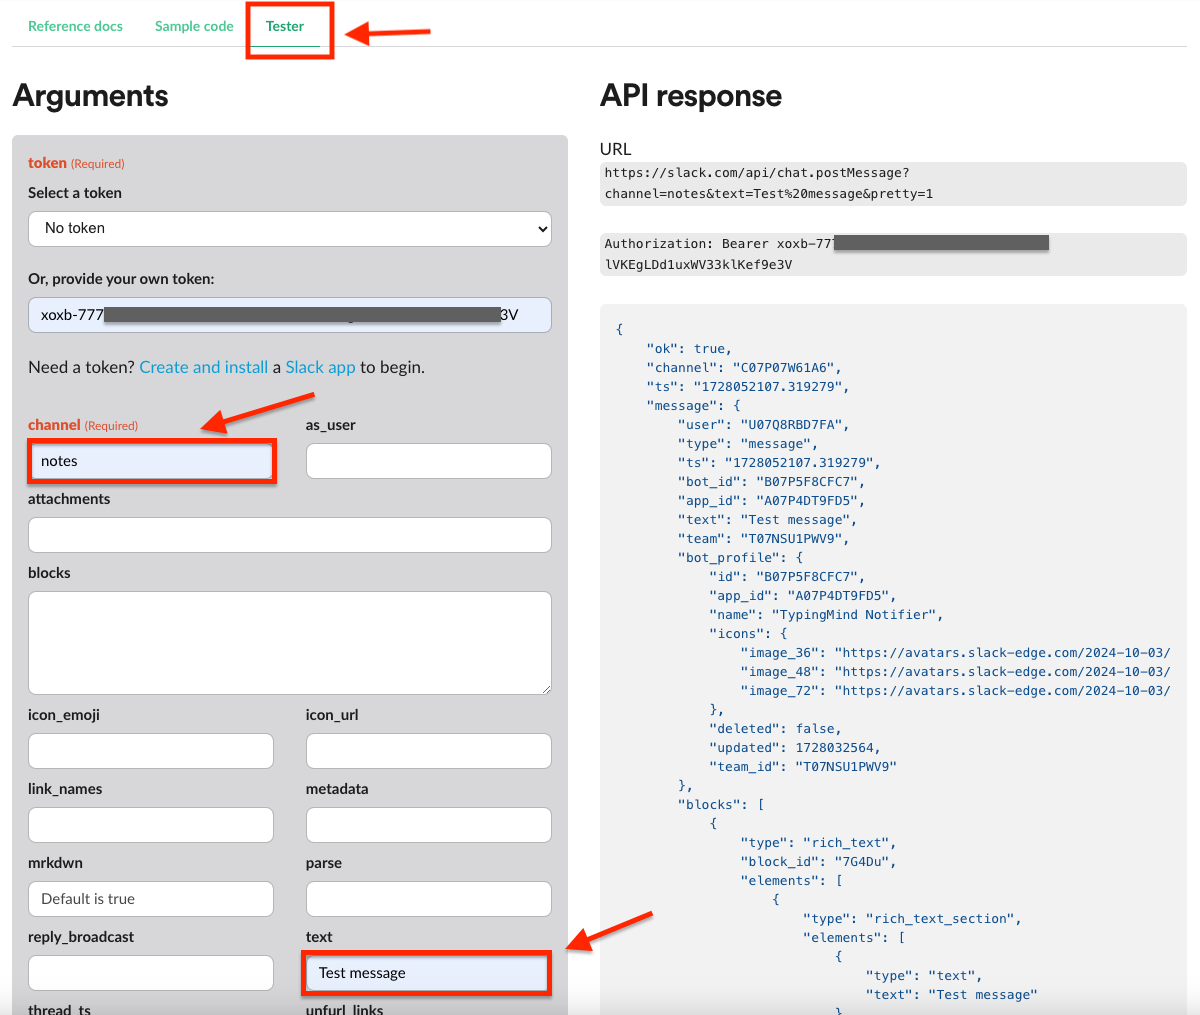
We can navigate to [API Tester Page](https://api.slack.com/methods/chat.postMessage/test) to test the endpoint and check a sample response:
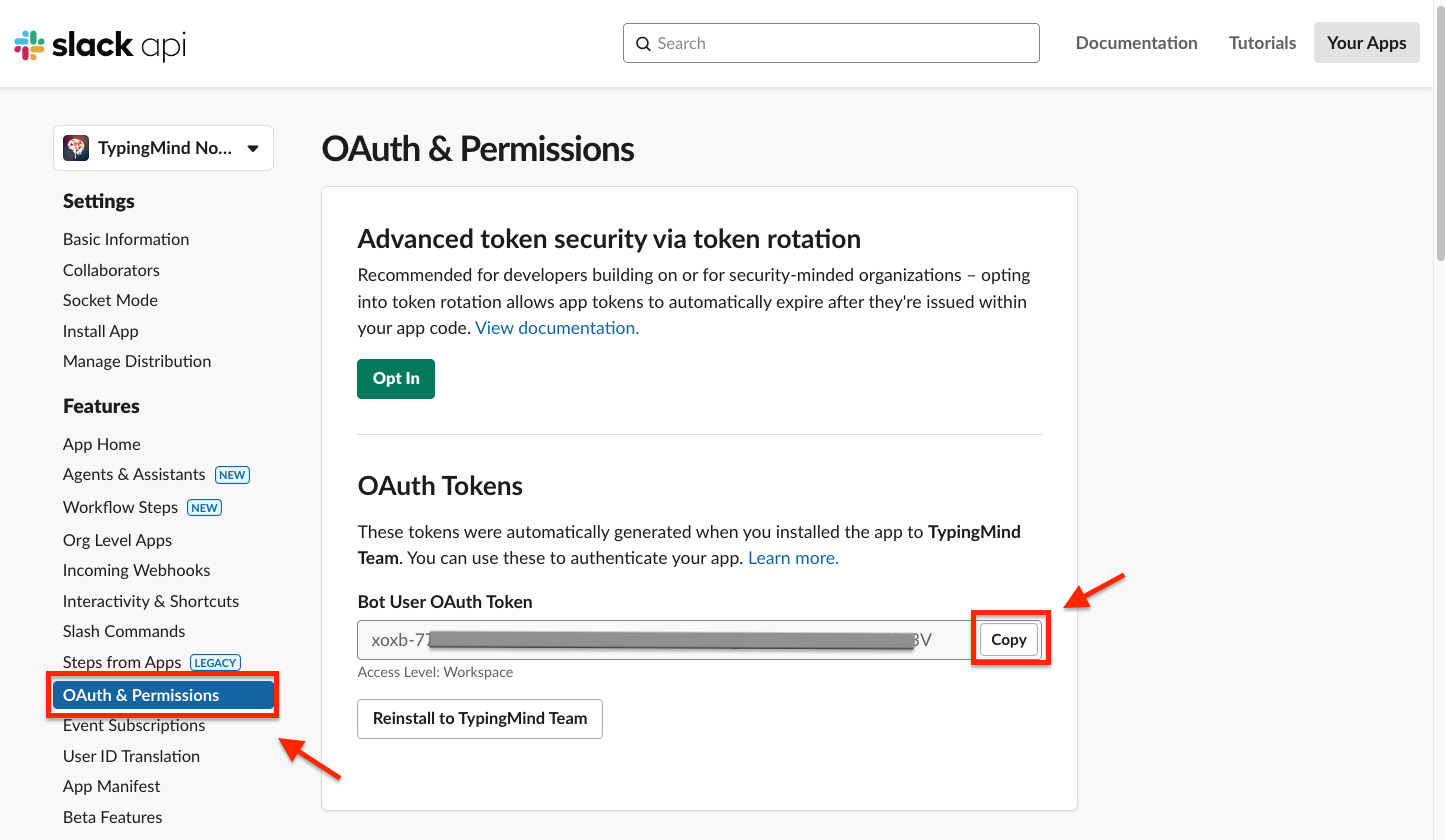
To run the test, you'll need to provide your test access token. Here's how to get one:
* Set up your Slack App with OAuth (see the "Prepare the Slack app for OAuth" section)
* Go to the OAuth & Permissions tab
* Find and copy the Bot User OAuth Token
Alternatively, we can construct a simple HTTP request to send a message to a Slack channel like this:
```bash theme={null}
curl -X POST \
-H "Authorization: Bearer {{ACCESS_TOKEN}}" \
-H "Content-Type: application/json" \
-d '{"channel": "{{CHANNEL}}", "text": "Test message"}' \
https://slack.com/api/chat.postMessage
```
You can execute this command in your terminal or Postman. Be sure to replace`{{ACCESS_TOKEN}}`with your actual Slack access token and`{{CHANNEL}}`with either the name or ID of the Slack channel where you want to send the message.
Now that we understand what is needed to send messages to Slack channels, let's start creating the "Slack Message Notifier" plugin.
### Creating a new plugin on TypingMind
The easiest way to create a new TypingMind plugin is to use the editor provided by TypingMind. You can access the editor via the Admin Panel.
* Go to your Admin Panel → Plugins → Create New Plugin.
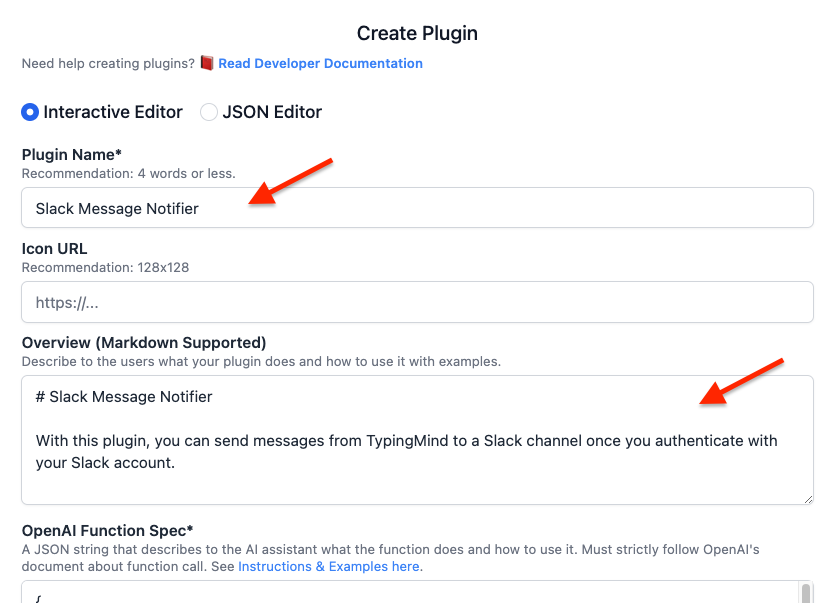
* Name the plugin “**Slack Message Notifier**”
* Description: “With this plugin, you can send messages from TypingMind to a Slack channel once you authenticate with your Slack account”
### OpenAI Function Spec
In this plugin, we want to enable the AI to send messages to a Slack channel. We'll name the function `send_message_to_slack_channel_via_http_action` with two parameters:
• `channel`
• `message`
The full function spec is as follows:
```json theme={null}
{
"name": "send_message_to_slack_channel_via_http_action",
"parameters": {
"type": "object",
"required": [
"channel",
"message"
],
"properties": {
"channel": {
"type": "string",
"description": "This parameter represents the target slack channel name"
},
"message": {
"type": "string",
"description": "This parameter represents the message that a user wants to send to the Slack channel"
}
}
},
"description": "This function sends authorized user's message to a specific slack channel via a http action"
}
```
### Authentication
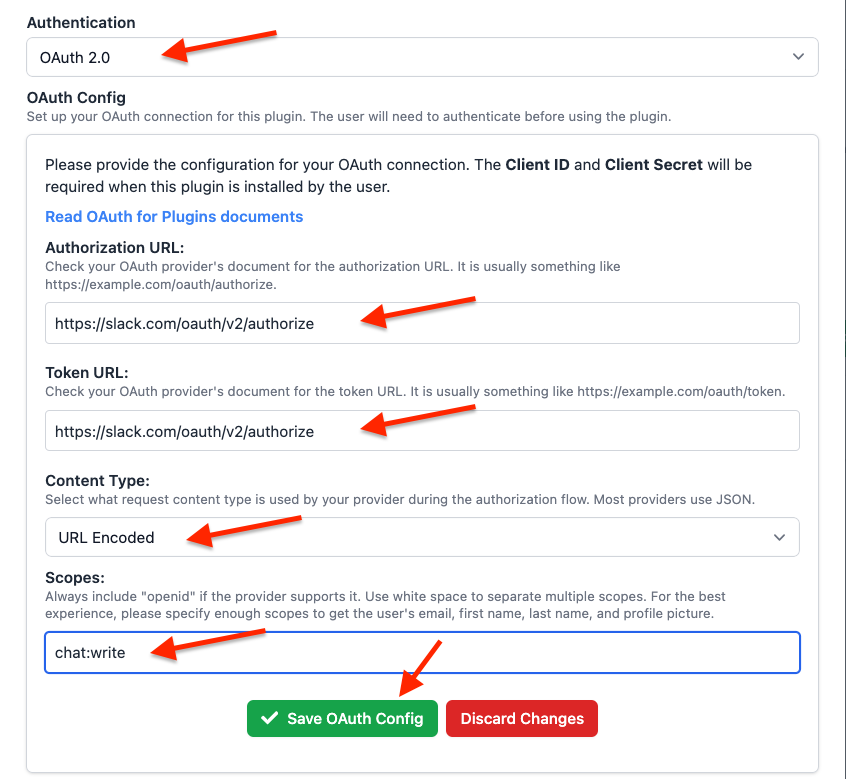
For authentication, let's choose "OAuth 2.0" and set up the OAuth configurations. For OAuth configurations, we will need the following information:
* **Scopes**: the permissions we need from the user. In this case, we already know the scope needed is `chat:write`
* **Content Type**: JSON or URL-encoded. In this case, we use URL-encoded.
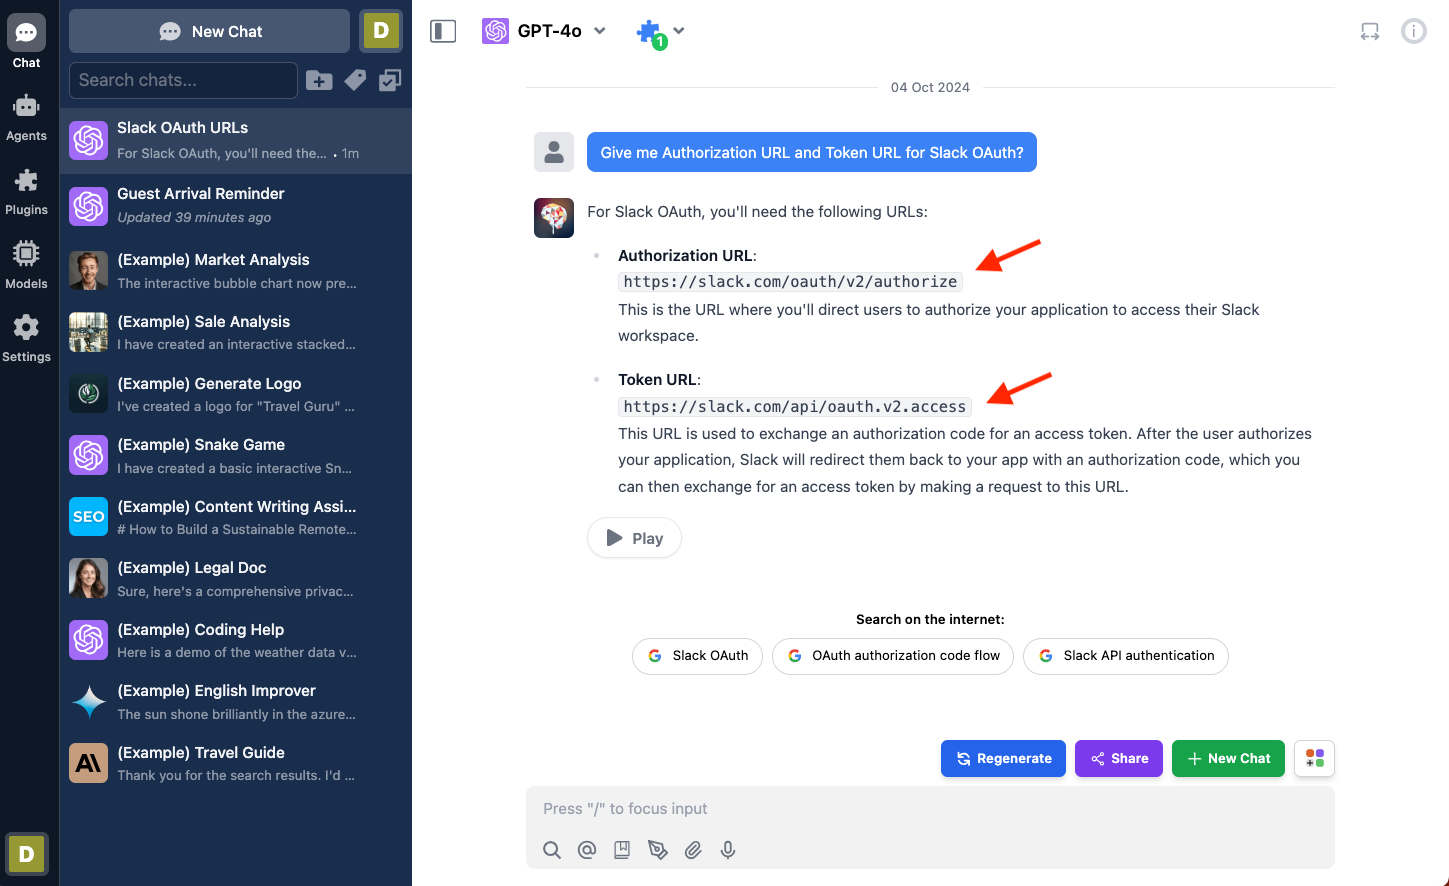
* **Authorization URL**: The URL where users are redirected to grant permission to the Slack app. This is the first step in the OAuth flow.
* **Token URL**: Endpoint to get access token.
The URLs can be found from Slack documentations, sometimes it can be difficult to navigate their documents, but in those cases, you can always ask AI!
Here's the OAuth configuration we set up for the plugin. Let's click "Save OAuth Config" to move on to the next step.
### Implementation
Now, let's implement our plugin using the HTTP Action as planned. This approach allows us to easily send messages to Slack channels without complex coding.
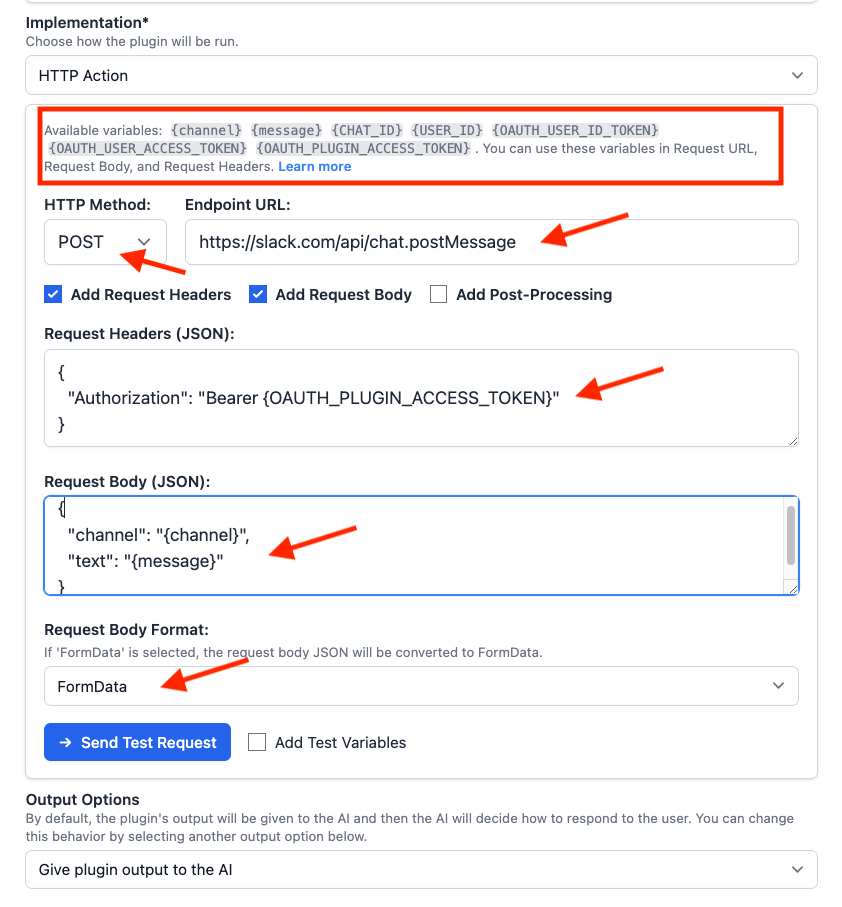
Based on the information we entered for the plugin, we have access to the following variables:
* `channel` and `message` from the OpenAI function spec.
* `OAUTH_PLUGIN_ACCESS_TOKEN` from the OAuth authentication type. This token will be provided when the user authorizes the plugin's access to Slack.
Here are the details to enter for the HTTP Action:
* Method: `POST`
* Endpoint URL: `https://slack.com/api/chat.postMessage`
* Request headers:
```json theme={null}
{
"Authorization": "Bearer {OAUTH_PLUGIN_ACCESS_TOKEN}",
"Content-Type": "application/json"
}
```
* Request body:
```json theme={null}
{
"channel": "{channel}",
"text": "{message}"
}
```
### Test the implementation
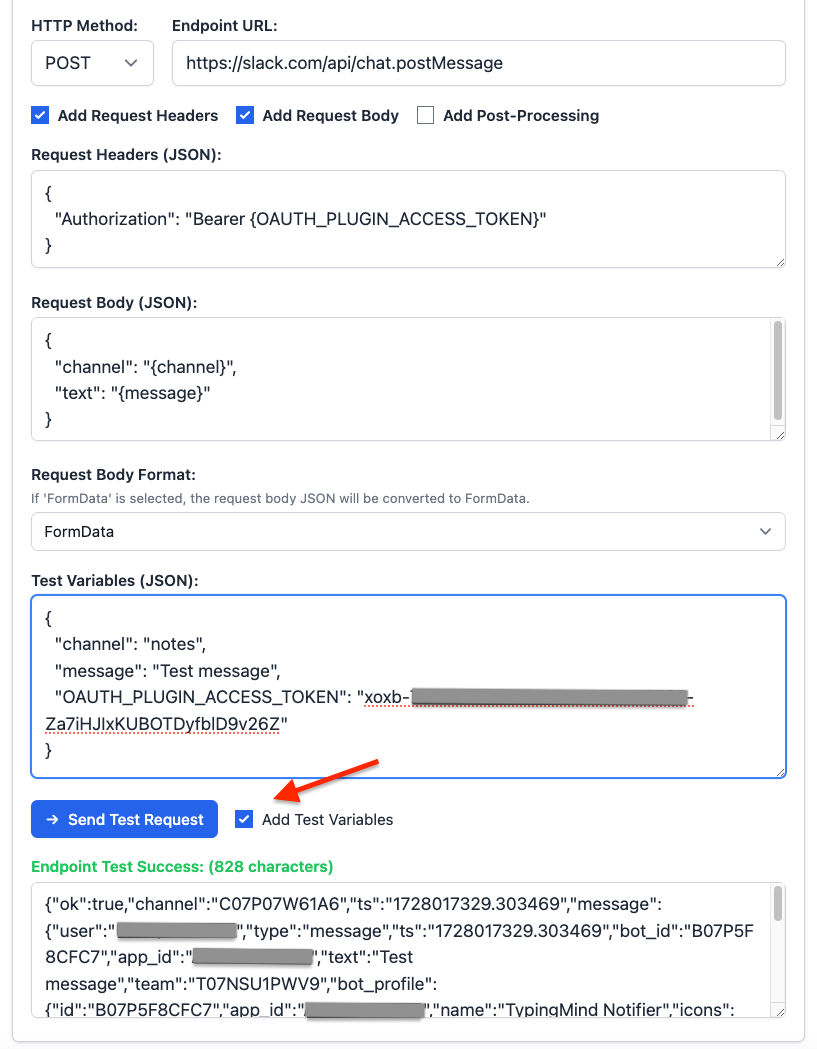
You can add some test variables and click “Send Test Request” to verify that all of your settings are correct. Here I use the same test access token I got from the Slack app:
### Finish creating the plugin
For the **Output Options**, we select "Give plugin output to the AI". This allows the AI to read the information in the response JSON and present the result to the user in a friendly format.
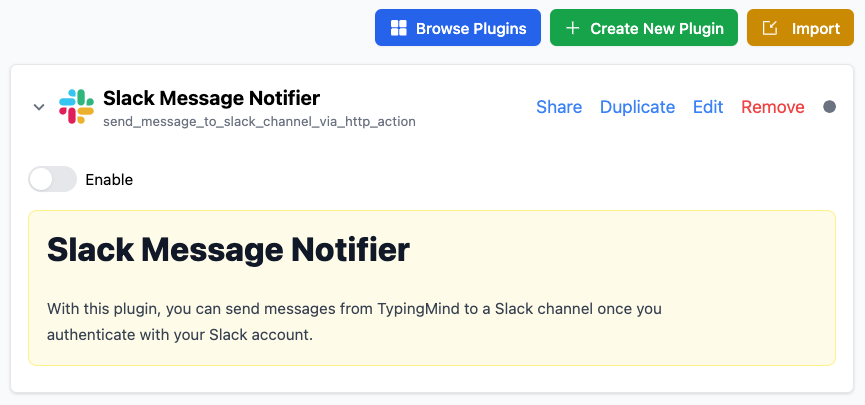
After configuring these settings, click "Update Plugin" to finalize the process. The plugin will be installed to your current instance. You can now see your plugin listed on your Plugins Page.
You can click “Share” to share this plugin to other people to use.
## Part 2: Install and setup the plugin
In this step, we will act as an **Admin User**. We will install the Slack Message Notifier to our TypingMind instance, enable it, and set it up OAuth with our Slack App.
### Prepare your TypingMind instance
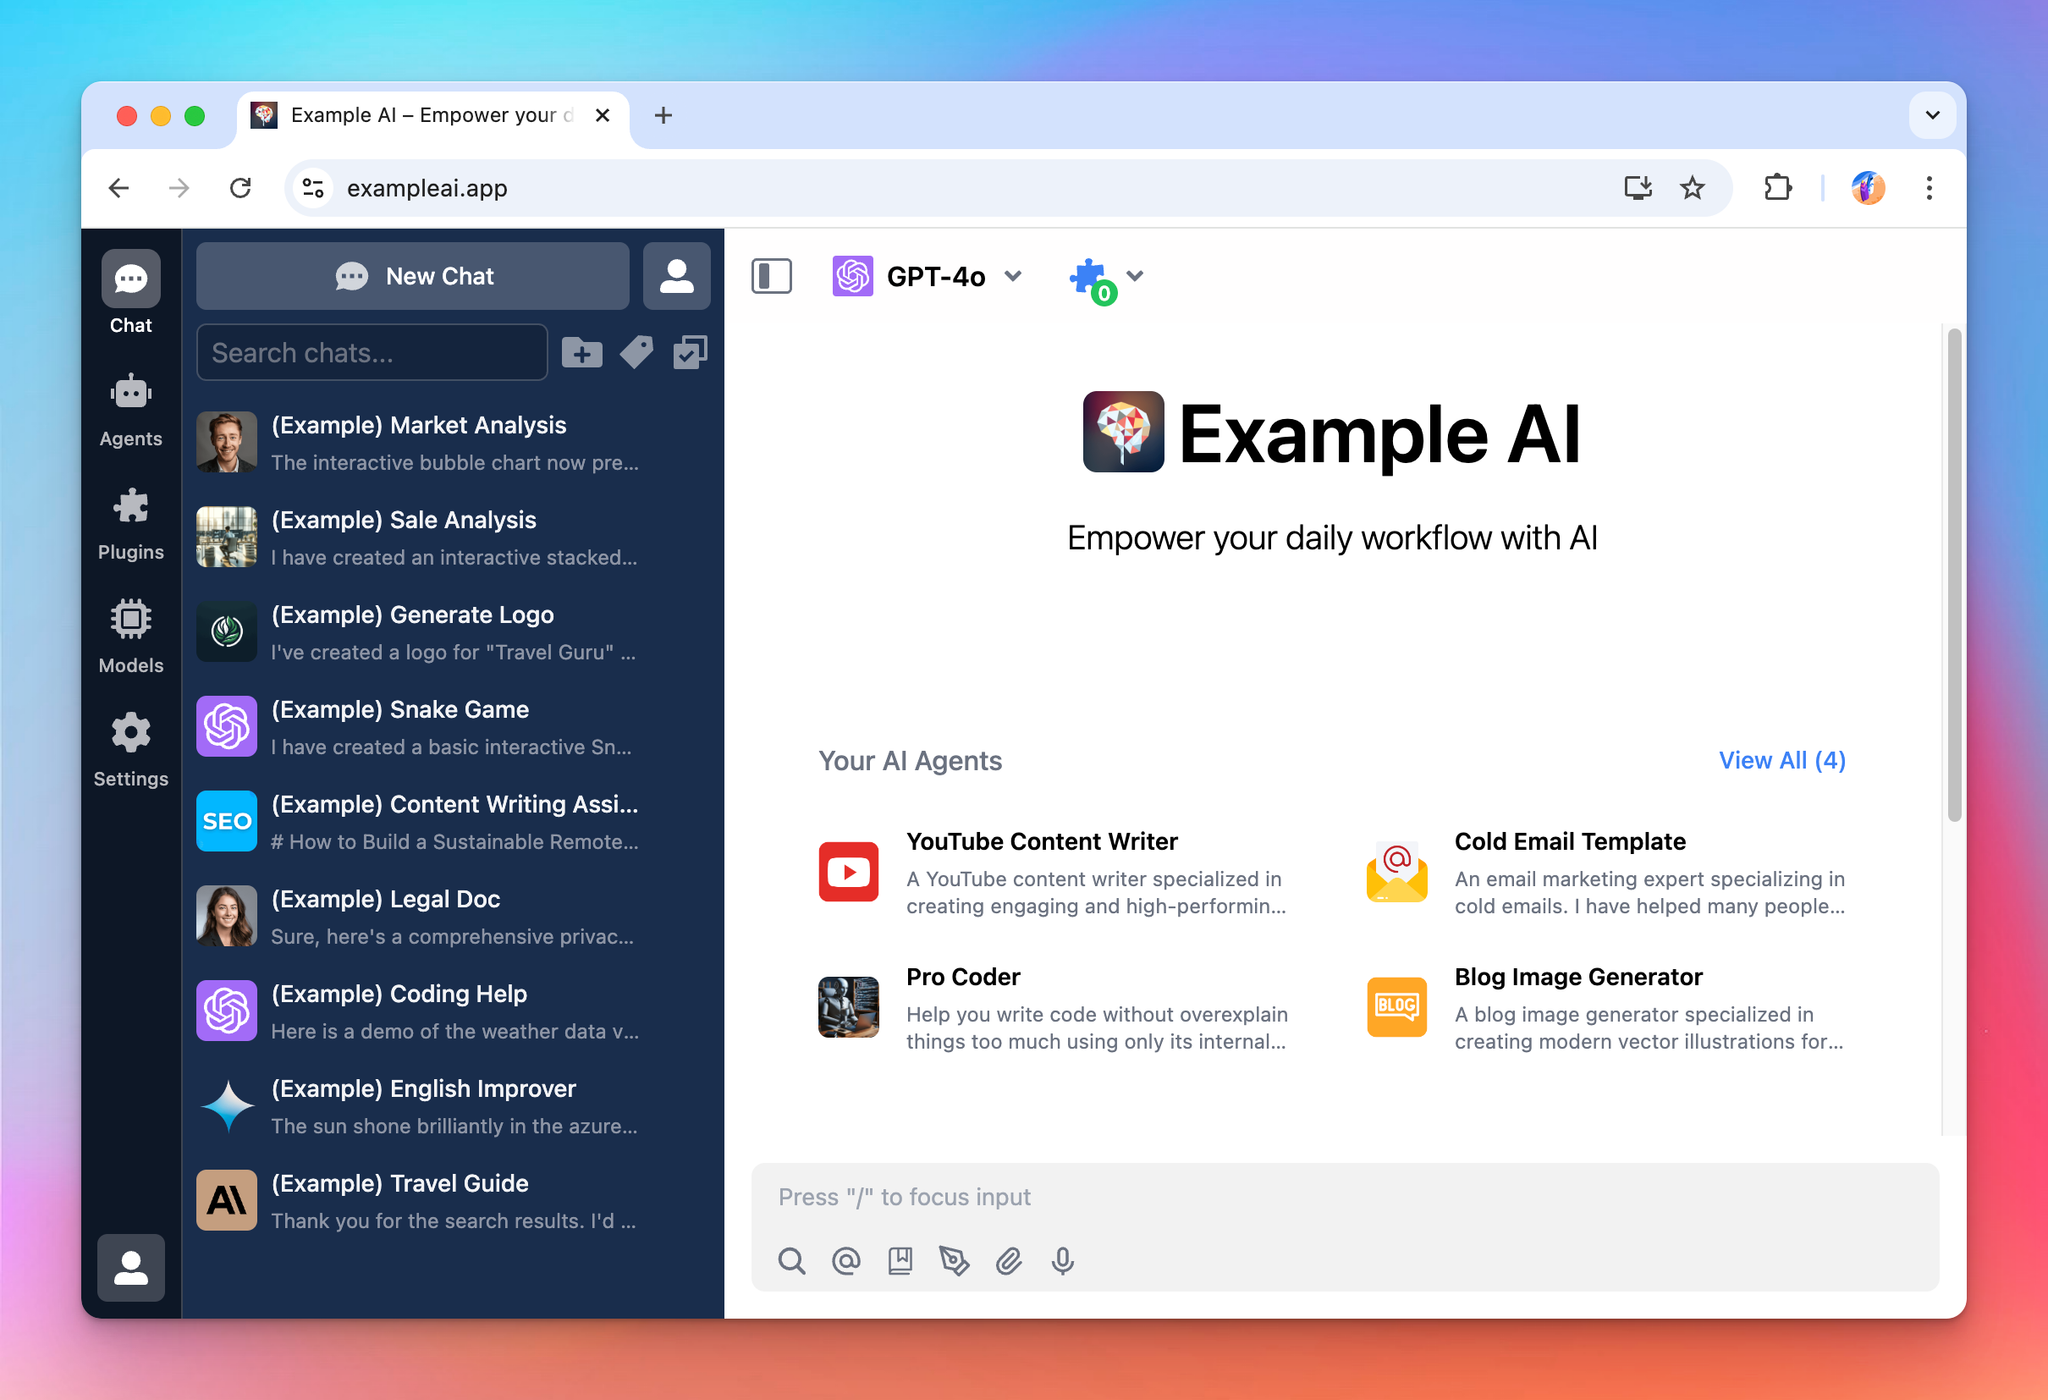
In this example, I will create a new TypingMind instance named “**Example AI**” hosted at [**exampleai.app**](https://www.exampleai.app/) (you can also create private instance like this using [**TypingMind Custom**](https://custom.typingmind.com/)). **Example AI** will be a private AI platform that I created to provide AI access to my teammates at my company.
I will invite my teammates to this platform and let them use the AI with the Google Calendar plugin.
### Create the Slack app for OAuth
To use the Slack Message Notifier plugin, I need a Slack app configured with OAuth.
To begin, we need to create a Slack App. Visit the Slack API website ([https://api.slack.com/apps](https://api.slack.com/apps)) and click on "Create an App".
Choose "From scratch"
Name your app "**TypingMind Notifier**" and select the workspace where you want to install it. Then, click "Create App" to initialize your app.
After creating the app, we'll configure OAuth for our Slack app. Navigate to the app details page and select "OAuth & Permissions" from the sidebar.
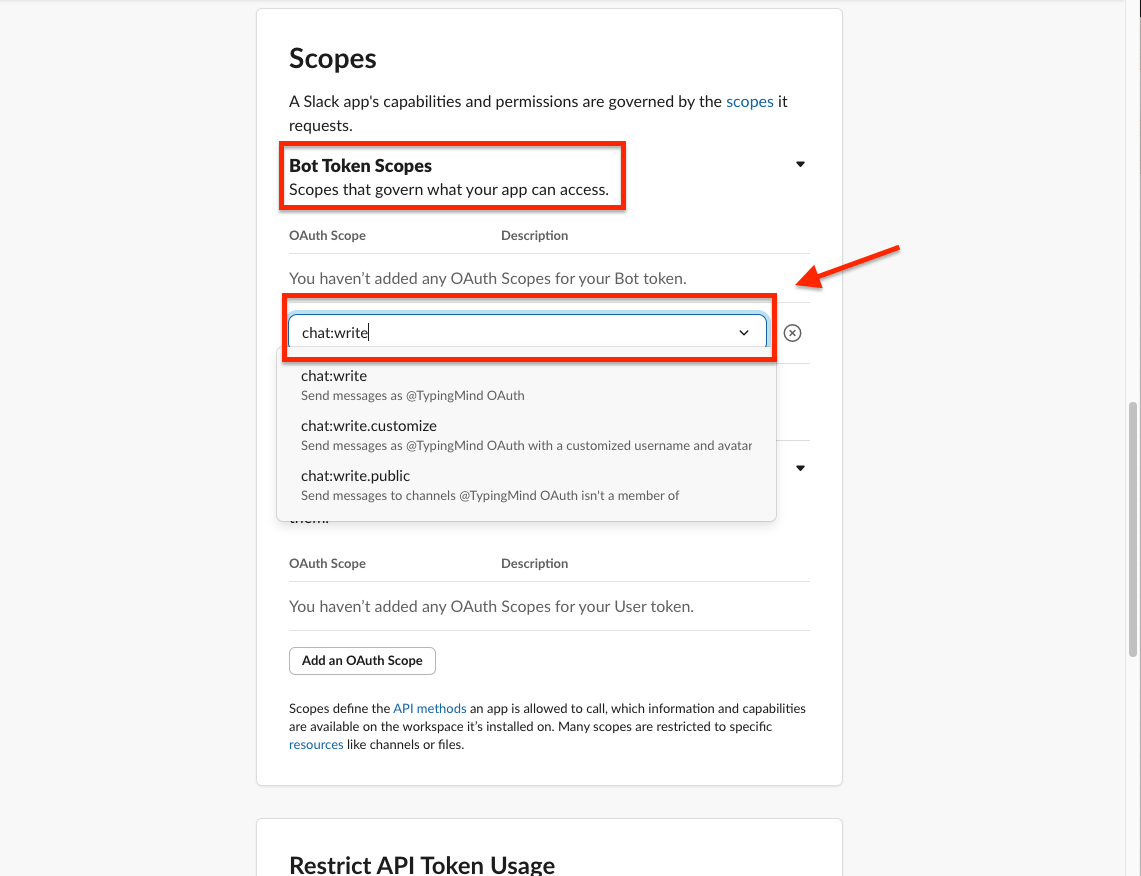
Scroll down to the Scopes section and add the `chat:write` scope to your **Bot Token Scopes**.
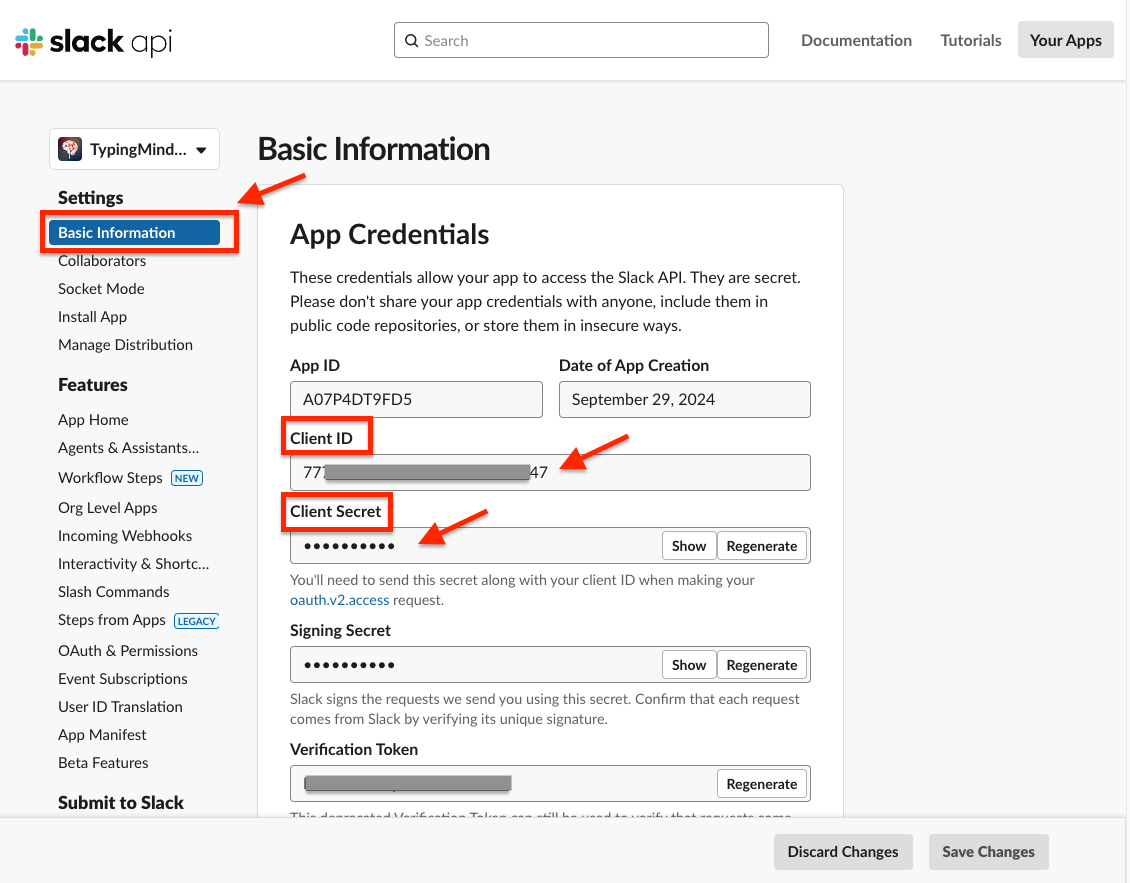
Next, navigate to "Basic Information" in the sidebar. Find the **Client ID** and **Client Secret**. Make sure to securely store these values, as you'll need them for the TypingMind Plugin configuration later.
### Integrate Slack App with Designated Channels
To enable sending messages to Slack channels, we need to integrate our app with the specific channels where we want to send messages.
Let's log in to your Slack Workspace and integrate the Slack app to your channel #general
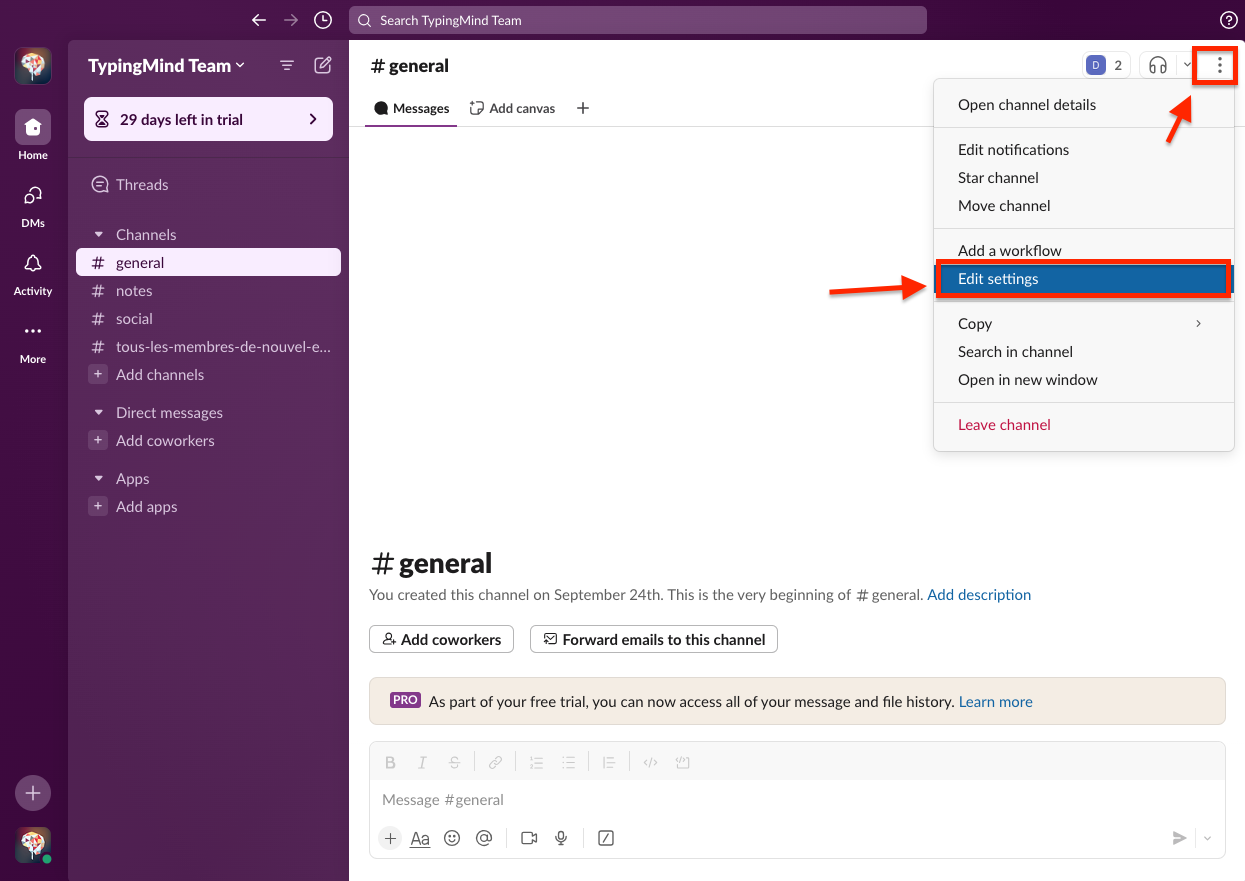
Click on the "Menu" icon in the top right, then choose "Edit settings".
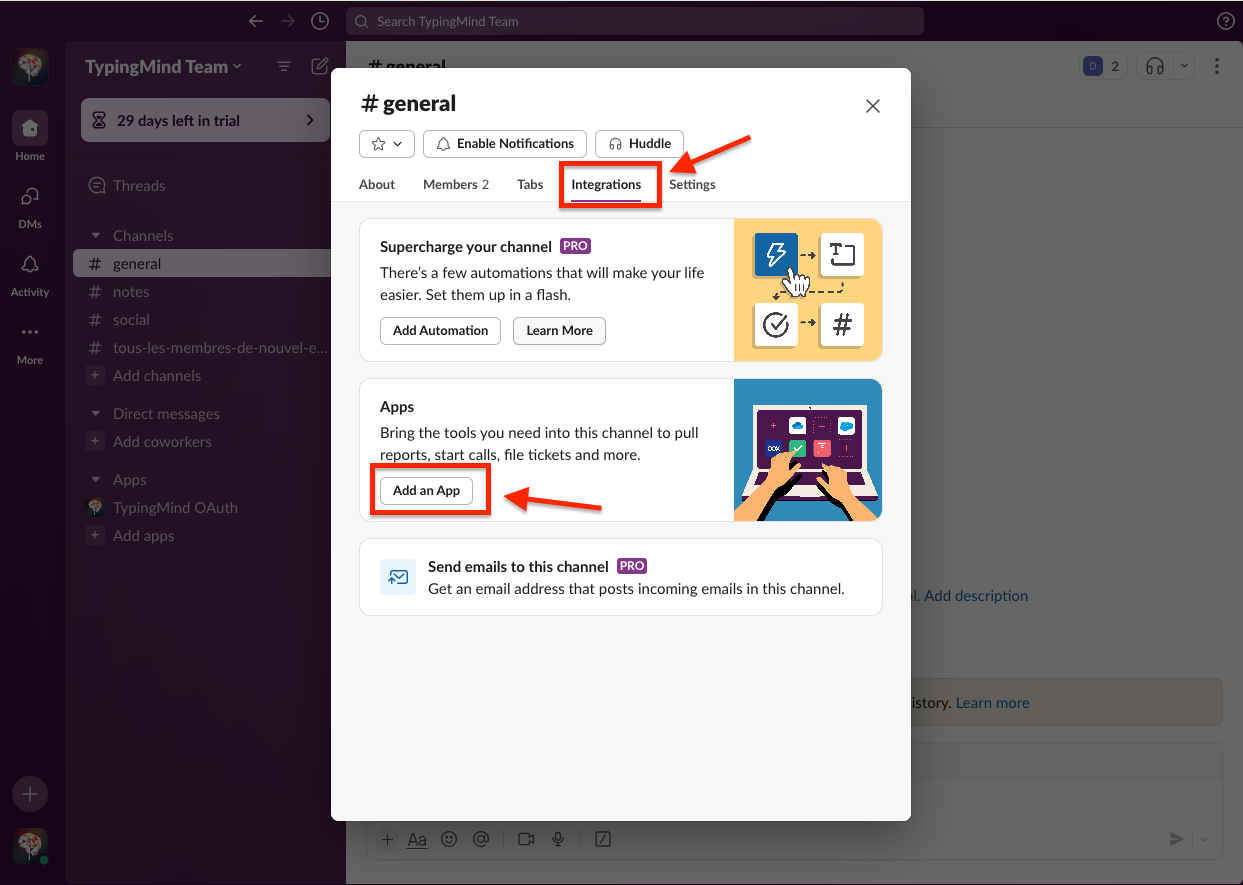
When the Edit settings popup show up, switch to integration tabs, click on “Add an App” button under Apps section.
Find the Slack app "TypingMind Notifier" and click Add
You can also set up for other channels based on your needs
### Install the Slack Message Notifier plugin
Now that we have configured our Slack App for OAuth and integrated it to your channels. we can add the Slack Message Notifier plugin created at the beginning of this tutorial. Let's go to the [Plugin Repo URL](https://github.com/TypingMind/plugin-slack-message-notifier) and install it on your Plugins Page.
When the plugin turned on, it asks for two things: the **OAuth Client ID** and **OAuth Client Secret**. Enter the **Client ID** and **Client Secret** you got in the previous step, then click “**Save Credentials**”
You can also have an **OAuth Callback URL**. Copy this URL and navigate back to the **OAuth & Permissions** section in your Slack App settings. In the Redirect URLs section, paste the copied URL and click Add button to save your changes.
## Part 3: Users use the plugin
As a user, I will login to the Example AI instance and start using the **Slack Message Notifier** plugin.
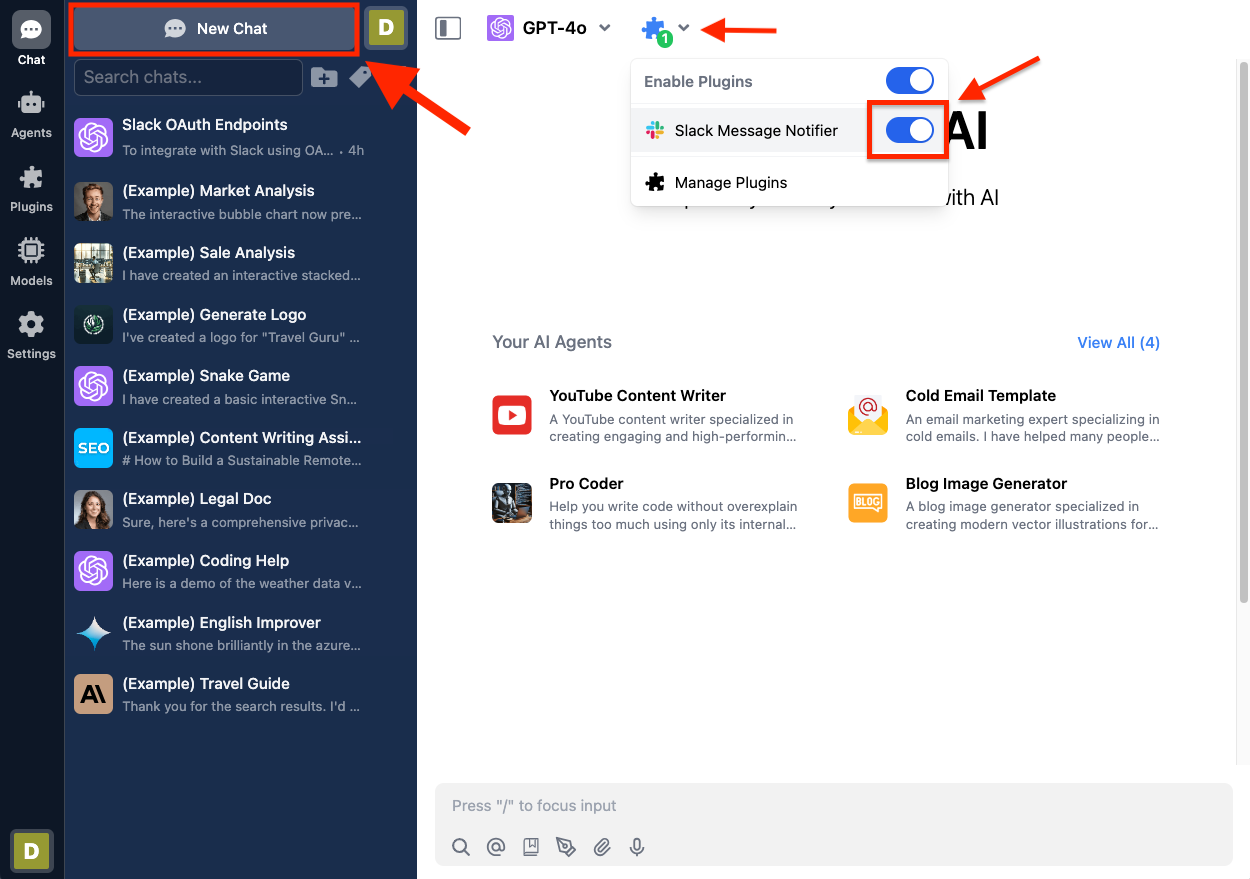
Start a new Chat. If the plugin is currently disabled, I'll make sure to enable it.
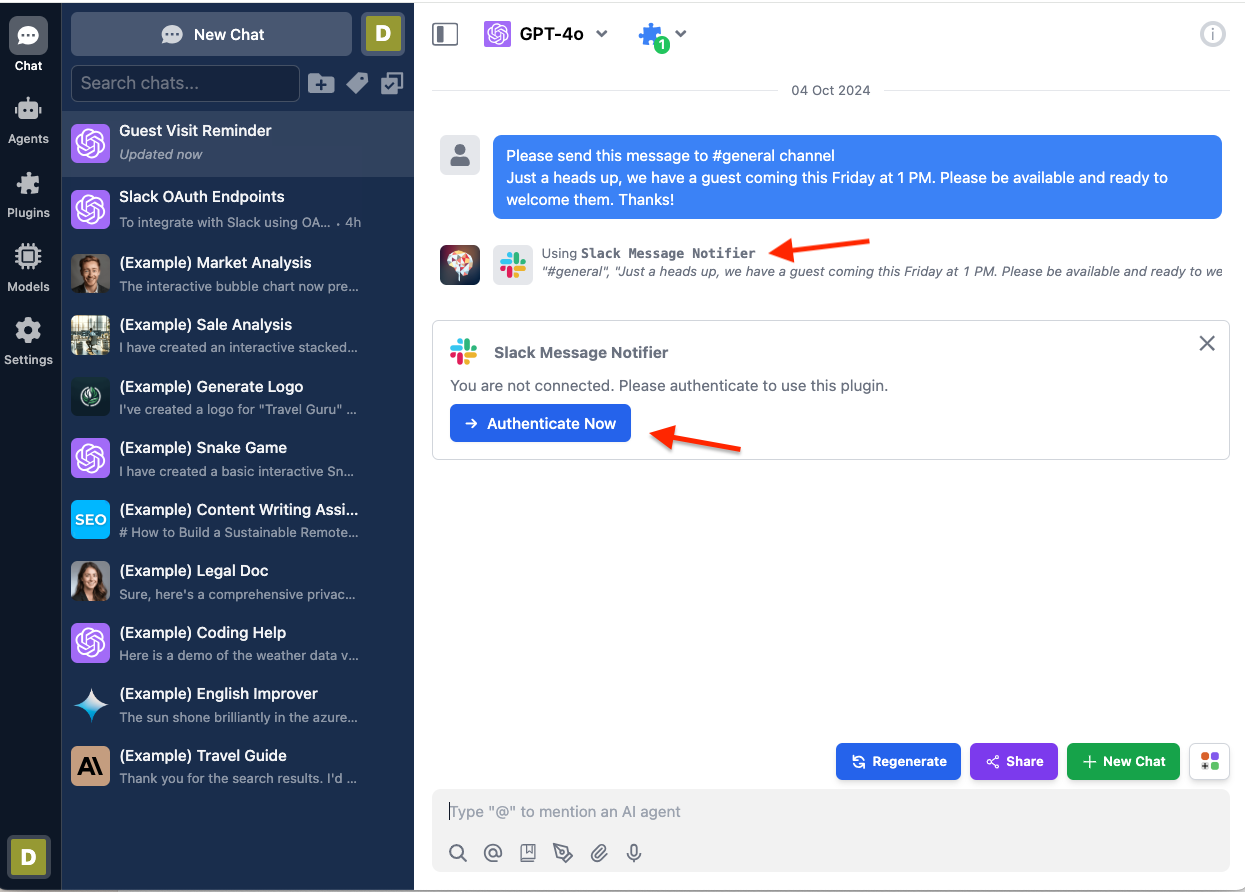
When I ask the AI to help me send a message to the #general channel notifying my teammates that a guest is coming on Friday, the plugin will first prompt me to authenticate with Slack.
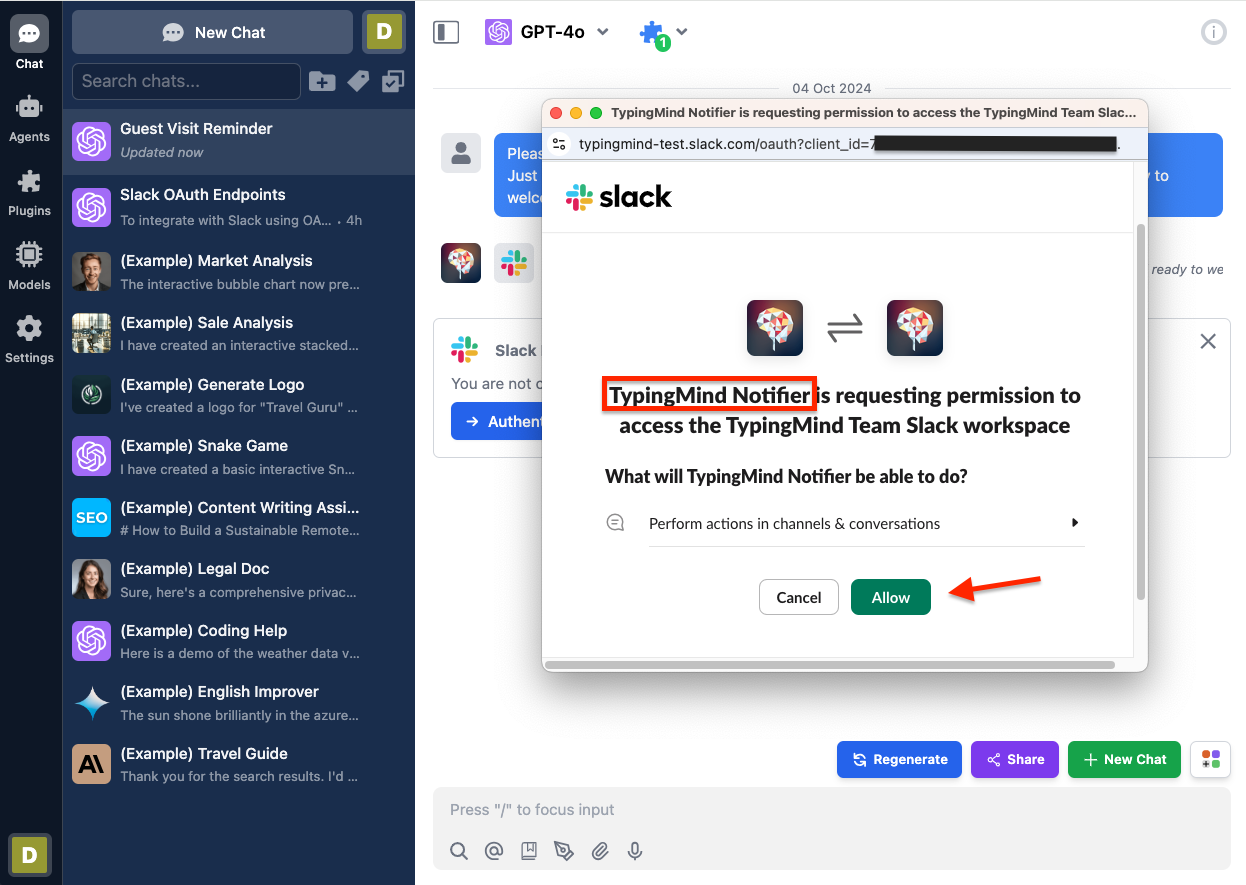
When I click "Authenticate Now," TypingMind sends me to authorize with the **TypingMind Notifier** Slack app.
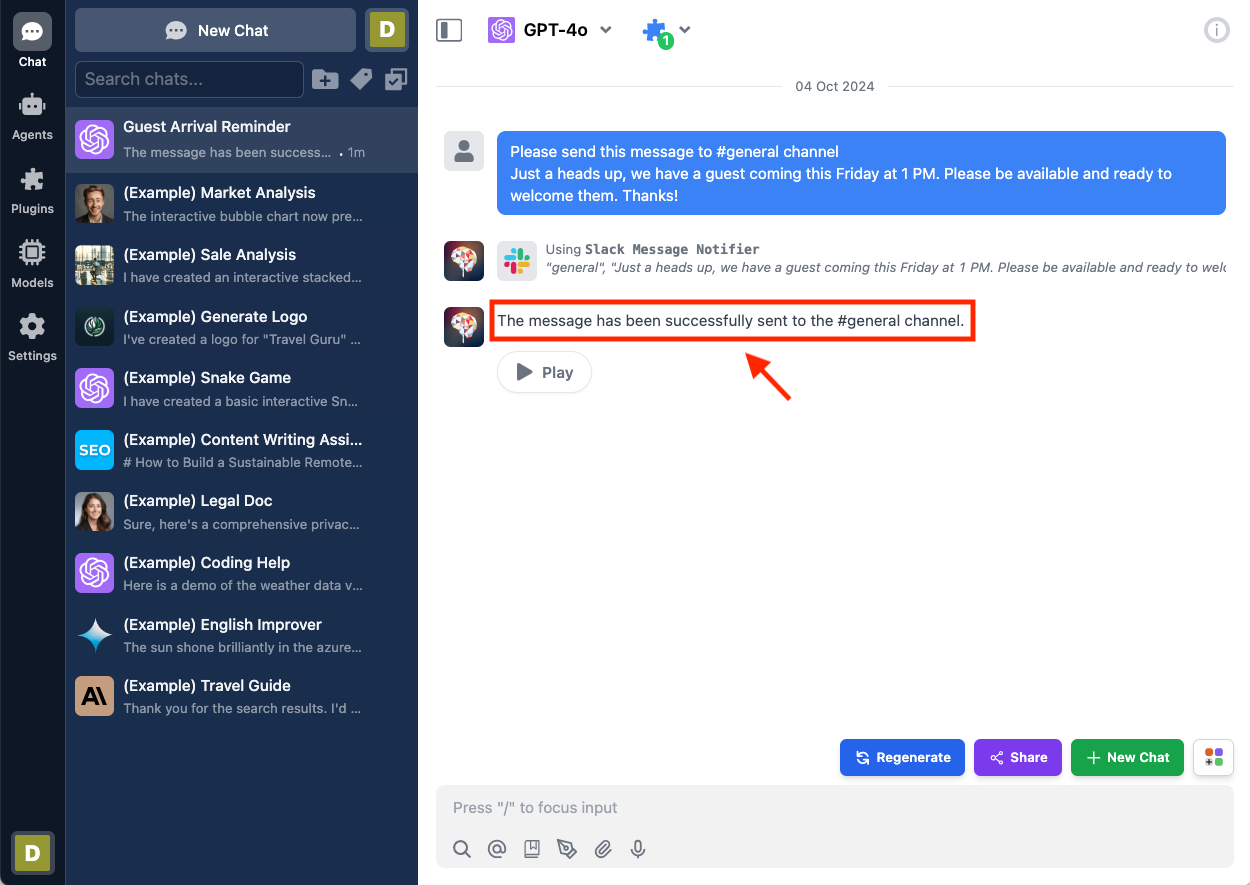
Once I've authorized, the AI now has access and can send the message to the Slack channel. The AI shows that the message has been sent successfully.
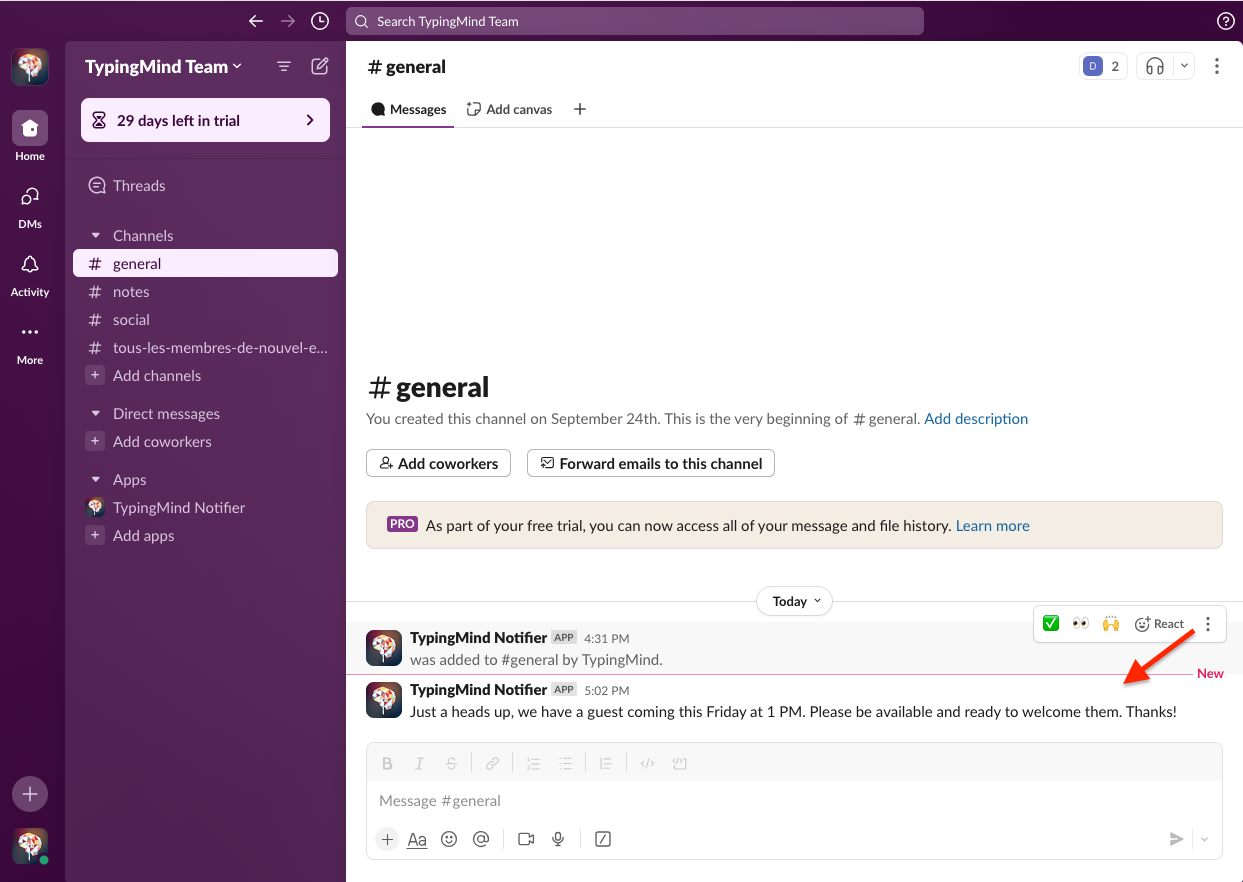
Finally, I switch to my Slack Workspace and check that the message has arrived.
## **Conclusion**
This tutorial covers three main roles in creating and using the Slack Message Notifier plugin:
### 1. As a Plugin Developer:
* Create the Slack Message Notifier plugin for TypingMind
* Set up the plugin structure and functionality
### 2. As a User Admin:
* Create and configure a Slack app for OAuth authentication
* Install and set up the plugin in a TypingMind instance
* Integrate the Slack app with specific channels
### 3. As a User:
* Enable the Slack Message Notifier plugin in TypingMind chat
* Authenticate with Slack when first using the plugin
* Use the AI to send messages to Slack channels
This plugin makes it easy for TypingMind users to send messages to their Slack channels using AI assistance. It connects TypingMind and Slack securely using OAuth 2.0.
## Learn more
Typing Mind OAuth for plugin: [https://docs.typingmind.com/plugins/oauth-for-plugin](https://docs.typingmind.com/plugins/oauth-for-plugin)
Slack Api documentation: [https://api.slack.com/docs](https://api.slack.com/docs)
TypingMind Plugin is a powerful system. Learn more about it by reading our documents at
[**https://docs.typingmind.com**](https://docs.typingmind.com/) or share your ideas at our [Awesome TypingMind Github Repo](https://github.com/TypingMind/awesome-typingmind)
 When using this plugin, the user must authenticate with their Slack account. The AI will then use the user's permissions to send messages to their Slack channel.
Here is the link to the repository of the completed plugin:
[https://github.com/TypingMind/plugin-slack-message-notifier](https://github.com/TypingMind/plugin-slack-message-notifier)
In this tutorial, we will go through 3 parts:
* Part 1: Create the plugin (as a plugin developer)
* Part 2: Install and setup the plugin (as an admin user)
* Part 3: Use the plugin (as an end user)
Let's get started!
When using this plugin, the user must authenticate with their Slack account. The AI will then use the user's permissions to send messages to their Slack channel.
Here is the link to the repository of the completed plugin:
[https://github.com/TypingMind/plugin-slack-message-notifier](https://github.com/TypingMind/plugin-slack-message-notifier)
In this tutorial, we will go through 3 parts:
* Part 1: Create the plugin (as a plugin developer)
* Part 2: Install and setup the plugin (as an admin user)
* Part 3: Use the plugin (as an end user)
Let's get started!
 From this page, we will learn that:
1. The endpoint to send messages to a Slack channel is:
```
POST https://slack.com/api/chat.postMessage
```
2. You need an access token with the right permissions to use this endpoint. For sending messages, you typically need the [chat:write](https://api.slack.com/scopes/chat:write) scope.
```bash theme={null}
https://api.slack.com/scopes/chat:write
```
3. The endpoint supports several parameters, but the ones we care about are:
* `channel`: The channel name (e.g. #general) or the channel ID (e.g. C024BE91L) of the channel you want to post the message to.
* `text`: The content of the message you want to send.
We can navigate to [API Tester Page](https://api.slack.com/methods/chat.postMessage/test) to test the endpoint and check a sample response:
From this page, we will learn that:
1. The endpoint to send messages to a Slack channel is:
```
POST https://slack.com/api/chat.postMessage
```
2. You need an access token with the right permissions to use this endpoint. For sending messages, you typically need the [chat:write](https://api.slack.com/scopes/chat:write) scope.
```bash theme={null}
https://api.slack.com/scopes/chat:write
```
3. The endpoint supports several parameters, but the ones we care about are:
* `channel`: The channel name (e.g. #general) or the channel ID (e.g. C024BE91L) of the channel you want to post the message to.
* `text`: The content of the message you want to send.
We can navigate to [API Tester Page](https://api.slack.com/methods/chat.postMessage/test) to test the endpoint and check a sample response:
 To run the test, you'll need to provide your test access token. Here's how to get one:
* Set up your Slack App with OAuth (see the "Prepare the Slack app for OAuth" section)
* Go to the OAuth & Permissions tab
* Find and copy the Bot User OAuth Token
To run the test, you'll need to provide your test access token. Here's how to get one:
* Set up your Slack App with OAuth (see the "Prepare the Slack app for OAuth" section)
* Go to the OAuth & Permissions tab
* Find and copy the Bot User OAuth Token
 Alternatively, we can construct a simple HTTP request to send a message to a Slack channel like this:
```bash theme={null}
curl -X POST \
-H "Authorization: Bearer {{ACCESS_TOKEN}}" \
-H "Content-Type: application/json" \
-d '{"channel": "{{CHANNEL}}", "text": "Test message"}' \
https://slack.com/api/chat.postMessage
```
You can execute this command in your terminal or Postman. Be sure to replace`{{ACCESS_TOKEN}}`with your actual Slack access token and`{{CHANNEL}}`with either the name or ID of the Slack channel where you want to send the message.
Now that we understand what is needed to send messages to Slack channels, let's start creating the "Slack Message Notifier" plugin.
### Creating a new plugin on TypingMind
The easiest way to create a new TypingMind plugin is to use the editor provided by TypingMind. You can access the editor via the Admin Panel.
* Go to your Admin Panel → Plugins → Create New Plugin.
* Name the plugin “**Slack Message Notifier**”
* Description: “With this plugin, you can send messages from TypingMind to a Slack channel once you authenticate with your Slack account”
Alternatively, we can construct a simple HTTP request to send a message to a Slack channel like this:
```bash theme={null}
curl -X POST \
-H "Authorization: Bearer {{ACCESS_TOKEN}}" \
-H "Content-Type: application/json" \
-d '{"channel": "{{CHANNEL}}", "text": "Test message"}' \
https://slack.com/api/chat.postMessage
```
You can execute this command in your terminal or Postman. Be sure to replace`{{ACCESS_TOKEN}}`with your actual Slack access token and`{{CHANNEL}}`with either the name or ID of the Slack channel where you want to send the message.
Now that we understand what is needed to send messages to Slack channels, let's start creating the "Slack Message Notifier" plugin.
### Creating a new plugin on TypingMind
The easiest way to create a new TypingMind plugin is to use the editor provided by TypingMind. You can access the editor via the Admin Panel.
* Go to your Admin Panel → Plugins → Create New Plugin.
* Name the plugin “**Slack Message Notifier**”
* Description: “With this plugin, you can send messages from TypingMind to a Slack channel once you authenticate with your Slack account”
 ### OpenAI Function Spec
In this plugin, we want to enable the AI to send messages to a Slack channel. We'll name the function `send_message_to_slack_channel_via_http_action` with two parameters:
• `channel`
• `message`
The full function spec is as follows:
```json theme={null}
{
"name": "send_message_to_slack_channel_via_http_action",
"parameters": {
"type": "object",
"required": [
"channel",
"message"
],
"properties": {
"channel": {
"type": "string",
"description": "This parameter represents the target slack channel name"
},
"message": {
"type": "string",
"description": "This parameter represents the message that a user wants to send to the Slack channel"
}
}
},
"description": "This function sends authorized user's message to a specific slack channel via a http action"
}
```
### Authentication
For authentication, let's choose "OAuth 2.0" and set up the OAuth configurations. For OAuth configurations, we will need the following information:
* **Scopes**: the permissions we need from the user. In this case, we already know the scope needed is `chat:write`
* **Content Type**: JSON or URL-encoded. In this case, we use URL-encoded.
* **Authorization URL**: The URL where users are redirected to grant permission to the Slack app. This is the first step in the OAuth flow.
* **Token URL**: Endpoint to get access token.
The URLs can be found from Slack documentations, sometimes it can be difficult to navigate their documents, but in those cases, you can always ask AI!
### OpenAI Function Spec
In this plugin, we want to enable the AI to send messages to a Slack channel. We'll name the function `send_message_to_slack_channel_via_http_action` with two parameters:
• `channel`
• `message`
The full function spec is as follows:
```json theme={null}
{
"name": "send_message_to_slack_channel_via_http_action",
"parameters": {
"type": "object",
"required": [
"channel",
"message"
],
"properties": {
"channel": {
"type": "string",
"description": "This parameter represents the target slack channel name"
},
"message": {
"type": "string",
"description": "This parameter represents the message that a user wants to send to the Slack channel"
}
}
},
"description": "This function sends authorized user's message to a specific slack channel via a http action"
}
```
### Authentication
For authentication, let's choose "OAuth 2.0" and set up the OAuth configurations. For OAuth configurations, we will need the following information:
* **Scopes**: the permissions we need from the user. In this case, we already know the scope needed is `chat:write`
* **Content Type**: JSON or URL-encoded. In this case, we use URL-encoded.
* **Authorization URL**: The URL where users are redirected to grant permission to the Slack app. This is the first step in the OAuth flow.
* **Token URL**: Endpoint to get access token.
The URLs can be found from Slack documentations, sometimes it can be difficult to navigate their documents, but in those cases, you can always ask AI!
 Here's the OAuth configuration we set up for the plugin. Let's click "Save OAuth Config" to move on to the next step.
 ### Implementation
Now, let's implement our plugin using the HTTP Action as planned. This approach allows us to easily send messages to Slack channels without complex coding.
### Implementation
Now, let's implement our plugin using the HTTP Action as planned. This approach allows us to easily send messages to Slack channels without complex coding.
 Based on the information we entered for the plugin, we have access to the following variables:
* `channel` and `message` from the OpenAI function spec.
* `OAUTH_PLUGIN_ACCESS_TOKEN` from the OAuth authentication type. This token will be provided when the user authorizes the plugin's access to Slack.
Here are the details to enter for the HTTP Action:
* Method: `POST`
* Endpoint URL: `https://slack.com/api/chat.postMessage`
* Request headers:
```json theme={null}
{
"Authorization": "Bearer {OAUTH_PLUGIN_ACCESS_TOKEN}",
"Content-Type": "application/json"
}
```
* Request body:
```json theme={null}
{
"channel": "{channel}",
"text": "{message}"
}
```
### Test the implementation
You can add some test variables and click “Send Test Request” to verify that all of your settings are correct. Here I use the same test access token I got from the Slack app:
Based on the information we entered for the plugin, we have access to the following variables:
* `channel` and `message` from the OpenAI function spec.
* `OAUTH_PLUGIN_ACCESS_TOKEN` from the OAuth authentication type. This token will be provided when the user authorizes the plugin's access to Slack.
Here are the details to enter for the HTTP Action:
* Method: `POST`
* Endpoint URL: `https://slack.com/api/chat.postMessage`
* Request headers:
```json theme={null}
{
"Authorization": "Bearer {OAUTH_PLUGIN_ACCESS_TOKEN}",
"Content-Type": "application/json"
}
```
* Request body:
```json theme={null}
{
"channel": "{channel}",
"text": "{message}"
}
```
### Test the implementation
You can add some test variables and click “Send Test Request” to verify that all of your settings are correct. Here I use the same test access token I got from the Slack app:
 ### Finish creating the plugin
For the **Output Options**, we select "Give plugin output to the AI". This allows the AI to read the information in the response JSON and present the result to the user in a friendly format.
### Finish creating the plugin
For the **Output Options**, we select "Give plugin output to the AI". This allows the AI to read the information in the response JSON and present the result to the user in a friendly format.
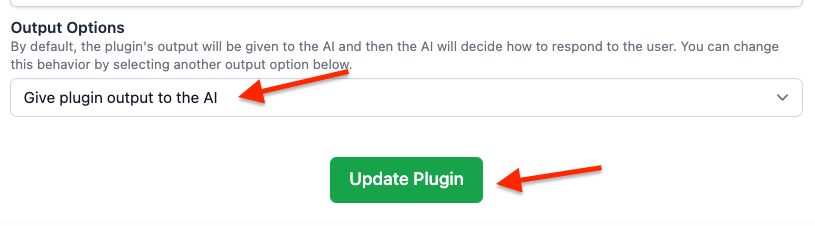 After configuring these settings, click "Update Plugin" to finalize the process. The plugin will be installed to your current instance. You can now see your plugin listed on your Plugins Page.
You can click “Share” to share this plugin to other people to use.
After configuring these settings, click "Update Plugin" to finalize the process. The plugin will be installed to your current instance. You can now see your plugin listed on your Plugins Page.
You can click “Share” to share this plugin to other people to use.
 ## Part 2: Install and setup the plugin
 ### Create the Slack app for OAuth
To use the Slack Message Notifier plugin, I need a Slack app configured with OAuth.
To begin, we need to create a Slack App. Visit the Slack API website ([https://api.slack.com/apps](https://api.slack.com/apps)) and click on "Create an App".
### Create the Slack app for OAuth
To use the Slack Message Notifier plugin, I need a Slack app configured with OAuth.
To begin, we need to create a Slack App. Visit the Slack API website ([https://api.slack.com/apps](https://api.slack.com/apps)) and click on "Create an App".
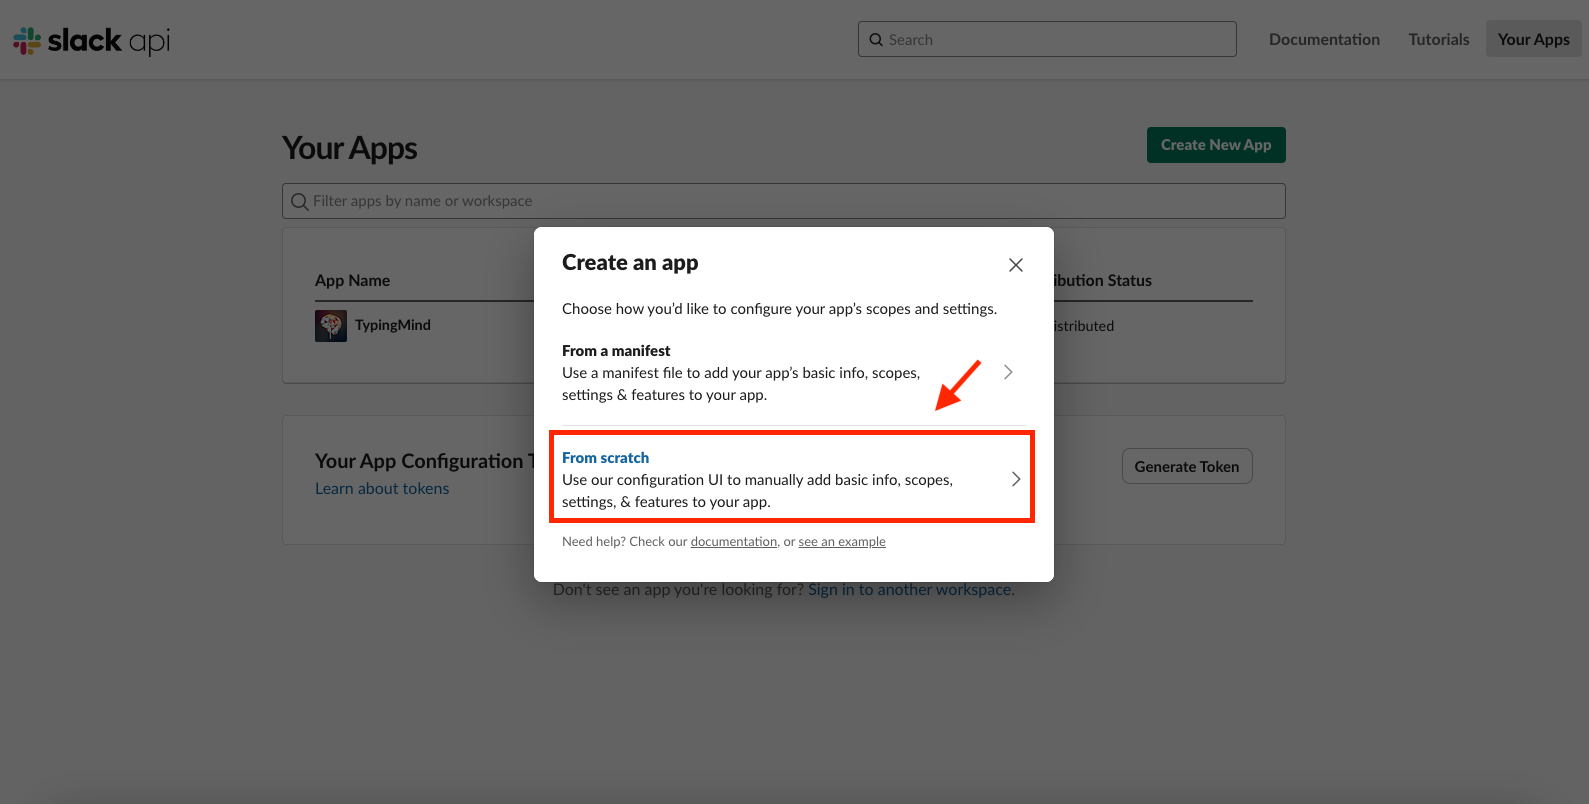
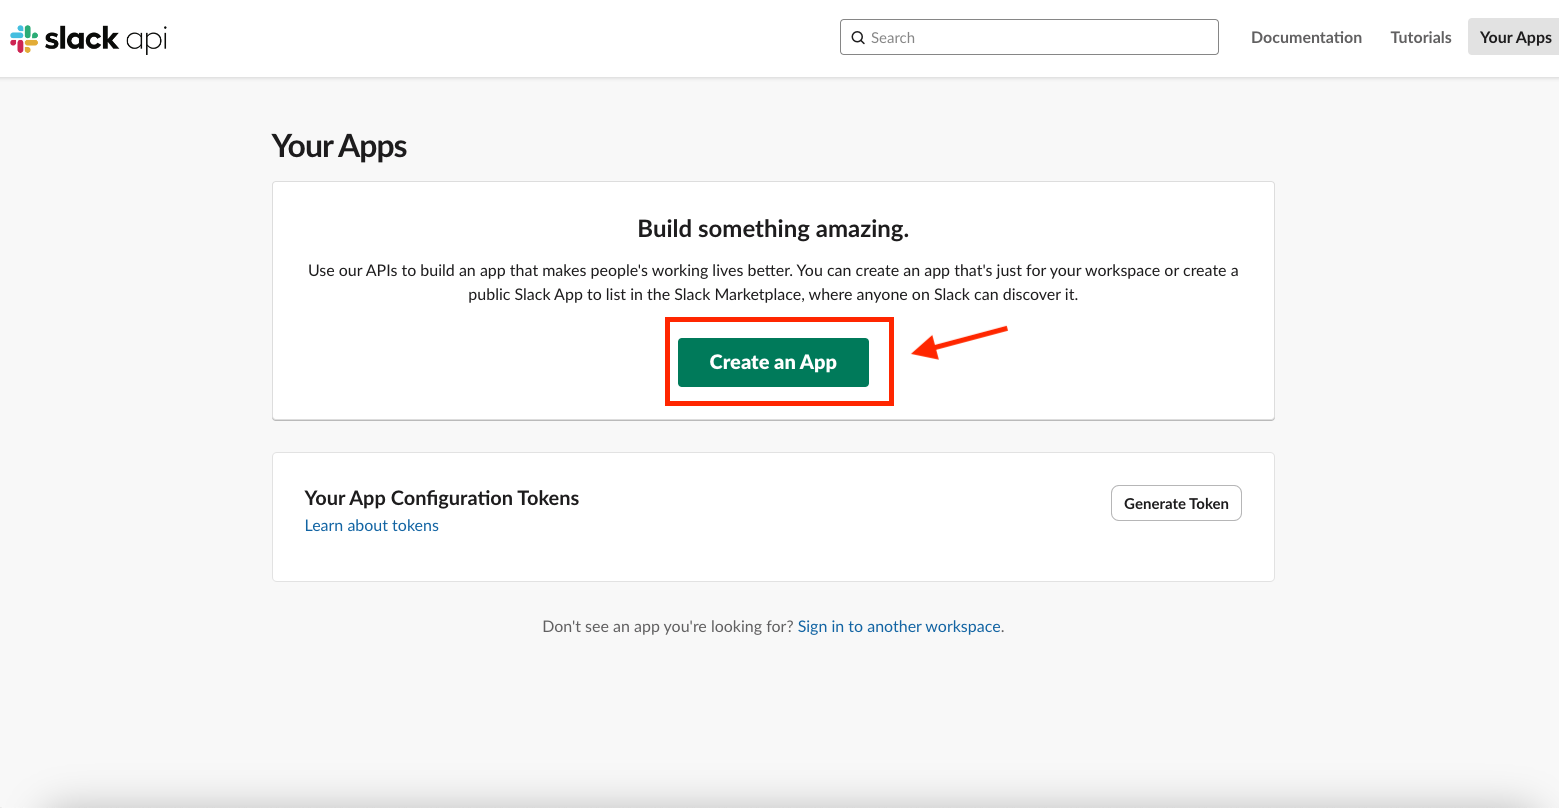 Choose "From scratch"
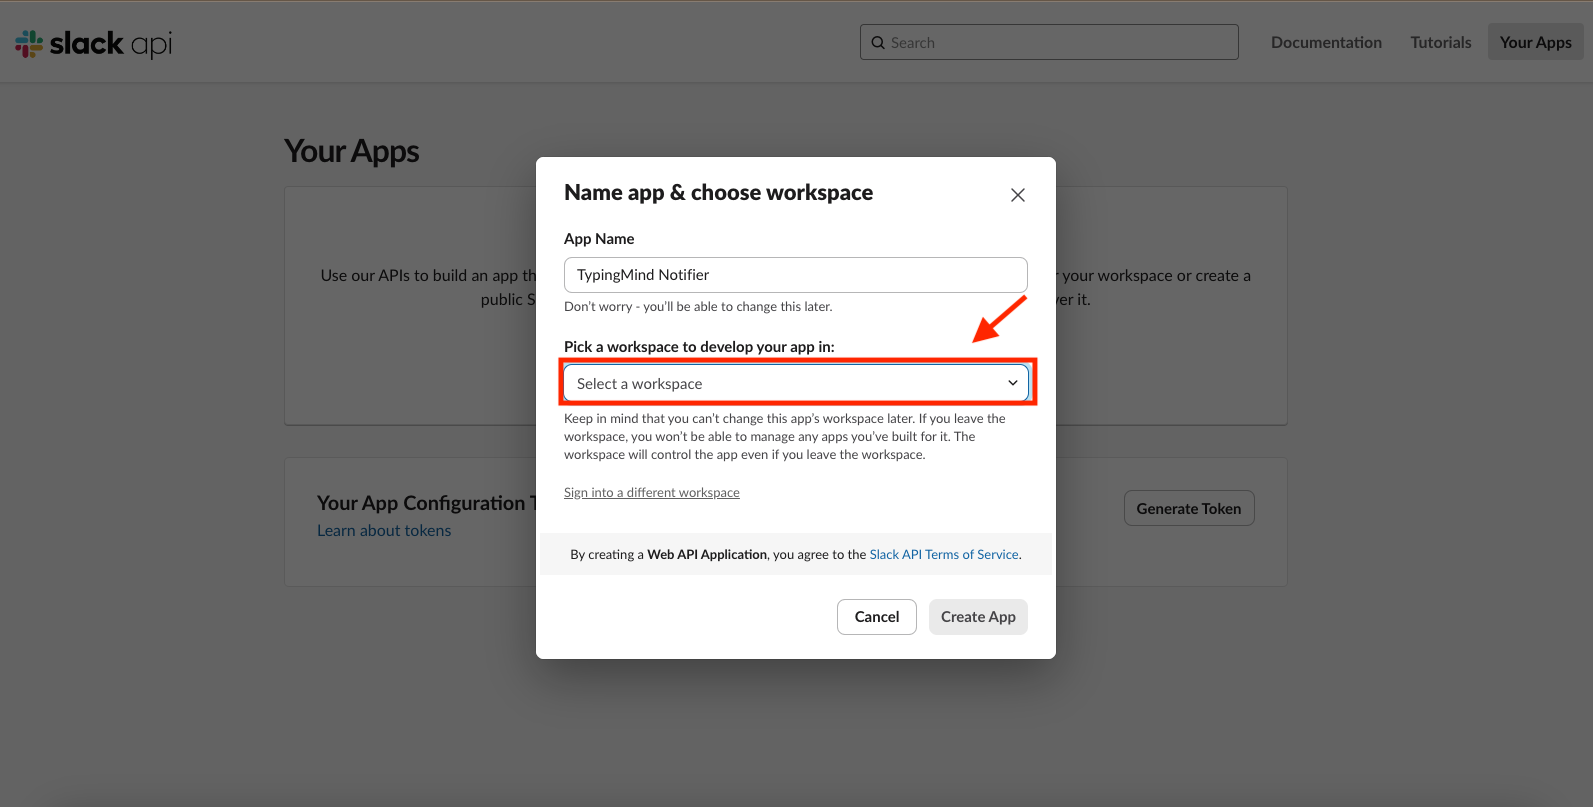
 Name your app "**TypingMind Notifier**" and select the workspace where you want to install it. Then, click "Create App" to initialize your app.
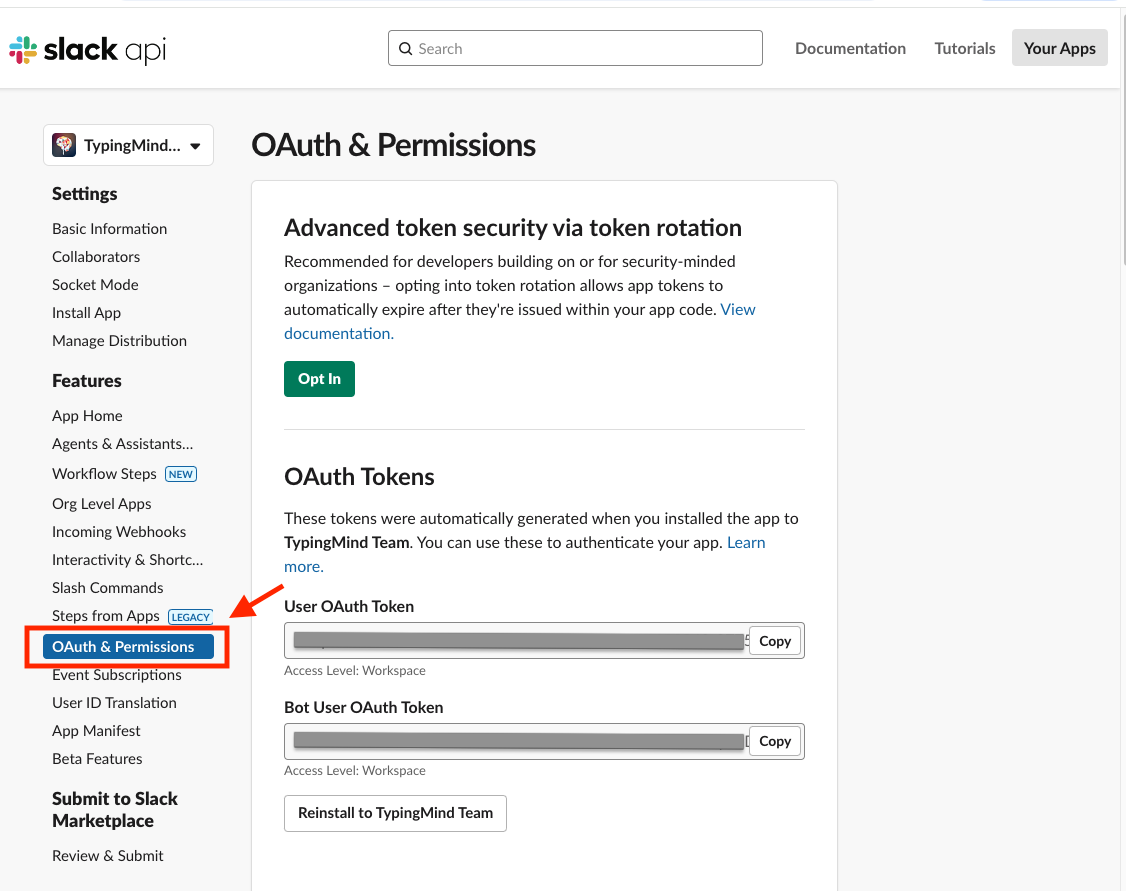
 After creating the app, we'll configure OAuth for our Slack app. Navigate to the app details page and select "OAuth & Permissions" from the sidebar.
 Scroll down to the Scopes section and add the `chat:write` scope to your **Bot Token Scopes**.
 Next, navigate to "Basic Information" in the sidebar. Find the **Client ID** and **Client Secret**. Make sure to securely store these values, as you'll need them for the TypingMind Plugin configuration later.
 ### Integrate Slack App with Designated Channels
To enable sending messages to Slack channels, we need to integrate our app with the specific channels where we want to send messages.
Let's log in to your Slack Workspace and integrate the Slack app to your channel #general
Click on the "Menu" icon in the top right, then choose "Edit settings".
### Integrate Slack App with Designated Channels
To enable sending messages to Slack channels, we need to integrate our app with the specific channels where we want to send messages.
Let's log in to your Slack Workspace and integrate the Slack app to your channel #general
Click on the "Menu" icon in the top right, then choose "Edit settings".
 When the Edit settings popup show up, switch to integration tabs, click on “Add an App” button under Apps section.
 Find the Slack app "TypingMind Notifier" and click Add
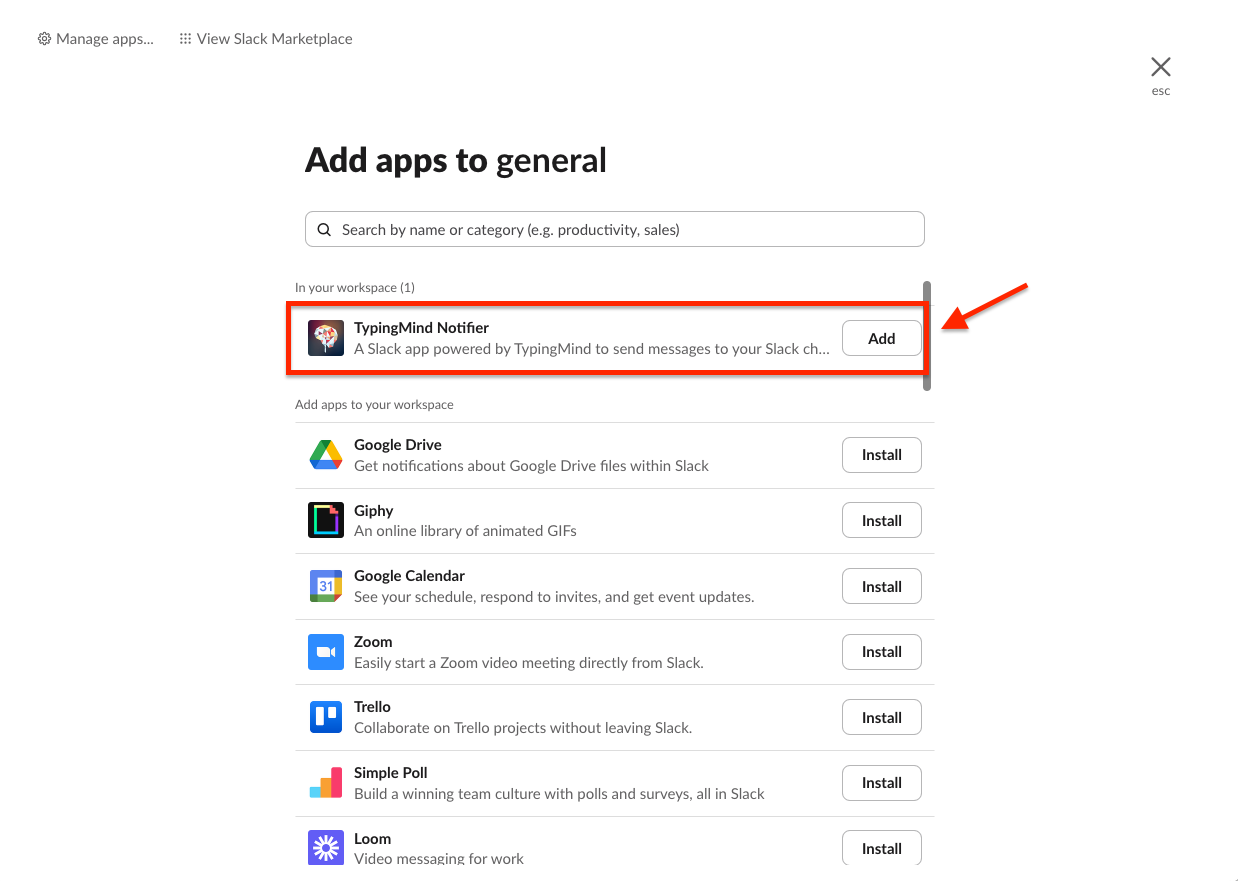 You can also set up for other channels based on your needs
### Install the Slack Message Notifier plugin
Now that we have configured our Slack App for OAuth and integrated it to your channels. we can add the Slack Message Notifier plugin created at the beginning of this tutorial. Let's go to the [Plugin Repo URL](https://github.com/TypingMind/plugin-slack-message-notifier) and install it on your Plugins Page.
When the plugin turned on, it asks for two things: the **OAuth Client ID** and **OAuth Client Secret**. Enter the **Client ID** and **Client Secret** you got in the previous step, then click “**Save Credentials**”
You can also set up for other channels based on your needs
### Install the Slack Message Notifier plugin
Now that we have configured our Slack App for OAuth and integrated it to your channels. we can add the Slack Message Notifier plugin created at the beginning of this tutorial. Let's go to the [Plugin Repo URL](https://github.com/TypingMind/plugin-slack-message-notifier) and install it on your Plugins Page.
When the plugin turned on, it asks for two things: the **OAuth Client ID** and **OAuth Client Secret**. Enter the **Client ID** and **Client Secret** you got in the previous step, then click “**Save Credentials**”
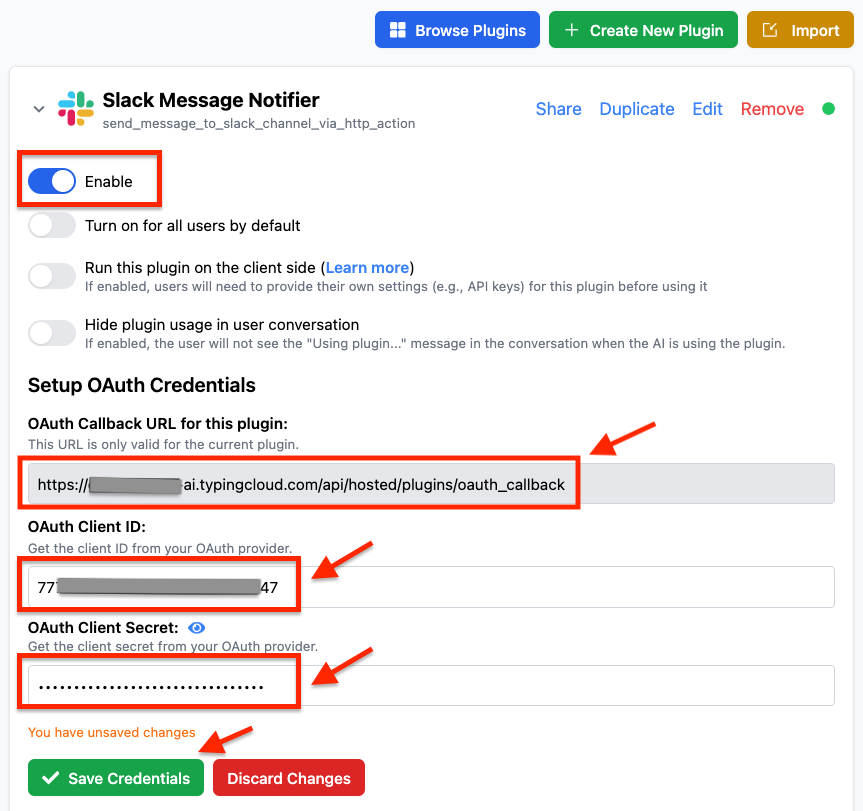 You can also have an **OAuth Callback URL**. Copy this URL and navigate back to the **OAuth & Permissions** section in your Slack App settings. In the Redirect URLs section, paste the copied URL and click Add button to save your changes.
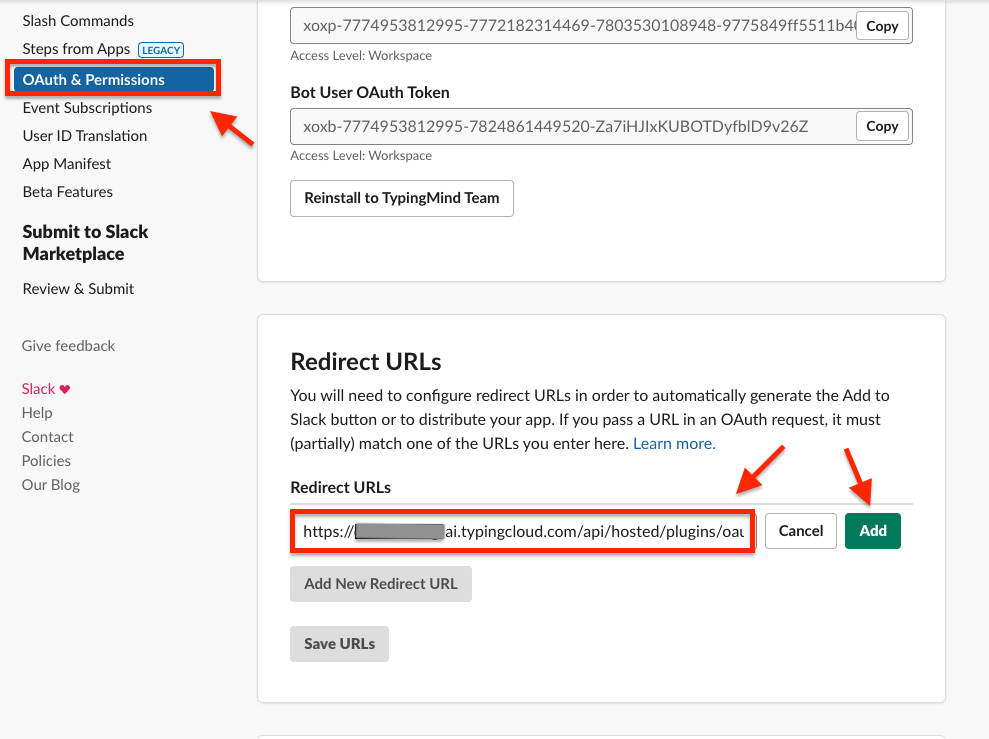 ## Part 3: Users use the plugin
As a user, I will login to the Example AI instance and start using the **Slack Message Notifier** plugin.
## Part 3: Users use the plugin
As a user, I will login to the Example AI instance and start using the **Slack Message Notifier** plugin.
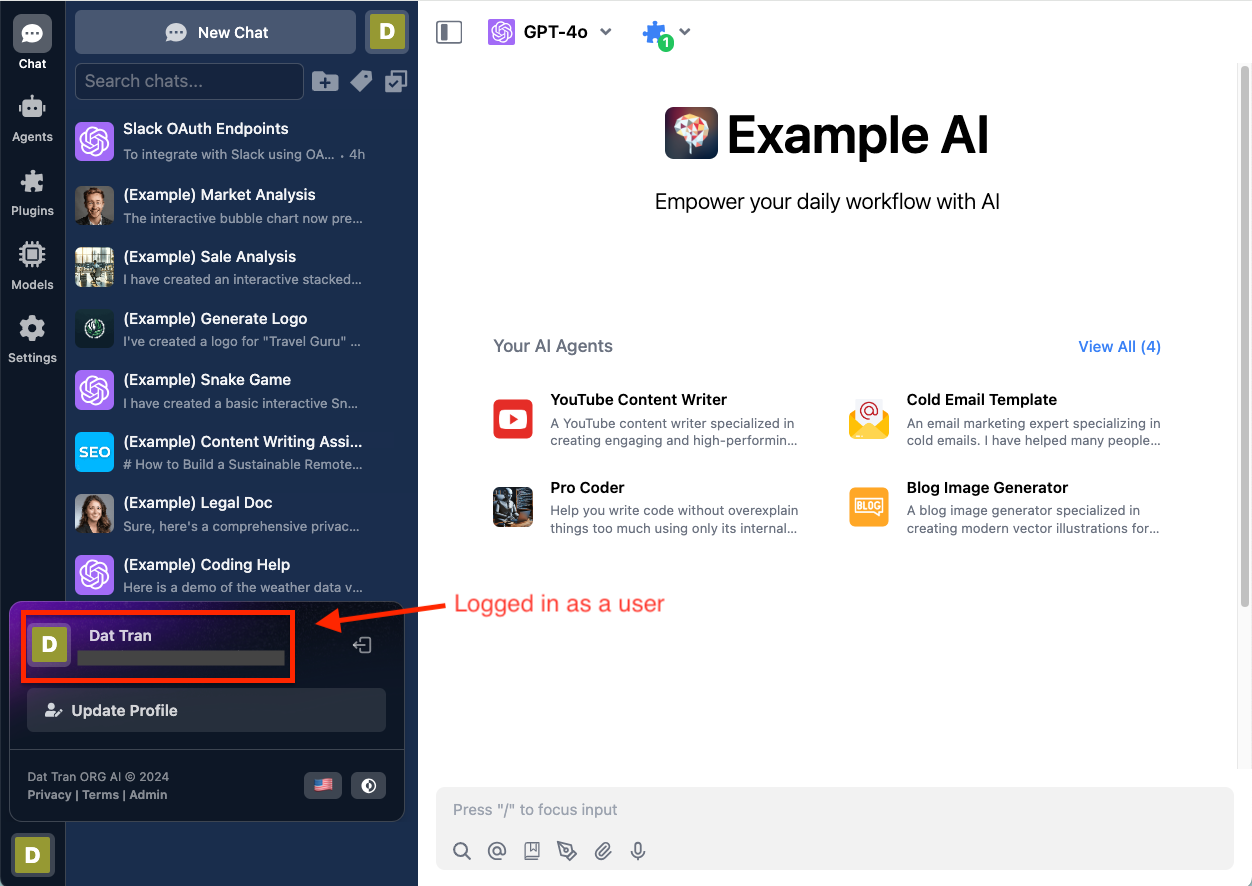 Start a new Chat. If the plugin is currently disabled, I'll make sure to enable it.
 When I ask the AI to help me send a message to the #general channel notifying my teammates that a guest is coming on Friday, the plugin will first prompt me to authenticate with Slack.
 When I click "Authenticate Now," TypingMind sends me to authorize with the **TypingMind Notifier** Slack app.
 Once I've authorized, the AI now has access and can send the message to the Slack channel. The AI shows that the message has been sent successfully.
 Finally, I switch to my Slack Workspace and check that the message has arrived.
 ## **Conclusion**
This tutorial covers three main roles in creating and using the Slack Message Notifier plugin:
### 1. As a Plugin Developer:
* Create the Slack Message Notifier plugin for TypingMind
* Set up the plugin structure and functionality
### 2. As a User Admin:
* Create and configure a Slack app for OAuth authentication
* Install and set up the plugin in a TypingMind instance
* Integrate the Slack app with specific channels
### 3. As a User:
* Enable the Slack Message Notifier plugin in TypingMind chat
* Authenticate with Slack when first using the plugin
* Use the AI to send messages to Slack channels
This plugin makes it easy for TypingMind users to send messages to their Slack channels using AI assistance. It connects TypingMind and Slack securely using OAuth 2.0.
## Learn more
Typing Mind OAuth for plugin: [https://docs.typingmind.com/plugins/oauth-for-plugin](https://docs.typingmind.com/plugins/oauth-for-plugin)
Slack Api documentation: [https://api.slack.com/docs](https://api.slack.com/docs)
TypingMind Plugin is a powerful system. Learn more about it by reading our documents at
[**https://docs.typingmind.com**](https://docs.typingmind.com/) or share your ideas at our [Awesome TypingMind Github Repo](https://github.com/TypingMind/awesome-typingmind)
## **Conclusion**
This tutorial covers three main roles in creating and using the Slack Message Notifier plugin:
### 1. As a Plugin Developer:
* Create the Slack Message Notifier plugin for TypingMind
* Set up the plugin structure and functionality
### 2. As a User Admin:
* Create and configure a Slack app for OAuth authentication
* Install and set up the plugin in a TypingMind instance
* Integrate the Slack app with specific channels
### 3. As a User:
* Enable the Slack Message Notifier plugin in TypingMind chat
* Authenticate with Slack when first using the plugin
* Use the AI to send messages to Slack channels
This plugin makes it easy for TypingMind users to send messages to their Slack channels using AI assistance. It connects TypingMind and Slack securely using OAuth 2.0.
## Learn more
Typing Mind OAuth for plugin: [https://docs.typingmind.com/plugins/oauth-for-plugin](https://docs.typingmind.com/plugins/oauth-for-plugin)
Slack Api documentation: [https://api.slack.com/docs](https://api.slack.com/docs)
TypingMind Plugin is a powerful system. Learn more about it by reading our documents at
[**https://docs.typingmind.com**](https://docs.typingmind.com/) or share your ideas at our [Awesome TypingMind Github Repo](https://github.com/TypingMind/awesome-typingmind)