> ## Documentation Index
> Fetch the complete documentation index at: https://docs.typingmind.com/llms.txt
> Use this file to discover all available pages before exploring further.
# TypingMind MCP + Blender
This guide walks you through setting up the **Blender MCP** server so your AI assistant in TypingMind can interact directly with Blender.
With Blender MCP, your AI can create and modify 3D objects, manage materials, inspect scenes, adjust cameras and lighting, execute Blender Python code, and help you build 3D scenes using natural language.
## Why connect your AI to Blender MCP?
* **Create 3D objects:** Add cubes, spheres, meshes, cameras, lights, and other objects directly in Blender.
* **Modify objects:** Move, rotate, scale, duplicate, or delete existing objects.
* **Create materials:** Apply colors, textures, and material properties to objects.
* **Inspect Blender scenes:** Let the AI understand the objects and structure of your current scene.
* **Control cameras and lighting:** Set up cameras, lights, and scene composition.
* **Run Blender Python:** Use Blender's Python API to perform more advanced operations.
* **Build scenes with natural language:** Describe what you want and let the AI perform the work directly inside Blender.
## Step-by-step to install
### Step 1: Set up MCP Connectors
In TypingMind, go to Settings → Advanced Settings → Model Context Protocol to start setup your MCP connector. The MCP Connector acts as the bridge between TypingMind and the MCP servers.
MCP servers require a server to run on. TypingMind allows you to connect to the MCP servers via:
* Your own local device
* Or a private remote server.
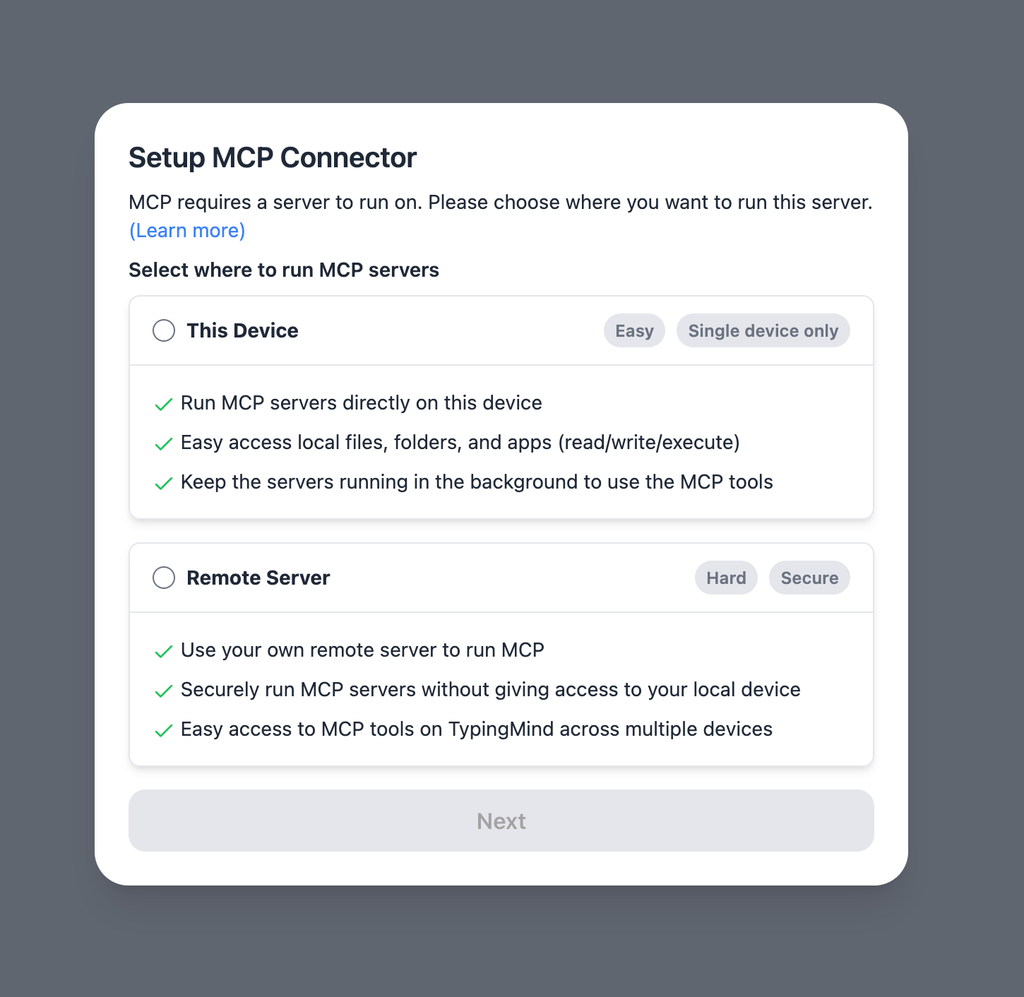 If you choose to run the MCP servers on your device, run the command displayed on the screen.
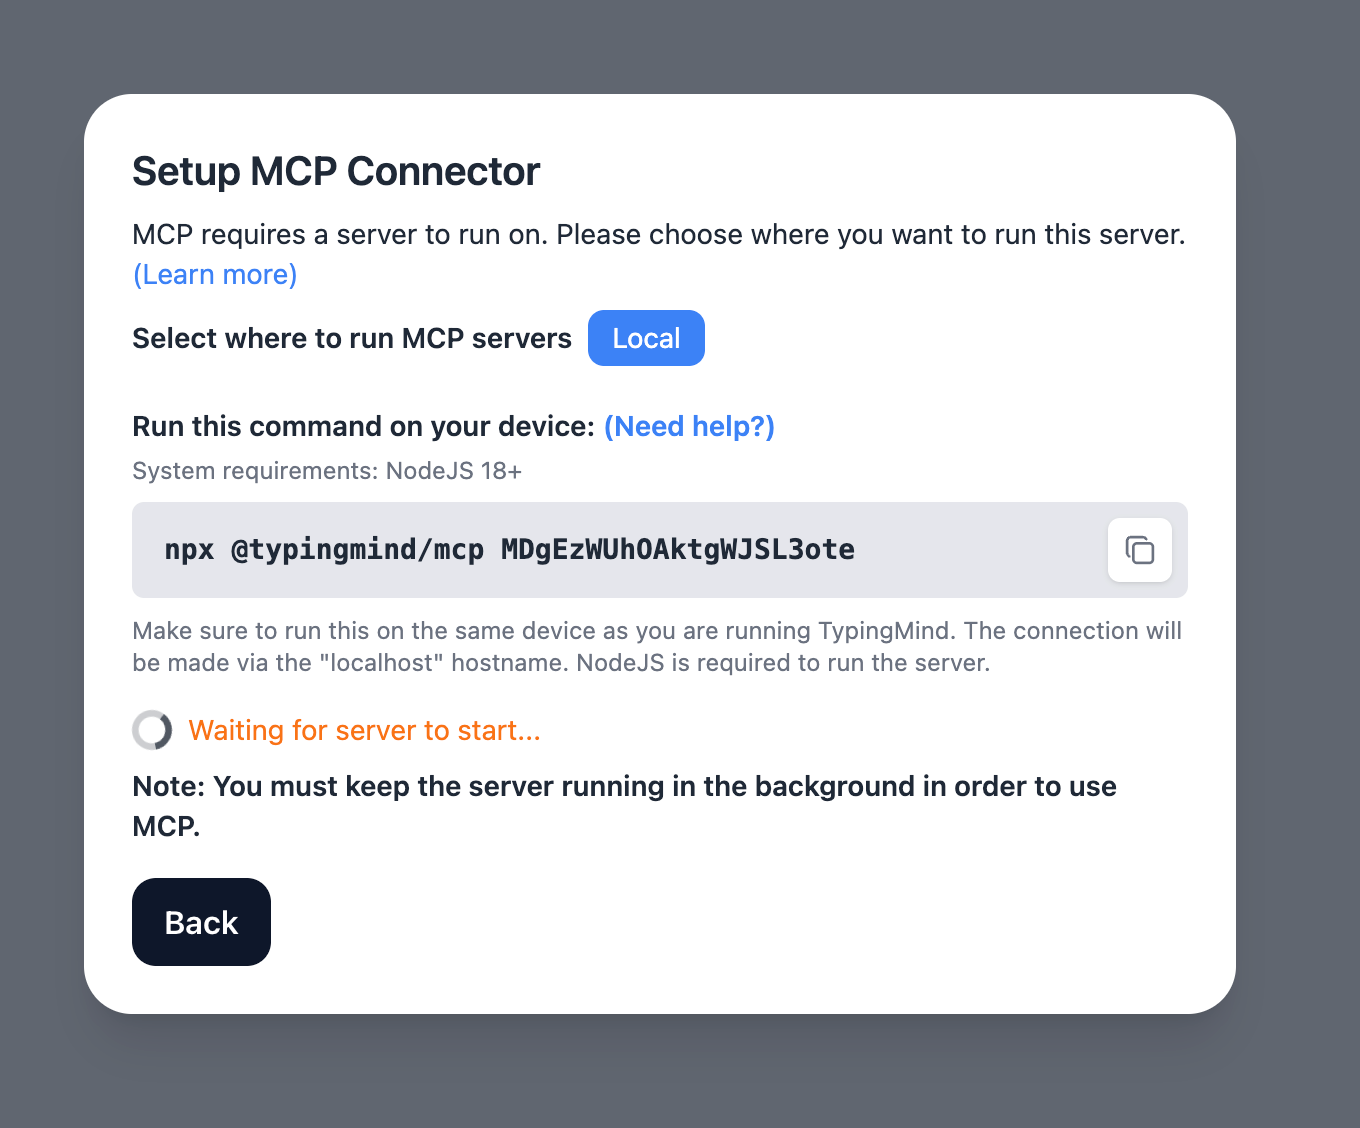 Detail setup can be found at [https://docs.typingmind.com/model-context-protocol-in-typingmind](https://docs.typingmind.com/model-context-protocol-in-typingmind)
### Step 2: Install Blender MCP
Blender MCP uses `uv` to run the MCP server.
#### macOS
Install `uv`:
```text theme={null}
brew install uv
```
#### Windows
Run:
```text theme={null}
powershell -c "irm https://astral.sh/uv/install.ps1 | iex"
```
#### Linux
Run:
```text theme={null}
curl -LsSf https://astral.sh/uv/install.sh | sh
```
After installation, verify that `uvx` is available:
```text theme={null}
uvx --version
```
Then install the Blender MCP add-on:
```text theme={null}
uvx blender-mcp install-addon
```
### Step 3: Enable the Blender MCP Add-on
Open Blender and go to:
**Edit → Preferences → Add-ons**
Search for:
```text theme={null}
MCP for Blender
```
Enable: **MCP for Blender**
Detail setup can be found at [https://docs.typingmind.com/model-context-protocol-in-typingmind](https://docs.typingmind.com/model-context-protocol-in-typingmind)
### Step 2: Install Blender MCP
Blender MCP uses `uv` to run the MCP server.
#### macOS
Install `uv`:
```text theme={null}
brew install uv
```
#### Windows
Run:
```text theme={null}
powershell -c "irm https://astral.sh/uv/install.ps1 | iex"
```
#### Linux
Run:
```text theme={null}
curl -LsSf https://astral.sh/uv/install.sh | sh
```
After installation, verify that `uvx` is available:
```text theme={null}
uvx --version
```
Then install the Blender MCP add-on:
```text theme={null}
uvx blender-mcp install-addon
```
### Step 3: Enable the Blender MCP Add-on
Open Blender and go to:
**Edit → Preferences → Add-ons**
Search for:
```text theme={null}
MCP for Blender
```
Enable: **MCP for Blender**
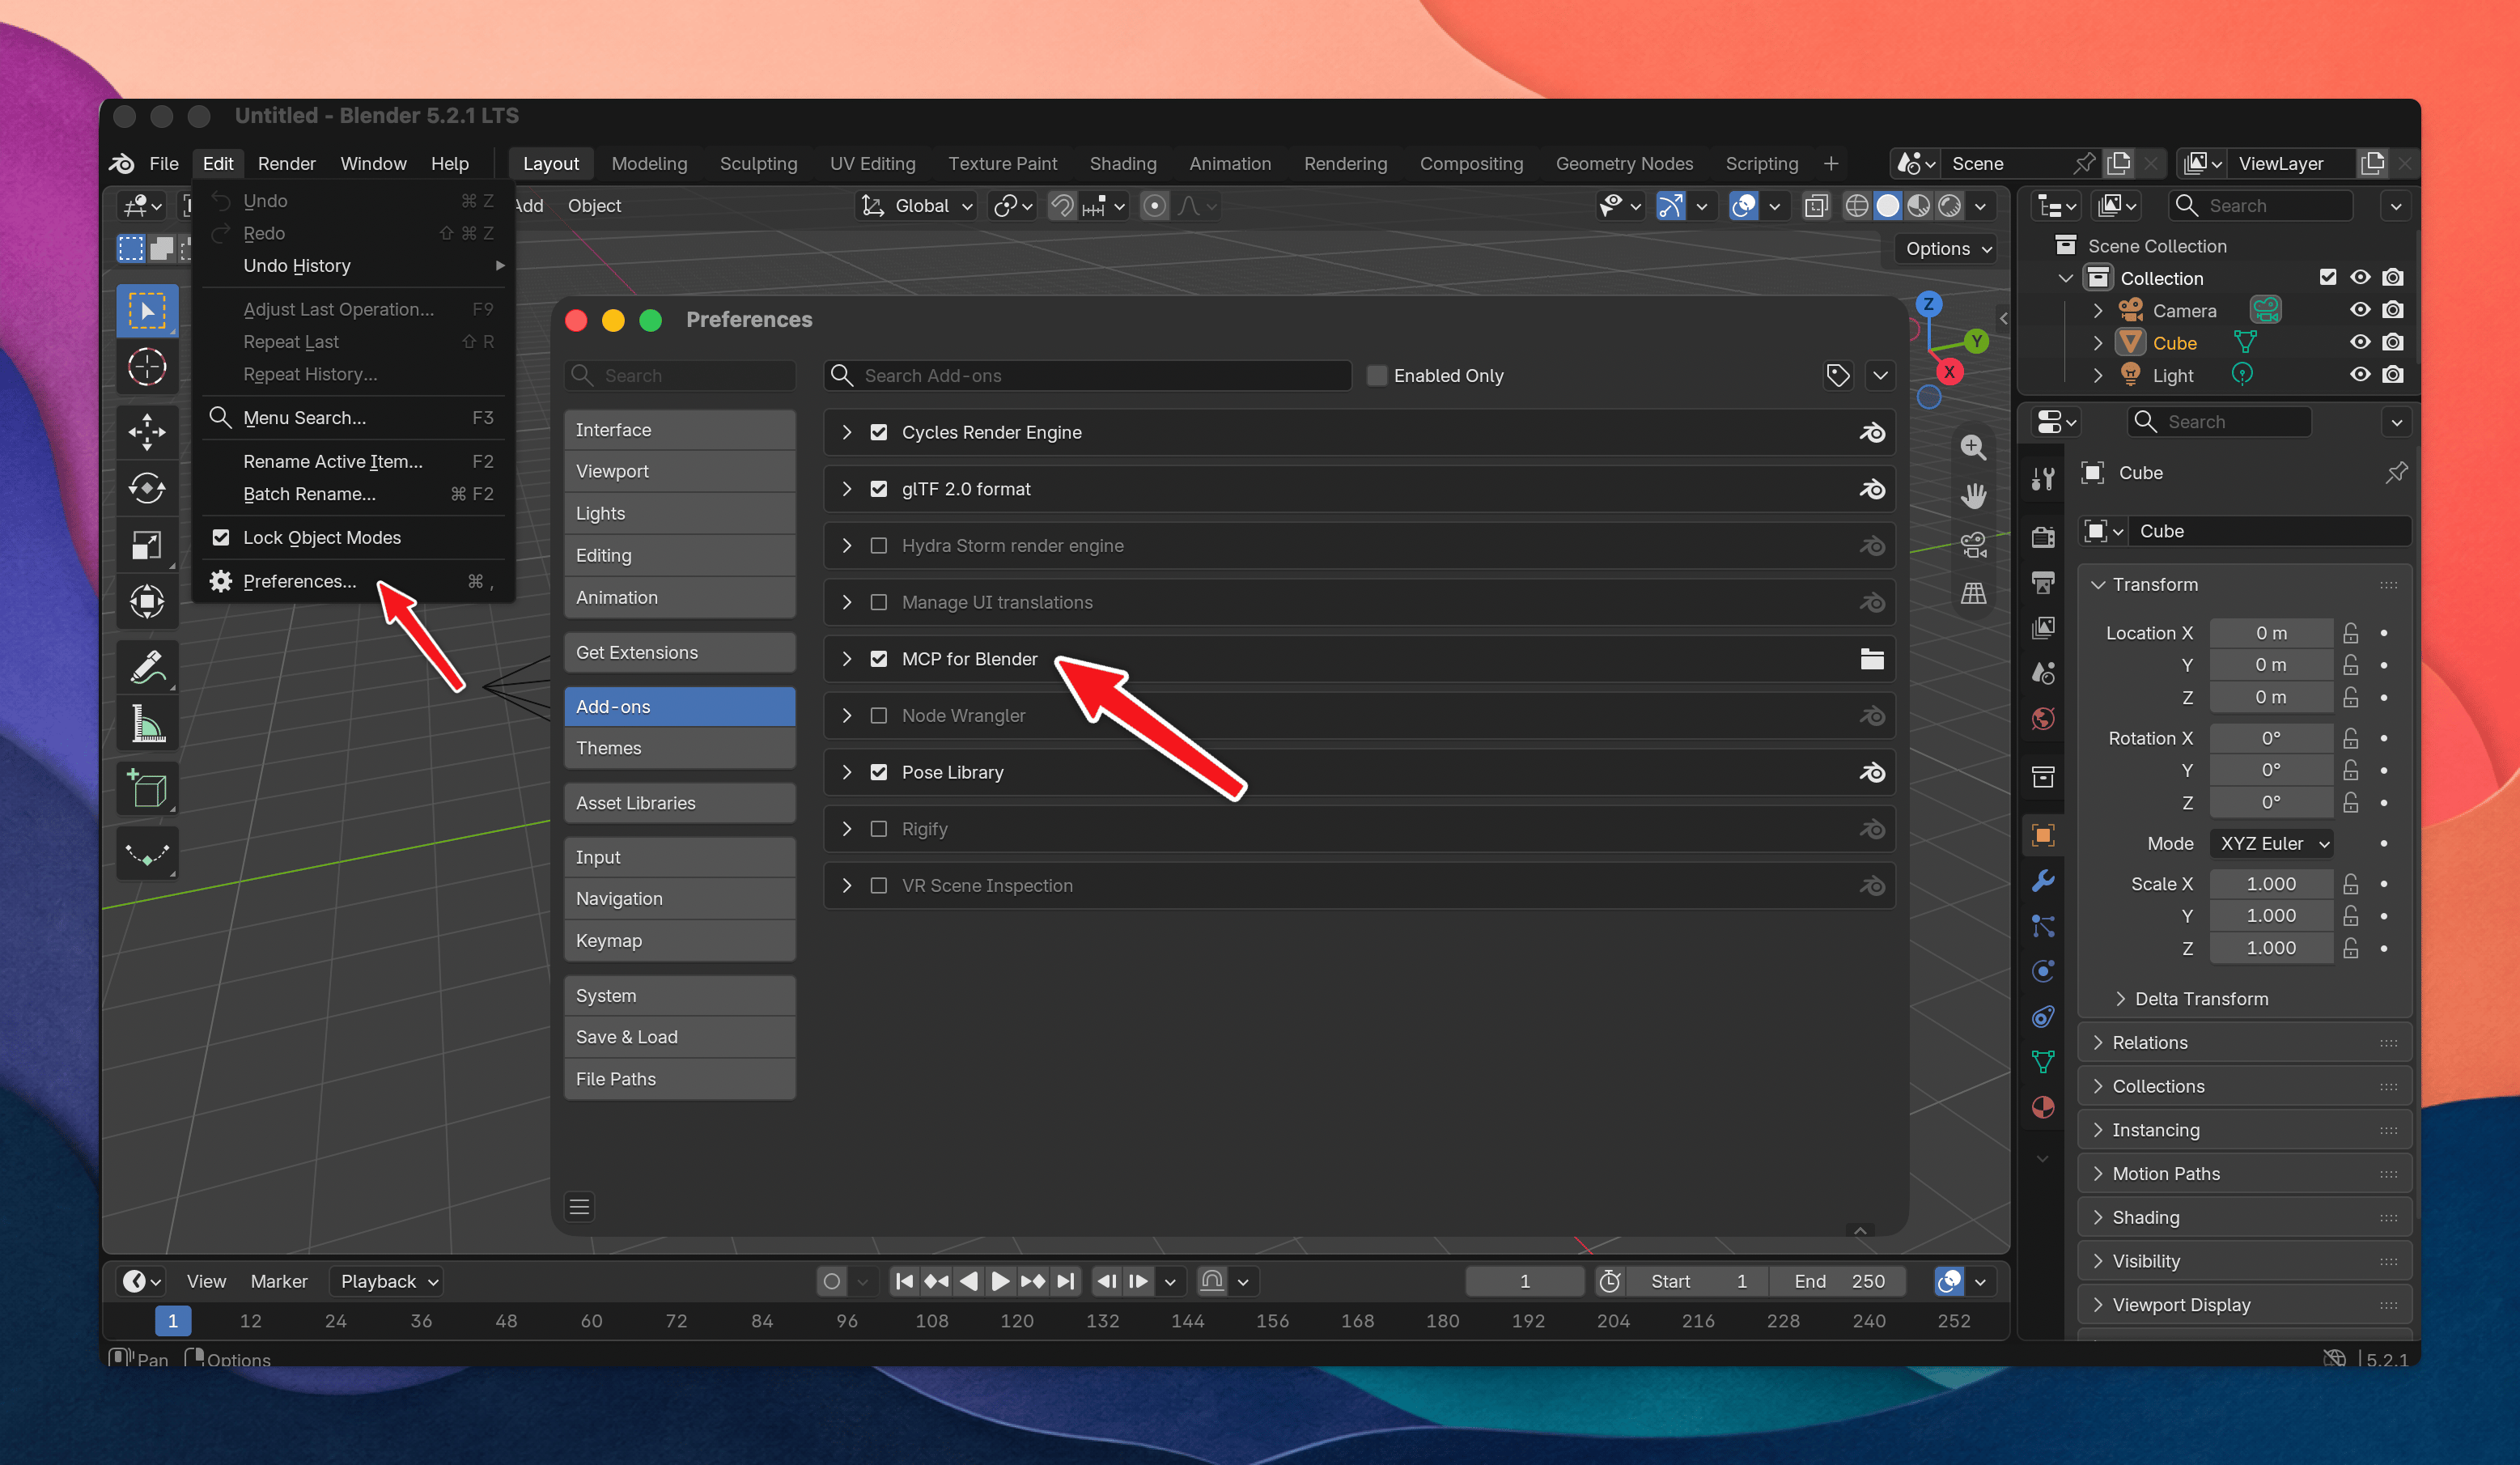 If the add-on does not appear immediately, restart Blender and check the Add-ons page again.
### Step 4: Add the Blender MCP Server to TypingMind
In TypingMind:
* Go to **Settings → Advanced Settings → Model Context Protocol**
* Click **Edit Servers**
* Add the following JSON configuration:
```text theme={null}
{
"mcpServers": {
"blender": {
"command": "uvx",
"args": ["blender-mcp"]
}
}
}
```
Click **Save changes** to save the MCP server.
This configuration tells the TypingMind MCP Connector to run the Blender MCP server locally using:
```text theme={null}
uvx blender-mcp
```
### Step 5: Start the MCP Server in Blender
* Open Blender.
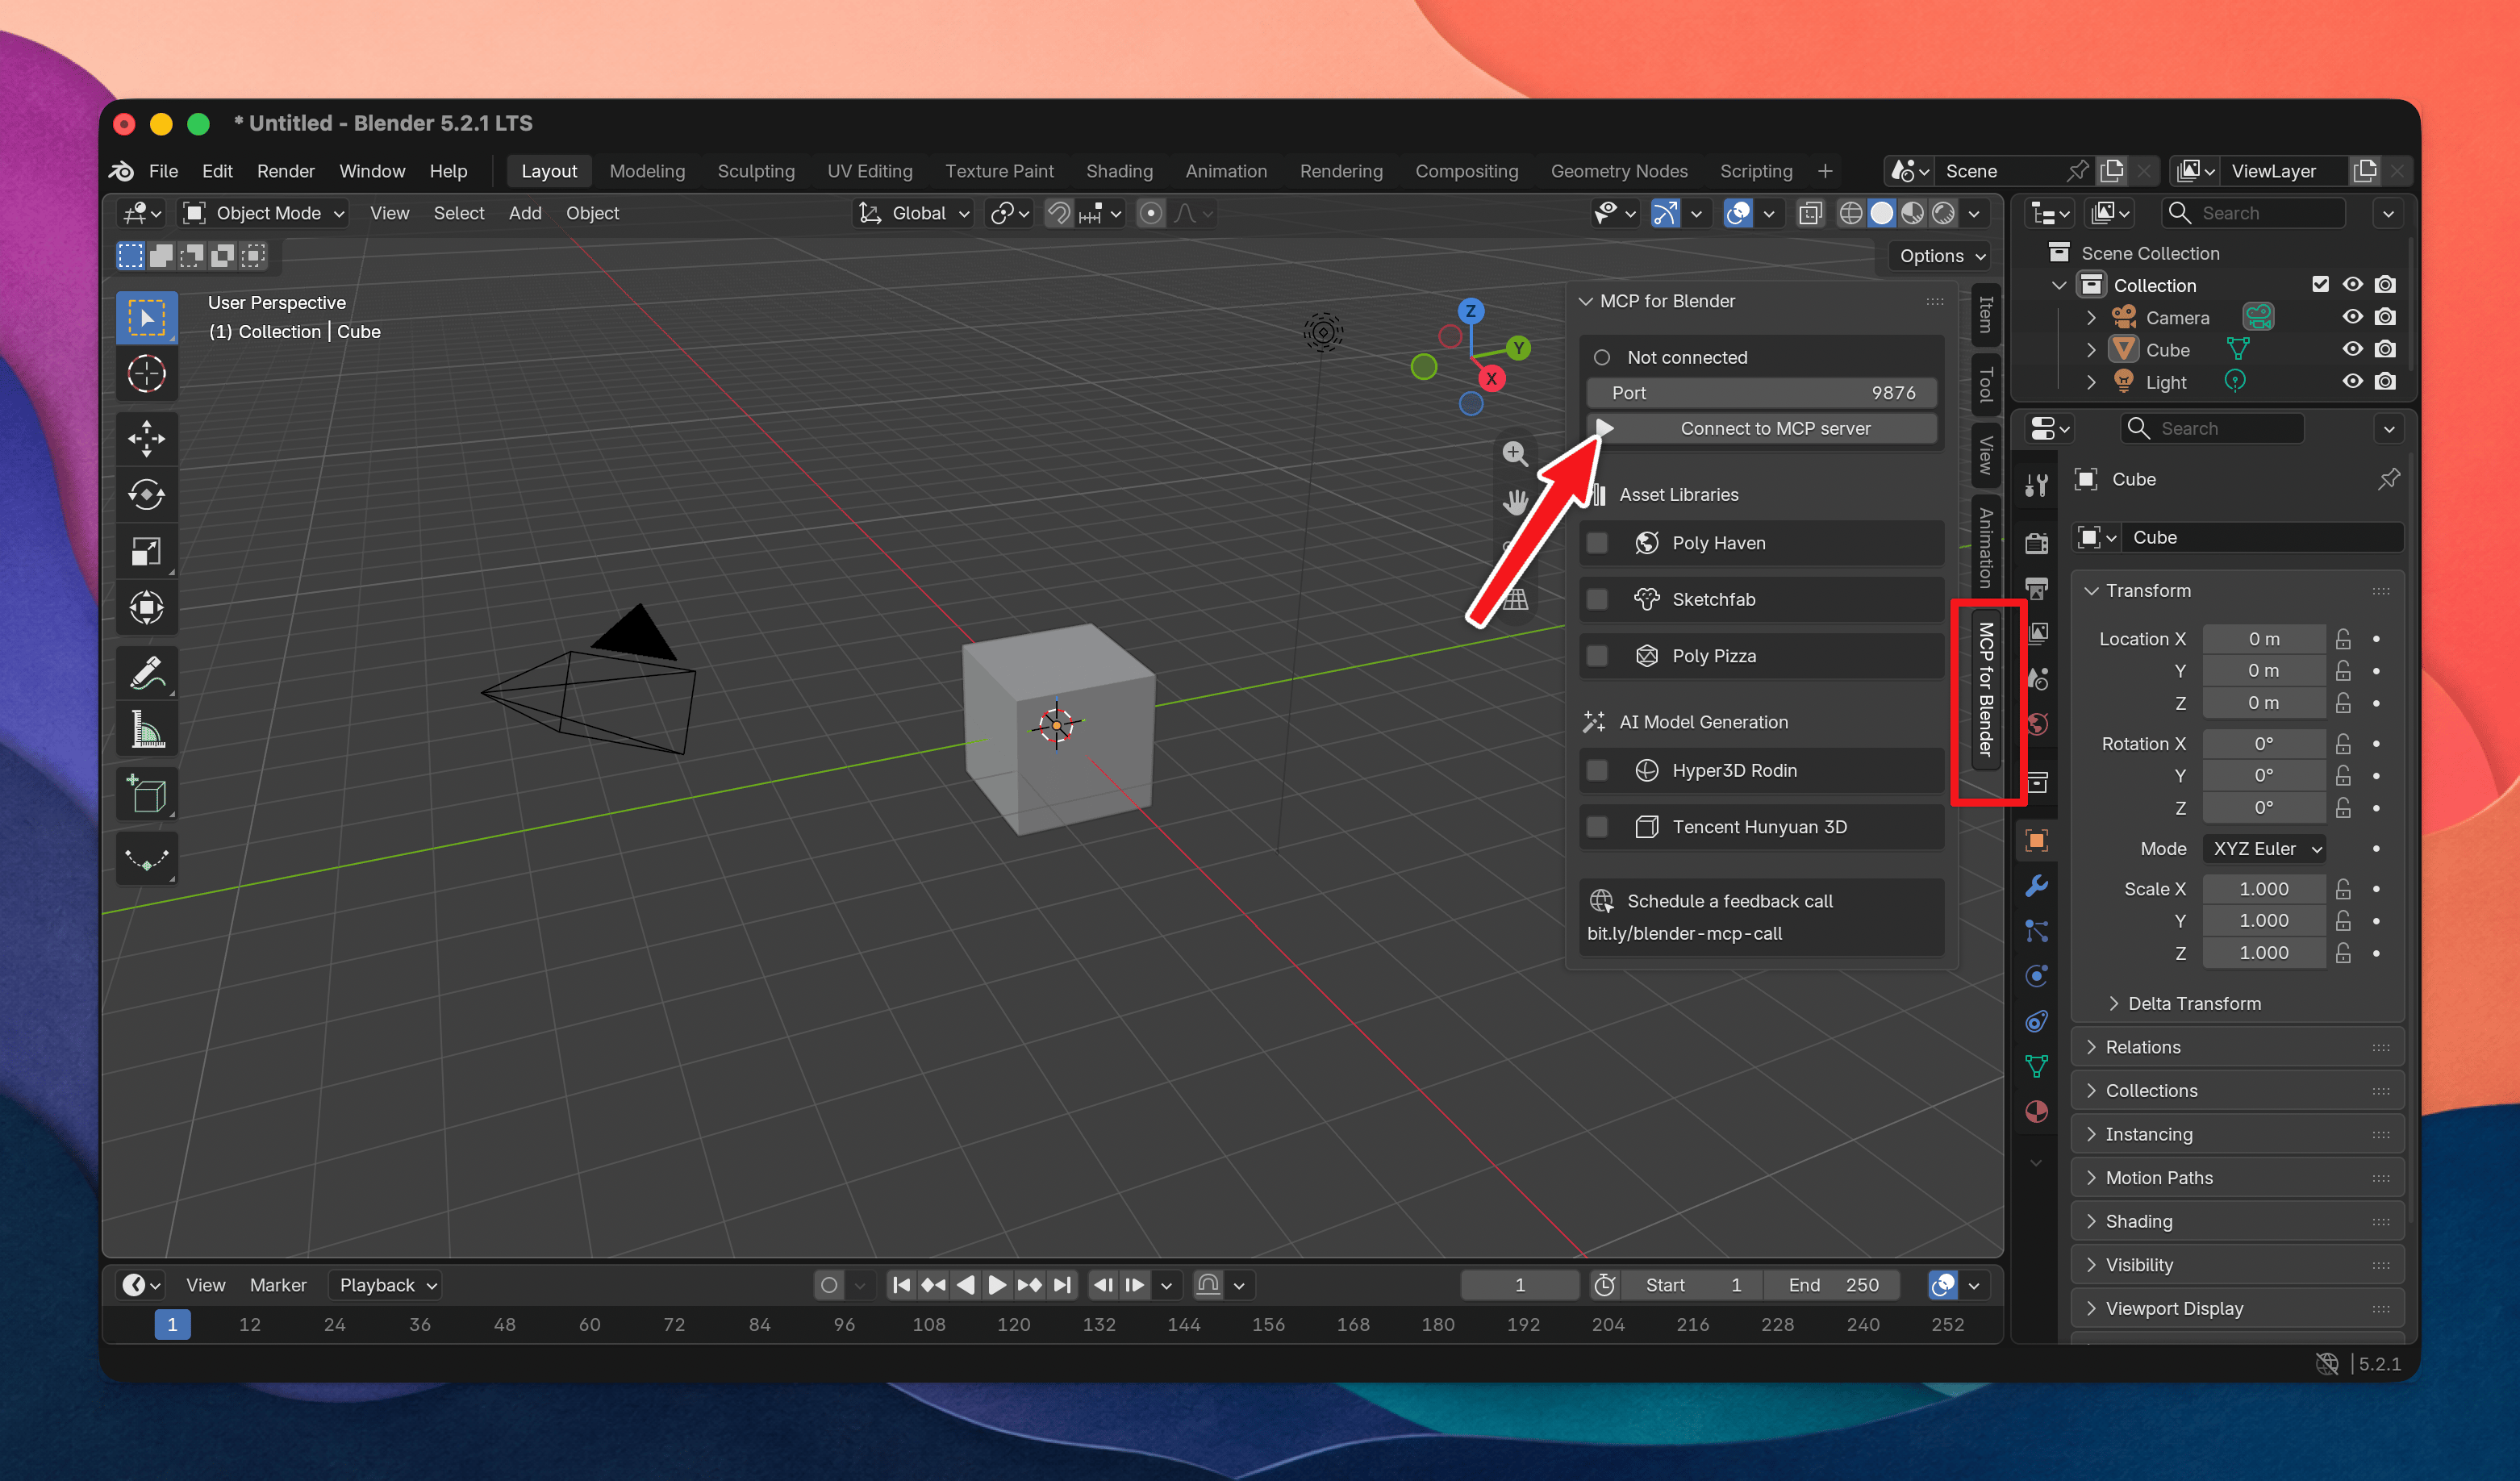
* From the **3D Viewport**, press **N** to open the sidebar.
* Open the **MCP for Blender** tab and click: **Start MCP Server**
* Keep Blender open while using the MCP tools.
If the add-on does not appear immediately, restart Blender and check the Add-ons page again.
### Step 4: Add the Blender MCP Server to TypingMind
In TypingMind:
* Go to **Settings → Advanced Settings → Model Context Protocol**
* Click **Edit Servers**
* Add the following JSON configuration:
```text theme={null}
{
"mcpServers": {
"blender": {
"command": "uvx",
"args": ["blender-mcp"]
}
}
}
```
Click **Save changes** to save the MCP server.
This configuration tells the TypingMind MCP Connector to run the Blender MCP server locally using:
```text theme={null}
uvx blender-mcp
```
### Step 5: Start the MCP Server in Blender
* Open Blender.
* From the **3D Viewport**, press **N** to open the sidebar.
* Open the **MCP for Blender** tab and click: **Start MCP Server**
* Keep Blender open while using the MCP tools.
 ### Step 6: Enable Blender via Plugin section
After the MCP server is added successfully, it will show up on your Plugins page and can be used like other TypingMind plugins.
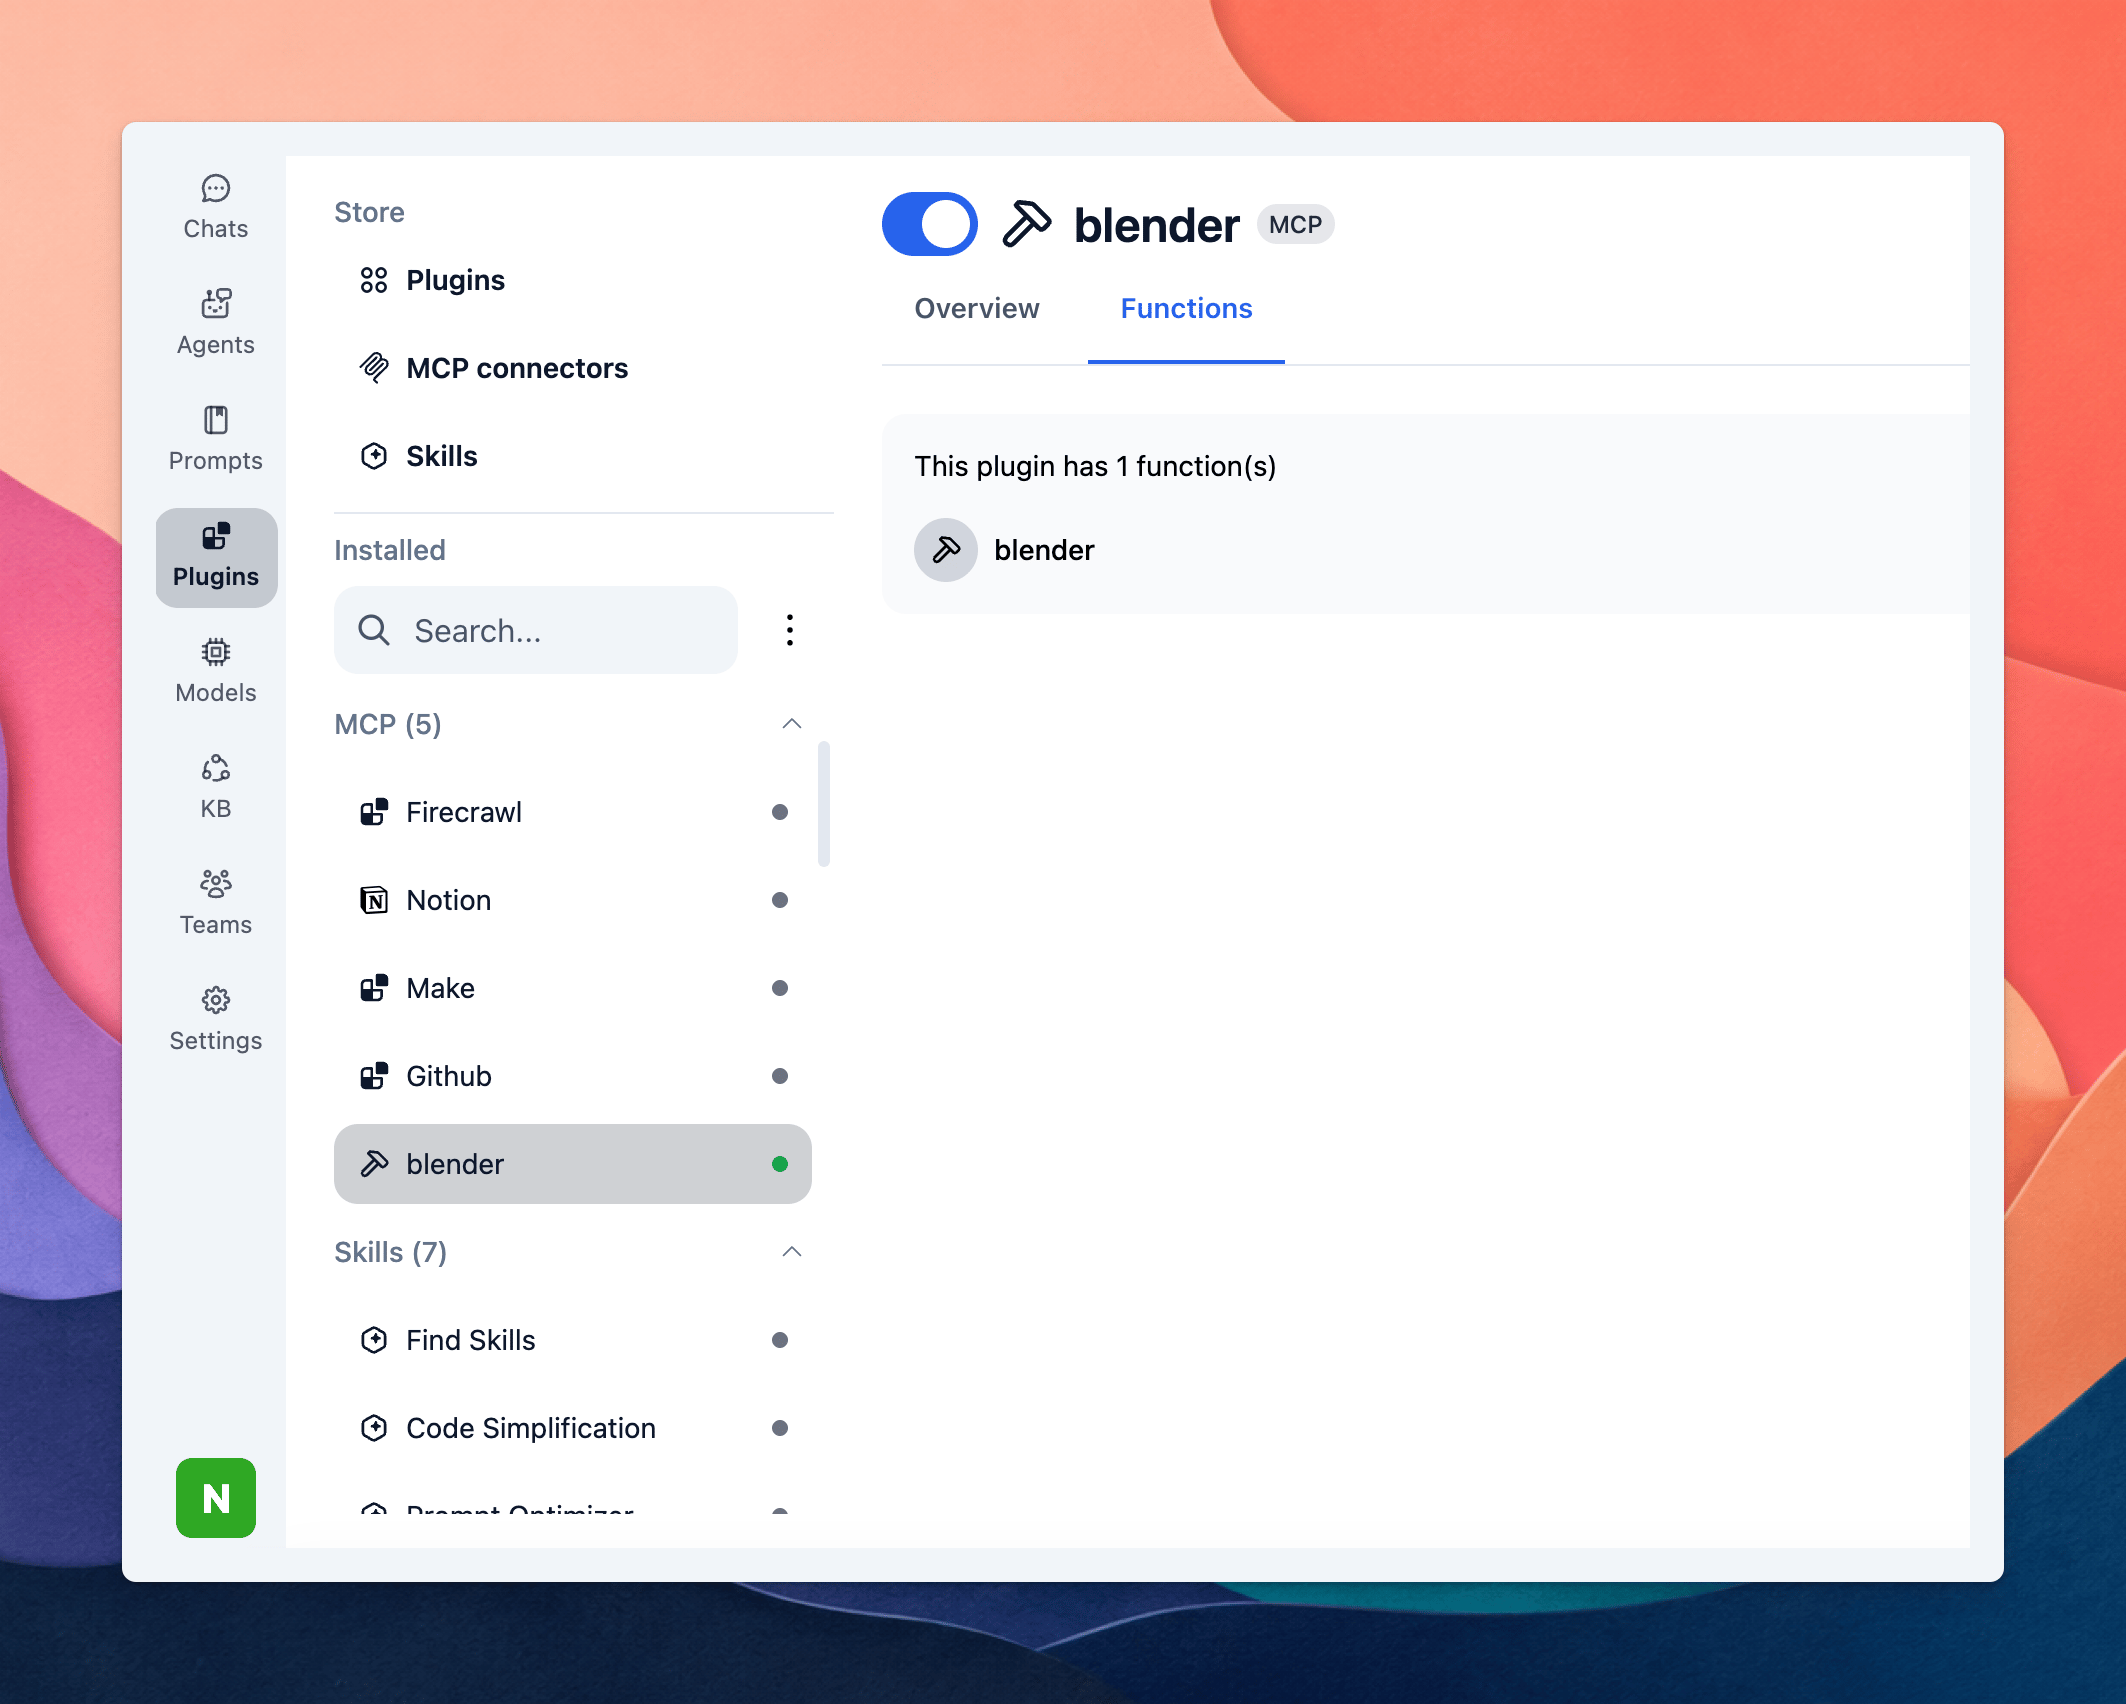
* Go to the **Plugins** section in TypingMind.
* You should see a new plugin called **blender**.
* Enable the plugin.
You can use the Blender MCP tools directly in a chat or assign them to an AI Agent like other plugins.
### Step 6: Enable Blender via Plugin section
After the MCP server is added successfully, it will show up on your Plugins page and can be used like other TypingMind plugins.
* Go to the **Plugins** section in TypingMind.
* You should see a new plugin called **blender**.
* Enable the plugin.
You can use the Blender MCP tools directly in a chat or assign them to an AI Agent like other plugins.
 ### Step 7: Start chatting
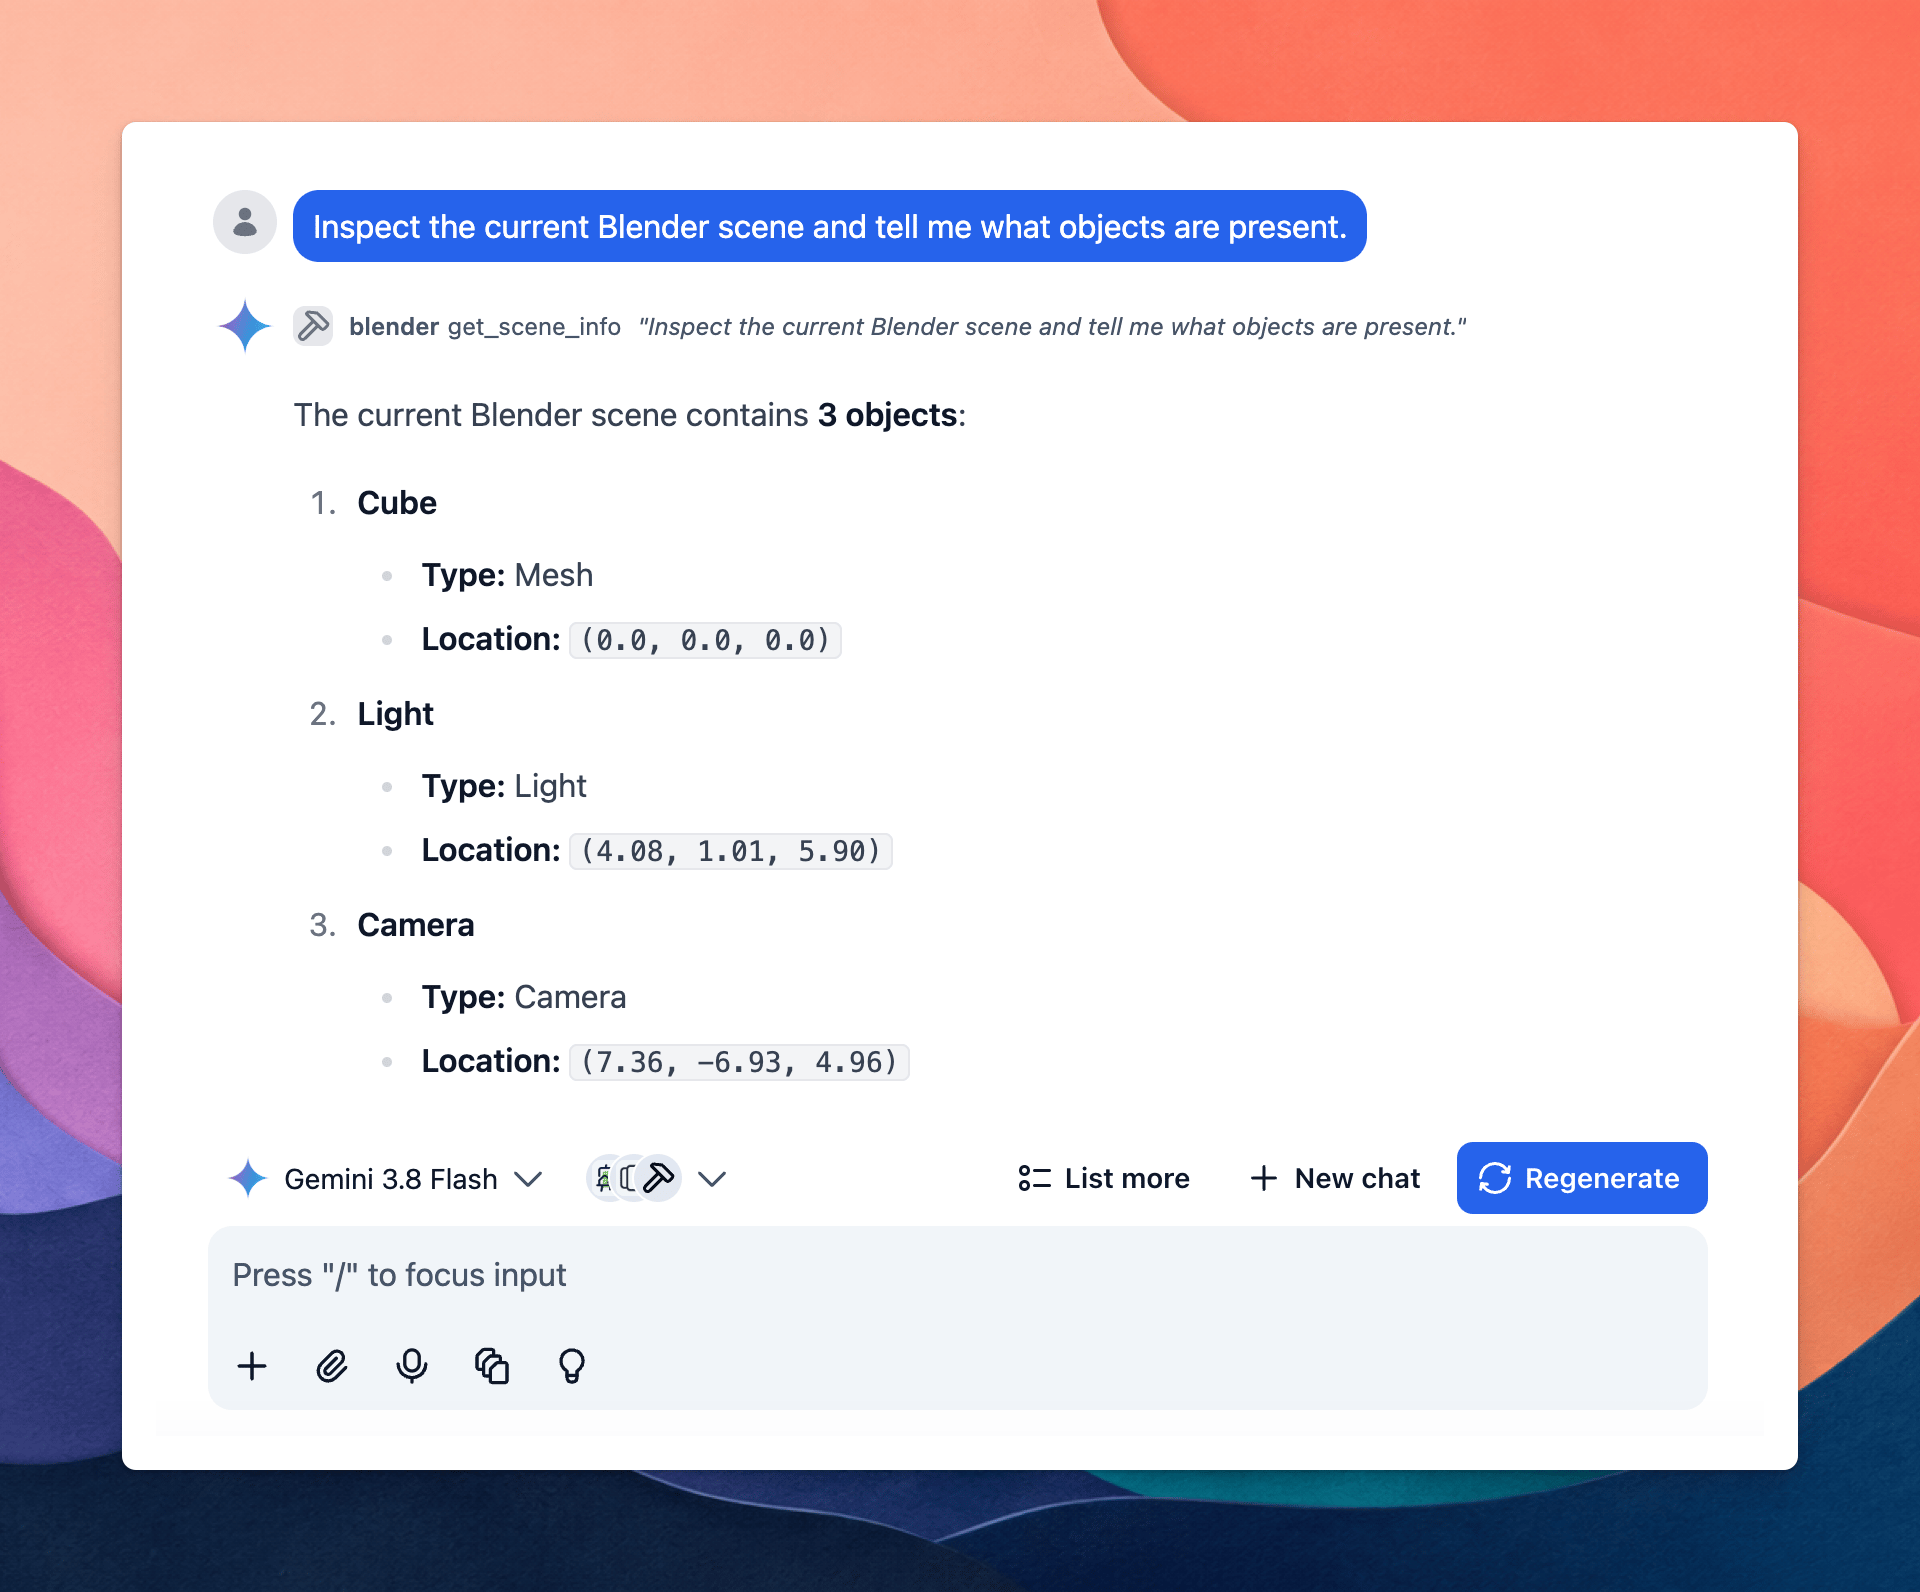
You can now ask the AI to interact with Blender.
### Step 7: Start chatting
You can now ask the AI to interact with Blender.